background image

A-Rival 2.5 User’s Guide


41 


6.5  Options 


Click the map during navigation to display the option dialog. 


6.5.1  Mute 

Use the Mute button to disable the acoustic driving instructions. Pressing the button 
again will enable the spoken instructions. 


6.5.2  Map View 

The Map View button calls up a menu for performing map display settings (cf. Chapter 
5.4). 


6.5.3  Night Mode 

Press the Night Mode button to display the map in a color scheme optimized for dark 
lighting conditions. Press the button again to revert to the normal display mode. 


6.5.4  Interstations 

The Interstation function allows you to add intermediate destinations while en route to 
your destination. For more detailed information on how to select the interstation, please 
refer to Chapter 2. 

Summary of Contents for NAV-PNF 43

Page 1: ...ou ll enjoy using your new an a rival Navigationsystem Just in case that you are facing any problems with your Device please call our support service hotline 0049 0 511 123 83 505 or send us an e mail to support a rival de For Updates and technical information please visit our website www a rival de ...

Page 2: ...t 9 2 3 5 House number 10 2 4 Favorites 11 2 5 Map 12 2 6 POI 14 2 7 POI in City 15 2 8 POI Text 15 2 9 Itinerary 17 2 10 Coordinates 18 2 11 Zip Code 19 2 12 Previous Destinations 20 2 13 Start Navigation 21 2 14 Alternative Routes 22 3 Route Planning 23 4 Position 25 5 Options 26 5 1 Favorites 26 5 1 1 Adding favorites 26 5 1 2 Deleting favorites 27 5 1 3 Renaming favorites 28 5 2 Volume 28 5 3 ...

Page 3: ...5 5 13 GPS Logs 36 5 14 Blockades 37 5 15 About 37 6 While on the Road 38 6 1 Travel Information 38 6 2 Zoom 39 6 3 Route Overview and Destination View 39 6 4 Driving Instruction Volume 40 6 5 Options 41 6 5 1 Mute 41 6 5 2 Map View 41 6 5 3 Night Mode 41 Interstations 41 6 5 4 41 6 5 5 Block KM 42 6 5 6 Traffic 42 6 5 7 TMC 42 6 5 8 GPS Logs 42 6 5 9 Speedwarnings 42 6 5 10 Blockades 42 6 5 11 Qu...

Page 4: ...Here you can plan the route to check the distance and approximate travel time 3 Position Indicates your current GPS position on the map 4 Options Here you can define diverse navigation device settings e g saving frequently visited addresses 5 Traffic Displays a list of current traffic conditions if TMC is installed 6 Quit Quits the navigation program 1 1 General Information Your navigation program...

Page 5: ...ndshields heat insulating windshields may adversely affect GPS reception Navigation can only take place if a valid GPS signal is received After setting up the device for the first time or after traveling by plane it may take a few minutes until a valid signal is received If the GPS receiver has not been configured yet the screen will display the above message By pressing the blue GPS settings butt...

Page 6: ...the GPS receiver has been configured correctly the route calculation will automatically start as soon as reception is back to normal During navigation the current GPS and TMC signal is indicated at the bottom left of the display red circle ...

Page 7: ... detailed information on how to set up your office address 2 3 Address 2 3 1 City You can enter the destination address here Enter the city name using the screen keyboard As soon as you enter the first letter the navigation system starts searching for the city Possible matches are presented in a results list If the desired city is shown you can select it by clicking it in the list The previously e...

Page 8: ...f Ö enter O instead of Ü enter U For example if your destination is located in Köln Germany just enter K O L N You do not need to enter spaces and hyphens Instead simply click the empty field to the left of the white triangle at the bottom third button from the right 2 3 3 Deleting entries If you make a mistake click the backspace key to delete the wrong entry ...

Page 9: ...y where the street is being searched Alternatively you can select DOWNTOWN if you want to drive to the center of the respective city In this example R O T E was entered If the desired street is displayed in the list you can select it by clicking it in the list In large cities it is possible that streets with the same name exist in different districts ...

Page 10: ...mber Next you are requested to enter the house number Enter the house number and confirm by pressing the GREEN button If you do not know the house number click the GREEN button without making an entry In this case the navigation system will take you to the center of the selected street Press the RED button to return to the street selection screen ...

Page 11: ...tion to the chosen intersection 2 4 Favorites Favorites are frequently used addresses you can store in a list This facilitates quick access to these destinations When you start up the system for the first time the favorites list is empty Please refer to Chapter 5 1 for information on how to set up favorites Click a list entry to select it Now the full address is displayed in the bottom part of the...

Page 12: ...ou can use the plus and minus Buttons to zoom in and out Alternatively you can use the magnifying glass If you draw a box around the target form the upper left to the lower right blue the map viewer zooms in the selected area If you draw a box from the lower right to the upper left red the map viewer will zoom out ...

Page 13: ...ed circle to select a destination by directly clicking into the map A shortcut menu now offers the following options Search nearest address Displays a list of addresses at the selected location that you can choose as the destination Set position Navigation is started for the selected position Show POI Displays information for a point of interest whenever you click a POI icon ...

Page 14: ...e list first indicates the top categories Top categories are displayed in brackets Further below all other categories are listed in alphabetical order The system will search for corresponding POIs starting from your current location Note that this function only works if you are receiving a valid GPS signal Click a list entry to select it as your destination Press the GREEN button to start navigati...

Page 15: ...y search you are first requested to enter the city see Chapter 2 3 1 The POI is then selected just like any other POI see Chapter 2 6 The POIs will searched for within the proximity of the city centre chosen The radius is depending on the POI category and the results will be listed by distance to the city centre 2 8 POI Text The POI Text function allows you to search POIs in any one category by en...

Page 16: ...ord e g Brandenburger for finding the Brandenburg Gate in Berlin All matching results are shown in a list Click the map icon red circle to display the location of the POI on the map Pressing the GREEN button will start navigation to the selected POI ...

Page 17: ...eral destinations you want to travel to successively and to save them Use the Create button to create new Itineraries and the Load button to load existing Itineraries Use the add button red circle to add stops to your tour You can use any of the available methods for selecting a destination ...

Page 18: ... to the next stop will commence at the touch of a button 2 10 Coordinates A destination can be defined by entering a pair of coordinates First enter the latitude then the longitude When entering the latitude please select N for North or S for South Respectively please select E for East or W for West when entering the longitude Coordinates may be entered using the formats decimal degrees or degree ...

Page 19: ... enables you to define your destination by entering a zip code This is what the screen looks like after entering 5137 After selecting the first entry you can search for a street within the zip code area or define the center of the zip code area as your destination ...

Page 20: ...le when you select the name of a city from the list a new screen will show the street names previously entered for this city If you select any of these streets the house number last used for this street is displayed You can then accept this setting or change it according to your needs After you enter a destination for the first time the destination selection list always shows the previous destinat...

Page 21: ...is query to appear each time navigation is started deselect the check mark in the Ask before every route calculation field red circle Press the GREEN button to start route calculation After calculation the navigation system presents the entire route in an overview map including information such as length of the route and expected travel duration Click the BLUE button to start navigation ...

Page 22: ...similar screen to the one below will appear The calculated route can be accepted by pressing the blue OK button Alternetively you can press the Alternative button to calculate other routes To choose one route press the OK button with the color corresponding to the color of the selected route ...

Page 23: ...duration ahead of time The Route Planning function works much the same as entering a normal destination the only difference is that you must indicate a start location in addition to the destination You are first asked to specify the start location There are several options for doing so see Chapter 2 Once you defined the start location you must enter the destination ...

Page 24: ...ppear each time route calculation and navigation are launched deselect the checkmark in the Ask before every route calculation field Press the GREEN button to start route calculation After calculation the navigation system presents the entire route in an overview map including information such as length of the route and expected travel duration Click the BLUE button to start a route simulation ...

Page 25: ...ll button allows you to move the displayed map section Press the selection button red circle to select destinations on the map and start navigation First click the selection button and then click any location on the map Now you can select Search nearest address Displays a list of addresses at the selected location that you can choose as the destination Set position Navigation is launched for the s...

Page 26: ...vorites Favorites are frequently used addresses you can store in a list This facilitates quick access to these destinations When you start up the system for the first time the favorites list is empty Click the add icon indicated by a red circle to create a new favorite ...

Page 27: ...dress e g by entering the address see Chapter 2 2 you will be prompted to provide a name for this favorite Confirm your entry with the GREEN button You can also define this address as your HOME or OFFICE address by clicking the blue house icon 5 1 2 Deleting favorites To delete a favorite mark the entry in the list and click the trash can icon red circle ...

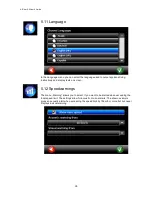
Page 28: ...entry in the list and click the renaming icon red circle 5 2 Volume The volume menu allows you to adjust the system volume If you want to change the system volume during navigation please refer to Chapter 6 4 Tap Button click sounds activate or deactivate the feedback sounds when tapping a button ...

Page 29: ... Auto zoom function ensures that the map is always displayed in a manner that provides you with a clear overview of your location and the upcoming maneuver The crossway zoom function ensures that the map will zoom in on every important crossway while the navigation When auto crossway zoom is enabled you can use the zoom buttons to zoom into out of the map After a few seconds the map will automatic...

Page 30: ...ther to calculate the shortest or fastest route Use avoid routes to indicate any toll roads ferries residential roads or highways to be avoided during route calculation Please note that even when checked these roads may not be excluded from route calculation completely Avoid highways may be used to calculate small scale detours only The option is not suitable when calculating long distance routes ...

Page 31: ...nger cars If you do not want this dialog to appear each time you start navigation deselect the check mark in the Ask before every route calculation field 5 7 GPS Settings In the menue GPS Settings the appropriate settings must be made to allow the navigation software to read GPS data from the receiver After the first installation of the software this screen should be displayed Please click on the ...

Page 32: ...ceiving data Count 3 The navigation software receives one dataset per second Since the connection was established 3 datasets have been received Satellites Number of satellites from which signals are currently being received For a position fix a minimum of three satellites must be received Time GPS Time in GMT 5 8 Units The Units menu allows you to specify the units to be used for distances and tim...

Page 33: ...s as TMC off in the drop down box The navigation software automatically searches for a connected TMC receiver If no receiver can be automatically detected please specify the correct settings see 5 10 3 The TMC traffic conditions should now be displayed on the map or in the menu Traffic see 5 10 5 9 2 Bypass traffic jams automatically Activate Bypass traffic jams automatically to let the navigation...

Page 34: ...Traffic The Traffic menue displays a list of the received traffic conditions Tap a list entry to display the full description below To sort the list alphabetically tap the A Z button red circle Tap the button again to sort the list by distance from your current location To view only the traffic reports which are relevant to your route tap the button on route yellow circle To view the location of a...

Page 35: ...ons and display texts on screen 5 12 Speedwarnings The menu Warning allows you to select if you want to be alerted when exceeding the local speed limit The settings allow for acoustic or visual alerts The shown example gives an acoustic alert when exceeding the speed limit by 10km h or more but but never displays a visual warning ...

Page 36: ...utton and enter a name for the log You can now use the navigation system as usual while the GPS data is recorded To finish recording click the black button To show a GPS track on a map click the green button and select a track The track will be shown on the map with a line of green dots Please open a mapviewer manually to do so ...

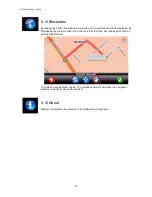
Page 37: ...e displayed By first tapping the marker button red circle and then the map any road segment can be permanently blocked To unblock a segment tap it again The blockades persist even when the navigation software is being shut down and started 5 15 About Displays information about version of the software and copyrights ...

Page 38: ...nd big crossings 460 meters Indicates the distance remaining until the next maneuver must be carried out 1 18 Indicates the calculated arrival time 48 min Indicates the remaining driving time 84 km Indicates the remaining distance 1 AS Bonn Bad Godesberg Indicates the name of the street you will turn into after the next driving maneuver The tmc and gps receiving is shown in the upper left corner g...

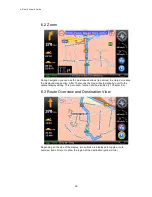
Page 39: ... section After 10 seconds the map will automatically revert to the optimal display setting This Auto zoom function can be disabled cf Chapter 5 4 6 3 Route Overview and Destination View Depending on the size of the display two buttons are displayed to toggle a route overview red circle or to show the region of the destination yellow circle ...

Page 40: ...A Rival 2 5 User s Guide 40 6 4 Driving Instruction Volume Click the left bar at any time to adjust the volume of the driving instructions After a few seconds the volume display automatically disappears ...

Page 41: ...button calls up a menu for performing map display settings cf Chapter 5 4 6 5 3 Night Mode Press the Night Mode button to display the map in a color scheme optimized for dark lighting conditions Press the button again to revert to the normal display mode 6 5 4 Interstations The Interstation function allows you to add intermediate destinations while en route to your destination For more detailed in...

Page 42: ...rnative route bypassing the blocked section This function is useful for circumventing traffic jams or blocked roads When you have blocked a road a button Free appears in the Options Menu Use this button to free the blocked road 6 5 6 Traffic Please see chapter 5 11 6 5 7 TMC Please see chapter 5 10 6 5 8 GPS Logs Please see chapter 5 15 6 5 9 Speedwarnings Please see chapter 5 12 6 5 10 Blockades ...

Page 43: ...A Rival 2 5 User s Guide 43 6 5 11 Quit Press the Quit button to end navigation The navigation software returnes to the main menue ...

Page 44: ...icence number 100026920 GREAT BRITAIN TMC codes The RDS TMC traffic information with TMC location table version number 6G 3 4 4 5 and 4 6 from Trafficmaster contained in this product is derived of the Trafficmaster TMC location table and is subject to the terms of limitation or exclusion of liability of the license agreement between Tele Atlas and Trafficmaster Trafficmaster All Rights Reserved No...

Page 45: ...is License does not imply any rights to future delivery of free or paid Service or any other services 2 COPYRIGHT The copyrights and other intellectual industrial and or proprietary rights to the Software are owned by infoware or its suppliers You may either a make one copy of the Software solely for backup or archival purposes or b transfer the Software to a single medium provided you keep the or...

Page 46: ...able to you through the use of the Software 8 LINKS TO THIRD PARTY SITES infoware is not responsible for the contents of any third party sites or services any links contained in third party sites or services or any changes or updates to third party sites or services infoware is providing these links and access to third party sites and services to you only as a convenience and the inclusion of any ...

Reviews: