background image


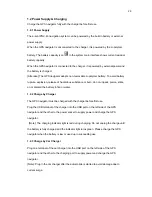
1.2 Power Supply & Charging 

Charge the GPS navigator fully with the charger before first use. 

1.2.1 Power Supply 

The a-rival PNV-43 navigation system can be powered by the built-in battery or external 

power supply.   

When the GPS navigator is unconnected to the charger, it is powered by the Li-polymer 

battery. The battery capacity icon 

  in the system main interface shows current residual 

battery capacity. 

When the GPS navigator is connected to the charger, it is powered by external power and 

the battery is charged.   

[Attention] The GPS navigator adopts non-removable Li-polymer battery. To avoid battery 

rupture, explosion, release of hazardous substance or burn, do not unpack, pierce, strike 

on or discard the battery in fire or water. 

1.2.2 Charge by Charger 

The GPS navigator must be charged with the charger before first use. 

Plug the USB terminal of the charger into the USB port on the left side of the GPS 

navigator and the other to the power socket to supply power and charge the GPS 

navigator. 

  [Note]: The charging indicator light is red during charging. Do not unplug the charge until 

the battery is fully charged and the indicator light turns green. Please charge the GPS 

navigator when the battery is low or used up in succeeding use. 

1.2.3 Charge by Car Charger 

Plug one terminal of the car charger into the USB port on the left side of the GPS 

navigator and the other to the charging port to supply power and charge the GPS 

navigator. 

[Note]: Plug in the car charger after the automobile is started to avoid damage due to 

current surge. 

29 

Summary of Contents for PNV-43

Page 1: ...wir nat rlich auch nach dem Kauf f r Sie da Bei technischen Fragen und oder Problemen erreichen Sie uns per Telefon unter 0511 123 83 506 oder E Mail unter support first servicecenter de Ben tigen Si...

Page 2: ...istungen und die pers nliche Sicherheit wird gef hrdet kann a rival keine Verantwortung bernehmen Die Daten elektronischer Navigationskarten stimmen aufgrund von Verkehrsent wicklungen m glicherweise...

Page 3: ...als auch zu Fehlfunktionen f hren Das GPS System wird von der Regierung der Vereinigten Staaten von Amerika betrieben Diese ist ausschlie lich f r die Leistung und Funktion des GPS Signals verantwortl...

Page 4: ...mhauptbildschirm und Hauptfunktionen 10 Kapitel II GPS 11 2 1 Karte 11 2 2 Navigation 11 2 3 Empfang 11 Kapitel III GPS Info 12 3 1 Funktionen 12 Kapitel IV Systemeinstellungen 13 4 1 bersicht 13 4 2...

Page 5: ...ltungsfunktionen Sie k nnen das GPS Navigationsger t berall und jederzeit beispielsweise beim Fahren Laufen oder Radfahren nutzen Die Navigations und Unterhaltungsfunktionen werden Ihren Alltag und Ih...

Page 6: ...Ausschalten des Ger ts sowie Wechseln in den Ruhemodus 2 Anzeigeleuchte Im ausgeschalteten Zustand und im Lademodus ist diese Leuchte rot W hrend des Betriebs leuchtet sie gr n 3 Micro SD Kartensteckp...

Page 7: ...Zur Vermeidung von Akkusch den Br nden einer Explosion sowie der Freisetzung von gef hrlichen Substanzen den Akku niemals freilegen oder durchbohren bzw ihn niemals Feuer oder Wasser aussetzen oder i...

Page 8: ...ionsger t erfolgt schaltet es sich automatisch aus Falls angetippt wird wechselt das Ger t in den Ruhemodus Bei erneutem Einschalten des Ger ts wird der Modus fortgesetzt der vor der Auswahl des Ruhem...

Page 9: ...es Airbags anbringen Hinweis Das GPS Navigationsger t kann je nach Modell mit diesem oder hnlichen Halterungen ausgeliefert werden 1 Zur Befestigung der Ger tegabel am Halter die 3 Befestigungselement...

Page 10: ...dr cken um den nachfolgenden Systemhauptbildschirm zu ffnen Die Hauptfunktionen sind nachfolgend aufgef hrt Funktion Erkl rung Navigation Aktivieren der Navigationsfunktion System Systemeinstellungen...

Page 11: ...Stra enverh ltnissen entsprechend fahren und die Verkehrsregeln beachten 2 2 Navigation Navigationsrouten dienen nur Referenzzwecken Der Benutzer kann selbst entscheiden ob er ihnen folgt Bitte beacht...

Page 12: ...etzen Kapitel IV Systemeinstellungen 4 1 bersicht In diesem Kapitel werden die Systemeinstellungen des GPS Navigationsger ts erl utert Das Symbol auf dem Systemhauptbildschirm antippen um den nachfolg...

Page 13: ...st tzung der automatischen Hintergrundbeleuchtung Datum und Uhr zeit Systemdatumseinstellung Systemzeiteinstellung Systemzeitzoneneinstellung Sprache Systemsprachenauswahl Systeminfo Anzeigen von Syst...

Page 14: ...en Speichern der Einstellungen und Schlie en des Bildschirms zur Lautst rkeeinstellung Lautst rke Es sind zehn Lautst rkestufen von lautlos bis maximal verf gbar Das Symbol oder antippen um die Lautst...

Page 15: ...tergrundbeleuchtung zu ffnen Schlie en Speichern der Einstellungen und Schlie en des Bildschirms zur Einstellung der Hintergrundbeleuchtung Anpassen der Hintergrundbeleuchtung Regler nach links ziehen...

Page 16: ...Zeitzone aus in der Ihr Startpunkt blicherweise liegt Im oben dargestellten Bildschirm das Symbol oder antippen um Jahr Monat Tag Stunde und Minute festzulegen Die Uhrzeit kann im 12 oder 24 Stunden F...

Page 17: ...irmdesign Blau oder Gelb auszuw hlen Anschlie end das Symbol antippen um die Auswahl zu speichern und zum Systemeinstellungsbildschirm zur ckzukehren 4 6 Systeminformationen Auf dem Systemeinstellungs...

Page 18: ...n Daten bertragungsmodus wechselt und die Navigation abbricht MASS STORAGE Massenspeicher 1 Sicherstellen dass der Betriebsmodus des GPS Navigationsger tes aktiviert ist und die SD Karte im Steckplatz...

Page 19: ...die Einstellung zu speichern Achtung Zur Datensicherheit die Daten des Navigationsger ts sichern Hinweis Bei der Auswahl von MASS STORAGE Massenspeicher w hrend das GPS Navigationsger t mit dem PC ve...

Page 20: ...ger sondern dem Bedienungsstift durchf hren Auf dem Einstellungsbildschirm das Symbol antippen um den folgenden Bildschirm zu ffnen Das Zentrum des Kreuzcursors antippen Daraufhin bewegt sich der Curs...

Page 21: ...brieren Geringe Lautst rke Lautst rke erh hen Keine Tonwiedergabe Schlechter Kopfh rerkontakt Kopfh rer korrekt anschlie en Keine Kommunikation mit PC Schlechte USB Verbindung USB Kabel korrekt anschl...

Page 22: ...r Sch den die durch unsachgem sse Behandlung oder durch u ere Einwirkung Wasser Sturz Sonne Schlag oder Bruch verursacht wurden Kundenservice Kontakt Sollte Ihr Ger t einen Defekt aufweisen Sie ein Pr...

Page 23: ...case we will help you For technical questions and or problems please contact us by phone at 49 0 511 123 83 506 or via E Mail to support first servicecenter de If you need additional accessories e g a...

Page 24: ...nger personnel safety for which a rival assumes no responsibility Data of navigation electronic maps might be inconsistent with actual traffic signals due to transportation development Please follow t...

Page 25: ...d States government which is solely responsible for the performance of GPS Any change to the GPS system can affect the accuracy of all GPS equipments GPS satellite signals cannot pass through solid ma...

Page 26: ...ions 32 Chapter II GPS 33 2 1 Map 33 2 2 Navigation 33 2 3 Reception 33 Chapter III Photo Browser 34 3 1 Features 34 3 2 Interface and Operation 34 Chapter IV System Settings 34 4 2 Volume 36 4 3 Back...

Page 27: ...use the GPS navigator anytime anywhere for example while driving walking or cycling Its navigation and amusement functions will enrich your life and work To fully exert the functions of the a rival PN...

Page 28: ...owering on off the device or enter sleep mode 2 Indicator light In power off state it is red while being charged It is green in operation 3 Micro SD card slot For inserting an optional flash memory ca...

Page 29: ...k pierce strike on or discard the battery in fire or water 1 2 2 Charge by Charger The GPS navigator must be charged with the charger before first use Plug the USB terminal of the charger into the USB...

Page 30: ...owered on again 1 3 2 Restart the System When the system does not response press the reset key on the right side of the GPS navigator to restart the system Relevant Information The following situation...

Page 31: ...of air bag or the area after the air bag is inflated Note The mount may diversify from the illustration above 1 To fix the cradle onto the bracket aim the 3 fasteners of the cradle at corresponding sl...

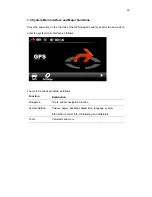
Page 32: ...fter two seconds to enter the system main interface as follows The main functions are listed as follows Function Explanation Navigation Tap to enable navigation function System Setting Volume power ba...

Page 33: ...te that the system does not support rat runs or similar abbreviations as they do not meet most of the program logic 2 3 Reception High and crowded structures such as inside of tunnels space between hi...

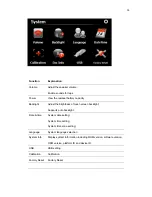
Page 34: ...ws Tap the Reset Icon to reset the GPS Receiver Chapter IV System Settings 4 1 Summary This chapter introduces the system settings of the GPS navigator Tap the icon in the system main interface to ent...

Page 35: ...s of touch screen backlight Supports auto backlight Date time System date setting System time setting System time zone setting Language System language selection System Info Display system information...

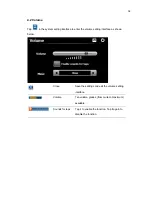
Page 36: ...ter the volume setting interface as shown below Close Save the settings and exit the volume setting interface Volume Ten volume grades from mute to maximum available Sounds for taps Tap it to enable t...

Page 37: ...ight Setting interface as follows Close Save the settings and exit the backlight setting interface Backlight adjustment Drag leftward or tap the icon to turn down or rightward or tap the icon to turn...

Page 38: ...ludes system date setting time setting and time zone setting Select a time zone of your usually starting point 4 4 1 Setting the system date In the above interface tap the icon or to set the Year Mont...

Page 39: ...age and skin the blue and yellow skins are provided and tap the icon to save the selection and return to the System Setting interface 4 6 System info Tap in the system setting interface to enter the s...

Page 40: ...ected to a cherger and change into data transmission mode 1 Have the GPS navigator in operation status and the SD card plugged in the slot 2 Tap the icon in the System Info interface to enter the foll...

Page 41: ...C and tap to save the setting 2 Connect the MINI USB terminal of the USB cord to the MINI USB port of the GPS navigator and the standard USB terminal to the USB Host port of PC Then the navigator stop...

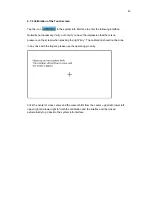
Page 42: ...no pressure on the screen when pressing the right key The calibration should not be done in any case with the fingers please use the operating pin carry Click the center of cross cursor and the curso...

Page 43: ...creen not calibrated Recalibrate the screen Low volume Turn up the volume No sounds Poor contact of earphone Connect the earphone Communication with PC Poor USB connection Connect the USB cable GPS si...

Page 44: ...e does not cover damage caused by improper use or external influence water falling sunlight breakage or impact Userinformation Contact If your device has a defect or you have problems with it please c...

Reviews: