Manuale di installazione, Uso e Manutenzione -
Installation, Use and Maintenance Manual
pag. 20
INTERFACCIA CONTROLLU UTENTE PCU
PCU USER CONTROL INTERFACE
FUNZIONE DEI TASTI
•
Il tasto On/Off (1) permette l’accensione/spegnimento dell’unità.
•
Il tasto Modo/Menù (2) permette di commutare tra modo di funziona-
mento riscaldamento/raffrescamento con unità accesa, con unità spen-
ta unitamente al tasto ventilazione permette di accedere ai parametri
installatore.
•
Il tasto ventilazione (3) permette di selezionare tra le velocità
min/med/max e auto dei ventilatori ad unità. accesa, mentre ad unità
spenta permette unitamente al tasto Modo/Menù di accedere ai param-
tri installatore.
•
Il tasto freccia giù (4) ed il tasto freccia su (5) permettono di modificare
il set point di temperatura.
BUTTON FUNCTIONS
•
The On / Off button (1) allows to power unit on / off.
•
The Mode / Menu key (2) allows switching between the heating / cooling
operation of the unit is on, with unit switched off together with the ven-
tilation button allows access to the installer parameters.
•
The ventilation button (3) allows you to select between speed min / med
/ max and car fans to unity. on, while the unit is off allows together with
the Mode / Menu button to access paramtri installer.
•
The down key (4) and the Up key (5) allow you to change the set point
temperature.
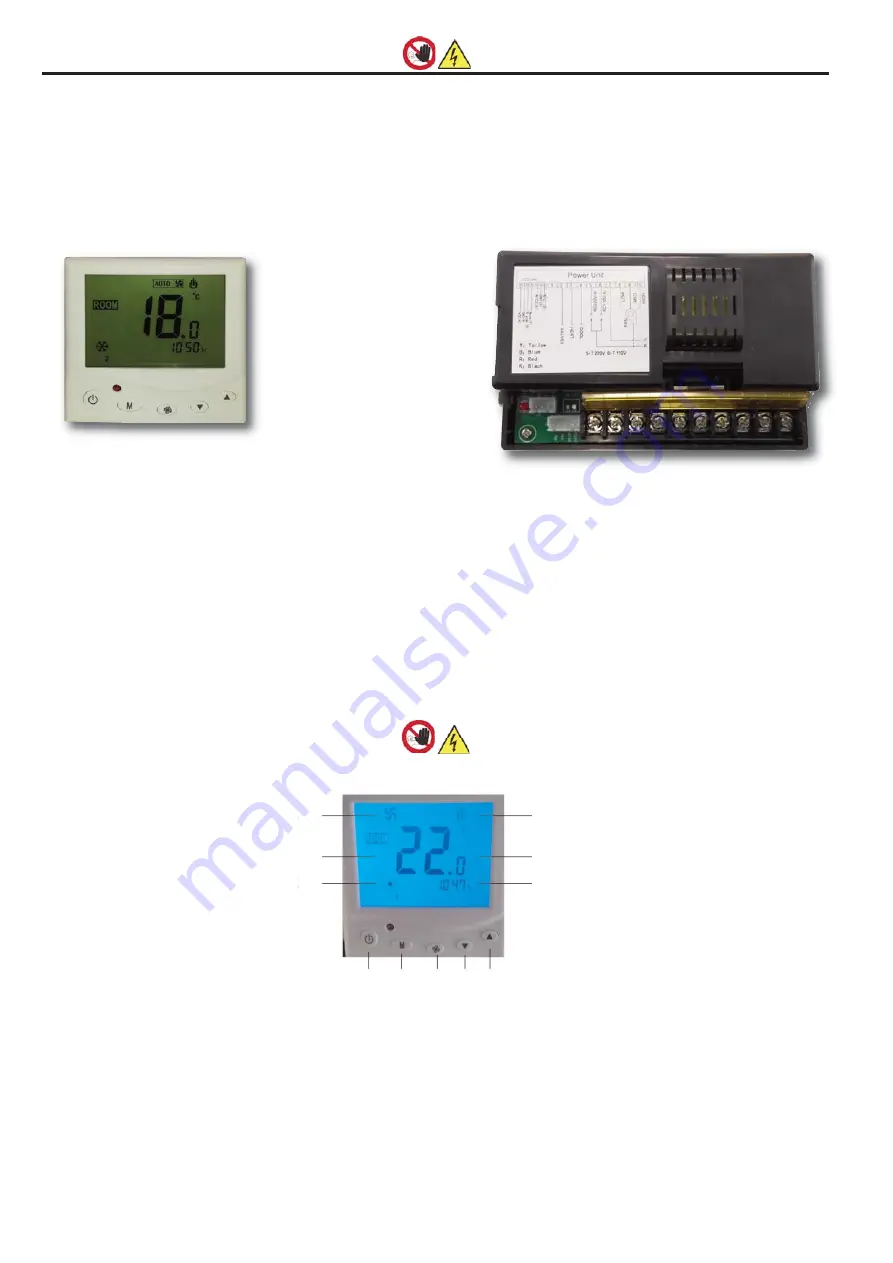
Display:
Dimensioni /
Dimensions
86x83x13mm
Unità potenza /power unit:
Dimensioni /
Dimensions
120x70x45mm
1.
Pulsante On/Off
2.
Pulsante Modo/Menù
3.
Pulsante ventilazione
4.
Pulsante freccia giù
5.
Pulsante freccia su
6.
Area simboli ventilazione
7.
Area scritta Room/Set
8.
Area modo operativo
9.
Area simbolo manuale
10.
Area fasce orarie
11.
Area orologio
1.
On/Off button
2.
Mode/Menù button
3.
Ventilation button
4.
Down button
5.
Up button
6.
Ventilation display area
7.
Room/set icon
8.
Operative mode selected
9.
Manual mode selecte
10.
Time zones display area
11.
Clock
8.1.4 Pannello di controllo unità - PCU
• II sistema di controllo PCU si compone di 2 parti, un display LCD, mon-
tabile su scatola ad incasso due moduli ed una unità di potenza nella
quale sono contenutì i relè di interfaccia da collegare ai dispositivi da
comandare.
ATTENZIONE
Distanza massima remotabile del display dalla macchina fino a 10
metri.
8.1.4 Control panel - PCU
•
The PCU control system consists of two parts, an LCD display moun-
ted on a flush mounting box 2 modules and a power unit in which are
contained the interface relays to be connected to the devices to be con-
trolled.
WARNING
Maximum remotable distance of the display from the machine up to
10 meters.
INSTALLAZIONE CONTROLLO REMOTO - PCU
• Per fissare il controllo alla scatola elettrica
1. sganciare la placca frontale del controllo, agendo delicatamente sui
fermi ad incastro posti sulla parte inferiore
2. fissare con due viti la base del controllo alla scatola elettrica
3. riposizionare la placca frontale
• Per fissare l’unità di potenza alla scatola elettrica:
1. sganciare la barra di fissaggio posteriore dell’unità, agendo delicata-
mente sui fermi ad incastro posti sulla parte laterale
2. fissare con due viti la barra del controllo alla scatola elettrica
3. riposizionare la unità di potenza.
REMOTE CONTROL INSTALLATION - PCU
• To attach the control to the electrical box:
1. unhook the front plate of the control, gently blowing on the latches snap
seats on the bottom
2. attach with two screws the basis of monitoring the electrical box
3. reposition the front plate
• To fix the power unit to the electrical box:
1. unhook the rear attachment rod, gently blowing on the latches snap
seats on the side
2. attach with two screws of the control bar to the electrical box
3. replace the power unit.
6
7
8
9
10
11
1 2 3 4 5
8 - COLLEGAMENTI ELETTRICI
8 - ELECTRIC CONNECTIONS
Summary of Contents for A CFR+ 40
Page 2: ......


