I
NSTRUCTION MANUAL
AAPRODUCTS INC.
F
or Technical Support Call:1-888-806- 3972 / 626-332-4245
W
ARNING!
Read, understand and follow all warnings and instructions before using this product. Failure to follow these directions
may result in property damage, serious bodily injury, and/or death. AA Products Inc. is not responsible for any property
damage, personal injury, or death occurred while using any AA-Racks products. Retain these instructions for future
reference.
Any modification or unintended use of this product voids any warranty and could create a hazardous condition.
Loads must be secure according to local height and deification regulations and or laws.
Secured loads and connections must be re-checked periodically for tightness.
In order to prevent installation problems, any consultation or use of certified installer or installation service company
is recommended.
Model Number: ADX32-50/60/72 (BLK& WHT)
Universal Aluminum Drilling Van Roof Rack With Ladder Stopper
P
RODUCT DESCRIPTION
T
he AA-Racks ADX32 Series is a universal rack system that can be installed on any vehicle (Drilling required for installation).
The Rack is made of Aluminum which a Rust Free Guarantee & Heavy-Duty purposed. Hardware package comes with bolt,
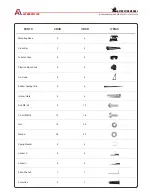
nuts & washers; as well as the polyfoam gasket for installation.
Max load capacity of this system is 600 lbs. for a two bar system.
I
NSTALLATION INSTRUCTION
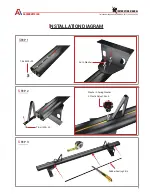
1.Slide 4 of the T-Bolts (M8*25) into the cross-bar slot. Flip both the mounting base and connect the bolts with washers &
nuts. Note: Do NOT tighten the nuts during this process.
2.Measure the position for both “Tie down” ; mark the position and cut the Sealing Strip accordingly for the cross-bar.
Repeat Step 1 for the installation of both “Tie down” . Installation of the “Tie down” and Sealing strips can save until the
rack set is installed on the vehicle.
3.Put the semi-finished rack set on the roof, set the distance for your own need. Align with interior plate to ensure bolt
alignment and mark with marker. Remove van rack and drill hole. The gasket adhere to the mounting base .
4.Tighten all the bolts for security. Put the Cabs on each cross-bar’ s end to complete installation.


