9
/
20
4.
Using the feed slide handwheel, locate the tool bit in position 1.
5.
Using the cross slide handwheel, slowly feed the tool bit in until it just contacts the shoe
wear area.
6.
With the drum turning, slowly rotate the feed screw handwheel counter-clockwise until the
lip is removed and the tool bit is past the outside edge.
7.
Examine the scratch cut making sure it is uniform around the entire circumference of the
rotor. If the scratch cut is uniform, you can do the next step. If the scratch cut is not uniform,
it means that the drum does not install correctly. You should turn the power off, remove the
rotor from the arbor, check the mounting adapters and arbor for nicks, burrs, or chips,
remount the rotor, and repeat the process.
8.
With the drum turning, using the cross slide handwheel, feed in the tool bit 0.002” to 0.004”.
9.
Position the rotor/drum switch on drum; tighten the knob on the portrait slide handwheel,
then start turning. Turn off Disc/Drum switch and spindle motor.
NOTE:
Refer to Speed and Feed RPM chart (Figure 15) to find spindle speed and feed speed.
“Some experimentation may be required for optimum surface finish.”
10.
Check the surface for total clean up.
11.
If the surface is not ideal, relocate the tool bit and feed in a little depth and repeat, until we
can get an ideal surface.
CARE AND MAINTENANCE
Some basic maintenance will assure that it will continue to operate in a satisfactory manner.
1.
Using a shop cloth, remove all of the chips and dust from on and above the lathe do not use
air to clean off the machine.
2.
Apply a thin layer of light weight oil to the arbor, taper cones and double radius adapters
after each use.
3.
A light coat of oil should be applied to spindle every month.
4.
Slide way is factory adjusted and held in place with set screws. No adjustment is needed in a
short period.
5.
A light coat of oil should be applied to dovetails every day.
6.
The screw should be lubricated often.
HELPFUL HINTS
1.
We recommend that you use a scrap disc or drum and practice before beginning an actual
job. This will avoid any undue pressure or failure while learning.
2.
Always clean the surfaces that will be contacting the taper cones, double radius adapter(s) or
bell clamp(s).
3.
If a disc or drum cannot be installed correctly (after having been cleaned and installed
properly), it may be damaged or bent.
4.
If in doubt, DON’T DO IT!
CAUTION: USE REQUIRED OUR CARBIDE TIPS ONLY
TRIANGLE CUTTING TIP TPGX110308
Summary of Contents for C9372
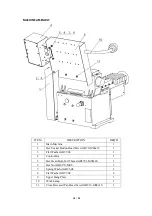
Page 13: ...13 20 Cross Feed Feed Slide Assembly ...
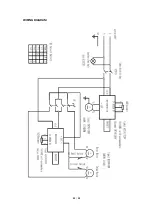
Page 20: ...20 20 WIRING DIAGRAM ...


