background image

A A E O N   P a n e l   P C   

A P C - 8 1 5 2


APC-8152 Series User Manual V1.0


47 

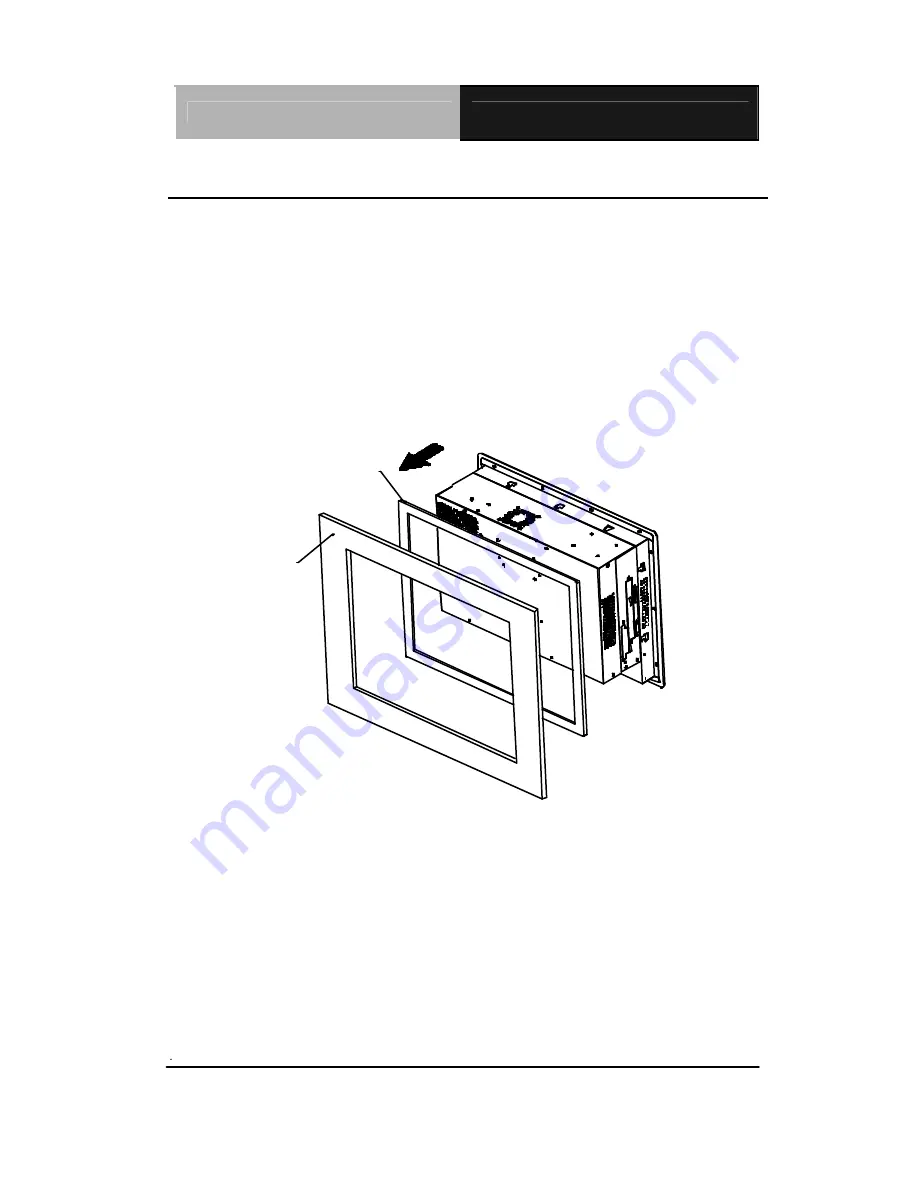
Waterproof sponge Installation 

The following illustration shows you how to lodge the waterproof sponge in 

the back of the monitor set.  

1.  Lodge the Sponge in the back of the monitor set. 

2.  Locate the monitor set on the wall. 


Wall

Sponge


Summary of Contents for APC - 8152

Page 1: ...AAEON Panel PC A P C 8 1 5 2 APC 8152 Series User Manual V1 0 1 APC 8152 Socket 478 based Intel Pentium 4 Processors Industrial Panel PC With 15 TFT LCD Two free expansion slots...

Page 2: ...on provided in this manual is intended to be accurate and reliable However the original manufacturer assumes no responsibility for its use or for any infringements upon the rights of third parties tha...

Page 3: ...is a registered trademark of Microsoft Corporation RTL is a trademark of Realtek Semi Conductor Co Ltd C T is a trademark of Chips and Technologies Inc UMC is a trademark of United Microelectronics Co...

Page 4: ...he following materials have been shipped 1 APC 8152 AAEON Panel PC 10 Panel mount clip screw 1 Screw Bag 1 Waterproof Sponge 1 Jumper Cap 2 Easy stand 1 Power Cord optional 1 CD ROM for manual in PDF...

Page 5: ...rotect the equipment from overheating DO NOT COVER THE OPENINGS 8 Make sure the voltage of the power source is correct before connecting the equipment to the power outlet 9 Position the power cord so...

Page 6: ...E STORAGE TEMPERATURE IS BELOW 20 C 4 F OR ABOVE 60 C 140 F IT MAY DAMAGE THE EQUIPMENT 16 External equipment intended for connection to signal input output or other connectors shall comply with relev...

Page 7: ...Safety This device complies with Part 15 FCC Rules Operation is subject to the following two conditions 1 this device may not cause harmful interference and 2 this device must accept any interference...

Page 8: ...11 Introduction 12 Features 14 Specifications 15 Dimension 21 Chapter 2 Hardware Installation 22 Safety Precautions 23 Location of Connectors and Jumpers 24 List of Jumpers 25 List of Connectors 26 Se...

Page 9: ...board Mouse Connector CN17 34 Digital I O Port 35 VGA Display Connector CN22 37 ATX Power Connector CN27 37 ATX Power 12V Connector CN28 38 FDD CD ROM Installation 39 HDD Installation 42 Easy Stand In...

Page 10: ...lth Status 59 Frequency Voltage control 60 Load Fail Safe Defaults 61 Load Optimized Defaults 62 Set Supervisor User Password 63 Save Exit Setup 64 Exit without saving 65 Limitations 66 Chapter 4 Driv...

Page 11: ...AAEON Panel PC A P C 8 1 5 2 APC 8152 Series User Manual V1 0 11 General Information Chapter 1...

Page 12: ...sale point of information Kiosk and gaming markets Multi Function Pentium4 Platform If you are looking for powerful multi media applications APC 8152 is the one APC 8152 integrates 15 color TFT LCD D...

Page 13: ...AAEON Panel PC A P C 8 1 5 2 APC 8152 Series User Manual V1 0 13 performance application Most of all Pentium 4 Level processors are suitable for APC 8152...

Page 14: ...ket 478 based Intel Pentium 4 Processor l Support Intel Hyper Threading Technology l Anti vibration disk drive bay for HDD l Water proof and anti scratch aluminum front panel with USB port IP 65 certi...

Page 15: ...s steel front panel l CPU Socket 478 based Pentium 4 13 Celeron Processors up to 3 06GHz with FSB 400 533MHz Hyper Threading Technology supported l Memory 184 pin DIMM x 1 support DDR 200 266 333MHz u...

Page 16: ...O 16 in or 16 out l Storage Disk Drive Anti vibration 2 5 HDD Slim FDD and Slim CD ROM l USB ports 4 USB 2 0 ports on rear chassis 1 USB 2 0 port on front panel Lockable by BIOS Because of USB chipset...

Page 17: ...ty disk drives appear XD and Flash Please ignore the two useless disk drives Support CompactFlash Type I II Secure Digital Multi Media Card Memory Stick PRO and Smart Media l Power Supply Universal 25...

Page 18: ...ut 250W standard offer Output rating 250W Input voltage 100VAC 240VAC 60 50Hz Output voltage 3 3V 16A 5V 25A 12V 13A 5VSB 2A 5V 0 3A 12V 0 8A l 24V DC input Output rating 300W Maximum Input voltage 19...

Page 19: ...m2 250 TYP 150 H Viewing angle 145 V Back Light MTBF Hrs 30 000 Touch screen Optional l Type 8 wire analog resistive l Resolution 2048 x 2048 l Light transmission 75 l Lifetime 1 million activations...

Page 20: ...AAEON Panel PC A P C 8 1 5 2 APC 8152 Series User Manual V1 0 20 l Vibration 1G 5 500Hz Random operation l Shock 15G peak acceleration 11 msec duration operation l EMC CE FCC Class B...

Page 21: ...AAEON Panel PC A P C 8 1 5 2 APC 8152 Series User Manual V1 0 21 Dimension 144 0 20 0 20 0 444 0 336 0 43 0 Cutout Size 405 299 mm Unit mm APC 8152 402 2 296 0...

Page 22: ...r Manual V1 0 22 Hardware Installation Chapter 2 Notice The Quick Installation Guide is derived from Chapter 2 of user manual For other chapters and further installation instructions please refer to t...

Page 23: ...the power is on because a sudden rush of power can damage sensitive electronic components Always ground yourself to remove any static charge before touching the board Modern electronic devices are ver...

Page 24: ...AAEON Panel PC A P C 8 1 5 2 APC 8152 Series User Manual V1 0 24 Location of Connectors and Jumpers Component Side...

Page 25: ...w you to configure your system to suit your application The table below shows the function of eachjumper in the board Jumpers Label Function JP1 Clear CMOS JP2 Audio Out Select JP3 COM2 Ring 5V 12V Se...

Page 26: ...your system to suit your application The table below shows the function of each connector in the board Connectors Label Function CN1 EIDE HDD Connector CN8 CN24 Fan Connector CN11 10 100Base Tx Ether...

Page 27: ...To close a jumper you connect the pins with the clip To open a jumper you remove the clip Sometimes a jumper will have three pins labeled 1 2 and 3 In this case you would connect either pins 1 and 2...

Page 28: ...ays turn off the power supply before setting Clear CMOS Before turning on the power supply set the jumper back to Normal JP1 Function 1 2 Active Default 2 3 Clear Audio Out Select JP2 JP2 Function 1 3...

Page 29: ...0 29 COM2 RS 232 422 485 Select JP4 JP5 JP4 JP5 Function 1 2 4 5 7 8 10 11 1 2 RS 232 Default 2 3 5 6 8 9 11 12 3 4 RS 422 2 3 5 6 8 9 11 12 5 6 RS 485 ATX Power simulate AT Power JP6 JP6 Function 1 2...

Page 30: ...ATA7 4 DATA8 5 DATA6 6 DATA9 7 DATA5 8 DATA10 9 DATA4 10 DATA11 11 DATA3 12 DATA12 13 DATA2 14 DATA13 15 DATA1 16 DATA14 17 DATA0 18 DATA15 19 GND 20 N C 21 REQ 22 GND 23 IO WRITE 24 GND 25 IO READ 26...

Page 31: ...Pin Signal 1 GND 2 5V 3 FAN SPEED SENSE 10 100Base Tx Ethernet Connector CN11 Pin Signal Pin Signal 1 TX 9 N C 2 TX 10 N C 3 RX 11 GND 4 N C 12 GND 5 N C 13 N C 6 RX 14 N C 7 N C 15 N C 8 N C 16 N C...

Page 32: ...1 7 GND 8 INDEX 9 GND 10 MOTOR A 11 GND 12 DRIVE SELECT B 13 GND 14 DRIVE SELECT A 15 GND 16 MOTOR B 17 GND 18 DIR 19 GND 20 STEP 21 GND 22 WRITE DATA 23 GND 24 WRITE GATE 25 GND 26 TRACK 27 GND 28 WR...

Page 33: ...CK 20 GND 21 BUSY 22 GND 23 PE 24 GND 25 SELECT 26 N C COM1 3 RS 232 422 485 Serial Port Connector CN16 Only COM1 support Wake on Ring function Pin Signal Pin Signal 1 DCD1 2 DSR1 3 RXD1 4 RTS1 5 TXD1...

Page 34: ...r Manual V1 0 34 23 RXD3 24 RTS3 25 TXD3 26 CTS3 27 DTR3 28 RI3 29 GND 30 N C 31 DCD4 32 DSR4 33 RXD4 34 RTS4 35 TXD4 36 CTS4 37 DTR4 38 RI4 39 GND 40 N C PS2 Keyboard Mouse Connector CN17 Pin Signal...

Page 35: ...IN OUT 841H 4 Digital IN OUT 841H 5 GND 6 GND 7 Digital IN OUT 841H 8 Digital IN OUT 841H 9 Digital IN OUT 841H 10 Digital IN OUT 841H 11 GND 12 GND 13 Digital IN OUT 801H 14 Digital IN OUT 801H 15 D...

Page 36: ...in1 Pin2 Pin3 Pin4 Pin7 Pin8 Pin9 Pin10 GPI 27 GPI 26 GPI 25 GPI 24 GPI 23 GPI 22 GPI 21 GPI 20 MSB LSB 8 out Pin1 Pin2 Pin3 Pin4 Pin7 Pin8 Pin9 Pin10 GPO 27 GPO 26 GPO 25 GPO 24 GPO 23 GPO 22 GPO 21...

Page 37: ...I 25 GPI 24 GPI 23 GPI 22 GPI 21 GPI 20 MSB LSB VGA Display Connector CN22 Pin Signal Pin Signal 1 Red 9 GND 2 VCC 10 HSYNC 3 Green 11 GND 4 GND 12 VSYNC 5 Blue 13 GND 6 N C 14 SCL 7 N C 15 GND 8 SDA...

Page 38: ...AAEON Panel PC A P C 8 1 5 2 APC 8152 Series User Manual V1 0 38 7 GND 17 GND 8 POWER OK 18 5V 9 5VSB 19 5V 10 12V 20 5V ATX Power 12V Connector CN28 Pin Signal Pin Signal 1 GND 2 GND 3 12V 4 12V...

Page 39: ...AAEON Panel PC A P C 8 1 5 2 APC 8152 Series User Manual V1 0 39 FDD CD ROM Installation We will guide you how to lock FDD and CD ROM together Please see the detail as follows Step 1 Plug in FDD cable...

Page 40: ...8 1 5 2 APC 8152 Series User Manual V1 0 40 Step 2 Fasten the FDD and CD ROM together with two brackets on the both sides symmetrically Step 3 Fasten the transferring bar with a pair of screws on the...

Page 41: ...AAEON Panel PC A P C 8 1 5 2 APC 8152 Series User Manual V1 0 41 Step 4 Plug in CD ROM Cable...

Page 42: ...HDD Installation In the following we will guide you how to install HDD Make sure that all parts are provided before you start the installation Step 1 Lock with the screws as the illustration shown St...

Page 43: ...l PC A P C 8 1 5 2 APC 8152 Series User Manual V1 0 43 Step 3 There re two pieces of iron surfaces as the illustration shown Step 4 Locate the HDD on one piece of the iron surface and fasten it with t...

Page 44: ...52 Series User Manual V1 0 44 Step 5 Cover it with another piece of iron surface and lock it with the screws Step 6 Fix the HDD module into the APC 8152 chassis and plug the cable in Fix the HDD modul...

Page 45: ...al V1 0 45 Easy Stand Installation There re two L shaped easy stands come with the product Refer to the following illustration to install it 1 Fix the L shaped easy stands with the screws on both side...

Page 46: ...g with the illustration Step 1 Bore the screw into the screw nut Step 2 Locate the screw set into the hole around the monitor as the right illustration and pull it back to lock the screw set on the ho...

Page 47: ...Manual V1 0 47 Waterproof sponge Installation The following illustration shows you how to lodge the waterproof sponge in the back of the monitor set 1 Lodge the Sponge in the back of the monitor set...

Page 48: ...AAEON Panel PC A P C 8 1 5 2 APC 8152 Series User Manual V1 0 48 BIOS Installation Chapter 3...

Page 49: ...ng with the following instructions Press F1 to RESUME Write down the message and press the F1 key to continue the boot up sequence System configuration verification These routines check the current sy...

Page 50: ...eplace the complete unit when it finally runs down Award BIOS Setup Awards BIOS ROM has a built in Setup program that allows users to modify the basic system configuration This type of information is...

Page 51: ...fy your settings for integrated peripherals Primary slave secondary slave keyboard mouse etc Power Management Setup Use this menu to specify your settings for power management HDD power down power on...

Page 52: ...rformance system operations While AWARD has designated the custom BIOS to maximize performance the factory has the right to change these defaults to meet their needs Set Supervisor User Password Use t...

Page 53: ...OS Features option from the INITIAL SETUP SCREEN menu the screen shown below is displayed This standard Setup Menu allows users to configure system components such as date time hard disk drive floppy...

Page 54: ...eries User Manual V1 0 54 Advanced BIOS Features By choosing the Advanced BIOS Features option from the INITIAL SETUP SCREEN menu the screen below is displayed This sample screen contains the manufact...

Page 55: ...ed Chipset Features option from the INITIAL SETUP SCREEN menu the screen below is displayed This sample screen contains the manufacturer s default values for the APC 8152 Attention The LCD signal may...

Page 56: ...52 Series User Manual V1 0 56 Integrated Peripherals By choosing the Integrated Peripherals from the INITIAL SETUP SCREEN menu the screen below is displayed This sample screen contains the manufacture...

Page 57: ...52 Series User Manual V1 0 57 Power management Setup By choosing the Power Management Setup from the INITIAL SETUP SCREEN menu the screen below is displayed This sample screen contains the manufacture...

Page 58: ...52 Series User Manual V1 0 58 PnP PCI configuration By choosing the PnP PCI configurations from the Initial Setup Screen menu the screen below is displayed This sample screen contains the manufacturer...

Page 59: ...APC 8152 Series User Manual V1 0 59 PC Health Status By choosing the PC Health Status from the Initial Setup Screen menu the screen below is displayed This sample screen contains the manufacturer s de...

Page 60: ...Series User Manual V1 0 60 Frequency Voltage control By choosing the Frequency Voltage Control from the Initial Setup Screen menu the screen below is displayed This sample screen contains the manufact...

Page 61: ...al V1 0 61 Load Fail Safe Defaults When you press Enter on this item you get a confirmation dialog box with a message similar to Load Fail Safe Default Y N Pressing Y loads the BIOS default values for...

Page 62: ...62 Load Optimized Defaults When you press Enter on this item you get a confirmation dialog box with a message similar to Load Optimized Defaults Y N Pressing Y loads the default values that are manuf...

Page 63: ...ons of the setup menus while the user password only allows entry to the program but not modify options To abort the process at any time press Esc In the Security Option item in the BIOS Features Setup...

Page 64: ...this option and press Enter the values entered in the setup utilities will be recorded in the chipset s CMOS memory The microprocessor will check this every time you turn on your system and compare t...

Page 65: ...anel PC A P C 8 1 5 2 APC 8152 Series User Manual V1 0 65 Exit without saving Selecting this option and pressing Enter allows you to exit the Setup program without recording any new value or changing...

Page 66: ...ation when CMOS was set up to LCD CRT the LCD display will not support full screen appearance 2 Because of USB chipset limitation front USB port and Card reader USB interface are linked together when...

Page 67: ...AAEON Panel PC A P C 8 1 5 2 APC 8152 Series User Manual V1 0 67 Driver Installation Chapter 4...

Page 68: ...USB 2 0 Drivers are available for download using Windows Update for both Windows XP and Windows 2000 For additional information regarding USB 2 0 support in Windows XP and Windows 2000 please visit ww...

Page 69: ...appear the pop up window as following 4 Please change the path to the installation folder and search for the two files named as ikch8xx cat and isb8xx cat 5 The LCD signal may be turned off automatica...

Page 70: ...e OK button to key in path 3 Click on the Finish button to finish installation process And allow the system to reboot Card Readers Driver Installation 1 Enter Step 6 Card Reader Driver folder 2 Double...

Page 71: ...XX Driver Touch screen Each touch screen driver folder will be attached to the user manual Limitations The limitations you may need to notice when you start to install the driver For the sake of USB4...

Reviews: