background image

EPC-CV1 Series

1-4

Others

Supported OS

Windows

®

 XP 32-bit

Windows

®

 XP 64-bit (only with AMD graphics)

Windows

®

 7 32-bit

Windows

®

 7 64-bit (only with AMD graphics)

Windows

®

 8 32-bit

Windows

®

 8 64-bit (only with AMD graphics)

Linux Fedora

Accessories

1 x SATA 3Gb/s cable
1 x SATA power cable
1 x Support DVD (Drivers, Manual)

NOTE:

  Specifications are subject to change without notice.

Summary of Contents for EPC-CV1 Series

Page 1: ...Industrial Motherboard EPC CV1 Series ...

Page 2: ...otice While reasonable efforts have been made in the preparation of this document to assure its accuracy the original manufacturer assumes no liabilities resulting from errors or omissions in this document or from the use of the information contained herein The original manufacturer reserves the right to make changes in the product design without notice to its users Acknowledgments All other produ...

Page 3: ... 2 7 1 Rear panel connectors 2 12 2 7 2 Internal connectors 2 13 Chapter 3 BIOS setup 3 1 BIOS setup program 3 1 3 2 BIOS menu screen 3 2 3 3 Main menu 3 4 3 3 1 System Language English 3 4 3 3 2 System Date Day xx xx xxxx 3 4 3 3 3 System Time xx xx xx 3 4 3 3 4 Security 3 4 3 4 Advanced menu 3 6 3 4 1 CPU Configuration 3 6 3 4 2 IDE Configuration 3 7 3 4 3 USB Configuration 3 7 3 4 4 APM 3 7 3 4...

Page 4: ...ssis Q Fan Control Enabled 3 10 3 5 4 CPU Voltage 3 3V Voltage 5V Voltage 12V Voltage 3 10 3 6 Boot menu 3 10 3 6 1 Bootup NumLock State On 3 10 3 6 2 Full Screen Logo Disabled 3 11 3 6 3 Wait for F1 If Error Enabled 3 11 3 6 4 Boot Option Priorities 3 11 3 6 5 Boot Override 3 11 3 7 Tools menu 3 11 3 8 Exit menu 3 12 Appendix Notices A 1 ...

Page 5: ...butor or sales representative immediately 1 2 Features Integrated Intel Atom processor N2600 N2800 optional One Single Channel DDR3 800 1066MHz SO DIMM Up To 2GB Realtek ALC887 Audio Amplifier EUA 2012A Multi Display LVDS HDMI VGA LVDS VGA HDMI Dual Ethernet LAN Realtek 8111F x 2 SATA 3Gb s x 2 USB2 0 x 6 COM x 4 2 x Mini Card slots with PCIe and USB interface 1 x Full Height with SIM card interfa...

Page 6: ...3V 5V 12V voltages Monitors chassis fan speed Watchdog Timer 1 255 steps by software program Smart Fan Control Yes Wake On LAN PXE Yes WOL PXE Power States S3 S4 S5 Graphics Graphics Chipset AMD HD7410M with 512M memory optional Graphics Multi Display LVDS HDMI VGA LVDS VGA HDMI Resolution VGA Up to 1920 x 1200 60Hz optional HDMI Up to 1920 x 1200 60Hz LVDS Up to 2048 x 1536 60Hz 24 bit dual chann...

Page 7: ...ector 4 pin RTC Internal RTC I O Placement Back panel I O ports 1 x HDMI port 1 x COM port RS232 485 2 x LAN RJ 45 port 4 x USB 2 0 ports 1 x Lockable DC power port 12V Internal I O connectors 1 x VGA pin header 1 x 12V DC power connector 2 pin 2 x SATA 3Gb s connectors 1 x 4 pin SATA power connector 1 x PS 2 keyboard mouse connector 6 pin 1 x USB 2 0 header supports additional 2 USB 2 0 ports 3 x...

Page 8: ...th AMD graphics Windows 7 32 bit Windows 7 64 bit only with AMD graphics Windows 8 32 bit Windows 8 64 bit only with AMD graphics Linux Fedora Accessories 1 x SATA 3Gb s cable 1 x SATA power cable 1 x Support DVD Drivers Manual NOTE Specifications are subject to change without notice ...

Page 9: ...trap or touch a safely grounded object or a metal object such as the power supply case to avoid damaging them due to static electricity Hold components by the edges to avoid touching the ICs on them Whenever you uninstall any component place it on a grounded antistatic pad or in the bag that came with the component Before you install or remove any component ensure that the power supply is switched...

Page 10: ... 887 ICS 9VRS4339AL RTL 8111F RTL 8111F SPDIF_OUT1 HDMI1 LAN1 LAN2 USB2 USB3 USB1 J2 J1 BATTERY DC_PWR KBMS1 DDR3 DIMM_A1 LVDS1 INV1 F_PANEL1 DIO1 COM2 COM3 COM4 R560 010S AMD GPU optional 4 2 1 3 5 15 18 16 17 6 8 11 9 10 12 13 14 21 24 22 23 26 25 7 19 20 2 2 Motherboard layout Place this side towards the rear of the chassis NOTE Place five screws into the holes indicated by circles to secure th...

Page 11: ...2 19 12 System panel connector 10 1 pin F_PANEL1 2 16 13 Digital I O connector 10 pin DIO1 2 22 14 Serial port connectors 9 pin COM2 3 4 2 14 15 Chassis fan connector 4 pin CHA_FAN1 2 15 16 Clear RTC RAM 3 pin CLRTC1 2 8 17 LVDS panel VDD setting jumper 3 pin LVDS_VDD_SEL1 2 10 18 DDR3 DIMM slot 2 6 19 EATX power connector 2 pin EATX_PWR1 2 14 20 Lockable DC power port DC_PWR 2 12 21 SATA power co...

Page 12: ...EPC CV1 Series 2 4 2 3 Screw size 2 3 1 Component side ...

Page 13: ...2 5 Chapter 2 Motherboard information 2 3 2 Solder side ...

Page 14: ...ional 2 5 System memory This motherboard comes with one Double Data Rate 3 DDR3 Small Outline Dual Inline Memory Modules SO DIMM socket The figure illustrates the location of the DDR3 DIMM socket To install a DIMM EPC CV1 Series Integrated Intel Atom processor Integrated Intel Atom processor EPC CV1 Series DDR3 DIMM socket DIMM_A1 ...

Page 15: ...2 7 Chapter 2 Motherboard information To remove a DIMM 3 ...

Page 16: ... Plug the power cord and turn ON the computer 4 Hold down the Del key during the boot process and enter BIOS setup to reenter data CAUTION Except when clearing the RTC RAM never remove the cap on CLRTC jumper default position Removing the cap will cause system boot failure NOTES If the steps above do not help remove the onboard battery and move the jumper again to clear the CMOS RTC RAM data After...

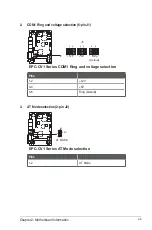
Page 17: ...ing and voltage selection 6 pin J1 Pins 1 2 12V 3 4 5V 5 6 Ring Default EPC CV1 Series COM1 Ring and voltage selection 1 2 3 4 5 6 Ring Default 5V 12V J1 3 AT Mode selection 2 pin J2 Pins 1 2 AT Mode EPC CV1 Series AT Mode selection AT MODE J2 PIN1 ...

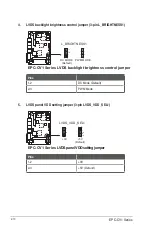
Page 18: ... 1 2 DC Mode Default 2 3 PWM Mode 5 LVDS panel VDD setting jumper 3 pin LVDS_VDD_SEL1 Pins 1 2 3V 2 3 5V Default 1 2 DC MODE Default PWM MODE L_BRIGHTNESS1 EPC CV1 Series LVDS backlight brightness control jumper 1 2 2 3 3V 5V Default LVDS_VDD_SEL1 EPC CV1 Series LVDSpanelVDDsettingjumper ...

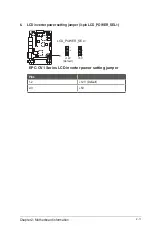
Page 19: ... Chapter 2 Motherboard information 6 LCD inverter power setting jumper 3 pin LCD_POWER_SEL1 Pins 1 2 12V Default 2 3 5V LCD_POWER_SEL1 1 2 2 3 12V Default 5V EPC CV1 Series LCD inverter power setting jumper ...

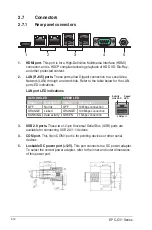
Page 20: ... panel connectors LAN port Speed LED Activity Link LED ACT LINK LED SPEED LED Status Description Status Description OFF No link OFF 10 Mbps connection ORANGE Linked ORANGE 100 Mbps connection BLINKING Data activity GREEN 1 Gbps connection 1 HDMI port This port is for a High Definition Multimedia Interface HDMI connector and is HDCP compliant allowing playback of HD DVD Blu Ray and other protected ...

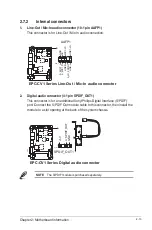
Page 21: ...r an additional Sony Philips Digital Interface S PDIF port Connect the S PDIF Out module cable to this connector then install the module to a slot opening at the back of the system chassis NOTE The S PDIF module is purchased separately AAFP1 GND NC MIC1 JD LINE1 JD A_MIC1_L A_MIC1_R LINE R A_JD_FRONT LINE L PIN 1 EPC CV1 Series Line Out Mic In audio connector SPDIF_OUT1 5V A_SPDIF_OUT GND PIN 1 EP...

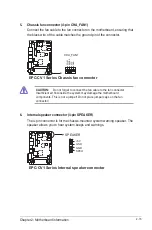
Page 22: ...nnector EATX_PWR1 4 Serial port connectors WtoB CON 9P 1 25mm S T SMT ACES 50273 00971 001 9 pin COM2 3 4 These connectors are for serial COM ports Connect the serial port module cable to this connector then install the module to a slot opening at the back of the system chassis NOTE The COM module is purchased separately EPC CV1 Series Serial port connectors PIN 1 COM4 GND RI DTR CTS TXD RTS RXD D...

Page 23: ...nector 4 pin CHA_FAN1 Connect the fan cable to the fan connector on the motherboard ensuring that the black wire of the cable matches the ground pin of the connector EPC CV1 Series Chassis fan connector CHA_FAN1 PWM SENSE VCC GND 6 Internal speaker connector 4 pin SPEAKER The 4 pin connector is for the chassis mounted system warning speaker The speaker allows you to hear system beeps and warnings ...

Page 24: ...ve activity LED 2 pin HD_LED This 2 pin connector is for the HDD Activity LED Connect the HDD Activity LED cable to this connector The IDE LED lights up or flashes when data is read from or written to the HDD ATX power button soft off button 2 pin PWR BTN This 2 pin connector is for the system power button Reset button 2 pin RESET This 2 pin connector is for the chassis mounted reset button for sy...

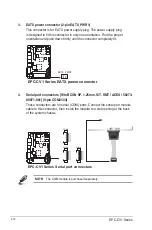
Page 25: ...A hard disk drives When using hot plug and NCQ set the Configure SATA as item in the BIOS to AHCI See section 3 4 2 IDE Configuration for details SATA3G_1 SATA3G_2 GND RSATA_RXP1 RSATA_RXN1 GND RSATA_TXN1 RSATA_TXP1 GND GND RSATA_TXP2 RSATA_TXN2 GND RSATA_RXN2 RSATA_RXP2 GND EPC CV1 Series SATA 3 0Gb s connectors 9 SATA power connector 4 pin SATA_PWR1 This connector is for the SATA power cable The...

Page 26: ...hat supports up to 480 Mbps connection speed CAUTION Never connect a 1394 cable to the USB connector Doing so will damage the motherboard NOTE The USB module cable is purchased separately EPC CV1 Series USB 2 0 connector PIN 1 GND GND USB5 _R USB5 _R 5V 5V USB4 _R USB4 _R GND GND USB1 11 SPI programming connector 8 pin SPI1 Use this connector to flash BIOS SPI ROM EPC CV1 Series SPI programming co...

Page 27: ...tor WAFER HD 5P S T 2 0mm WHITE PINREX 721 81 05TW00 5 pin INV1 Connect the backlight inverter power cable to this connector NOTE The backlight inverter power cable is purchased separately EPC CV1 Series PS 2 keyboard mouse connector MS_DATA GND KB_DATA MS_CLK 5V KB_CLK KBMS1 PIN 1 VCC_LVDS1_BKLT L_BRIGHTNESS1 GND GND BKLT_EN EPC CV1 Series Backlight inverter power connector INV1 ...

Page 28: ...PIN 1 LOUTP LOUTN ROUTN ROUTP AMP_CON1 EPC CV1 Series Speaker out connector 14 VGA connector BOX HEADER 2X8P S T 2 0mm SMT PINREX 52M 90 16GBE0 16 pin VGA This 16 pin connector is for a VGA monitor or other VGA compatible devices PIN 1 VGA 5V GND NC RDDCA_DATA_R R_HSYNC R_VSYNC RDDCA_CLK_R GND DAC_R DAC_G DAC_B NC GND NC GND GND EPC CV1 Series VGA connector ...

Page 29: ...onnector is for the lithium CMOS battery EPC CV1 Series LVDS connector LVDS1 PIN 1 L_BRIGHTNESS1 LVDSB_L0N_GPU LVDSB_L0P_GPU GND LVDSB_L1N_GPU LVDSB_L1P_GPU GND LVDSB_L2N_GPU LVDSB_L2P_GPU LDDC_CLK LVDSB_L3N_GPU LVDSB_L3P_GPU GND LVDSB_LCLKN_GPU BKLT_EN LVDS_DN0 LVDS_DP0 VDD_LVDS1 LVDS_DN1 LVDS_DP1 VDD_LVDS1 LVDS_DN2 LVDS_DP2 LDDC_DATA LVDS_DN3 LVDS_DP3 VDD_LVDS1 LVDS_CLKN LVDS_CLKP LVDSB_LCLKP_GP...

Page 30: ...an be individually programmed to support various devices NOTE To configure the I O pins in BIOS go to the Advanced tab DIO Function GPIO 1 8 See section 3 4 6 DIO Function for details EPC CV1 Series Digital I O connector PIN 1 DIO1 DIO_P 1 GPIO80 DIO_P 3 GPIO82 DIO_P 5 GPIO84 DIO_P 7 GPIO86 5V DIO_P 2 GPIO81 DIO_P 4 GPIO83 DIO_P 6 GPIO85 DIO_P 8 GPIO87 GND ...

Page 31: ...from a running operating system can cause damage to your data or system We recommend to always shut down the system properly from the operating system IMPORTANT The default BIOS settings for this motherboard apply for most conditions to ensure optimum performance If the system becomes unstable after changing any BIOS settings load the default settings to ensure system compatibility and stability S...

Page 32: ...n has the following main items Main For changing the basic system configuration Advanced For changing the advanced system settings Monitor For displaying the system temperature power status and changing the fan settings Boot For changing the system boot configuration Tool For configuring options for special functions Exit For selecting the exit options and loading default settings 3 2 BIOS menu sc...

Page 33: ...d press Enter Pop up window Select a menu item and press Enter to display a pop up window with the configuration options for that item Navigation keys At the bottom right corner of the menu screen are the navigation keys for the BIOS setup program Use the navigation keys to select items in the menu and change the settings General help At the top right corner of the menu screen is a brief descripti...

Page 34: ...e system time 3 3 4 Security The Security menu items allow you to change the system security settings NOTES If you have forgotten your BIOS password erase the CMOS Real Time Clock RTC RAM to clear the BIOS password See section 2 6 Jumpers for information on how to erase the RTC RAM The Administrator or User Password items on top of the screen show the default Not Installed After you set a password...

Page 35: ...er when prompted to create confirm the password After you clear the password the Administrator Password item on top of the screen shows Not Installed User Password If you have set a user password you must enter the user password for accessing the system The User Password item on top of the screen shows the default Not Installed After you set a password this item shows Installed To set a user passw...

Page 36: ...ology allows a hyper threading processor to appear as two logical processors to the operating system allowing the operating system to schedule two threads or processes simultaneously Enabled Two threads per activated core are enabled Disabled Only one thread per activated core is enabled Limit CPUID Maximum Disabled Enabled Allows legacy operating systems to boot even without support for CPUs with...

Page 37: ...al ATA features that increases storage performance on random workloads by allowing the drive to internally optimize the order of commands 3 4 3 USB Configuration The items in this menu allow you to change the USB related features NOTE The USB Devices item shows the auto detected values If no USB device is detected the item shows None EHCI Hand off Disabled Enabled Enables the support for operating...

Page 38: ...024x768 Allows you to configure the resolution for the LVDS panel Configuration options 800x600 18bit 800x480 18bit 1024x768 24bit 1280x800 18bit 1280x1024 48bit 1440x900 48bit 1680x1050 48bit 1920x1080 48bit EDID Panel Option Enabled Enables or disables the EDID panel Configuration options Enabled Disabled 3 4 8 Onboard Devices Configuration Onboard WLAN Enabled Enabled Enables the onboard wirele...

Page 39: ...ature power status and allows you to change the fan settings 3 5 1 CPU Temperature MB Temperature xxxo C xxxo F The onboard hardware monitor automatically detects and displays the CPU and motherboard temperatures Select Ignore if you do not wish to display the detected temperatures 3 5 2 Chassis Fan Speed xxxx RPM or N A The onboard hardware monitor automatically detects and displays the chassis f...

Page 40: ...djust depending on the chassis temperature Silent Sets to Silent to minimize the fan speed for quiet chassis fan operation Turbo Sets to Turbo to achieve maximum chassis fan speed 3 5 4 CPU Voltage 3 3V Voltage 5V Voltage 12V Voltage The onboard hardware monitor automatically detects the voltage output through the onboard voltage regulators Select Ignore if you do not want to detect this item 3 6 ...

Page 41: ...s on the screen depends on the number of devices installed in the system NOTES To select the boot device during system startup press F8 after the first screen appears To access Windows OS in Safe Mode press F8 after POST 3 6 5 Boot Override These items displays the available devices The number of device items that appears on the screen depends on the number of devices installed in the system Click...

Page 42: ...n or if you press F5 a confirmation window appears Select Yes to load the default values Save Changes Reset Once you are finished making your selections choose this option from the Exit menu to ensure the values you selected are saved When you select this option or if you press F10 a confirmation window appears Select Yes to save changes and exit Discard Changes Exit This option allows you to exit...

Page 43: ...uipment off and on the user is encouraged to try to correct the interference by one or more of the following measures Reorient or relocate the receiving antenna Increase the separation between the equipment and receiver Connect the equipment to an outlet on a circuit different from that to which the receiver is connected Consult the dealer or an experienced radio TV technician for help WARNING The...

Page 44: ...產造成嚴重損害的期限 部件名稱 有害物質或元素 鉛 Pb 汞 Hg 鎘 Cd 六 價 鉻 Cr VI 多 溴 聯 苯 PBB 多 溴 二 苯 醚 PBDE 印刷電路板及其 電子組件 外部信號連接頭 及線材 有毒有害物質或元素的名稱及含量說明標示 表示該有毒有害物質在該部件所有均質材料中的含量均在 SJ T 11363 2006 標准規定的限量要求以下 表示該有毒有害物質至少在該部件的某一均質材料中的含量超出 SJ T 11363 2006 標准規定的限量要求 然該部件仍符合歐盟指令 2002 95 EC 的 規范 備註 此產品所標示之環保使用期限 係指在一般正常使用狀況下 ...

Reviews: