N e t w o r k Ap p l i a n c e
F W S - 2 2 0 0
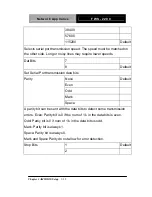
Stop bits indicate the end of a serial data packet. (A start bit indicates the
beginning).
The standard setting is 1 stop bit. Communication with slow devices may
require more than 1 stop bit.
None Default
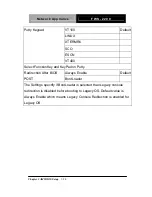
Flow Control
Hardware RTS/CTS
Flow control can prevent data loss from buffer overflow. When sending
data, if the receiving buffers are full, a ‘stop’ signal can be sent to stop the
data flow. Once the buffers are empty, a ‘start’ signal can be sent to
re-start the flow. Hardware flow control uses two wires to send start/stop
signals.
Disabled
VT-UTF8 Combo Key
Support
Enabled Default
Enable VT-UTF8 Combination Key Support for ANSI/VT100 terminals.
Disabled Default
Recorder Mode
Enabled
On this mode enabled only text will be send. This is to capture Terminal
data.
Disabled Default
Resolution 100x31
Enabled
Enables or disables extended terminal resolution.
80x24 Default
Legacy OS Redirection
Resolution
80x25
On Legacy OS, the Number of Rows and Columns supported redirection.
Chapter 3 AMI BIOS Setup
3-23
Summary of Contents for FWS-2200
Page 34: ...Network Appliance F W S 2 2 0 0 Chapter 3 AMI BIOS Setup 3 1 AMI Chapter 3 BIOS Setup...
Page 37: ...Network Appliance F W S 2 2 0 0 Setup Menu Main Chapter 3 AMI BIOS Setup 3 4...
Page 38: ...Network Appliance F W S 2 2 0 0 Advanced Chapter 3 AMI BIOS Setup 3 5...
Page 46: ...Network Appliance F W S 2 2 0 0 Super IO Configuration Chapter 3 AMI BIOS Setup 3 13...
Page 47: ...Network Appliance F W S 2 2 0 0 Serial Port Configuration Chapter 3 AMI BIOS Setup 3 14...
Page 50: ...Network Appliance F W S 2 2 0 0 H W Monitor Chapter 3 AMI BIOS Setup 3 17...
Page 58: ...Network Appliance F W S 2 2 0 0 Chipset Chapter 3 AMI BIOS Setup 3 25...
Page 59: ...Network Appliance F W S 2 2 0 0 North Bridge Chapter 3 AMI BIOS Setup 3 26...
Page 64: ...Network Appliance F W S 2 2 0 0 BBS Priorities Chapter 3 AMI BIOS Setup 3 31...
Page 79: ...Network Appliance F W S 2 2 0 0 Appendix B I O Information B 1 I O Information Appendix B...
Page 80: ...Network Appliance F W S 2 2 0 0 Appendix B I O Information B 2 B 1 I O Address Map...
Page 81: ...Network Appliance F W S 2 2 0 0 Appendix B I O Information B 3...
Page 82: ...Network Appliance F W S 2 2 0 0 Appendix B I O Information B 4 B 2 Memory Address Map...
Page 83: ...Network Appliance F W S 2 2 0 0 Appendix B I O Information B 5 B 3 IRQ Mapping Chart...
Page 84: ...Network Appliance F W S 2 2 0 0 Appendix B I O Information B 6...
Page 85: ...Network Appliance F W S 2 2 0 0 Appendix B I O Information B 7...
Page 86: ...Network Appliance F W S 2 2 0 0 Appendix B I O Information B 8 B 4 DMA Channel Assignments...
Page 102: ...Network Appliance F W S 2 2 0 0 Appendix D AHCI Settings D 1 AHCI Settings Appendix D...
Page 106: ...Network Appliance F W S 2 2 0 0 Appendix D AHCI Settings D 5 Step 7 Press F6 Step 8 Choose S...
Page 108: ...Network Appliance F W S 2 2 0 0 Appendix D AHCI Settings D 7 Step 11 Setup is loading files...


