background image


Chapter 3 

 AMI BIOS Setup 


68


Pico
-IT

X Bo

ar


PIC
O

-E

HL

4-

A11


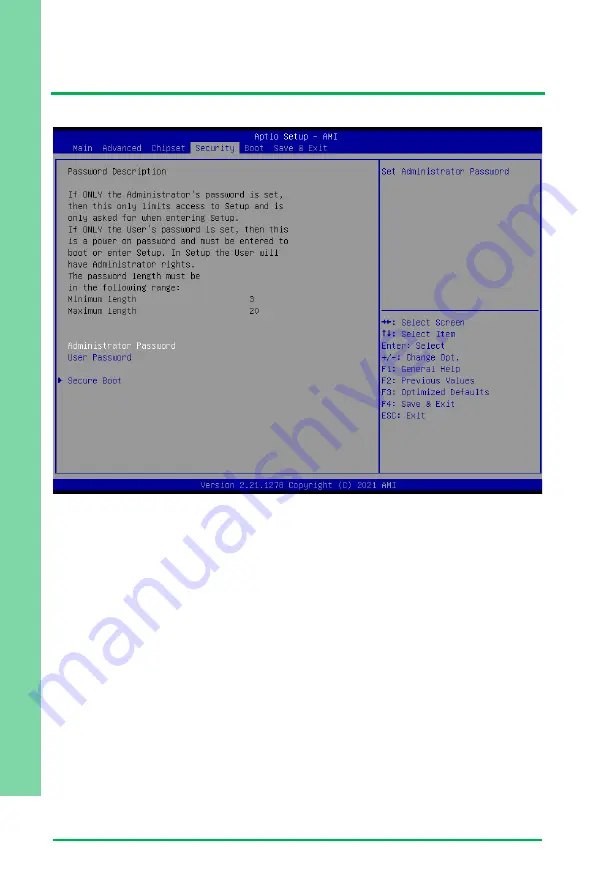
3.6  Setup Submenu: Security 


Change User/Supervisor Password 

You can install a Supervisor password, and if you install a supervisor password, you can 

then install a user password. A user password does not provide access to many of the 

features in the Setup utility. 

If you highlight these items and press Enter, a dialog box appears which lets you enter a 

password. You can enter no more than six letters or numbers. Press Enter after you 

have typed in the password. A second dialog box asks you to retype the password for 

confirmation. Press Enter after you have retyped it correctly. The password is required 

at boot time, or when the user enters the Setup utility. 

Removing the Password 

Highlight this item and type in the current password. At the next dialog box press Enter 

to disable password protection. 


Summary of Contents for PICO-EHL4-A11

Page 1: ...Last Updated August 24 2022 PICO EHL4 A11 PICO ITX Single Board Computer User s Manual 1st Ed...

Page 2: ...in this manual is intended to be accurate and reliable However the original manufacturer assumes no responsibility for its use or for any infringements upon the rights of third parties that may result...

Page 3: ...e registered trademarks of Intel Corporation Intel Atom is a trademark of Intel Corporation ITE is a trademark of Integrated Technology Express Inc IBM PC AT PS 2 and VGA are trademarks of Internation...

Page 4: ...acking List Before setting up your product please make sure the following items have been shipped Item Quantity PICO EHL4 A11 1 If any of these items are missing or damaged please contact your distrib...

Page 5: ...descriptions and explanations on the product s hardware and software features if any its specifications dimensions jumper connector settings definitions and driver installation instructions if any to...

Page 6: ...ansient over voltage 7 Always disconnect this device from any AC supply before cleaning 8 While cleaning use a damp cloth instead of liquid or spray detergents 9 Make sure the device is installed near...

Page 7: ...intrusion to the device iii Exposure to moisture iv Device is not working as expected or in a manner as described in this manual v The device is dropped or damaged vi Any obvious signs of damage disp...

Page 8: ...losion if the battery is incorrectly replaced Replace only with the same or equivalent type recommended by the manufacturer Dispose of used batteries according to the manufacturer s instructions and y...

Page 9: ...Preface IX Pico ITX Board PICO EHL4 A11 China RoHS Requirements CN AAEON Main Board Daughter Board Backplane Pb Hg Cd Cr VI PBB PBDE O SJ T 11363 2006 X SJ T 11363 2006...

Page 10: ...nyl Ethers PBDE PCB Other Components O O O O O Wires Connectors for External Connections O O O O O O O The quantity of poisonous or hazardous substances or elements found in each of the component s pa...

Page 11: ...ttery Connector CN1 13 2 4 2 LVDS Back Light Inverter CN2 13 2 4 3 LVDS eDP Reserved CN3 14 2 4 4 Dual HDMI CN4 16 2 4 5 Dual RJ45 CN5 19 2 4 6 SATA Port CN6 21 2 4 7 5V SATA Power Connector CN7 21 2...

Page 12: ...nd Initialization 42 3 2 AMI BIOS Setup 43 3 3 Setup Submenu Main 44 3 4 Setup Submenu Advanced 45 3 4 1 CPU Configuration 46 3 4 2 PCH FW Configuration 47 3 4 2 1 Firmware Update Configuration 48 3 4...

Page 13: ...s 77 A 1 List of Mating Connectors and Cables 78 Appendix B I O Information 80 B 1 Direct Memory Access DMA Map 81 B 2 I O Address Map 82 B 3 IRQ Mapping Chart 83 B 4 Large Memory Map 94 B 5 Memory Ad...

Page 14: ...Preface XIV Pico ITX Board PICO EHL4 A11 C 3 1 6 EapiWDogGetStatus 104 C 3 1 7 EapiWDogSetStatus 105...

Page 15: ...Pico ITX Board PICO EHL4 A11 Chapter 1 Chapter 1 Product Specifications...

Page 16: ...W Intel Atom x6211E 2C 1 2GHz up to 3GHz TDP 6W Intel Pentium J6426 4C 1 8GHz up to 3GHz TDP 10W Intel Pentium N6415 4C 1 2GHz up to 3GHz TDP up 6 5W Intel Celeron J6412 4C 1 8GHz up to 3GHz TDP 10W I...

Page 17: ...onboard 16GB 2 48A 12V Typical Intel Atom x6425E LPDDR4x onboard 16GB 2 62A 12V Max Display Controller Intel Atom x6000E series Intel Pentium and Celeron N and J series processors LVDS eDP eDP x 1 up...

Page 18: ...Front Panel HDD LED PWR LED Power Button Buzzer Reset Expansion Mini PCI E mSATA Full size mPCIe mSATA x 1 SATA as default PCIe selected by BIOS M 2 M 2 E Key 2230 x 1 PCIe x1 USB 2 0 Others CANBUS x...

Page 19: ...Chapter 1 Product Specifications 5 Pico ITX Board PICO EHL4 A11 1 2 Function Block Diagram...

Page 20: ...Pico ITX Board PICO EHL4 A11 Chapter 2 Chapter 2 Hardware Information...

Page 21: ...Chapter 2 Hardware Information 7 Pico ITX Board PICO EHL4 A11 2 1 Dimensions...

Page 22: ...Chapter 2 Hardware Information 8 Pico ITX Board PICO EHL4 A11...

Page 23: ...Chapter 2 Hardware Information 9 Pico ITX Board PICO EHL4 A11 2 2 Jumpers and Connectors Component Side...

Page 24: ...Chapter 2 Hardware Information 10 Pico ITX Board PICO EHL4 A11 Solder Side...

Page 25: ...cation needs Please refer to the table below for all of the board s jumpers that you can configure for your application Label Function JP1 Clear CMOS Jumper Auto Power Button Enable Disable 2 3 1 Clea...

Page 26: ...VDS Back Light Inverter CN3 LVDS eDP Reserved CN4 Dual HDMI CN5 Dual RJ45 CN6 SATA CN7 SATA Power CN8 4 bit DIO Header CN9 USB 2 0 3 2 GEN 2 Port1 Port2 CN10 USB 2 0 Header Support 2 ports CN11 mSATA...

Page 27: ...C Battery Connector CN1 Pin Pin Name Signal Type Signal Level 1 3 3V PWR 3 3V 2 GND GND 2 4 2 LVDS Back Light Inverter CN2 Pin Pin Name Signal Type Signal Level 1 BLK_PWR PWR 12V Default 5V 2 BLK_PWR...

Page 28: ...lt is 12V Note 2 CN2 max current 2A 2 4 3 LVDS eDP Reserved CN3 Pin Pin Name Signal Type Signal Level 1 GND GND 2 LVD1_CB_3_DP DIFF 3 LVD1_CB_3_DN DIFF 4 GND GND 5 LVD1_CB_CLKP DIFF 6 LVD1_CB_CLKN DIF...

Page 29: ...L DDI0_BKLTCTL Signal 22 GND GND 23 LVD1_CA_CLKP DDI0_AUX_DP DIFF 24 LVD1_CA_CLKN DDI0_AUX_DN DIFF 25 GND GND 26 LVD1_CA_3_DP DDI0_LANE3_DP DIFF 27 LVD1_CA_3_DN DDI0_LANE3_DN DIFF 28 GND GND 29 LVD1_C...

Page 30: ...Signal Type Signal Level 38 VDD PWR 3 3V 39 VDD PWR 3 3V 40 VDD PWR 3 3V Note CN3 VDD power current max 1 5A 2 4 4 Dual HDMI CN4 Pin Pin Name Signal Type Signal Level 1 HDMI_TX2 DIFF 2 GND GND 3 HDMI_...

Page 31: ...DIFF 11 GND GND 12 HDMI_CLK DIFF 13 NC 14 NC 15 DDC_CLK I O 5V 16 DDC_DATA I O 5V 17 GND GND 18 5V PWR 5V 19 HDMI_HPD 20 HDMI_TX2 DIFF 21 GND GND 22 HDMI_TX2 DIFF 23 HDMI_TX1 DIFF 24 GND GND 25 HDMI_...

Page 32: ...Chapter 2 Hardware Information 18 Pico ITX Board PICO EHL4 A11 Pin Pin Name Signal Type Signal Level 35 DDC_DATA I O 5V 36 GND GND 37 5V PWR 5V 38 HDMI_HPD...

Page 33: ...AN1_MDI0 DIFF 1P2 LAN1_MDI0 DIFF 1P3 LAN1_MDI1 DIFF 1P4 LAN1_MDI1 DIFF 1P5 GND GND 1P6 GND GND 1P7 LAN1_MDI2 DIFF 1P8 LAN1_MDI2 DIFF 1P9 LAN1_MDI3 DIFF 1P10 LAN1_MDI3 DIFF 1L1 LAN1_LED_LNK _ACT Signal...

Page 34: ...A11 Pin Pin Name Signal Type Signal Level 2P4 LAN2_MDI1 DIFF 2P5 GND GND 2P6 GND GND 2P7 LAN2_MDI2 DIFF 2P8 LAN2_MDI2 DIFF 2P9 LAN2_MDI3 DIFF 2P10 LAN2_MDI3 DIFF 2L1 LAN2_LED_LNK _ACT Signal 2L2 V3P3A...

Page 35: ...t CN6 Pin Pin Name Signal Type Signal Level 1 GND GND 2 SATA_1_TXP DIFF 3 SATA_1_TXN DIFF 4 GND GND 5 SATA_1_RXN DIFF 6 SATA_1_RXP DIFF 7 GND GND 2 4 7 5V SATA Power Connector CN7 Pin Pin Name Signal...

Page 36: ...ation 22 Pico ITX Board PICO EHL4 A11 2 4 8 DIO 4 bit Header CN8 Pin Pin Name Signal Type Signal Level 1 V5S VDD 5V 2 DIO_0 Signal 3 DIO_1 Signal 4 DIO_2 Signal 5 DIO_3 Signal 6 GND GND GND Note CN8 D...

Page 37: ...rt2 CN9 Pin Pin Name Signal Type Signal Level 1 V5A_USB12 PWR 5V 2 USB2_0_DN DIFF 3 USB2_0_DP DIFF 4 GND GND 5 USB3_0_RXN DIFF 6 USB3_0_RXP DIFF 7 GND GND 8 USB3_0_TXN DIFF 9 USB3_0_TXP DIFF 10 V5A_US...

Page 38: ...TXP DIFF Note CN9 USB Power max current 2 0A 1 0A for each port 2 4 10 USB 2 0 Dual Port Header CN10 Pin Pin Name Signal Type Signal Level 1 V5A_USB34 PWR 5V 2 V5A_USB34 PWR 5V 3 USB2_2_DN DIFF 4 USB2...

Page 39: ...HL4 A11 2 4 11 mSATA Mini Card Slot CN11 Pin Pin Name Signal Type Signal Level 1 PCIE_WAKE IN 2 3 3V PWR 3 3V 3 NC 4 GND GND 5 NC 6 1 5V PWR 1 5V 7 PCIE_CLK_REQ IN 8 NC 9 GND GND 10 NC 11 PCIE_REF_CLK...

Page 40: ...1 GND GND 22 PCIE_RST OUT 3 3V 23 PCIE_RX SATA_RX DIFF 24 3 3V PWR 3 3V 25 PCIE_RX SATA_RX DIFF 26 GND GND 27 GND GND 28 1 5V PWR 1 5V 29 GND GND 30 SMB_CLK I O 3 3V 31 PCIE_TX SATA_TX DIFF 32 SMB_DAT...

Page 41: ...in Name Signal Type Signal Level 43 GND GND 44 NC 45 NC 46 NC 47 NC 48 1 5V PWR 1 5V 49 NC 50 GND GND 51 NC 52 3 3V PWR 3 3V 2 4 12 M 2 E Key Slot CN12 Pin Pin Name Signal Type Signal Level 1 GND GND...

Page 42: ...PICO EHL4 A11 Pin Pin Name Signal Type Signal Level 6 NC 7 GND GND 8 NC 9 NC 10 NC 11 NC 12 NC 13 NC 14 NC 15 NC 16 NC 17 NC 18 GND GND 19 NC 20 NC 21 NC 22 NC 23 NC 32 NC 33 GND GND 34 NC 35 PCIE_2_T...

Page 43: ...41 PCIE_2_RXP DIFF 42 NC 43 PCIE_2_RXN GND 44 NC 45 GND GND 46 NC 47 PCIE_0_CLK_DP DIFF 48 NC 49 PCIE_0_CLK_DN DIFF 50 NC 51 GND GND 52 BUF_PLT_RST Signal 53 PCIE_CLKREQ 0 Signal 54 SOC_BT_EN Signal...

Page 44: ...l Type Signal Level 66 NC 67 NC 68 NC 69 GND GND 70 NC 71 NC 72 V3P3A PWR 3 3V 73 NC 74 V3P3A PWR 3 3V 75 GND GND 2 4 13 CAN Bus Dual Port Header CN13 Pin Pin Name Signal Type Signal Level 1 V5A PWR 5...

Page 45: ...CN15 Pin RS232 Signal RS422 Signal RS485 Signal 1 DCD_1 TX_1 DATA_1 2 DCD_2 TX_2 DATA_2 3 RX_1 TX_1 DATA_1 4 RX_2 TX_2 DATA_2 5 TX_1 RX_1 6 TX_2 RX_2 7 DTR_1 RX_1 8 DTR_2 RX_2 9 GND GND GND 10 GND GN...

Page 46: ...IOS Default is RS 232 Note 2 RI1 5V 12V can be set by BOM R423 RI R369 12V R370 5V Default is RING Note 3 RI2 5V 12V can be set by BOM R424 RI R372 12V R373 5V Default is RING Note 4 Max current 0 5A...

Page 47: ...ame Signal Type Signal Level 1 ESPI_IO0 IN OUT 1 8V 2 ESPI_IO1 IN OUT 1 8V 3 ESPI_IO2 IN OUT 1 8V 4 ESPI_IO3 IN OUT 1 8V 5 V3 3S PWR 3 3V 6 ESPI_CS Signal 7 ESPI_RESET OUT 1 8V 8 GND GND 9 ESPI_CLK OU...

Page 48: ...17 4 pin Smart Fan Connector CN19 Pin Pin Name Signal Type Signal Level 1 GND GND 2 V12S PWR 12V 3 FAN_TAC Signal 4 FAN_CTL Signal Note CN19 Smart Fan power max current 1 0A 2 4 18 Power Input 12V CN...

Page 49: ...Pico ITX Board PICO EHL4 A11 2 4 19 Front Panel CN21 Pin Pin Name Signal Type Signal Level 1 GND GND 2 EXT_PWRBTN Signal 3 FP_IDELED Signal 4 V3P3S PWR 3 3V 5 FP_BUZZER Signal 6 V5S PWR 5V 7 GND 8 V3P...

Page 50: ...Chapter 2 Hardware Information 36 Pico ITX Board PICO EHL4 A11 2 4 20 DC Jack Power Input Reserved CN22 Pin Pin Name Signal Type Signal Level 1 V_IN PWR 12V 2 GND GND 3 GND GND...

Page 51: ...Name Signal Type Signal Level 1P1 LAN1_MDI0 DIFF 1P2 LAN1_MDI0 DIFF 1P3 LAN1_MDI1 DIFF 1P4 LAN1_MDI1 DIFF 1P5 GND GND 1P6 GND GND 1P7 LAN1_MDI2 DIFF 1P8 LAN1_MDI2 DIFF 1P9 LAN1_MDI3 DIFF 1P10 LAN1_MDI...

Page 52: ...Chapter 2 Hardware Information 38 Pico ITX Board PICO EHL4 A11 2 5 Thermal Assembly Options 2 5 1 Active Cooling Fan FAN01 Active Cooling Fan Part Number PICO EHL4 FAN01...

Page 53: ...Chapter 2 Hardware Information 39 Pico ITX Board PICO EHL4 A11 2 5 2 Fan less Heatspreader HSP01 Heat spreader fan less assembly Part Number PICO EHL4 HSP01...

Page 54: ...Chapter 2 Hardware Information 40 Pico ITX Board PICO EHL4 A11 2 5 3 Heatsink HSK01 with Heatspreader Heatsink with heatspreader Part Number PICO EHL4 HSK01...

Page 55: ...Pico ITX Board PICO EHL4 A11 Chapter 3 Chapter 3 AMI BIOS Setup...

Page 56: ...memory and BIOS NVRAM If system configuration is not found or a system configuration data error is detected the system will load optimized default and re boot with this default system configuration a...

Page 57: ...that it retains the Setup information when the power is turned off Entering Setup Power on the computer and press Del or ESC immediately This will allow you to enter Setup Main Set the date use tab to...

Page 58: ...Chapter 3 AMI BIOS Setup 44 Pico ITX Board PICO EHL4 A11 3 3 Setup Submenu Main...

Page 59: ...Chapter 3 AMI BIOS Setup 45 Pico ITX Board PICO EHL4 A11 3 4 Setup Submenu Advanced...

Page 60: ...ive Processor Cores All Optimal Default Failsafe Default 1 N Number of cores to enable in each processor package Intel VMX Virtualization Technology Disabled Enabled Optimal Default Failsafe Default W...

Page 61: ...Chapter 3 AMI BIOS Setup 47 Pico ITX Board PICO EHL4 A11 3 4 2 PCH FW Configuration...

Page 62: ...1 Firmware Update Configuration Options Summary Me FW Image Re Flash Enabled Disabled Optimal Default Failsafe Default Enable Disable Me FW Image Re Flash function FW Update Disabled Enabled Optimal...

Page 63: ...security device O S will not show Security Device TCG EFI protocol and INT1A interface will not be available SHA 1 PCR Bank Disabled Optimal Default Failsafe Default Enabled Enable or Disable SHA 1 PC...

Page 64: ...hy Endorsement Hierarchy Enabled Optimal Default Failsafe Default Disabled Enable or Disable Endorsement Hierarchy TPM 2 0 UEFI Spec Version TCG_2 Optimal Default Failsafe Default TCG_1_2 Select the T...

Page 65: ...oard PICO EHL4 A11 3 4 4 SATA Configuration Options Summary SATA Controller s Enabled Optimal Default Failsafe Default Disabled Enable Disable SATA Device Port Enabled Optimal Default Failsafe Default...

Page 66: ...led Optimal Default Failsafe Default Disabled Enable or Disable SCS eMMC 5 1 Controller SDIO Access Mode Auto Optimal Default Failsafe Default ADMA SDMA Auto Option Access SD device in DMA mode if con...

Page 67: ...Chapter 3 AMI BIOS Setup 53 Pico ITX Board PICO EHL4 A11 3 4 6 Hardware Monitor...

Page 68: ...mode push pull to control 4 wire fans Linear fan application circuit to control 3 wire fan speed by fan s power terminal Output PWM mode open drain to control Intel 4 wire fans Fan1 Smart Fan control...

Page 69: ...Chapter 3 AMI BIOS Setup 55 Pico ITX Board PICO EHL4 A11 3 4 7 SIO Configuration...

Page 70: ...This Device Disabled Enabled Optimal Default Failsafe Default Enable or Disable Serial Port COM Possible Use Automatic Settings Optimal Default Failsafe Default IO 2F8 IRQ 3 IO 3F8 IRQ 4 Select an opt...

Page 71: ...lear WDT on completion of POST WDT will reset system automatically if it is not cleared before its timer counts down to zero POST Timer second 30 Optimal Default Failsafe Default Timer count set to Wa...

Page 72: ...ot does this before Sends watch dog Delayed time second 10 Optimal Default Failsafe Default Period of time for Robot to hold BIOS from POST Delayed POST DXE phase Disabled Optimal Default Failsafe Def...

Page 73: ...e Optimal Default Failsafe Default Always On Always Off Select power state when power is re applied after a power failure RTC wake system from S5 Disabled Optimal Default Failsafe Default Fixed Time D...

Page 74: ...CO EHL4 A11 3 4 10 Digital IO Port Configuration Options Summary DIO Port0 3 Output Optimal Default Failsafe Default Input Set DIO as Input or Output Output Level High Optimal Default Failsafe Default...

Page 75: ...Chapter 3 AMI BIOS Setup 61 Pico ITX Board PICO EHL4 A11 3 5 Setup Submenu Chipset...

Page 76: ...Chapter 3 AMI BIOS Setup 62 Pico ITX Board PICO EHL4 A11 3 5 1 System Agent SA Configuration...

Page 77: ...Chapter 3 AMI BIOS Setup 63 Pico ITX Board PICO EHL4 A11 3 5 1 1 Memory Configuration...

Page 78: ...MI BIOS Setup 64 Pico ITX Board PICO EHL4 A11 3 5 1 2 Graphics Configuration Options Summary Internal Graphics Auto Optimal Default Failsafe Default Disabled Enabled Keep IGFX enabled based on the set...

Page 79: ...ns Summary LVDS Disabled Enabled Optimal Default Failsafe Default Enable Disable this panel LVDS Panel Type 640X480 60HZ 800X480 60HZ 800X600 60HZ 1024X600 60HZ 1024X768 60HZ Optimal Default Failsafe...

Page 80: ...BIOS Application Select backlight control signal type Backlight Type Normal Optimal Default Failsafe Default Inverted Select backlight control signal type Backlight Level 0 10 20 30 40 50 60 70 80 Op...

Page 81: ...Enabled Optimal Default Failsafe Default Disabled Control Detection of the HD Audio device Disabled HDA will be unconditionally disabled Enabled HDA will be unconditionally enabled Full MiniCard Slot...

Page 82: ...ghlight these items and press Enter a dialog box appears which lets you enter a password You can enter no more than six letters or numbers Press Enter after you have typed in the password A second dia...

Page 83: ...is in User mode The mode change requires platform reset Secure Boot Mode Standard Custom Optimal Default Failsafe Default Secure Boot mode options Standard or Custom In Custom mode Secure Boot Policy...

Page 84: ...tem is in Setup mode Restore Factory Keys Force System to User Mode Install factory default Secure Boot key databases Reset To Setup Mode Delete all Secure Boot key databases from NVRAM Export Secure...

Page 85: ...ized Signature database db Restore DB defaults Restore DB variable to factory defaults Secure Boot Variables Enroll Factory Defaults or load certificates from a file 1 Public Key Certificate in a EFI_...

Page 86: ...ult Enable or Disable Quiet Boot option Network Stack Disabled Optimal Default Failsafe Default Enabled Enable Disable UEFI Network Stack IPv4 PXE Support Disabled Optimal Default Failsafe Default Ena...

Page 87: ...A11 3 8 Setup Submenu Save Exit Options Summary Save Changes and Reset Reset the system after saving the changes Discard Changes and Exit Exit system setup without saving any changes Restore Defaults...

Page 88: ...Pico ITX Board PICO EHL4 A11 Chapter 4 Chapter 4 Drivers Installation...

Page 89: ...need and follow the steps below to install them Step 1 Install Chipset Driver 1 Open the Intel Chipset folder 2 Run the SetupChipset exe file 3 Follow the instructions 4 Drivers will be installed aut...

Page 90: ...5 Install LAN Driver 1 Open the LAN folder 2 Run the Install_Win10_10050_08132021 exe file 3 Follow the instructions 4 Driver will be installed automatically Step 6 Peripheral Drivers 1 Open the Peri...

Page 91: ...Pico ITX Board PICO EHL4 A11 Appendix A Appendix A Mating Connectors...

Page 92: ...00152 CN3 LVDS I PEX 20453 040T 11 LVDS Cable 170X000532 EDP EDP Cable 170X000531 CN6 SATA Molex 887505318 SATA Cable 1709070500 CN7 SATA Power JST PHR 2 SATA Power Cable 1702150155 CN8 4 bit DIO Head...

Page 93: ...0H0H0 001 Front Panel Cable 1709100108 CN22 DC Jack Power Input HUANG JI 5525C257 3T00 R1 7 5 Power Cable 1702041004 Note 1 eDP Test Panel B173ZAN01 0 AUO LVDS Test Panel G121XN01V0 AUO Note 2 170X000...

Page 94: ...Pico ITX Board PICO EHL4 A11 Appendix B Appendix B I O Information...

Page 95: ...Appendix B I O Information 81 Pico ITX Board PICO EHL4 A11 B 1 Direct Memory Access DMA Map...

Page 96: ...Appendix B I O Information 82 Pico ITX Board PICO EHL4 A11 B 2 I O Address Map...

Page 97: ...Appendix B I O Information 83 Pico ITX Board PICO EHL4 A11 B 3 IRQ Mapping Chart...

Page 98: ...Appendix B I O Information 84 Pico ITX Board PICO EHL4 A11...

Page 99: ...Appendix B I O Information 85 Pico ITX Board PICO EHL4 A11...

Page 100: ...Appendix B I O Information 86 Pico ITX Board PICO EHL4 A11...

Page 101: ...Appendix B I O Information 87 Pico ITX Board PICO EHL4 A11...

Page 102: ...Appendix B I O Information 88 Pico ITX Board PICO EHL4 A11...

Page 103: ...Appendix B I O Information 89 Pico ITX Board PICO EHL4 A11...

Page 104: ...Appendix B I O Information 90 Pico ITX Board PICO EHL4 A11...

Page 105: ...Appendix B I O Information 91 Pico ITX Board PICO EHL4 A11...

Page 106: ...Appendix B I O Information 92 Pico ITX Board PICO EHL4 A11...

Page 107: ...Appendix B I O Information 93 Pico ITX Board PICO EHL4 A11...

Page 108: ...Appendix B I O Information 94 Pico ITX Board PICO EHL4 A11 B 4 Large Memory Map...

Page 109: ...Appendix B I O Information 95 Pico ITX Board PICO EHL4 A11 B 5 Memory Address Map...

Page 110: ...Appendix B I O Information 96 Pico ITX Board PICO EHL4 A11...

Page 111: ...Pico ITX Board PICO EHL4 A11 Appendix C Appendix C Watchdog Timer Programming...

Page 112: ...ly send a signal to reset the watchdog timer If the system does not reset the watchdog timer it will timeout and force the system into recovery and or reboot The following sections refer to additional...

Page 113: ...DK is installed and double click the icon The following dialog box will appear Count Mode Set Watchdog Timer to count in minutes or seconds Time Count The length of time in minutes or seconds before t...

Page 114: ...or C C based app make sure the lib files and executable files are in the same folder The following shows how to build and run codes There are two scenarios to invoke Watchdog Timer functions 1 Use EAp...

Page 115: ...to get maximum Supported Delay Supported Event Timeout Supported Reset Timeout of the watchdog timer Parameters Function Parameters pMaxDelay Maximum Supported Delay in milliseconds pMaxEvenTimeout M...

Page 116: ...n with new values to restart If the hardware implementation of the watchdog timer does not allow the user to select the exact time they want the EAPI will select the next longer time setting available...

Page 117: ...EAPI_STATUS_NOT_INITIALIZED Watchdog Not Started EAPI_STATUS_ERROR Common Error Common Error Code Others EAPI_STATUS_SUCCESS C 3 1 4 EapiWDogStop Command Line EapiWDogStop Use this command to close th...

Page 118: ...API_STATUS_SUCCESS C 3 1 6 EapiWDogGetStatus Command Line EapiWDogGetStatus __OUTOPT uint32_t pwdtMinute __OUTOPT uint32_t pwdtCountTime __OUTOPT uint32_t pwdtReloadTime Use this command to get the Wa...

Page 119: ...__IN uint32_t wdtReloadTime Use this command to set Watchdog Timer mode time count value and reload timer Parameters Function Parameters wdtMinute Set the mode of minute or second wdtCountTime Set WD...

Reviews: