37
RotoClone
®
W
© 2015 American Air Filter Company, Inc. Any use of the text or images
this document contains, without permission of American Air Filter
Company, Inc., is prohibited. RotoClone, AAF, REDClean, REDFiltration,
and Reliable Efficient Durable are registered trademarks of American Air
Filter Company, Inc. d/b/a AAF International.
11.8
Emergency Overflow (Arr. D only)
An emergency overflow is provided on side of hopper to drain off the water
in case hopper drain pipe becomes clogged. This stoppage must be cleared
immediately.
11.9
Shaft Seal
Other than routine greasing of the shaft seal (see 11.2 Lubrication), the
shaft seal requires no maintenance. Should the seal fail, replacement of the two
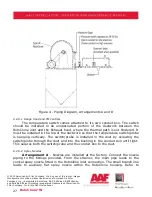
seals as shown in Figure 6 may be necessary. Since the seals are “split”, it is
usually not necessary to remove anything, other than the seals, from the shaft
itself, unless damage to the seal housing or metal spacer (located between the
two seals) is evident. On the smaller RotoClone, it may be necessary to loosen the
bearing closest to the seal and move it back about 6 inches, to gain clearance to
remove the seal housing. Be certain that the position of the shaft in relation to the
RotoClone is not changed in any direction when doing this.
1.
Remove the seal housing by removing the nuts securing it to the
scroll, and slide the housing back, exposing the seals and spacer. Discard old
seals.
2.
Inspect the shaft and seal housing to ensure that they are clean and
smooth. Remove any rust buildup with emery cloth or steel wool. Inspect
metal spacer; replace if necessary (this will require removing bearings to slip
spacer off the shaft and install new spacer. Be sure to reposition impeller per
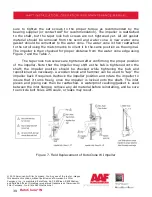
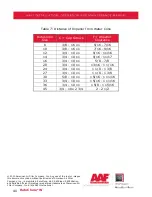
Figure 7, before tightening bearings back in place).
3.
Place a small amount of silicone sealant between the radial cut on each
seal.
4.
Install the new seals on either side of the spacer with the radial cut at
the top and the garter springs circling the inner lip of each seal.
5.
Ensure that the radial cut in the metal spacer is located directly below
the grease fitting in the seal housing to allow grease flow.
6.
Install the seal housing and tighten the nuts.
7.
Lubricate the seal thoroughly with No. 2 grease.

