112
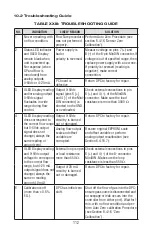
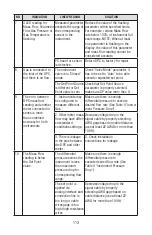
10.2 Troubleshooting Guide
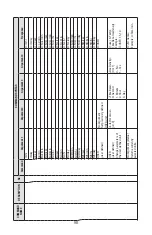
TABLE XXIII: TROUBLESHOOTING GUIDE
NO.
INDICATION
LIKELY REASON
SOLUTION
1
No zero reading, with
no fl ow condition.
Flow Tare procedure
was not performed
properly.
Perform Auto Zero Procedure (see
section 6.4.16 "Sensor Zero
Calibration").
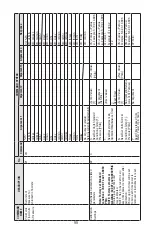
2
Status LED indicator
and OLED Display
remain blank when
unit is powered up.
No response (when
SP and fl ow is
introduced) from
analog outputs
0-5Vdc or 4-20 mA.
Power supply is
bad or
polarity is reversed.
Measure voltage on pins 7 (+) and
8 (-) of the 8-pin MinDIN connector. If
voltage is out of specifi ed range, then
replace power supply with a new one.
If polarity is reversed (reading is
negative), make correct
connection.
PC board is
defective.
Return DPC to factory for repair.
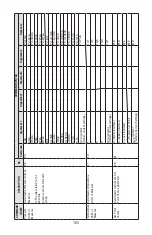
3
OLED Display reading
and/or analog output
0-5Vdc signal
fl uctuates in wide
range during fl ow
control.
Output 0-5Vdc
signal (pins 6 [+]
and 4 [-] of the Mini-
DIN connector) is
shorted on the GND
or overloaded.
Check external connections to pin
6 (+) and 4 (-), of the MiniDIN
connector. Make sure the load
resistance is more than 3000
.
4
OLED Display reading
does correspond to
the correct fl ow range,
but 0-5Vdc output
signal does not
change (always the
same reading or
around zero).
Output 0-5Vdc
circuitry is burned
out or damaged.
Return DPC to factory for repair.
Analog fl ow output
scale and offset
variable are
corrupted.
Restore original EEPROM scale
and offset variable or perform
analog output recalibration (see
Section 6.4.15.7).
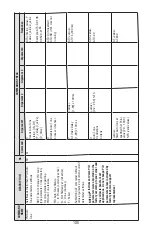
5
OLED Display reading
and 0-5Vdc output
voltage do correspond
to the correct fl ow
range, but 4-20 mA
output signal does not
change (always the
same or reading
around 4.0 mA).
External loop is open
or load resistance
more than 550
.
Check external connections to pins
6 (+) and 4 (-) of the D-connector
MiniDIN. Make sure the loop
resistance is less than 550
.
Output 4-20 mA
circuitry is burned
out or damaged.
Return DPC to factory for repair.
6
Calibration is off
(more than ± 0.5 %
F.S.).
DPC has initial zero
shift.
Shut off the fl ow of gas into the DPC;
ensure gas source is disconnected and
no seepage or leak occurs into the
controller from either port). Wait for 1
min. with no fl ow condition and per-
form Auto Zero calibration Procedure
(see Section 6.4.16 “Zero
Calibration”).
Summary of Contents for DPC
Page 6: ...2...
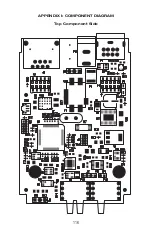
Page 120: ...116 APPENDIX I COMPONENT DIAGRAM Top Component Side...
Page 121: ...117 Bottom Component Side...

