background image

IMPORTANT INFORMATION 

This  appliance  is  not  for  professional  use.  You  should  follow  the  requested  breaks.  Failure  to  follow  this  instruction 

carefully may result in damage to the motor.   


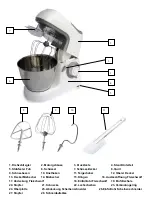
Beater/Dough hook/Whisk 


ASSEMBLING   

Clean all attachment before use .   

Make sure that the switch is in   

“0” position, and the appliance is unplugged 

Put the bowl(6) on stand base(4) and turn anti-clockwise. 

Press push button(3) will uplift motor body(2).   

Instert bowl lid(7) under motor body , and turn as marking. 


Beaters/hooks/whisk(8/9/10):  insert  the  beaters/hooks/whisk  under  the  body  of  the mixer  until  you  hear  a  clicking 

sound. 

Press push buton and put down motor body , then bowl lid cover bowl   


OPERATION   

Whisk -Turn from 1 speed to 8 speed, blend egg , salad , babyfood, soup, juice, milk etc soft ingredient. Max. Capacity 

2.5L. The maximum continuous usage cant

’s more than 10 minutes, the break at least 25-30 minutes. 

Beater- Turn from 1 speed to 3 speed, mix milk shake, salad, mayonnaise, mashed potatoes    etc soft ingredient. 

Max. Capacity 2.5L. The maximum continuous usage cant

’s more than 10 minutes, the break at least 25-30 minutes. 

Dough hook- Only can use 1 speed , blend flour make cake , bread , noodle , steam bread etc. Max. Capacity 1000g 

flour +720g water. The maximum continuous usage cant

’s more than 5 minutes, the break at least 25-30 minutes. 


SWITCH KNOB USE : 

Turn speed must step by step , e.g. 1 speed to 2 speed then to 3 speed...until high speed. 

If stop due to power off , it must turn to 0 speed then can continue.   

Knob to Pulse position to high speed.   

If  mixer  automatic  stop  during  operation,  that  means  protect  device  has    been  actived  due  to  put  excess 

ingredient or long operation time, that need unplug and wait 30-60 mins until norml working.   


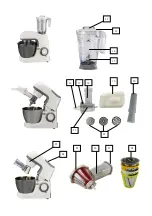
Blender   
 

ASSEMBLE 

Clean all attachment before use .   

Blades are sharp. Handle carefully. Always handle blades with hand away from cutting edge.   

Make sure that the switch is in   

“0” position, and the appliance is unplugged 

Open top plate(24) and put blender jar(14) on , turn as marking direction until locked tightly.   


OPERATION   

Make sure top lid(12) and jar lid(13) are close tightly during operation.   

Use 5-8 speed or pulse speed .   

Blend soup, juice, soybean ,sesame paste , babyfood etc   

Max. Capacity 1000ml   

Operation time : 3 mins on , 1min off .   


Summary of Contents for RMF700

Page 1: ...MANUEL D UTILISATION ROBOT Multifonction MODELE RMF700 AC 220 240V 50 60Hz 750W...

Page 2: ...trisseur 11 Spatule 12 Couvercle sup rieur 13 Couvercle de la jarre 14 Blender 15 Lame 16 Bouche du hachoir 17 Couvercle du hachoir 18 Couloir du hachoir 19 Plateau 20 Poussoir du hachoir 21 Vis hach...

Page 3: ...12 13 14 15 16 17 18 19 20 21 22 23 24 25 26 27 28 3...

Page 4: ...e nettoyage 11 Evitez tout contact avec les pi ces mobiles 12 Ne pas utiliser l appareil si le cordon ou la fiche est endommag e s il ne fonctionne pas correctement ou s il est tomb ou endommag de que...

Page 5: ...les aliments pour nourrissons la soupe le jus le lait etc avec une capacit maximale de 2 5L La dur e d utilisation continue ne peut pas d passer 10 minutes et l arr t de l appareil doit tre au moins 2...

Page 6: ...r toutes les pi ces jointes avant utilisation S assurer que l interrupteur soit la position 0 et l appareil d branch Mettre le r cipient sur la base du support et faites tourner dans le sens horaire A...

Page 7: ...enfants pour s assurer qu ils ne jouent pas avec l appareil NETTOYAGE D branchez l appareil avant tout nettoyage Enlevez tous les accessoires tirer directement le fouet le crochet p trisseur le batte...

Page 8: ...ZI PARIS NORD 11 120 All e des Erables 93420 Villepinte France...

Page 9: ...INSTRUCTION MANUAL Multi function Kitchen Mixer MODEL NO RMF700 AC 220 240V 50 60Hz 750W...

Page 10: ...hisk 10 Dough hook 11 Scrapper 12 Top lid 13 Jar lid 14 Blender jar 15 Blade 16 Grinder mouth 17 Grinder cover 18 Grinder canister 19 Tray 20 Push sticker 21 Screw stick 22 Blade disk 23 Connect ring...

Page 11: ...12 13 14 15 16 17 18 19 20 21 22 23 24 25 26 27 28 3...

Page 12: ...anical adjustment 13 Never use the appliance outside and always place it in a dry environment 14 Do not let cord hang over edge of table or counter 15 Never use accessories that are not recommended by...

Page 13: ...ximum continuous usage cant s more than 10 minutes the break at least 25 30 minutes Dough hook Only can use 1 speed blend flour make cake bread noodle steam bread etc Max Capacity 1000g flour 720g wat...

Page 14: ...blade disk Note This merchine only for grind shirimp fish pork beef etc not for high fat meat or meat with bone Clean blade disk with flow water store in dry condition do not dip blade into water for...

Page 15: ...cloth ensuring that it wipe and no moisture enters the cooling slots Do not clean with any abrasive scouring pad steel wool or thinner etc as this will damage the finish Do not immerse in water or an...

Page 16: ...ZI PARIS NORD 11 120 All e des Erables 93420 Villepinte France...

Page 17: ...ANLEITUNG Multifunktionaler K chenmixer MODELL NR RMF700 220 240 V AC 50 60 Hz 750 W...

Page 18: ...ber 12 Oberer Deckel 13 Deckel Mixbecher 14 Mixbecher 15 Klingen 16 Auslass ffnung Fleischwolf 17 Abdeckung Fleischwolf 18 Einf llrohr Fleischwolf 19 Einf llschale 20 Stopfer 21 Schnecke 22 Lochscheib...

Page 19: ...12 13 14 15 16 17 18 19 20 21 22 23 24 25 26 27 28 3...

Page 20: ...tzkabel oder Stecker benutzen nachdem das Ger t eine Fehlfunktionen aufweist oder in irgendeiner Weise besch digt wurde Bringen Sie das Ger t zur berpr fung zu einer autorisierten Werkstatt zur elektr...

Page 21: ...Babynahrung Suppen S fte Milch etc das max Fassungsverm gen betr gt 2 5 l Die maximale kontinuierliche Betriebsdauer darf nicht mehr als 10 Minuten betragen und es muss eine Pause von mindestens 25 3...

Page 22: ...chwolf MONTAGE Reinigen Sie alle Zubeh rteile vor dem Gebrauch Stellen Sie sicher dass sich der Schalter in Position 0 befindet und dass das Ger t ausgesteckt ist Setzen Sie die Sch ssel auf das Unter...

Page 23: ...Durch ffnen der Abdeckung der Schneidklingen 28 k nnen die Messerscheiben ausgewechselt werden Hinweis Die Klingen des Scheibenschneiders sind sehr scharf nicht ber hren Reinigen Sie die Messer des S...

Page 24: ...ZI PARIS NORD 11 120 All e des Erables 93420 Villepinte France...

Reviews: