background image

AD-4411 


3. Installing to the control panel 

3.1. Installing the indicator to the control panel 

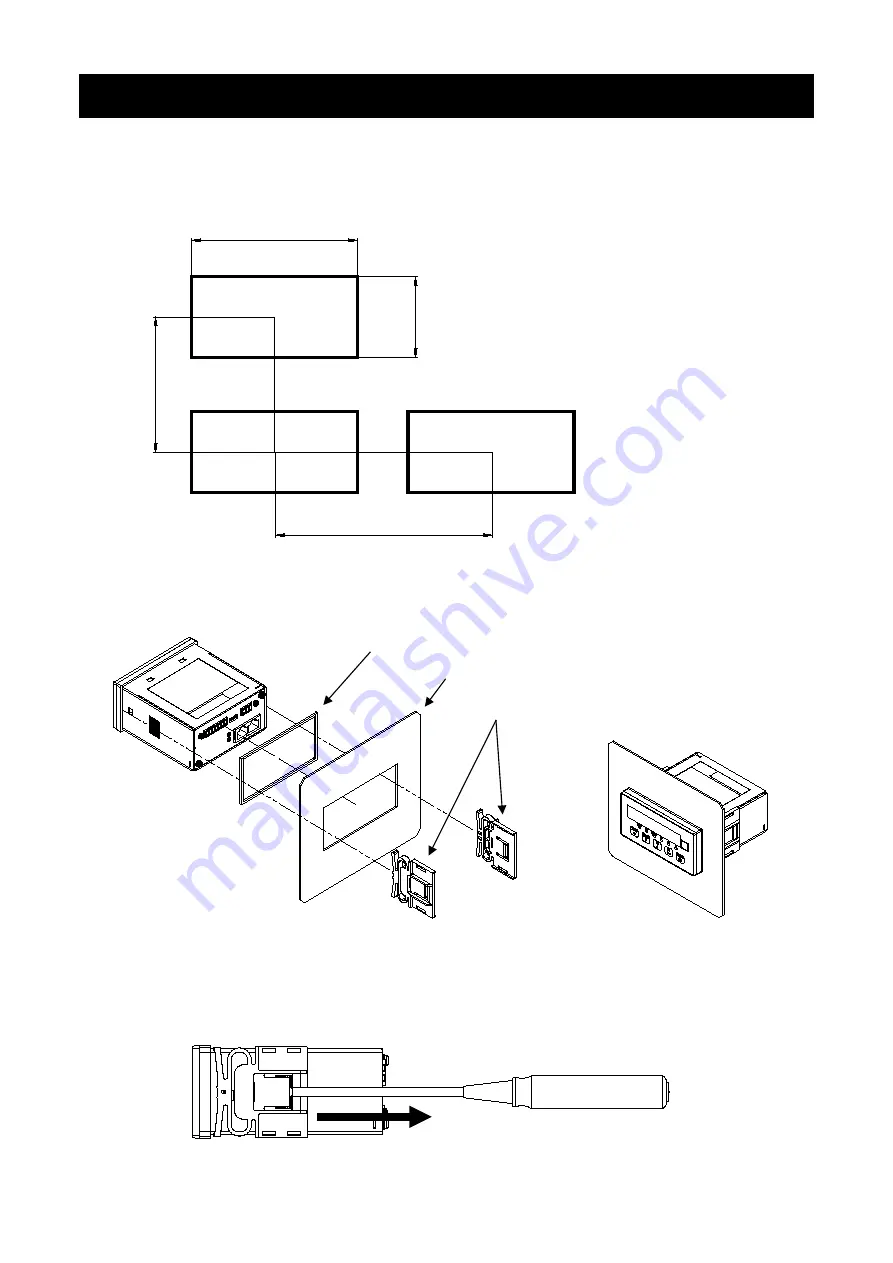
Make a hole in the control panel of the dimensions shown in the figure below. When installing more than one 
indicator, make sure there is sufficient space around each unit for heat dissipation. 


Attach the waterproof packing to the main body, then insert the main body into the control panel from the front. 
Fit the left and right mounting brackets into the grooves of the case and slide them all the way into the panel. 


3.2. Removing the indicator from the control panel 

While lifting the latch of the panel mounting bracket from the case using a flat head screwdriver or similar tool, 
slide the bracket towards the rear of the case. 


92

+0.8

 0

45

+0

.6

 0

120

75

Panel thickness: 1.6 to 3.2 
Unit: mm 

Control panel 

Waterproof packing 

Panel mounting brackets 

Summary of Contents for AD-4411

Page 1: ...1WMPD4004595 ...

Page 2: ... This symbol indicates that an operation is prohibited NOTE Information or cautions to use the device correctly 2022 A D Company Limited All rights reserved No part of this publication may be reproduced transmitted transcribed or translated into any language in any form by any means without the written permission of A D Company Limited The contents of this manual and the specifications of the inst...

Page 3: ... display 17 8 2 Power on zero 17 8 3 Zero setting 18 8 4 Zero tracking 18 8 5 Tare 18 8 6 Gross Net display selection 18 8 7 Center zero detection 19 8 8 Stability detection 19 8 9 High resolution display selection 19 8 10 Comparator 19 9 Industrial Ethernet 20 9 1 EtherNet IP AD 4411 EIP 20 9 2 PROFINET AD 4411 PRT 22 9 3 EtherCAT AD 4411 ECT 23 9 4 Cyclic data layout 24 10 USB 28 10 1 Communicat...

Page 4: ...n 41 14 2 Setting general functions 42 15 Function setting lists 44 15 1 Calibration function list 45 15 2 Digital calibration function list 45 15 3 Basic function list 46 15 4 IP function list 47 15 5 EtherCAT function 47 16 Specifications 48 ...

Page 5: ...duct Provide an external safety circuit for the indicator so that the safety of the whole system can be secured even if errors occur in the external power supply or the indicator Do not use the indicator in the following environments where the temperature and the humidity exceed the specifications where there are corrosive or flammable gases where the indicator could be subjected to oil chemicals ...

Page 6: ...tion FncF09 is met 3 Key switches ZERO Zeros the gross value Moves the blinking digit to the left when not in measurement mode TARE Performs tare Increases the blinking digit by one when not in measurement mode F1 Performs the function set for the F1 key function FncF05 Decreases the blinking digit by one when not in measurement mode F2 ENTER Performs the function set for the F2 key function FncF0...

Page 7: ...s LEDs Indicate Industrial Ethernet status 5 Industrial Ethernet connector Connector for connection of PLC via Industrial Ethernet Dual ports can be used for daisy chain wiring RJ 45 2 3 Accessories Name Type No Manufacturer Qty Waterproof packing 1064053659 A D 1 Panel mounting bracket 1073035116 A D 2 Capacity label 1084054808 A D 1 Unit label 1084023456A A D 1 Power connector MC 1 5 3 ST 3 81 P...

Page 8: ... the main body then insert the main body into the control panel from the front Fit the left and right mounting brackets into the grooves of the case and slide them all the way into the panel 3 2 Removing the indicator from the control panel While lifting the latch of the panel mounting bracket from the case using a flat head screwdriver or similar tool slide the bracket towards the rear of the cas...

Page 9: ...on DC power input 24V DC power input 0V Functional ground Applicable wire Item Specifications Wire size 0 14 to 1 5 mm AWG 26 to 16 Wire strip length 7 mm Tightening torque 0 22 to 0 25 Nm 4 2 Connection diagram Attach the included power connector accessory and wire as shown below 24V 0V ...

Page 10: ...ensing input SEN Sensing input EXC Load cell excitation voltage SLD Shield Applicable wire Item Specifications Wire size 0 14 to 1 5 mm AWG 26 to 16 Wire strip length 7 mm Tightening torque 0 22 to 0 25 Nm 5 2 Connection diagram Attach the included load cell connector accessory and wire as shown below 4 Wire type Set load cell connection type CALF17 to 0 4 wire type default 1 6 wire type ...

Page 11: ...load cell connection type CALF17 to 1 6 wire type default When you connect the load cells in parallel use a summing box Connecting AD 4411 to four load cells is as shown below Signal Summing Box Shield Power supply Power supply Signal ...

Page 12: ...isplay all on and off Measurement mode Power on General function mode Calibration function mode Check mode Initialization mode Mode selection Press for 3s or more Reset Actual load calibration mode Digital calibration function mode ...

Page 13: ...ault 1 0 0 2 0 00 3 0 000 4 0 0000 5 0 00000 Set the minimum division CALF03 1 1d default 2 2d 3 5d 4 10d 5 20d 6 50d Set the maximum capacity CALF04 Default 999999 7 2 Digital calibration After calibration using calibration weights is completed digital calibration function settings are automatically updated Be sure to make a note of the updated settings so you can re calibrate without applying ac...

Page 14: ...bration The current load cell input signal mV V is displayed Check that the STABLE status is ON Press the F2 ENTER key to execute zero calibration If zero calibration fails C ErrX is displayed Refer to 7 3 3 Error in actual load calibration for error details If zero calibration is successful PASS is displayed and zero calibration is completed Press the F2 ENTER key to enter span calibration Or pre...

Page 15: ...2 ENTER key Confirm the setting value The current load cell input signal mV V is displayed Place the calibration weight or apply load to the load cell Check that STABLE status is ON Press the F2 ENTER to execute span calibration If span calibration fails C ErrX is displayed Refer to 7 3 3 Error in actual load calibration for error details If span calibration is successful PASS is displayed and spa...

Page 16: ...ation weight value for span calibration exceeds the maximum capacity Set the calibration weight value to the maximum capacity or less The calibration weight value for span calibration is below the scale interval Set the calibration weight value to the scale interval or more The load cell input signal at span calibration is smaller one at zero calibration Check that the load cell is connected corre...

Page 17: ...overload The gross value exceeds the maximum capacity by 8d Negative overload The gross value meets the negative overload condition CALF15 Default 0 Gross maximum capacity 8d 8 2 Power on zero After power on the gross value is set to zero automatically when the gross value is within the maximum capacity 10 and stable Set power on zero CALF14 to 1 Enable default 0 Disable to use this function If th...

Page 18: ...lowing to use this function Set the zero tracking time CALF06 to a value other than 0 0s default Set the zero tracking width CALF07 to a value other than 0 Disable default 8 5 Tare Executing tare Press the TARE key or request externally to save the gross value as the tare value and set the net value to zero Set the following to use this function Select taring at unstable CALF11 from 0 Disable 1 En...

Page 19: ...splay selection Press a key to which the high resolution display selection function is assigned to switch the displayed value between high resolution display 10 times higher and normal display Set the following to use this function Set the function of F1 F2 key FncF05 Fnc06 to 4 high resolution display selection default 0 None 8 10 Comparator The comparison value and the measured value are compare...

Page 20: ...Green blinking Scanner in idle state Red ON Unrecoverable fault Red blinking Recoverable fault 9 1 2 Communication specifications Communication is performed according to the following communication specifications Note that communication is possible only in measurement mode Communication protocol EtherNet IP DLR supported Transmission speed 10 100 Mbps Connector RJ 45 Cable specifications Shielded ...

Page 21: ...ult gateway settings DHCP is not supported IP F Setting item Setting value Default IP address XXX XXX XXX XXX 01 0 255 192 02 0 255 168 03 0 255 0 04 0 255 2 Subnet mask XXX XXX XXX XXX 05 0 255 255 06 0 255 255 07 0 255 255 08 0 255 0 Default gateway setting XXX XXX XXX XXX 09 0 255 0 10 0 255 0 11 0 255 0 12 0 255 0 ...

Page 22: ...ion is performed according to the following communication specifications Note that communication is possible only in measurement mode Communication standard PROFINET IO RT Transmission speed 100 Mbps Connector RJ 45 Cable specifications Shielded twisted pair STP cable straight crossover CAT 5e or above Configuration file GSDML file Please download the configuration file from A D s website 9 2 3 Co...

Page 23: ...cording to the following communication specifications Note that communication is possible only in measurement mode Communication standard EtherCAT Sync mode is supported only for Free Run Transmission speed 100 Mbps Connector RJ 45 P1 IN P2 OUT Cable specifications Shielded twisted pair STP cable straight crossover CAT 5e or above Configuration file ESI file Please download the configuration file ...

Page 24: ...No Data area name Data type Description Word 0 1 Command value Int32 This area is used to send various commands to AD 4411 Word 2 Command UInt16 Read data AD 4411 PLC Word No Data area name Data type Description Word 0 1 Response value Int32 This area is used to receive the response for a command from AD 4411 Word 2 Response UInt16 Word 3 4 Net value Int32 Net value Word 5 6 Gross value Int32 Gros...

Page 25: ...ar 401 Zero calibration 402 Span calibration Use the following procedure to execute a function such as tare 1 Set the command 0 in the Command area on PLC 2 When AD 4411 accepts the command 0 it echoes back 0 in the Response area and waits for a command 3 Set a valid command e g 202 Tare in the Command area on PLC 4 If AD 4411 successfully executes the command it echoes back the command e g 202 Ta...

Page 26: ...alue 1 Set the command 0 in the Command area on PLC 2 When AD 4411 accepts the command 0 it echoes back 0 in the Response area and waits for a command from PLC 3 Set a valid read command in the Command area on PLC 4 If AD 4411 successfully reads the data it echoes back the command in the Response area and updates the read data in the Response value area If it fails the Response area is updated to ...

Page 27: ...s for a command from PLC 3 Set valid write data in the Command value area on PLC 4 Set a valid write command in the Command area on PLC 5 If AD 4411 successfully writes the data it echoes back the command in the Response area and the write data in the Response Value If it fails the Response area is updated to 65535 Error The following is an example of writing FncF10 and setting value 35 Command Va...

Page 28: ... specification USB function is available in measurement mode USB Specification Connector Type C Communication USB 2 0 Full speed virtual COM port Power 5V 3 0A at using bus power Communication protocol Modbus RTU Slave address 1 Baud rate 115200 bps Data length Parity Stop bit 8bits None 1 bit Function code and maximum quantity Code Function name Maximum qty 01 Read coils 100 03 Read holding regis...

Page 29: ... 000021 When zero setting fails 000022 When tare fails 000023 000200 000201 W 1 Zero setting 000202 Tare 000203 000206 000207 Tare clear 000208 000211 000212 Zero clear 000213 Switch gross on the display 000214 Switch net on the display 000215 000300 000301 000400 R W 000401 W 1 Zero calibration 000402 Span calibration 000403 000500 1 When 1 is written the operation is executed ...

Page 30: ...lue 400003 400004 Gross value 400005 400006 Net value 400007 400008 Tare value 400009 400010 Status See the next page for details 400011 400094 400095 400096 Load cell input signal 1 count means 1 nV V 400097 400100 400101 400134 R W Calibration function 1 400135 400300 400301 400326 Basic function 1 400327 401500 401501 401506 Digital calibration function 1 401507 401600 401601 401624 IP function...

Page 31: ... 04 Lo 400009 03 OK 400009 02 Hi 400009 01 400009 00 400010 15 10 400010 09 S3 status is ON 400010 08 S2 status is ON 400010 07 S1 status is ON 400010 06 ZERO status is ON 400010 05 STABLE status is ON 400010 04 Displayed value is gross 400010 03 Displayed value is net 400010 02 400010 01 400010 00 ...

Page 32: ...ddress 000001 065535 coil Data address 0x00 C9 The Modbus protocol specifies that the starting data address be set to the value of the coil data address minus 000001 so set 0x00C9 000202 000001 Write data 0xFF 00 Set 0xFF 00 ON CRC 0x5C 04 An error checking field is based on a CRC method Slave Master 0x01 05 00 C9 FF 00 5C 04 Slave address 0x01 In this example the sent message is echoed back as is...

Page 33: ...0003 400001 Read data points 0x00 04 In this example set 0x04 to read 4 data from 400003 to 400006 CRC 0x E5 C9 An error checking field is based on a CRC method Slave Master 0x01 03 08 86 9F 00 01 C3 4F 00 00 42 C7 Slave address 0x01 The slave address is echoed back as is Function code 0x03 The function code is echoed back as is Number of read data bytes 0x08 The number of read data bytes is set D...

Page 34: ...sion and make sure the hardware is operating properly in check mode Refer to 6 Operation mode to enter check mode See below for check mode procedures Checking software version Check item selection Checking display Checking key switches Load cell input checking Press for 3s or more ...

Page 35: ...EDs on and off Press MODE ESC key to return to check item selection 11 3 Checking key switches Press any key to change from 0 to 1 in the corresponding digit Press MODE ESC key for 3s or more to return to check item selection 11 4 Checking load cell input The current load cell input signal mV V is displayed Press MODE ESC key to return to check item selection All LEDs on All LEDs off ...

Page 36: ...ower on the product may have failed Please consult your local A D representative Error code Error description A problem is detected in the memory FRAM on the main board A problem is detected in the AD converter on the main board A problem is detected in the network module on the Industrial Ethernet board ...

Page 37: ...tage Normally 100 mV or less EXC SEN EXC voltage drop by load cell cable Normally 0 2 V or less The value may exceed 2 V when a long cable is used For the 4 wire connection it is 0 V EXC SEN EXC voltage drop by load cell cable Normally 0 2 V or less The value may exceed 2 V when a long cable is used For the 4 wire connection it is 0 V SIG EXC Load cell middle point voltage Normally 2 5 V half of t...

Page 38: ... load cell cable mm2 0 5 mm2 Number of load cells connected 3 units Summing box Used Not used Used Load cell model number and manufacturer LC4221 K050 A D Load cell rated capacity 50 99 kg Load cell rated output mV V 2 0394 mV V Load cell input resistance Ω 400 Ω Load cell output resistance Ω 350 Ω Load cell output at initial load 1 mV approx 4 0 mV Load cell output at capacity or any load 1 at mV...

Page 39: ...ue Gross Net display state General function Calibration function Digital calibration function Parameter initialization General function initialization All data initialization Refer to 6 Operation mode to enter initialization mode See below for the procedure in initialization mode Performs parameter initialization Performs general function initialization Blinking status LEDs Performs all data initi...

Page 40: ...escription Calibration function The setting values related to legally relevant parameters when AD 4411 is used for such purposes Digital calibration function The setting values related to calibration that depends on the individual instrument General function Basic function The setting values related to measurement functions IP function The setting values related to communication ...

Page 41: ...lue input ZERO key Shifts the blinking digit to the left TARE key Increases the blinking digit by one Use the leftmost digit to change the polarity An underscore _ indicates a positive value and a hyphen indicates a negative value F1 key Decreases the blinking digit by one Use the leftmost digit to change the polarity An underscore _ indicates a positive value and a hyphen indicates a negative val...

Page 42: ...tion mode to enter general function mode The general functions are grouped according to their functions The following explains how to select a group Basic function IP function General function item selection EtherCAT function AD 4411 EIP only AD 4411 ECT only ...

Page 43: ... the left TARE key Increases the blinking digit by one Use the leftmost digit to change the polarity An underscore _ indicates a positive value and a hyphen indicates a negative value F1 key Decreases the blinking digit by one Use the leftmost digit to change the polarity An underscore _ indicates a positive value and a hyphen indicates a negative value F2 ENTER key Saves the input setting value a...

Page 44: ...tion 2 is the first data address to be accessed via Modbus All data types are DWORD Refer to 10 3 Holding register data address 3 is the command to be accessed via Industrial Ethernet The left side shows the read command and the right side shows the write command Refer to 9 4 2 Command and response 4 is the setting item name 5 are the setting values and their meanings 6 is the factory default valu...

Page 45: ...e 0 Disable 1 Enable 1 400121 1121 10121 Taring at unstable 0 Disable 1 Enable 1 400123 1123 10123 Taring at the negative gross 0 Disable 1 Enable 1 400125 1125 10125 Zero clear 0 Disable 1 Enable 1 400127 1127 10127 Power on zero 0 Disable 1 Enable 0 400129 1129 10129 Condition of negative overload 0 Gross Maximum capacity 8d 1 Gross 19d 0 400131 1131 10131 NTEP 0 Disable 1 Enable 0 400133 1133 1...

Page 46: ...Lo 4 Zero setting error 5 Taring error 6 High resolution display selection 0 400315 1315 10315 Condition to turn S2 status ON 0 400317 1317 10317 Condition to turn S3 status ON 0 400319 1319 10319 Digital filter cut off frequency Hz 0 273 0 1 120 0 2 100 0 3 84 0 4 70 0 5 68 0 6 56 0 7 48 0 8 40 0 9 34 0 10 28 0 11 24 0 12 20 0 13 17 0 14 14 0 15 12 0 16 10 0 17 8 4 18 7 0 19 6 8 20 5 6 21 4 8 22 ...

Page 47: ... Subnet mask XXX XXX XXX XXX 401609 2609 11609 0 to 255 255 401611 2611 11611 0 to 255 255 401613 2613 11613 0 to 255 255 401615 2615 11615 0 to 255 0 Default gateway XXX XXX XXX XXX 401617 2617 11617 0 to 255 0 401619 2619 11619 0 to 255 0 401621 2621 11621 0 to 255 0 401623 2623 11623 0 to 255 0 15 5 EtherCAT function The following functions are valid only for AD 4411 ECT Modbus Command Setting ...

Page 48: ... mA Up to six 350 Ω load cells can be connected in parallel 6 wire type with remote sensing Signal input range 7 0 mV V to 7 0 mV V Minimum input sensitivity 0 15μV d or more d minimum division Nonlinearity 0 005 of F S max Temperature coefficient Zero drift 0 02μV C Typ 0 1μV C max Span drift 3ppm C Typ 15ppm C max Sampling rate 1200 times s Display Main display 7 digit LED green with character h...

Page 49: ...49 AD 4411 External dimensions Unit mm ...

Page 50: ...egeumyung ro 6 gil Yeongdeungpo gu Seoul 07331 Korea 전화 82 2 780 4101 팩스 82 2 782 4264 OOO A D RUS OOO ЭЙ энд ДИ РУС Почтовый адрес 121357 Российская Федерация г Москва ул Верейская дом 17 Юридический адрес 117545 Российская Федерация г Москва ул Дорожная д 3 корп 6 комн 8б 121357 Russian Federation Moscow Vereyskaya Street 17 тел 7 495 937 33 44 факс 7 495 937 55 66 A D Instruments India Private ...

Reviews: