background image


English  5


Using The Monitor 


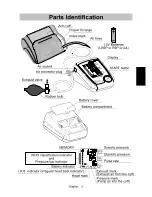
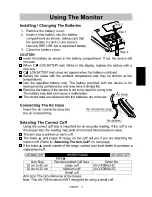
Installing / Changing The Batteries 

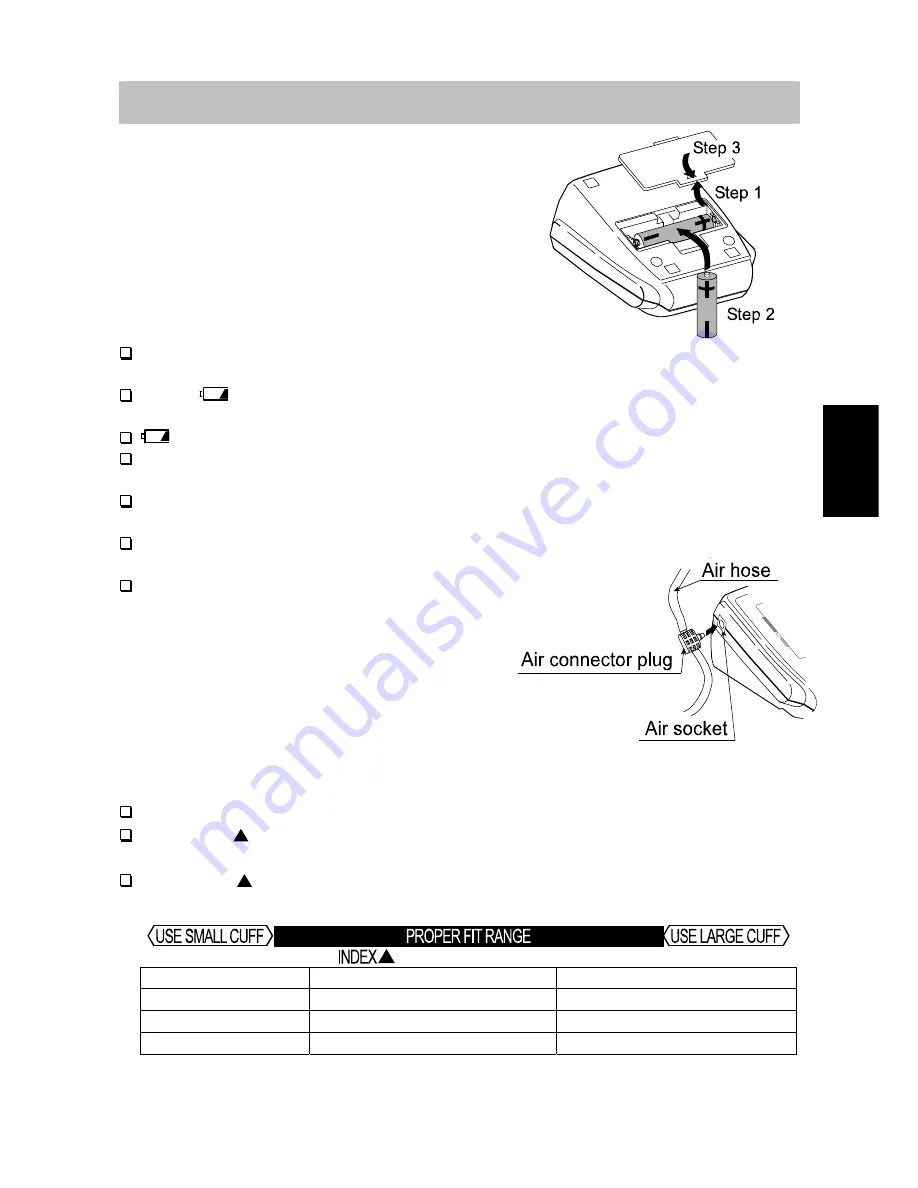
1.  Remove the battery cover. 
2.  Insert a new battery into the battery 

compartment as shown, taking care that 
the polarities (+) and (-) are correct. 


Use only R6P, LR6, AA or equivalent battery. 

3.  Close the battery cover. 


CAUTION 

 Insert the battery as shown in the battery compartment. If not, the device will 

not work. 

 When 

  (LOW BATTERY mark) blinks in the display, replace the battery with a 

new one. 


  (LOW BATTERY mark) does not appear when the battery is drained. 

 Battery life varies with the ambient temperature and may be shorter at low 

temperatures. 

 Use the specified battery only. The battery provided with the device is for 

testing monitor performance and may have a limited life. 

  Remove the battery if the device is not to be used for a long time. 

The battery may leak and cause a malfunction. 

  The stored data are cleared when the batteries are removed. 


Connecting The Air Hose 

  Insert the air connector plug into 

the air socket firmly. 


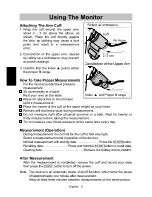
Selecting The Correct Cuff 

  Using the correct cuff size is important for an accurate reading. If the cuff is not 

the proper size, the reading may yield an incorrect blood pressure value. 

  The arm size is printed on each cuff. 
 The index    and proper fit range, on the cuff, tell you if you are attaching the 

correct cuff. (Refer to "

Attaching The Arm Cuff

" on next page) 

 If the index   points outside of the range, contact your local dealer to purchase a 

replacement cuff. 


Arm Size 

Recommended Cuff Size 

Order No. 

32 cm to 45 cm 

Large cuff 

UA-CUFDBKLA-EC 

22 cm to 32 cm 

Medium cuff 

UA-CUFDBKAU-EC 

 Small 

cuff 


  Arm size: The circumference at the biceps. 

    Note: This UA-705 monitor is NOT designed for using a small cuff. 

Summary of Contents for UA-705

Page 1: ...Digital Blood Pressure Monitor Model UA 705 Instruction Manual Manuel d instructions Manual de Instrucciones Manuale di Istruzioni 1WMPD4000988B...

Page 2: ...Measurement Operation 6 After Measurement 6 Measurements 7 Measurement With Storing Data 7 Notes For Proper Measurement 8 Operation Mode 9 WHO Classification Indicator 9 Pressure Bar Indicator 9 What...

Page 3: ...use The device is for use indoors Precautions Precision components are used in the construction of this device Extremes in temperature humidity direct sunlight shock or dust should be avoided Clean t...

Page 4: ...English 3 Parts Identification...

Page 5: ...surement until exhaust is complete Press the exhaust valve button to exhaust air from the cuff Flashes when pressure is insufficient for the measurement Pump air into the cuff with the rubber bulb Pre...

Page 6: ...attery if the device is not to be used for a long time The battery may leak and cause a malfunction The stored data are cleared when the batteries are removed Connecting The Air Hose Insert the air co...

Page 7: ...right after physical exercise or a bath Rest for twenty or thirty minutes before taking the measurement Try to measure your blood pressure at the same time every day Measurement Operation During measu...

Page 8: ...hen the mark disappears Note If you want to stop inflation at any time stop squeezing the rubber bulb and press the exhaust valve button to expel the air from the cuff 4 When inflation is complete def...

Page 9: ...ter of the cuff will be at the same height as your heart Relax for about five or ten minutes before taking a measurement If you are excited or depressed by emotional stress the measurement will reflec...

Page 10: ...ain WHO Classification Indicator Each of the six segments of the bar indicator corresponds to the WHO blood pressure classification described on the next page Pressure Bar Indicator The indicator moni...

Page 11: ...h arterial blood pressure if left unattended can cause many health problems including stroke and heart attack Hypertension can be controlled by altering one s lifestyle avoiding stress and with medica...

Page 12: ...Battery polarities are not in the correct position Reinstall the battery with its negative and positive end matching those indicated in the battery compartment The cuff is not fastened properly Fasten...

Page 13: ...functioning and accuracy Please contact either your authorized dealer or A D for maintenance Technical Data Type UA 705 Measurement method Oscillometric measurement Measurement range Pressure 20 280...

Page 14: ......

Reviews: