background image

ANNUAL MAINTENANCE 


It is important that your appliance is regularly  
serviced in accordance with these instructions. 
This should be carried out at least annually by a 
qualified person and should consist of the  
following : 
 

CLEANING 

 
Important; 

Under some circumstances soot can 

quickly build up on the throat plate and adjacent 
areas. The throat plate should be removed and 
checked monthly, and any debris stripped off. 
Similarly, clean the upper surface of the firebox. 
 
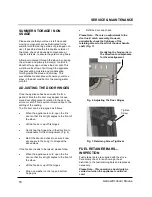
Remove the firebrick linings and throat plate,  
inspect all rope gaskets on doors, glass etc, and re
-order any items that may need replacing from 
your 

Aarrow

 dealer. 

With a wire brush clean inside the appliance  
paying particular attention to the small inlet holes 
of the air wash on the inside, above the fire door. 
 
Sweep the chimney and confirm that it is sound. 
Examine all joints in the flue pipe etc, and re-seal if 
necessary. Re-assemble and leave with the air 
inlet and air wash control about half way open. 
This will allow a free flow of air through the  
appliance thus preventing moisture and  
condensation from building up inside the stove and  
chimney. 

 
CHIMNEY SWEEPING 


Sweeping should be carried out with an  
appropriate sized bristle brush and rods to suit 
chimney size and type. As with all appliances  
regular sweeping of the flue is essential to avoid 
danger of blockage and the escape of poisonous 
fumes. Access for cleaning should also be  
incorporated in the chimney (e.g.. Soot door or 
access through the register plate). 
 
Any existing chimney should be swept prior to  
installation of the appliance, and swept again a 
second time 

within one month 

of regular use after 

installation to establish frequency of sweeping  
required. This should be done by a competent  
person such as a NACS chimney engineer who will 
provide a Certificate Of Chimney Sweeping. 
The whole flue way including the outlet must be 
swept at least twice per burning season. It is  
important that the flue ways, flue pipe and chimney 


be cleaned prior to lighting the fire after a  
prolonged shut down period. 
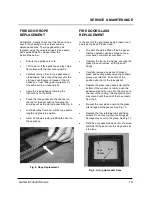
 

DOOR GLASS 


The door glass should remain clear during normal 
burning. However, under certain conditions, such 
as burning at a low rate or damp wood, or over-
night burning, the glass may become somewhat 
blackened. To remedy this, operate the appliance 
at a fast rate. Alternatively when the stove is cold, 
open the door and clean the inside face of the 
glass with a damp cloth or with glass cleaner 
(available from fire stockists). A piece of cloth 
moistened with vinegar and dipped in wood ash 
(

not coal ash

) will provide a good soft scourer to 

remove the soot without scratching the glass. 
 

OUTER FINISH 

 
The outer finish of the appliance is a durable high 
temperature paint. It is best cleaned, by brushing 
down, with a clean shoe brush. Do not allow  
moisture to remain on the appliance whilst cold or 
surface rust may form. 
The high temperature paint should not require  
attention for some time, depending on use. The 
hotter the fire burns the sooner repainting will be  
necessary. Aerosol tins of paint are available for 
complete refurbishing.  
Before repainting make sure that the fire is out and 
the stove is cold. 

 

Remove the door glass 

 

Lightly wire brush, or rub with wire wool, the 
body of the appliance to remove any loose 
paint or rust. 

 

Mask or remove items such as brass work. 

 

Any adjacent brickwork, mantelpiece, hearth 
etc, should be carefully masked for quite a 
distance around the appliance. This  

          precaution is to prevent discolouration of the                        
 

surrounding brickwork or wall paper etc. 

Re-spray in a well ventilated area, avoid breath-
ing the vapour. Refer to safety instructions on 
paint cans. 

 

When the paint is dry refit the door glass & 
any other parts previously removed.


 

Leave the appliance for eight hours before 
lighting a fire.


 

Burn slowly for the first four hours, then build  
up heat slowly to gradually cure paint. 


Note: Use genuine Aarrow touch up spray as some 
paints interact. This could ruin the finish and  
invalidate the guarantee. 

SERVICE & MAINTENANCE


Aarrow Ecoburn Stoves 

17 

Summary of Contents for BK061

Page 1: ...PLEASE RETAIN THIS GUIDE FOR FUTURE REFERENCE Operating Installation Manual BK061 EN 13240 2001 Amd A2 2004 Rev 05 August 2009 Part No AFS1363 09 RANGE OF STOVES...

Page 2: ...847 5107 Copyright 2008 Arada Ltd This booklet has copyright and may not be copied in whole or part or used for any purpose other than that for which it is supplied without express written consent fro...

Page 3: ...Page No SERVICE MAINTENANCE Annual Maintenance 17 Cleaning 17 Chimney Sweeping 17 Door Glass 17 Outer Finish 17 Summer Storage Non Usage 18 Adjusting The Door Hinges 18 Fuel Retaining Bar Inspection 1...

Page 4: ...BY HETAS IF IN DOUBT CONTACT HETAS LIMITED TELEPHONE NUMBER 0845 634 5626 www hetas co uk THIS STOVE MUST NOT BE CONNECTED TO A SHARED FLUE SYSTEM TO ALL USERS PETROLEUM COKE SOME OF WHOSE BRAND NAME...

Page 5: ...st modern equipment available It is a highly efficient and sophisticated piece of machinery and when properly installed and operated should provide a lifetime of heating satisfaction Safety is the mos...

Page 6: ...tion Visual Aid not to scale Aarrow ECB 5 Aarrow ECB 7 Aarrow ECB 9 Aarrow ECB 11 1 Fuel Retainers 2 2 2 2 2 Throat Plate 1 1 1 1 3 Flue Spigot 1 4 1 5 1 5 1 6 4 Hot Plate 1 4 1 5 1 5 1 6 5 Ash Pan 1...

Page 7: ...1 1 1 1 11 Stove Mitten Hot Glove 1 1 1 1 14 Fire Door Handle Nickel Plated 1 1 1 1 Data Plate Information Please Note All Ecoburn stoves are fitted with a data plate located on the bottom right hand...

Page 8: ...4 449 485 478 5 Depth From Back To Centre Of Flue mm 94 109 102 5 141 Flue Diameter mm 102 4 127 5 127 5 152 6 Weight Packed Kg 57 68 79 106 Weight Nett Kg 54 64 75 101 Aarrow Ecoburn Stoves Minimum D...

Page 9: ...nstalled on a floor with adequate load bearing capacity If the existing construction does not meet this prerequisite suitable measures e g load distributing plate should be taken to achieve it Ideally...

Page 10: ...e aware of this Failure to correct an over drawing flue will invalidate the warranty Please remember that chimney draught is dependent on four main factors Flue gas temperature Flue height Flue size F...

Page 11: ...f providing a Notice Plate giving details on the chimney flue lining hearth and fireplace installation Approved Docu ment J of the Building Regulations for England Wales is available from The Stationa...

Page 12: ...ppliance be connected to a shared flue system that serves any other heating appliance TYPICAL REAR FLUE OUTLET as per BS 8303 1 Maximum 150mm 6 Horizontal Flue Section Minimum 150mm 6 Diameter Flue So...

Page 13: ...Plan View Of Steel Register Plate 1 5mm Thick Minimum Non Combustible Register Plate Minimum 1 5mm Thick Steel TYPICAL TOP FLUE OUTLET as per BS 8303 1 Typical Metal Insulated Chimney System Installed...

Page 14: ...te sits on top of the sides and rear panels These should come fitted to your stove if however they are not proceed as follows to fit them Open the fire door Remove the two round front fuel retaining b...

Page 15: ...uld read 1 2mm or 0 1 0 2 mbar If Building Control Consent route is being sought please complete the check list on page 17 For a registered Competent Persons Scheme such as HETAS please complete the C...

Page 16: ...title Profession Capacity Telephone No Address Postcode Signed Date Registered member of e g Gas Safe CORGI OFTEC HETAS NACE NACS 7 Hearth Form of construction new or existing 8 Inspection and testing...

Page 17: ...on It is important that the flue ways flue pipe and chimney be cleaned prior to lighting the fire after a prolonged shut down period DOOR GLASS The door glass should remain clear during normal burning...

Page 18: ...re aligned as follows When the appliance is cold open the fire door so that it is at right angles to the front of the stove Lift the fire door up off its hinges Gently tap the hinge pins in the direct...

Page 19: ...re refitting the door to the appliance FIRE DOOR GLASS REPLACEMENT In the event of the door glass being broken it can easily be replaced Please follow The door should be lifted off the hinges so that...

Page 20: ...from the stove body and place on a level work bench with the rear face upper most Remove the 2x no fixings Working from the front withdraw the oval assembly from the door casting Clean the air slots w...

Page 21: ...vered in this manual please contact your Aarrow dealer Please keep all repair receipts safely Please ensure you have this manual available when an engineer visits so they can complete the service reco...

Page 22: ...BURN LIQUID FUELS IN YOUR STOVE PLEASE CONTACT The Manufacturer For Further Details Advice On The Use Of Other Fuels Please Note Do not use smaller sizes than Stovesse eg Beans Peas or Grains Do not u...

Page 23: ...d burn rates are possible by re ducing the primary and secondary air wash air inlet controls to a lower setting Please note if both controls are set on the minimum settings the appliance will be starv...

Page 24: ...e done by a HETAS registered engineer ASH REMOVAL The appliance will require ash to be removed periodically but an ash bed of approximately 20mm 3 4 should be maintained Ash may be removed with a smal...

Page 25: ...stove To decrease push the slider to the left as in Fig 14 AIR WASH SYSTEM The air wash has an internal sliding plate with slots housed in a cover plate and is located above the fire door Sliding the...

Page 26: ...he ash pan open the fire door s fit the fork end of the operating tool into the ash pan slots and remove from the ash pit chamber Empty the ash into a suitable container and replace the ash pan into t...

Page 27: ...ng the fire door as any surrounding areas of the stove will be very hot WARNING Never attempt to open the fire door whilst the appliance is in use WITHOUT the use of the stove mitten or suitable glove...

Page 28: ...and is 160 mm This increases the combined height of the stove and stand by 100mm This will effect the height from the floor to the centre of the rear flue outlet just add 100mm to the stated rear flue...

Page 29: ...FGS009B AFS009 AFS009 AFS012 Rear Liner s AFS1207 AFS1210 AFS1213 AFS1244 Side Liners AFS1206 AFS1209 AFS1212 AFS1243 Liner Set AFS1205 AFS1208 AFS1211 AFS1242 Ash Pan AFS058 AFS051 AFS1309 AFS0052a F...

Page 30: ...FS1365 AFS1365 Hinge Fixing Kit AFS047 AFS047 AFS047 AFS047 AFS1021 AFS1021 AFS1021 AFS1021 AFS1218 AFS1219 AFS1220 AFS1220 AFS1306 AFS1306 AFS1306 AFS1306 AFS1363 AFS1363 AFS1363 AFS1363 Aarrow Ecobu...

Page 31: ...5 Aarrow ECB7 Aarrow ECB9 Aarrow ECB11 AFS1285 AFS1285 AFS1285 AFS1285 AFS1368 AFS1369 AFS1369 AFS1369 AFS1405 AFS1405 AFS1405 AFS1405 AFS 1196 AFS 1197 AFS 1198 AFS 1483 31 Replacement Stove Mitten H...

Page 32: ...nd checked annually by a qualified heating engineer with documentation to be retained and produced in the event of a claim being made Claims are not valid where installation does not conform to approp...

Page 33: ...replacement Documentation must be retained and produced in the event of a warranty claim This guarantee specifically does not cover accidental damage misuse wear tear The use of non Aarrow replacemen...

Page 34: ...roat Plate Door Catch Nickel Door Handle Convector Kit Fixings x 4 Ash Pan Adjusting Feet x 2 Operating Tool Operating Installation Manual Stove Mitten Assembled By Checked by Date of Purchase Name an...

Reviews: