background image

USER INSTRUCTIONS 

Page 42 

Aarrow Sherborne GSL CF  

IMPORTANT NOTICES 
 

A qualified gas engineer must carry out the 
installation and servicing of this appliance in 
accordance with these instructions and in 
compliance with current Building Regulations. 

Such person must be a registered CORGI 
engineer. 

This appliance is designed to run on natural 
gas or LPG, however it is not possible to 
change between the two versions without 
factory service. 

WARNING, Only use the appliance with 
the specified gas (See the appliance data 
plate). 

This appliance is intended for use on a gas 
installation with a governed meter. 
 
The instructions must be read before use, of 
the appliance. 

Please note the following: 

 

Sealed components must not be  


interfered with. 

 

Servicing instructions and part  


Identification numbers are given  


towards the back of the manual. 

 

Only use genuine Aarrow parts for  


Replacement. 


All surfaces except the control knobs are 
considered to be working surfaces. 
 

Please note, that the monitoring system 
ODS, operates if evacuation of the  
combustion products is interrupted. If this 
does occur, turn the appliance to the fully 

OFF

 position, and re-light (see page 37). If 

this monitoring system continues to cut out 
the appliance, a qualified gas engineer 
should be called. 
 

WARNING: Under no circumstances must 
the stove be operated if the glass is 
cracked, broken, removed or open. 
 
WARNING: If it is known or suspected that 
an operational or ignition fault exists on 


the appliance, it must not be used until it has 
been investigated and corrected by a  
qualified gas engineer. 
 
WARNING: The stove will become very hot. 
Always use a fire guard in the presence of 
children, the elderly and the infirm. The fire 
guard must comply with BS 8423:2002 (Fire 
Guards suitable for use with solid fuel  
appliances). 
 
WARNING: No combustible materials  
including clothing, furniture and furnishings 
(including curtains) must not be placed within 
1 metre of the stove. 
 
WARNING: This gas appliance must be  
serviced every twelve months by a qualified 
gas engineer.  
 

STATUTORY REQUIREMENTS 
 

This product must be installed in accordance with 
the rules in force. 
The current Gas Safety (Installation and Use) 
Regulations (as amended). 
The Building Regulations for England and Wales 
2000 ref Approved Document J 2002 edition 
(issued by the DTLR). 
The Building Standards (Scotland) 
(Consolidation) Regulations. 
Detailed recommendations are outlined in the 
current issue of the following British Standards: 
BS5440 parts 1 and 2 , BS5871 part 1 and 
BS6891. 

Any manufactures instructions must not be 
taken as overriding statutory requirements. 


CERTIFICATION 
 

This appliance is CE certificated for performance 
and safety. Therefore, it is important that no  
alteration is made to the appliance. 
Any alteration not approved by 

Arada Ltd will 

invalidate the guarantee. 

Summary of Contents for BK047

Page 1: ...r NG 32 248 06 LPG 32 248 07 Rev 08 August 2009 Part No AFGS1095 Installation Servicing Instructions User Manual Sherborne GSL Conventional Flue Gas Stove PLEASE RETAIN THESE INSTRUCTIONS FOR FUTURE R...

Page 2: ...ng Logs NG 19 20 Fitting and arranging Logs LPG 21 22 Installation Of The Remote Control 23 26 System Commissioning Of The stove 27 Fire Testing 27 Advise The End User 28 Building Control Check List 2...

Page 3: ...It is recommended that any replacement item s are not broken up but sealed within a heavy duty polythene bag and clearly labelled R C F waste This is not classified as Hazardous waste and may be disp...

Page 4: ...Purpose All materials appliances and equipment used should be fit for purpose be of suit able quality and workmanship and should comply with the applicable British Standard 9 Data Label Plate The dat...

Page 5: ...ANKING FLUE SPIGOT OUTER BODY AND CANOPY FIRE DOORS VALVE COVER HOT GLOVE GAS SERVICE TAP GLASS SCREWS Packed Inside The Stove All Types Coal Set NG LPG or Log Set NG Only or Log Set LPG Only Flue Spi...

Page 6: ...knobs are considered to be working surfaces Warning Under no circumstances must the stove be operated if the glass is cracked broken removed or open If it is known or suspected that an operational or...

Page 7: ...cordance with the following regulations and standards The Gas safety Installation and Use Regulations current edition The Building Regulations for England and Wales 2000 ref Approved Document J 2002 e...

Page 8: ...the stove must stand on a fireproof hearth which has a minimum upper fire proof layer of 12mm non combustible material The rear of the stove is to be 100mm from the wall which must be of non combustib...

Page 9: ...derside of a shelf or other projection made of wood or any other combustible material is shown on graph 1 Non Combustible shelf clearances The minimum height from the extreme top surface of the stove...

Page 10: ...Requirements and BS5440 Part1 Suitable types of chimney include the following Masonry chimney built with clay or concrete liners or chimney block system meeting Building Regulations Precast concrete...

Page 11: ...6 a b c on page 12 however Fig 5c Provision must be made for checking for debris build up Closure plates must be sealed to the chimney or fireplace opening with fire cement fireproof rope or other su...

Page 12: ...Page 12 Aarrow Sherborne GSL CF INSTALLATION INSTRUCTIONS Y See Graph 1 Fig 6a Fig 6c Fig 6b...

Page 13: ...ess using a soap water solution and the pressure drop method To check the pressure to the burner This must be carried out with all other gas PRESSURE TEST SEQUENCE Controls are located at the base of...

Page 14: ...n If the coals and or the coal matrix are damaged then they must be replaced with a genuine Aarrow spare part Ensure the appliance is cold before placement NOTE It is very important for the loose coal...

Page 15: ...hould look like Fig 11 Caution Ensure that the pilot light is visible through the slot in the front right base matrix and that the pilot flame is not impinged Fig 11 Pilot Cut Out Notch Fig 12 1 2 3 4...

Page 16: ...be placed with a flat face parallel to the front of the stove see FIG 13b Coal Position Notch 4 Place Coals 3 4 into the grooves within the base matrix FIG 13c again these are to be placed with a flat...

Page 17: ...stove this front face is level with the front edge of the base matrix as shown in FIG 13f Aarrow Sherborne GSL CF Page 17 INSTALLATION INSTRUCTIONS Coal Position Notch FIG 13e FIG 13f FIG 13g 6 Coal...

Page 18: ...re positioned again Fig 13 j INSTALLATION INSTRUCTIONS Aarrow Sherborne GSL CF Page 18 FIG 13h Coal Position Notch FIG 13i 7 Coals 9 10 11 are all placed diagonally at approx 45 degrees to the front o...

Page 19: ...rix into position If the logs and or the rear matrix are damaged then they must be replaced with a genuine Aarrow parts Ensure the appliance is cold before placement Warning An incorrect log layout ma...

Page 20: ...e should be a gap between both side logs when resting correctly on the rear matrix Fig 15 4 Next scatter the loose embers onto the burner area Take care not to obstruct the pilot assembly 5 Lay the ce...

Page 21: ...ed Rear Log Matrix B Loose Embers Bagged C Left Curved Log D Right Knotted Lump Protruding E 3x Small Twigs F 1x Medium Twig G 2x Large Twigs A C D B E F G How to arrange the logs 1 Position the Y sha...

Page 22: ...the base to form a vee shape and rest upon the rear Y log left hand and straight log right hand The medium twig is placed between the large twigs as shown in Fig 21 Fig 21 5 The remaining 3x small tw...

Page 23: ...rtant A Gas Safe Register qualified engineer must carry out the installation of the remote control system PARTS LIST 1 Motor 2 Ultrasonic Receiver 3 Remote control handset Transmitter 4 Wiring Harness...

Page 24: ...ob B Unclip the right hand side of the cover located to the side of knob A See fig 24a b Fig 24a Fig 24b Screw Tab X Y 4 Replace valve cover ensure clip is located before the pozi screw is tightened D...

Page 25: ...fit to the spade tabs on the micro switch These are not handed See Fig 25b 3 Place the double sided adhesive tape onto the underside of the receiver unit Slide back the cover and insert the 4x AA LR6...

Page 26: ...t and connect a suitable battery and replace the cover Fig 26 2 The remote is now ready to use In the event of battery failure the flame height can still be adjusted manually using the valve Knob B NO...

Page 27: ...hown in Fig 27 All of the smoke should be drawn into the fire If this does not occur the appliance must be disconnected and the flue checked Step 5 If there is an extractor fan in any room this must b...

Page 28: ...s supply is turned off A flame failure device The second will cut of the stove if there is inadequate flue draw for example a blockage in the chimney If this occurs the stove should not be re lit unti...

Page 29: ...of the Building regulations Print name and title Profession Capacity Telephone No Address Postcode Signed Date Registered member of e g GAS SAFE REGISTER OFTEC HETAS NACE NACS 7 Hearth Form of constr...

Page 30: ...Step 3 Disengage locking levers 1 per side Step 4 Lift the body and canopy off the chassis Refer to Guide to manual handling on page 3 Step 5 Remove the dummy fuel retainer if the glass is broken sui...

Page 31: ...es take care not to damage the matrix See page 14 Step 7 Remove the 2 no self tapping screws each side of the injector as shown in Fig 30 The burner assembly may now be removed Slide back off the inje...

Page 32: ...to the flue from inside the fire box of the stove check that it is clear of any debris or obstructions Step 10 Check the system for gas soundness Step 11 Check the ignition of the pilot and with the p...

Page 33: ...Seek Expert Advice No Is The Supply Pressure Correct No Correct Pressure Is The Thermocouple Ok No No Yes Replace Pilot OSD Assembly No Check Gas Supply Operation Of The Control Valve Replace If Nece...

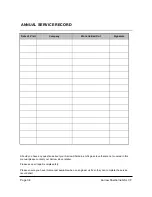
Page 34: ...Should you have any questions about your Aarrow Sherborne GSL gas stove that are not covered in this manual please contact your Aarrow stove retailer Please keep all repair receipts safely Please ensu...

Page 35: ...Page 35 Aarrow Sherborne GSL CF USER INSTRUCTIONS...

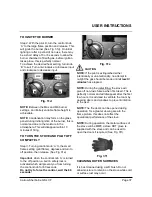
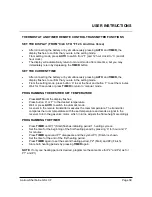
Page 36: ...off position See Fig 31e Fig 31a Fig 31b B A Continue pressing down while turning knob A anti clockwise to the small flame position this will activate the piezo and light the pilot Continue to hold do...

Page 37: ...ition then release See Fig 31e Important when the control knob A is turned to the off position a built in safety lock is activated which will prevent you from turning the control knob for 60 seconds D...

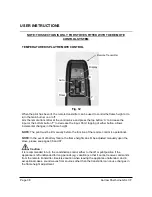
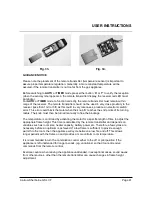
Page 38: ...nges in the flame height NOTE The pilot must be lit manually before the function of the remote control is operational NOTE In the event of battery failure the flame height can still be adjusted manual...

Page 39: ...IMER to return to manual mode PROGRAMMING THE DESIRED SET TEMPERATURE Press AUTO until the display flashes Press button X or Y to the desired temperature Wait or press AUTO to switch to automatic mode...

Page 40: ...ure control This minimizes battery consumption You may press AUTO to verify the set temperature and then press TIMER to return to timer mode You may press either the X or Y button from any mode for ma...

Page 41: ...ob B reaches the end points of its turning radius The knob must then be turned manually to free the blockage The temperature is controlled by activating the motor for a specific length of time to adju...

Page 42: ...the stove be operated if the glass is cracked broken removed or open WARNING If it is known or suspected that an operational or ignition fault exists on the appliance it must not be used until it has...

Page 43: ...stible shelf clearances The minimum height from the extreme top surface of the stove to the underside of a shelf or other projection made of wood or any other non combustible material is shown on grap...

Page 44: ...perature regulation auto mode and also a programmable timer function Paint Matching aerosol paint to tone in any connecting flue pipes or surrounding metalwork Tracery Gothic style door traceries are...

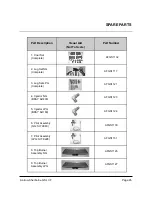
Page 45: ...Set Complete 2 Log Set NG Complete 3 Log Set LPG Complete 4 Injector NG BRAY 82 400 5 Injector LPG BRAY 82 160 7 Pilot Assembly LPG SIT 9228 6 Pilot Assembly NG SIT 9043 8 Top Burner Assembly NG 9 To...

Page 46: ...al Aid Not To Scale 10 Control Valve 11 Fire Door Set Complete With Handles 12 Glass Frame Assembly 13 Hinge Kit With Fixings 14 Dummy Fuel Retainer 15 Instruction Manual 16 Stove Glass Rope Gasket Bo...

Page 47: ...Visual Aid Not To Scale Part Number 17 Top Flue Cover Plate 18 Top Flue Infill Piece 19 Valve Cover 20 Flue Spigot Complete With Rope Gasket 21 Hot Plate Complete With Rope Gasket 22 Hot Glove Heat R...

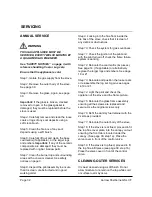
Page 48: ...on page 29 The stove must be serviced in accordance with these instructions and the record of annual service on page 34 should be completed by your service engineer USE OF SPARE PARTS OTHER THAN THOS...

Page 49: ...NOTES Aarrow Sherborne GSL CF Page 49...

Page 50: ...DOORS HANDLES DUMMY FUEL RETAINER VALVE COVER GLASS FRAME ASSEMBLY SELF LEVELING FEET OUTER BODY ASSEMBLY HOT GLOVE I ve checked it and it s OK ASSEMBLED BY CHECKED BY FUEL BED SELECTION NG LPG COAL S...

Reviews: