background image

AMT/PTD/PBX/0058/4/6/EN

Installation and Maintenance Manual - Aastra 5000

Page 

242 01/2011


Description des sous-ensembles

4.13.5.5 Installation and wiring

The PT2 card cannot be hot-plugged in a working system. The system must be powered
off before it is plugged.

This card must be connected with cable No. HG4731.

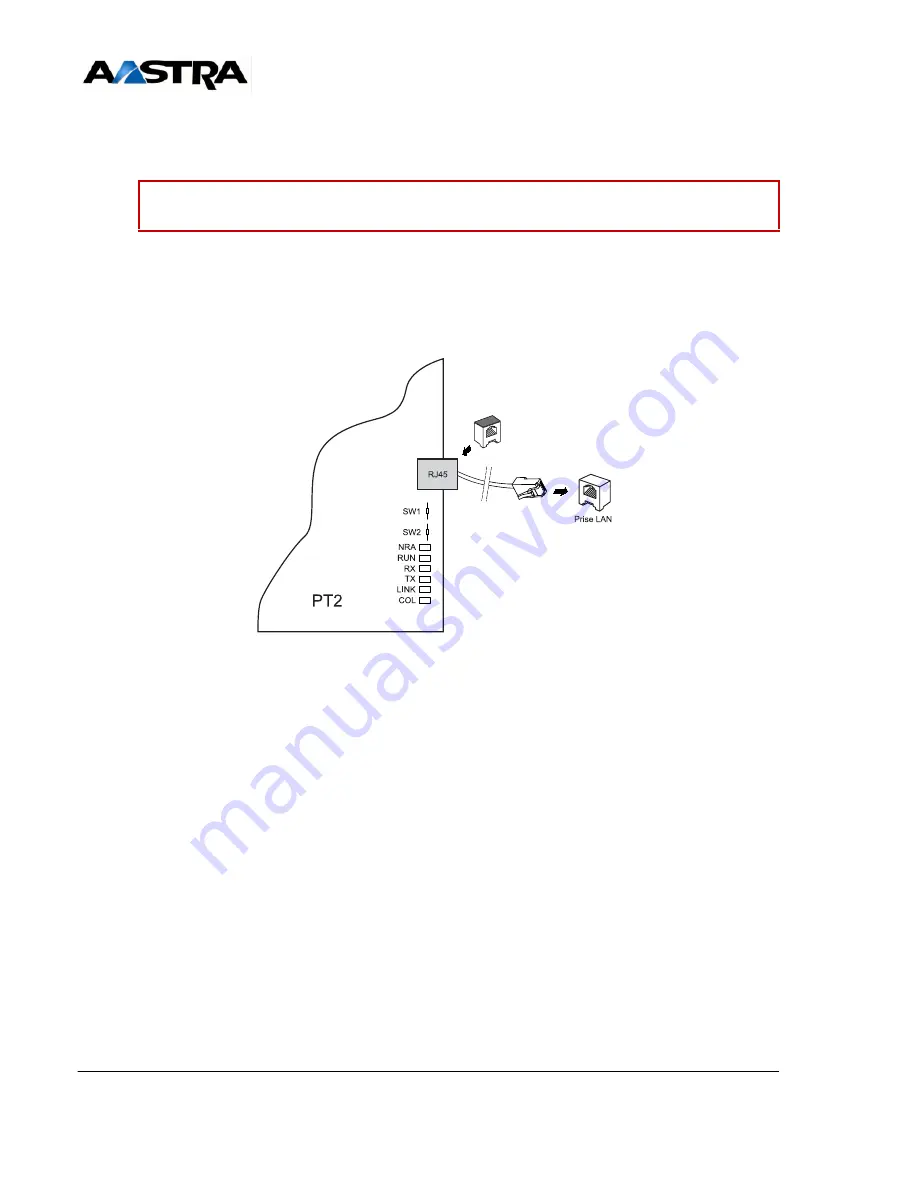
The system is connected to the Ethernet LAN by plugging the RJ45 connector of the PT2
card into an available LAN socket, as shown in the diagram below:

Figure 4.45

WIRING


A


PT

CARD

Caution:

Specific programming with Aastra Management Portal is required to declare
and activate this card before it can be used.

Carte PT2

Summary of Contents for AXD

Page 1: ...Installation and Maintenance Manual Aastra 5000 AMT PTD PBX 0058 4 6 EN 01 2011 Page 1 AXD AXL AXS AXS12 AXS6 Aastra 5000 Server Installation and Maintenance Manual AMT PTD PBX 0058 4 6 EN 01 2011...

Page 2: ...58 4 6 ENInstallation and Maintenance Manual Aastra 5000 Page 2 01 2011 Pr liminaires AASTRA 1 rue Arnold Schoenberg 78280 Guyancourt France Tel 33 1 30 96 42 00 Fax 33 1 30 96 43 00 www aastra com Co...

Page 3: ...ES D UN PBX 43 3 1 PHYSICAL DESCRIPTION 43 3 1 1 General description of AXD iPBXs 43 3 1 1 1 Internal description 44 3 1 2 General description of AXL iPBXs 55 3 1 3 General description of AXS iPBXs 60...

Page 4: ...management function 95 3 8 1 7 Synchronisation function 95 3 8 2 Connection to the communication networks and terminals 96 3 8 3 Duplication Aastra XD 97 3 8 4 Synchronisation chain Plate 9 1 100 3 8...

Page 5: ...1 6 Installation and wiring 126 4 2 2 ADS 300XD AXD iPBX 127 4 2 2 1 Description 127 4 2 2 2 Functional description Figure 3 21 127 4 2 2 3 Monitoring 128 4 2 2 4 Physical description Figure 4 3 129 4...

Page 6: ...on 151 4 4 2 1 Connectors 152 4 4 2 2 Indicators 155 4 4 3 Hardware and software configuration 156 4 4 4 Installation and wiring 156 4 5 RUCV D CARD 157 4 5 1 Functional description 157 4 5 2 Physical...

Page 7: ...Functional description 191 4 9 2 Physical description 193 4 9 2 1 Connectors 193 4 9 2 2 Indicators 193 4 9 3 Hardware and software configuration 194 4 9 3 1 Installation and wiring 194 4 10 EXT1 S6 C...

Page 8: ...4 Hardware configuration 223 4 13 3 5 Installation and wiring 224 4 13 4 LT2 card 228 4 13 4 1 Description 228 4 13 4 2 Functional description see Figure 4 35 228 4 13 4 3 Physical description see Fi...

Page 9: ...ion 260 4 14 1 3 Physical description see Figure 4 51 262 4 14 1 4 Hardware configuration 262 4 14 1 5 Installation and wiring 262 4 14 2 LA16X 8 card 264 4 14 2 1 Description 264 4 14 2 2 Functional...

Page 10: ...allation and wiring 277 4 14 10LH8 card 278 4 14 10 1Description 278 4 14 10 2Functional description 278 4 14 10 3Physical description see Figure 4 58 278 4 14 10 4Installation and wiring 278 4 14 11L...

Page 11: ...TATION OF PERIPHERAL DEVICES 301 5 1 DIGITAL SETS 301 5 1 1 Overview 301 5 1 2 INSTALLATION 301 5 2 ANALOGUE SETS 302 5 2 1 Description 302 5 2 2 INSTALLATION 302 5 3 IP SETS 303 5 3 1 Description 303...

Page 12: ...ortal User interface 327 6 2 6 1 Accessing the user interface Aastra Management Portal via the LAN 327 6 2 6 2 Accessing the user interface Aastra Management Portal in local access mode via the COM po...

Page 13: ...THE SOFTWARE OF A SIMPLEX AASTRA SYSTEM R5 2 378 6 8 1 Principle 378 6 8 2 Upgrading the software from AMP 378 6 8 3 Restarting and validating the new version 379 6 8 4 Upgrading the software from Aas...

Page 14: ...7 2 7 5 lithium batteries of UCV cards 403 7 2 7 6 Optional interchangeable batteries 403 7 2 7 7 Interchangeable cabinets AXD iPBX with ADS350XD 404 7 2 7 8 Interchangeable cabinets AXL iPBX with AD...

Page 15: ...E 479 10 9 1 Principle 479 10 9 2 Upgrading the software from AMP 479 10 9 2 1 Loading the application 481 10 9 3 Switchover 484 10 9 4 Restarting and validating the new version 485 10 9 5 Via Aastra...

Page 16: ...AMT PTD PBX 0058 4 6 EN Installation and Maintenance Manual Aastra 5000 Page 16 01 2011...

Page 17: ...ion of IUCV D card connectors 2 2 153 Tableau 4 9 Description of iUCV card relays 154 Tableau 4 10Presentation of IUCV D card indicators 155 Tableau 4 11Description of RUCV D card connectors 157 Table...

Page 18: ...u 4 66Connecting a DTE CA1 to a DCE modem or V24 adapter 253 Tableau 4 67Presentation of the CP1 card indicators 255 Tableau 4 68Description of MUM card connectors 258 Tableau 4 69Presentation of mum...

Page 19: ...stra 5000 AMT PTD PBX 0058 4 6 EN 01 2011 Page 19 Tableau 7 7 List of optional interchangeable batteries 403 Tableau 7 8 List of interchangeable cabinets AXD iPBX 404 Tableau 7 9 List of mounting kits...

Page 20: ...AMT PTD PBX 0058 4 6 EN Installation and Maintenance Manual Aastra 5000 Page 20 01 2011...

Page 21: ...011 Page 21 LIST OF PLATES PLATE 9 1 FUNCTIONAL DIAGRAM OF AN AASTRA XD IN SIMPLEX CONFIGURATION 455 PLATE 9 2 FUNCTIONAL DIAGRAM OF AN AASTRA XD IN DUPLEX CONFIGURATION 456 PLATE 9 3 FUNCTIONAL DIAGR...

Page 22: ...AMT PTD PBX 0058 4 6 EN Installation and Maintenance Manual Aastra 5000 Page 22 01 2011...

Page 23: ...of an AXS12 cabinet 67 Figure 3 18 Rear view of an AXS12 cabinet 68 Figure 3 19 Overview of an AXS6 cabinet 71 Figure 3 20 Rear view of an AXS6 cabinet 72 Figure 3 21 Block diagram of the power supply...

Page 24: ...of the EXT1 S card 185 Figure 4 25 Configuring remote power supply of S T0 to S T3 accesses 187 Figure 4 26 Connecting a DECT base station to an S0 interface of the EXT1 S card 188 Figure 4 27 Overvie...

Page 25: ...view of the LH16X card 280 Figure 4 61 Overview of the LH16X 8 card 282 Figure 4 62 Overview of the LR4 card 285 Figure 4 63 Overview of the LI1 card 291 Figure 4 64 lI1 cable 294 Figure 4 65 Wiring a...

Page 26: ...AMT PTD PBX 0058 4 6 EN Installation and Maintenance Manual Aastra 5000 Page 26 01 2011...

Page 27: ...ation abbreviations definitions Chapter 2 Pr sentation This chapter defines the various products in the Aastra 5000 range Chapter 3 Description et caract ristiques d un PBX This chapter gives the foll...

Page 28: ...pment etc The preventive maintenance operations to be performed periodically on the equipment Test procedures How to replace the subassemblies Chapter 8 Installing and using the IPS card This chapter...

Page 29: ...ation and Implementation Guide for MUM Multiplexer card PS8913A 8 M7xx digital set and i7xx IP set Installation manual AMT PTD TR 0001 9 Aastra i2052 Installation manual AMT PTD TR 0002 10 Aastra i207...

Page 30: ...t DTE Data Terminal Equipment FIFO First In First Out HDLC High level Data Link Control IP Internet Protocol TS Time Slot LAN Local Area Network LCR Least Cost Routing TL Tie Line PLL Permanent Logica...

Page 31: ...AXD A5000 series physical gateways Aastra Management 7450 or AM7450 Systems management centre 1 6 Definition Synchronous announcements Announcements synchronised with start of call ACD Automatic call...

Page 32: ...FTXA card Detection card 50 kHz for billing pulses fitted on LR4 card FTXC card 12 kHz or 16 kHz detection card for billing pulses fitted on LR4 card EXT1 S card Card to which all the network and subs...

Page 33: ...d Interface card used for connecting 8 hotel analogue sets LH16X card Interface card used for connecting 16 hotel analogue sets LH16X 8 card Interface card used for connecting 8 hotel analogue sets LI...

Page 34: ...er mode Connection with the server is via either an X25 or TCP IP link DISA Direct Inward System Access Service used to provide users outside the installation with the same features as a set connected...

Page 35: ...tification Basic or extended RON TRON signalling Signalling method in which information is transferred between the switching and transmission equipment through specialised wires called TRON transmissi...

Page 36: ...AMT PTD PBX 0058 4 6 EN Installation and Maintenance Manual Aastra 5000 Page 36 01 2011 Introduction...

Page 37: ...n the main cabinet a single RUCV D card in the expansion cabinet s and a single power supply module per cabinet In this case none of its elements is duplicated Simplex configuration with secure power...

Page 38: ...work Aastra X series is compatible with an already existing multi site configuration as of software release R4 1 and R4 2 with functional restrictions on inter operation Aastra XD was designed to opti...

Page 39: ...connected networks They are added to increase the connection possibilities of One or two ADS350XD or ADS300XD power supply modules one ADS350XD or ADS300XD power supply module and one VADS ventilatio...

Page 40: ...AXS12 and EXT1 S6 for AXS6 basically provide the interface with the management devices they have management ports Possibly expansion cards for AXS AXS12 AXS6 and AXL PBXs These cards interface with t...

Page 41: ...ral devices digital sets analogue sets IP sets SIP set computer terminals DECT base stations Managing access to other platforms multi site access through interfaces PCM E1 T1 Ethernet network analogue...

Page 42: ...rations Managing duplicated services Aastra XD only duplication of power supply switchover duplication of CPU cards switchover duplication of hardware functions data synchronisation software synchroni...

Page 43: ...iece of furniture The cabinets can be stacked but not installed next to each other to prevent blocking the air inlets located on the left hand side The main cabinet and expansion cabinets have the sam...

Page 44: ...unused slots Air inlets outlets for ventilating the elements in the cabinet are available on the left hand side fresh air inlet rear panel hot air outlet The external cables are connected on the fron...

Page 45: ...6 EN Description et caract ristiques d un PBX 01 2011 Page 45 Figure 3 1 OVERVIEW OF AN AXD CABINET IN SIMPLEX CONFIGURATION Ventilation module Power supply module BTX card IUCV D card UCV D card A E...

Page 46: ...enance Manual Aastra 5000 Page 46 01 2011 Description et caract ristiques d un PBX Figure 3 2 REAR VIEW OF AN AXD CABINET Fresh air inlet Hot air outlet Connector Battery 4 DB25 F connectors Connectio...

Page 47: ...ge 47 Figure 3 3 OVERVIEW OF AN A2XD CABINET IN SIMPLEX CONFIGURATION Ventilation module RUCV D card A UCV D card A Expansion cards Blanking plate empty slot Blanking plate empty slot Power supply mod...

Page 48: ...ex configuration Ventilation modu RUCV D card A UCV D card A Expansion cards Blanking plate empty slot Blanking plate mpty slot Power supply module Power supply module Ventilation module Main rack Bla...

Page 49: ...on et caract ristiques d un PBX 01 2011 Page 49 Figure 3 5 Overview of an AXD cabinet in simplex configuration with secure power unit Power supply module p Power supply module pow IUCV D card UCV D ca...

Page 50: ...net in simplex configuration with secure power unit RUCV D card A UCV D card A Expansion cards Blanking plate empty slot Blanking plate empty slot Connection cable for AXD A2XD A Expansion cabinet Mai...

Page 51: ...card A Expansion cards Blanking plate empty slot Blanking plate empty slot Power supply module Power supply module Power supply module Second expansion cabinet Main rack Blanking plate empty slot RUC...

Page 52: ...2011 Description et caract ristiques d un PBX Figure 3 8 Overview of an AXD cabinet in duplex configuration Power supply module Power supply module IUCV D card UCV D card B UCV D card A Expansion car...

Page 53: ...d A UCV D card A Expansion cards Blanking plate empty slot Connection cable Expansion cabinet Main rack Power supply module Power supply module Power supply module power suppl Power supply module BTX...

Page 54: ...module Power supply module Power supply module Second expansion cabinet Main rack Blanking plate empty slot RUCV D card A AXD A2XD A Power supply module power Power supply module power supply AXD A3X...

Page 55: ...r part of the cabinet reserved for the main card 2 rows of 7 slots i e 14 slots reserved for plug in expansion cards along the guides on the sides of the cabinet RJ45 format RJ cards are locked on the...

Page 56: ...EN Installation and Maintenance Manual Aastra 5000 Page 56 01 2011 Description et caract ristiques d un PBX Figure 3 10 Overview of an AXL cabinet UCV L card Expansion cards Power supply module Blank...

Page 57: ...T PTD PBX 0058 4 6 EN Description et caract ristiques d un PBX 01 2011 Page 57 Figure 3 11 REAR VIEW OF AN AXL CABINET PBX_MATRIX_XL_COFFRJ_3 4ARRIERE_01_01 Expansion cabinet connection cable connecto...

Page 58: ...nual Aastra 5000 Page 58 01 2011 Description et caract ristiques d un PBX Figure 3 12 Overview of an A2XL cabinet Expansion cabinet RUCV L card Connection cable AXL A2XL Power supply modules Expansion...

Page 59: ...ption et caract ristiques d un PBX 01 2011 Page 59 Figure 3 13 Overview of an A3XL cabinet expansion cabinet Connection cable AXL A2XL A3XL Second expansion cabinet First Main rack Power supply module...

Page 60: ...t the base of the cabinet reserved for the main UCV S card An EXT1 S card fitted with Extension and T0 S0 interface sockets RJ45 sockets for the analogue and digital equipment interfaces on the front...

Page 61: ...cabinet and expansion cabinet include in addition to the slots for the CPU cards and removable subassemblies A backplane UCV S for a main cabinet or RUCV S for an expansion cabinet meant to host expan...

Page 62: ...Installation and Maintenance Manual Aastra 5000 Page 62 01 2011 Description et caract ristiques d un PBX Figure 3 14 Overview of an AXS cabinet UCV Scard Fresh air inlet Power supply Hot air outlet Ex...

Page 63: ...nance Manual Aastra 5000 AMT PTD PBX 0058 4 6 EN Description et caract ristiques d un PBX 01 2011 Page 63 Figure 3 15 Overview of an A2XS cabinet RUCV Scard Expansion cabinet Main rack EXT1 S card UCV...

Page 64: ...anual Aastra 5000 Page 64 01 2011 Description et caract ristiques d un PBX Figure 3 16 Rear view of an AXS cabinet Mains socket I O switch Battery connector Expansion cabinet connection with expansion...

Page 65: ...e A slot located at the base of the cabinet reserved for the main UCV S card An EXT1 S12 card fitted with Extension and T0 S0 interface sockets RJ45 sockets for the analogue and digital equipment inte...

Page 66: ...cabinet and expansion cabinet include in addition to the slots for the CPU cards and removable subassemblies A backplane UCV S for a main cabinet or RUCV S for an expansion cabinet meant to host expa...

Page 67: ...e Manual Aastra 5000 AMT PTD PBX 0058 4 6 EN Description et caract ristiques d un PBX 01 2011 Page 67 Figure 3 17 Overview of an AXS12 cabinet CV S12card Fresh air inlet Power supply Hot air outlet Ex...

Page 68: ...llation and Maintenance Manual Aastra 5000 Page 68 01 2011 Description et caract ristiques d un PBX Figure 3 18 Rear view of an AXS12 cabinet I O switch Battery connector Fuse holder Mains socket Fres...

Page 69: ...e A slot located at the base of the cabinet reserved for the main UCV S card An EXT1 S6 card fitted with Extension and T0 S0 interface sockets RJ45 sockets for the analogue and digital equipment inter...

Page 70: ...cabinet and expansion cabinet include in addition to the slots for the CPU cards and removable subassemblies A backplane UCV S for a main cabinet or RUCV S for an expansion cabinet meant to host expa...

Page 71: ...nce Manual Aastra 5000 AMT PTD PBX 0058 4 6 EN Description et caract ristiques d un PBX 01 2011 Page 71 Figure 3 19 Overview of an AXS6 cabinet UCV Scard Fresh air inlet Power supply Hot air outlet Ex...

Page 72: ...allation and Maintenance Manual Aastra 5000 Page 72 01 2011 Description et caract ristiques d un PBX Figure 3 20 Rear view of an AXS6 cabinet I O switch Battery connector Fuse holder Mains socket Fres...

Page 73: ...Height 310 mm 7 U 89 mm 2 U 450 mm 10 U Width 440 mm 19 440 mm 19 440 mm 19 Depth 316 mm 400 mm 316 mm Max weight 20 kg 7 5 kg 15 kg simplex 18 kg duplex without expansion cards and 28 kg in total AD...

Page 74: ...15 A et 5 V 0 5 A 12 V 0 5 A and 12 V 0 65 A 0 25 A for cards and 0 40 A for fans 48 V 1 9 A ringer 70 V 0 2A 25 50 Hz symmetrical current External battery option See Section 3 8 7 1 ADS 350X power su...

Page 75: ...and 12 V 0 25 A 48 V 1 9 A 40 V ISDN 0 7 A ring 70 V 0 2 A 25 50 Hz symmetrical current External battery option voir 3 8 7 1 ADS 150X power supply module AXS AXS12 AXS6 iPBX CHARACTERISTICS VALUES Ra...

Page 76: ...AMT PTD PBX 0058 4 6 EN Installation and Maintenance Manual Aastra 5000 Page 76 01 2011 Description et caract ristiques d un PBX 3 3 Capacity Refer to the product Guide...

Page 77: ...depend on the configuration rules see Section3 5 and engineering rules of each site Subassemblies MAIN CABINET AXD AXD EXPANSION CABINET A2XD A3XD Power supply module Simplex 1 1 2 3 Simplex with secu...

Page 78: ...nce Manual Aastra 5000 Page 78 01 2011 Description et caract ristiques d un PBX Simplex 1 1 1 Simplex with secure power supply Duplex Subassemblies MAIN CABINET AXD AXD EXPANSION CABINET A2XD A3XD Lis...

Page 79: ...ode 2 3 Simplex 10 10 10 Simplex with secure power supply Duplex LT2 2 3 Simplex 6 6 6 Simplex with secure power supply Duplex IPS 2 1 1 1 1 PT2 2 8 channel VoIP4E 16 channel VoIP4E 32 channel VoIP4E...

Page 80: ...ent cards Simplex 12 16 28 44 Simplex with secure power supply Duplex LA16X Simplex 12 16 28 44 Simplex with secure power supply Duplex LA16X 8 Simplex 12 16 28 44 Simplex with secure power supply Dup...

Page 81: ...plex LM8 Simplex 12 12 12 Simplex with secure power supply Duplex LH8 Simplex 10 10 10 Simplex with secure power supply Duplex LH16X Simplex 12 14 26 40 Simplex with secure power supply Duplex LH16X 8...

Page 82: ...X 10 no other card is accepted in the main cabinet 3 The LD4 LD4N LD4X and LT2 synchronising cards must be located in slots 0 to 5 of the AXD main cabinet when they are to be used to provide the carri...

Page 83: ...ain card 4 1 IPS card maximum per system UCV 1 1 1 1 1 1 1 RUCV 1 2 1 CLX cards 10 1 10 1 10 1 3 3 3 3 LD4 LD4N 2 3 6 6 6 3 3 3 3 LD4X 2 3 10 10 10 3 3 3 3 LT2 2 3 6 6 6 1 1 1 1 IPS 2 4 1 1 1 1 1 1 1...

Page 84: ...slots numbered from 00 to 15 corresponding to the following physical positions TABLEAU 3 4 SLOT NUMBERS ON THE BACKPLANE OF AN AXD IPBX The following table presents the possible slots as well as the...

Page 85: ...ithout VOIP Yes Yes Yes Yes Yes Yes Yes Yes Yes Yes Yes Yes Yes Yes Not Not PT2 8 Yes Yes Yes Yes Yes Yes Yes Yes Yes Yes Yes Yes Yes Yes Not Not PT2 16 8 9 10 11 12 13 Yes Yes Not Not Not Not Not Not...

Page 86: ...in slot 1 00 8 a card from the short list cannot be installed in slot 1 08 but a card from the full list can be installed Short list LA8 LN8 LM8 LH8 LI1 LR4 CP1 8 channel PT2 MUM and 16 channel PT2 LD...

Page 87: ...slots numbered from 00 to 13 corresponding to the following physical slots TABLEAU 3 7 SLOT NUMBERS ON THE BACKPLANE OF AN AXL IPBX 3 5 2 1 AXL main cabinet The following table presents the possible...

Page 88: ...es Yes Yes Yes Yes Yes Yes Yes Yes PT2 16 8 9 10 11 12 13 Yes Yes Not Not Not Not Not Not PT2 32 Yes Yes Yes Yes Yes Yes Yes Yes Yes Yes Yes Yes Yes Yes CS1 Yes Yes Yes Yes Yes Yes Yes Yes Yes Yes Yes...

Page 89: ...uipped if no card in the short list is installed in slot n in the main cabinet Exemple If a PT2 VOIP 16 card is installed in slot 1 00 8 a card from the short list cannot be installed in slot 1 08 If...

Page 90: ...n only be fitted with certain equipment cards TABLEAU 3 9 POSSIBLE CONFIGURATIONS OF THE TWO EXPANSION BACKPLANES OF AN AXL IPBX Cards A2XL and A3XL expansion cabinet CLX cards LD4 LD4N LD4X Not LT2 N...

Page 91: ...o EXT1 S EXT1 S12 EXT1 S6 which have the same priority level The following table summarises the possible slots and gives restrictions concerning the various expansion cards of the AXS AXS12 AXS iPBX T...

Page 92: ...of the iPBX without any other action needed 3 7 AXS AXL AXD iPBX SOFTWARE KEY CODES The various functions which require a software key code are Demonstration number of days 1 to 30 E voicemail yes no...

Page 93: ...on Defence Power supply Ventilation 3 8 1 Command and processing unit The command and processing unit chain is ensured by the main card It manages the following features Duplex and start logic Aastra...

Page 94: ...tive at a given moment Commands Normal Maintenance Start Stop and indicators Operational Active Out of service on the front panel Command and status registers Both cards exchange status signals enabli...

Page 95: ...on the iPBX IVS ensured by integration of a predefined voice prompt used by the caller through DTMF code detection to browse through a series of menus providing access to the functions offered or a p...

Page 96: ...through RS232 links CA1 card intersite voice fax communication multiplexer cards MUM card cards used to interface PCM channels with other private systems LT2 cards cards interfacing with ISDN network...

Page 97: ...ive CPU card takes over and becomes active in the following three cases If the active card is removed If the active card remains idle for 2 minutes If a hardware failure is detected on the active UCV...

Page 98: ...changes Data synchronisation Data synchronisation is performed progressively to bring the data on the passive card to the same level as the active card This synchronisation guarantees service continu...

Page 99: ...ed ACD music on hold spoken announcements The answering service configuration and the associated voice messages music spoken announcements are automatically updated on the passive card each time the a...

Page 100: ...and one from the ISDN accesses integrated in the EXT1S card These LT2 LD4 LD4N and LD4X cards must be fitted in slots 0 to 5 in the main cabinet of the AXL and AXD iPBXs slots 0 to 2 for AXS All the...

Page 101: ...sation port which can work in Priority Master mode only one in the network Non Priority Master mode only one in the network or Slave mode The primary ports of the two Master cabinets exchange status s...

Page 102: ...ronisation on the public network of the priority master iPBX the non priority master iPBX provides synchronisation The secondary port of the iPBX provides a copy of the synchronisation signals of the...

Page 103: ...in card The alarms managed are those of the subassemblies in the iPBX but also external alarms The main card collects the status of Expansion cards Peripheral devices and links to the various cards It...

Page 104: ...supply power to an expansion cabinet just like the power supply modules of an expansion cabinet cannot supply power to a main cabinet In a simplex configuration the cabinets are powered up by a single...

Page 105: ...105 The mains is distributed to the power supply module s rectifier through A mains switch used to power the supply module on or off Two fuses A converter inside the power supply module converts the...

Page 106: ...IN AN AXD CABINET IN SIMPLEX CONFIGURATION 115 V 230 V Rectifier Converter Fuses 48 V 48 V Fan monitoring Failure of both fans CABINET POWER SUPPLY MODULE Battery Cards internal circuit power supllies...

Page 107: ...sup Active UCV D RUCV D 0 8 42 8 8 50 8 39 0 Rectifier Converter Fuses 48 V 48 V Fan monitoring Failure of both fans POWER SUPPLY MODULE Cards internal circuit power supplies Line power supplies Ring...

Page 108: ...current for certain equipment cards set line current 48 V Each back plane connector of the AXL iPBXs hosting an expansion card has advanced contacts for earthing and 5 V for hot plugging during cabin...

Page 109: ...by the battery or rectifier to the low voltages required by the various subassemblies of the iPBX Figure 3 23 BLOCK DIAGRAM OF THE POWER SUPPLY CHAIN IN AN AXL CABINET 6 6 2EDRESSEUR ONVERTISSEUR USIB...

Page 110: ...d un PBX Figure 3 24 Block diagram of the power supply chain in an AXS cabinet 6 6 2EDRESSEUR ONVERTISSEUR USIBLES 6 6 3URVEILLANCE VENTILATEUR FAUT DES DEUX VENTILATEURS 2 4 5 4 4 ATTERIE LIMENTATIO...

Page 111: ...1 Figure 3 25 Block diagram of the power supply chain on an AXS12 AXS6 cabinet 6 6 2EDRESSEUR ONVERTISSEUR USIBLES 6 6 3URVEILLANCE VENTILATEUR FAUT DES DEUX VENTILATEURS 2 4 5 4 4 ATTERIE LIMENTATION...

Page 112: ...2 and AXS6 iPBX An external optional backup battery can be installed to protect the iPBX from a power supply failure and prevent service disruption and loss of critical data When an iPBX has several c...

Page 113: ...e following table TABLEAU 3 13 A3XD OR A3XL IPBX BATTERY CHARACTERISTICS Attention 1 Do not connect an AXL iPBX and an AXS iPBX to the same battery pack 2 Do not connect an AXD iPBX and another Aastra...

Page 114: ...I S E 1 T 1 L O F L O C C O M R U N L T 2 X L 1 5 L 7 L 8 L 0 L N 1 6 X L 1 5 L 7 L 8 L 0 L N 1 6 X L 1 5 L 7 L 8 L 0 L N 1 6 X L 1 5 L 7 L 8 L 0 L N 1 6 X L 1 5 L 7 L 8 L 0 L N 1 6 X L 1 5 L 7 L 8 L...

Page 115: ...tions in the following table TABLEAU 3 14 A2XD OR AXL IPBX BATTERY CHARACTERISTICS Attention 1 Do not connect an AXD iPBX and another Aastra iPBX for instance AXL or AXS to the same battery pack 2 Do...

Page 116: ...R U N L T 2 X B I E R C R C E B L E R E R A I S E 1 T 1 L O F L O C C O M R U N L T 2 X L 1 5 L 7 L 8 L 0 L N 1 6 X L 1 5 L 7 L 8 L 0 L N 1 6 X L 1 5 L 7 L 8 L 0 L N 1 6 X L 1 5 L 7 L 8 L 0 L N 1 6 X...

Page 117: ...er use a battery complying with the specifications in the following table TABLEAU 3 15 BATTERY SPECIFICATIONS FOR AN A2XS IPBX Attention Do not connect an AXL iPBX and an AXS iPBX to the same battery...

Page 118: ...d the ventilation module for a simplex configuration see Section 3 8 7 Aastra XS XL Cooling is ensured by the 2 fans in the power supply unit 1 fan only for AXS AXS12 and AXS6 which extract air from t...

Page 119: ...quirements including for example its own central office trunks operator consoles speed dial numbers and greeting messages 3 9 4 Multi site configuration A multi site network is made up of a number of...

Page 120: ...X Remotely via an analogue or ISDN modem Remotely via an ISDN router Note See the corresponding sections for these different access types The iPBX user interface is used for Telephony management users...

Page 121: ...ical format a format fitted with a front panel for RJ45 connectors These cards are called RJ cards The dimensions of the cards Lx16 X are 280 mm in depth and 100 mm in width The physical interface of...

Page 122: ...re 4 1 Set the two 1 4 turn locks in the horizontal position Push the card to the bottom of its slot inside the cabinet Turn the locks by 1 4 turn inwards the inside to lock the card in its slot Figur...

Page 123: ...see Figure 4 1 Turn the two 1 4 turn locks outward to unlock the card Pull the two locks to extract the card 4 1 2 Loading CLX cards The flash memory on CLX cards contain the start up software an imag...

Page 124: ...odules then work in load sharing mode If one power supply module becomes faulty the other one carries the entire load The mains power supply voltage is 115 230 V 50 60 Hz 350 W An optional external 48...

Page 125: ...inals and stops when this voltage drops below a threshold set at 43V This device prevents deep discharging of the battery in the absence of mains or failure shutdown of the rectifier When the 2 fans a...

Page 126: ...power supply module has a mains socket Indicators The ADS 350XD power supply modules have 6 indicators on the front panel which give the following information 4 2 1 5 Hardware configuration The mains...

Page 127: ...then added instead of the second power supply module For a simplex configuration with secure power supply and for a duplex configuration two power supply modules are used per cabinet The power supply...

Page 128: ...module in case of overvoltage An F300 6 3 A fuse inside the power supply module see Figure 4 3 protects the power supply in case of polarity inversion when connecting the battery The converter monito...

Page 129: ...switch and the mains outlet The ADS 300XD is fitted with two 80 mm diameter fans located at the back of the power supply module Connectors The front panel of the power supply module has a mains socke...

Page 130: ...nal 48V backup battery can be installed 4 2 3 2 Functional description The two power supplies include the following functional blocks A 48V converter supplying the following voltages 5 V 15 A 5 V 0 5...

Page 131: ...5 protects the power supply in case of polarity inversion when connecting the battery The converter monitors the voltage on the battery terminals and stops when this voltage drops below a threshold s...

Page 132: ...g in rack extraction handles excluded The maximum height of the components above the PCB is 90 mm An I O switch on the front panel is used to power the supply on and off The fuse holder is located bet...

Page 133: ...automatically internally 4 2 3 6 Installation and wiring The ADS 350X power supply module is supplied with a battery connection cable fitted with a 4 pin connector with a centring piece to prevent po...

Page 134: ...plies include the following functional blocks see Section 3 8 6 A 48V converter supplying the following voltages 5 V 13 A 5 V 0 5 A 12 V 0 5A This value does not include the fan power supply current 1...

Page 135: ...connecting the battery The converter monitors the voltage on the battery terminals and stops when this voltage drops below a threshold set at 43V This device prevents deep discharging of the battery i...

Page 136: ...action handles excluded The maximum height of the components above the PCB is 90 mm An I O switch on the front panel is used to power the supply on and off The fuse holder is located between the I O s...

Page 137: ...automatically internally 4 2 4 6 Installation and wiring The ADS 300X power supply module is supplied with a battery connection cable fitted with a 4 pin connector with a centring piece to prevent po...

Page 138: ...follows 1 6 A for the converter 0 45 for the DECT telephone sets and base stations 0 95 A for charging a 7 5 Ah battery which offers the system 4 hours of autonomy The rectifier can be connected to a...

Page 139: ...Connectors The back plane of AXS and XS12 cabinets comprises A mains socket a 4 pin battery connector Indicators An ALIM indicator located on the front panel of the UCV card indicates when on mains p...

Page 140: ...ard receives the following on the back plane connector J1 a 5 V power supply voltage used for the operation of its internal circuits 12 V power supply used in operating the microcontroller The card ha...

Page 141: ...Installation and Maintenance Manual Aastra 5000 AMT PTD PBX 0058 4 6 EN Description des sous ensembles 01 2011 Page 141 J2 J1 J3 J14 EIP card No 2 J13 EIP card No 1...

Page 142: ...AMT PTD PBX 0058 4 6 EN Installation and Maintenance Manual Aastra 5000 Page 142 01 2011 Description des sous ensembles Figure 4 6 OVERVIEW OF THE UCV D CARD...

Page 143: ...J13 and J14 CMS 80 pin connectors receive two optional daughter cards EIP No 1 on J13 and EIP No 2 on J14 to increase the capacity of the VoIP function J10A and J10B HE14 connector CONSOLE 1 Local ac...

Page 144: ...1 RJ45 connector Pin 1 RXP Pin 2 RXM Pin 3 TXP Pin 4 TLBR Pin 5 TLBR Pin 6 TXM Pin 7 RLBR Pin 8 RLBR ETH2 1 RJ45 connector Connection used for the access Administration in the case of configuration of...

Page 145: ...ting down after the SHTD button has been pressed or following a Reset OS or Reboot OS request by MMC do not power off the device Power off authorisation Normal operation DISK ON green Disk is being us...

Page 146: ...ot work 4 3 3 Hardware and software configuration During operation the UCV D card does not have any hardware configuration All the configurations are performed by MMC from Aastra Management Portal Mas...

Page 147: ...es 01 2011 Page 147 If a hardware failure is detected on the active UCV D card in this case a hardware fault detection is performed The unavailability time on the cabinet can therefore be up to 3 minu...

Page 148: ...ut for a source of external music Two primary and secondary DECT synchronisation ports Four alarm inputs and four relays 3 remote control relays one watchdog alarm relay For a duplex configuration the...

Page 149: ...Installation and Maintenance Manual Aastra 5000 AMT PTD PBX 0058 4 6 EN Description des sous ensembles 01 2011 Page 149 i Button J1...

Page 150: ...AMT PTD PBX 0058 4 6 EN Installation and Maintenance Manual Aastra 5000 Page 150 01 2011 Description des sous ensembles Figure 4 8 OVERVIEW OF THE IUCV D CARD...

Page 151: ...Installation and Maintenance Manual Aastra 5000 AMT PTD PBX 0058 4 6 EN Description des sous ensembles 01 2011 Page 151 4 4 2 Physical description...

Page 152: ...for radio base stations DECT P Pin 1 AHGA Pin 2 AHGB Pin 3 PHBIT1 Pin 4 PHDECT1 Pin 5 NHDECT1 Pin 6 NHBIT1 Pin 7 HEXTA Pin 8 HEXTB DECT S Pin 1 and 2 L0V Pin 3 PHBIT2 Pin 4 PHDECT2 Pin 5 NHDECT2 Pin...

Page 153: ...osts the alarms and relays connection includes four alarm inputs controlled by a TTL electric level used for the built in UAD function 4 command relays 2 Pin 1 NAL 3 alarm input 3 Pin 2 GND NAL 3 Pin...

Page 154: ...2 and R3 relays of the iUCV card Note The relay positions shown are the inactive states Figure 4 9 IUCV CARD RELAY CONTACTS RELAYS FUNCTIONS STATE R1 Remote control Work 12 V 1 R2 Alarm relays assignm...

Page 155: ...ation clock fault alarm No correct synchronisation clock primary network or DECT port BVF green orange Green flashing ON green or OFF Run Voice mail operating Voice mail not working BVF not activated...

Page 156: ...figuration During operation the IUCV D card does not have any hardware configuration 4 4 4 Installation and wiring The IUCV D card can be hot plugged removed in an operational AXD iPBX The equipment c...

Page 157: ...nnectors TABLEAU 4 11 DESCRIPTION OF RUCV D CARD CONNECTORS 4 5 2 2 Indicators NAME FUNCTION CONTACTS J1 Female connector 192 pins backplane connection It includes the synchronous junctions used in th...

Page 158: ...AMT PTD PBX 0058 4 6 EN Installation and Maintenance Manual Aastra 5000 Page 158 01 2011 Description des sous ensembles Figure 4 11 OVERVIEW OF THE RUCV D CARD J1 J2...

Page 159: ...expansion cabinet see cabinet reference in Section 7 2 7 7 For a duplex configuration comprising one or two expansion cabinets a second RUCV D card must be added to each expansion cabinet A cable for...

Page 160: ...PANSION CABINET SIMPLEX CONFIGURATION UCV D A RUCV D A Simplex configuration connecting UCV D B RUCV D B see Figure 4 14 Install the yellow clamps at each end of the AXD A2XD connection cable Figure 4...

Page 161: ...g two expansion cabinets A3XD Simplex configuration connecting UCV D A RUCV D A see Figure 4 16 Install the red clamps at each end of the AXD A2XD connection cable Install the green clamps at each end...

Page 162: ...llow clamps at each end of the AXD A2XD connection cable Install the blue clamps at each end of the AXD A3XD connection cable Figure 4 17 CONNECTING TWO EXPANSION CABINETS SIMPLEX CONFIGURATION UCT D...

Page 163: ...amps at each end of the AXD A3XD connection cable UCV D B RUCV D B connection Install the yellow clamps at each end of the AXD A2XD connection cable Install the blue clamps at each end of the AXD A3XD...

Page 164: ...ecognising a synchronisation pattern The UCV L card can command a general Reset of the expansion cabinets provided they are synchronised Locking and unlocking optional software functions through a rem...

Page 165: ...EN Description des sous ensembles 01 2011 Page 165 The UCV L card can be fitted with two EIP daughter cards for managing VoIP communications These two daughter cards have 8 32 channels each for signal...

Page 166: ...4 6 EN Installation and Maintenance Manual Aastra 5000 Page 166 01 2011 Description des sous ensembles Figure 4 19 OVERVIEW OF THE UCV L CARD J1 J2 BATTE CARD COMPACT FLASH J14 EIP card No 2 J13 EIP c...

Page 167: ...ence clocks and system bus J2 rear panel Female connector 48 pins link with the RUCV card connector in an expansion cabinet J13 and J14 CMS 80 pin connectors receive two optional daughter cards EIP No...

Page 168: ...Pin 8 RLBR ETH2 1 RJ45 connector Connection used for the access Administration in the case of configuration of separation of the networks Administration and Telephony refer to Manual AMT PTD PBX 0101...

Page 169: ...ernal source of music on hold MUSA Input impedance 15 Kohms MUSB Input impedance 600 Kohms ETM external source present Pin 2 JP12 Pin 3 GNDL Pin 4 MUSA Pin 5 ETM Pin 6 GNDL Pin 7 MUSB Pins 1 and 8 NC...

Page 170: ...h an 8 Ohm CTP 2 The R2 R3 and R4 relays deliver 12V through a 25 Ohms CTP TABLEAU 4 16 DESCRIPTION OF UCV CARD RELAYS RELAYS FUNCTIONS STATE R1 Remote control Work 12 V 1 R2 Alarm relays assignment o...

Page 171: ...bles 01 2011 Page 171 Figure 4 20 illustrates the R1 R2 and R3 relays of the UCV card Note The relay positions shown are the inactive states Figure 4 20 UCV CARD RELAY CONTACTS R1 switching relay R2 a...

Page 172: ...UX green On not used BVF green orange Green flashing ON green or OFF Run Voice mail operating Voice mail not working BVF not activated or faulty ON orange BVF initialising S EXT green red ON green ON...

Page 173: ...eboot shutting down and restarting the iPBX Pressing and holding down the SHTD button 5 seconds triggers an OS reboot shutdown iPBX restart Forced restart not recommended in normal operation Press RST...

Page 174: ...5000 Page 174 01 2011 Description des sous ensembles 4 6 4 Installation and wiring The equipment connected to the UCV L card has the installation details described in Section 5 6 Operating console Ex...

Page 175: ...Functional description The UCV S card provides the same functions as the UCV L described in Section 4 6 1 Daughter cards The UCV S card can be fitted with two EIP daughter cards for managing VoIP com...

Page 176: ...4 6 EN Installation and Maintenance Manual Aastra 5000 Page 176 01 2011 Description des sous ensembles Figure 4 22 OVERVIEW OF THE UCV S CARD J1 J2 J13 EIP CARD NO 1 J14 EIP CARD NO 2 COMPACT FLASH1...

Page 177: ...ar panel Female connector 48 pins link with the RUCV card connector in an expansion cabinet J13 and J14 80 pin CMS connectors receive two optional daughter cards EIP No 1 on J13 and EIP No 2 on J14 to...

Page 178: ...to Manual AMT PTD PBX 0101 Pin 1 RXP Pin 2 RXM Pin 3 TXP Pin 4 TLBR Pin 5 TLBR Pin 6 TXM Pin 7 RLBR Pin 8 RLBR DECT SYNC P 1 DECT SYNC S 1 RJ45 double connector primary and secondary DECT synchronisa...

Page 179: ...2 JP12 Pin 3 GNDL Pin 4 MUSA Pin 5 ETM Pin 6 GNDL Pin 7 MUSB Pins 1 and 8 NC ALARM REMOTE CONTROL 1 DB25 F connector hosts the alarms and relays connection includes four alarm inputs controlled by a...

Page 180: ...rapid flashing If one cabinet indicates mains presence and operation of the rectifier in the cabinet power supply unit If two cabinets main cabinet and expansion cabinet indicates mains presence and o...

Page 181: ...art with OS reboot shutting down and restarting the iPBX S DECT green red ON green ON red Flashing green slowly Flashing green average Flashing green rapidly DECT synchronisation correct DECT synchron...

Page 182: ...recommended in normal operation Restart with OS reboot shutting down and restarting the iPBX Pressing and holding down the SHTD button 5 seconds triggers an OS reboot shutdown iPBX restart Forced rest...

Page 183: ...synchronisation port by default set to Master Priority Non Priority mode of the synchronisation port by default set to Priority setting of the input level for the external music on hold setting of the...

Page 184: ...on by bit M frame S The AXS cabinet delivers 48V remotely over an S0 link Factory configuration of the EXT1S card remote power supply is activated on the 4 interfaces 2 ISDN T0 interfaces for connecti...

Page 185: ...Installation and Maintenance Manual Aastra 5000 AMT PTD PBX 0058 4 6 EN Description des sous ensembles 01 2011 Page 185 Figure 4 24 OVERVIEW OF THE EXT1 S CARD J5 J6...

Page 186: ...for LVDS link with the processor card J6 48 pin connector for power supply and clock and interruption signals S T0 S T1 S T2 S T3 1 RJ45 connectors T0 S0 access Note Connecting S0 peripherals S sets...

Page 187: ...s one jumper block for each access These jumpers are fitted on connectors J29_xx and J30_xx located on the front panel of the EXT1 S card J29_30 for S T0 access J29_31 and J30_31 for S T1 access The f...

Page 188: ...terfaces of the LD4 card see section 4 13 2 1 Wiring DECT base stations Each base station is connected to an ISDN S0 BRI interface of an EXT1 S card and uses two pairs 1 transmit pair and 1 reception...

Page 189: ...D PBX 0058 4 6 EN Description des sous ensembles 01 2011 Page 189 TABLEAU 4 24 S0 INTERFACE LINK WITH DECT BASE STATION TWISTED CABLE EXT1 S card RJ45 connector Base station RJ45 connector Pin 6 NED1...

Page 190: ...ynchronisation port by default set to Master Priority Non Priority mode of the synchronisation port by default set to Priority setting of the input level for the external music on hold setting of the...

Page 191: ...onisation by bit M frame S The AXS cabinet delivers 48V remotely over an S0 link Factory configuration of the EXT1S12 card remote power supply is enabled on interfaces 2 and 3 and disabled on interfac...

Page 192: ...AMT PTD PBX 0058 4 6 EN Installation and Maintenance Manual Aastra 5000 Page 192 01 2011 Description des sous ensembles Figure 4 27 OVERVIEW OF THE EXT1 S12 CARD...

Page 193: ...not have any indicators on the front panel NAME Function characteristic contacts J5 48 pin connector for LVDS link with the processor card J6 48 pin connector for power supply and clock and interrupti...

Page 194: ...he front panel of the EXT1 S12 card J29_30 for S T0 access J29_31 and J30_31 for S T1 access The four accesses are placed vertically on the card The one at the bottom is the S T0 access and the one at...

Page 195: ...al to those of the interfaces of the LN16X card see Section 4 14 5 5 The S T0 to S T3 interfaces of the EXT1 S12 card have installation details identical to those of the interfaces of the LD4 card for...

Page 196: ...Figure 4 29 CONNECTING A DECT BASE STATION TO AN S0 INTERFACE OF THE EXT1 S12 CARD TABLEAU 4 26 S0 INTERFACE LINK WITH DECT BASE STATION TWISTED CABLE EXT1 S12 card RJ45 connector Base station RJ45 co...

Page 197: ...frame S The AXS cabinet delivers 48V remotely over an S0 link Factory configuration of the EXT1 S6 card remote power supply is enabled on interfaces 2 and 3 and disabled on interfaces 0 and 1 Power su...

Page 198: ...does not have any indicators on the front panel NAME Function characteristic contacts J5 48 pin connector for LVDS link with the processor card J6 48 pin connector for power supply and clock and inter...

Page 199: ...nnectors J29_xx and J30_xx located on the front panel of the EXT1 S16 card J29_30 for S T0 access J29_31 and J30_31 for S T1 access Depending on the position of the jumpers the S T0 to S T1 accesses w...

Page 200: ...ces of the LN16X card see Section 4 14 5 5 The S T0 to S T3 interfaces of the EXT1 S6 card have installation details identical to those of the interfaces of the LD4 card for T accesses see Section 4 1...

Page 201: ...t DECT base stations Figure 4 32 CONNECTING A DECT BASE STATION TO AN S0 INTERFACE OF THE EXT1 S6 CARD TABLEAU 4 28 S0 INTERFACE LINK WITH DECT BASE STATION TWISTED CABLE EXT1 S6 card RJ45 connector B...

Page 202: ...transmitted by UCV L One PCM conversion logical block One equipment bus E S part equipment bus and synchronous bus controller One Reset unit for resetting the card and interfaces correctly One mainten...

Page 203: ...INDICATORS 4 11 3 Hardware and software configuration This card does not require any hardware or software configuration INDICATOR STATE EXPLANATION LINK front panel flashing green not flashing Correct...

Page 204: ...n and Maintenance Manual Aastra 5000 Page 204 01 2011 Description des sous ensembles 4 11 4 Installation and wiring Connecting an RUCV L card to a UCV L card requires a specific cable supplied with th...

Page 205: ...Installation and Maintenance Manual Aastra 5000 AMT PTD PBX 0058 4 6 EN Description des sous ensembles 01 2011 Page 205 Figure 4 33 OVERVIEW OF THE RUCV L CARD J1 J3 J3...

Page 206: ...and synchronous bus controller One Reset unit for resetting the card and interfaces correctly One maintenance bus I 2 C used for montitoring among others the power supply block alarms Two expansion ca...

Page 207: ...re or software configuration 4 12 4 Installation and wiring Connecting an RUCV S card to a UCV S card requires a specific cable provided with the expansion cabinet cable HT8212AA01 Note The basic cabi...

Page 208: ...AMT PTD PBX 0058 4 6 EN Installation and Maintenance Manual Aastra 5000 Page 208 01 2011 Description des sous ensembles Figure 4 34 OVERVIEW OF THE RUCV S CARD J1 J2...

Page 209: ...also used to connect 2 channel DECT base stations LD4 card fitted with one or two signal processing daughter cards for connecting 4 channel DECT base stations to one to four of its interfaces see the...

Page 210: ...pin connector backplane connection J4 HE14 connector 1 x 8 male pins partially equipped used for loading programmable components On Site not used J5 and J6 Two connectors AMP CMS 2 x 10 female pins h...

Page 211: ...the manufacturer S0 to S2 RJ45 8 pin connectors connection to S0 interface 1 S3 RJ45 8 pin connector connection to S0 interface ISDN 40 V remote supply voltage 1 T0 to T2 RJ45 8 pin connectors connect...

Page 212: ...nable remote power supply on each interface when connecting a T0 interface SW3 remote power supply interface 3 SW4 remote power supply interface 2 SW5 remote power supply interface 1 SW6 remote power...

Page 213: ...Connecting a T0 interface One end of the connection cable must be fitted with an ISO 8877 compliant male RJ45 connector The minimum diameter of the cables has to be 26AWG 0 4mm Figure 4 36 WIRING THE...

Page 214: ...The S0 bus is a shielded two pair cable Depending on the bus length and topology between one and eight female RJ45 connectors can be connected to it for one ISDN S0 BRI terminal Long bus point to poin...

Page 215: ...and an S0 terminal supplied with 40 V other than the base station on the same card the base station will be powered with a 40 V available only on an AXL cabinet Whatever the synchronisation mode grou...

Page 216: ...ons ISDN interface cards LD4 LD4N LD4X and EXT1 S EXT1 S12 cards fitted with four ISDN ports EXT1 S6 card fitted with two ISDN ports which by default have no ADPCM encoding decoding function can be fi...

Page 217: ...te power supply once the card is in service 4 13 3 2 Functional description The LD4NX card is a card connecting to the base rate interface of the ISDN network It includes 4 line interfaces configurabl...

Page 218: ...circuits Management of M bit channel by channel For software releases before 3 2 the 4 equipment interfaces on the card generate the M bit in the S frame every 800 ms factory setting This setting can...

Page 219: ...sembles 01 2011 Page 219 Figure 4 39 OVERVIEW OF THE LD4NX CARD LD4NX CARD FRONT PANEL J1 J6 J5 J2 1 J2 4 J2 3 J2 2 J1 1 J1 2 J1 3 J1 4 SW6 SW5 J14 J4 J14 1 2 3 CA1 HVAL ON CA1 HVAL 1 2 CA1 1 ON HVAL...

Page 220: ...loading programmable components On Site reserved for manufacturer not used J5 and J6 Two connectors AMP CMS 2 x 10 female pins hosts an ADPCM16V daughter card Caution the ADPCM8V daughter card is not...

Page 221: ...1 2011 Page 221 TABLEAU 4 40 DETAILS OF THE S0 T0 CONNECTIONS OF LD4NX CARD CONNECTORS Indicators TABLEAU 4 41 PRESENTATION OF LD4NX CARD INDICATORS Note Disable the card to hot unplug it NAME STATE E...

Page 222: ...EN Installation and Maintenance Manual Aastra 5000 Page 222 01 2011 Description des sous ensembles Pushbuttons The front panel includes an RST push button used to reset the card a NMI pushbutton used...

Page 223: ...re storage positions for jumpers Jumper J14 is used to select the LD4NX card s operating mode leave the jumper in factory position 2 3 for an LD4N configuration Place the jumper on 1 2 or remove the j...

Page 224: ...ensembles 4 13 3 5 Installation and wiring The LD4NX card can be hot plugged in removed from an AXL iPBX AXS iPBX or AXS12 iPBX in normal operation This card must be connected with cable No HG4731 Ca...

Page 225: ...s 01 2011 Page 225 Connecting a T0 interface One end of the connection cable must be fitted with an ISO 8877 compliant male RJ45 connector Figure 4 40 WIRING THE T0 INTERFACE OF AN LD4NX CARD TNR 3 6...

Page 226: ...The S0 bus is a shielded two pair cable Depending on the bus length and topology between one and eight female RJ45 connectors can be connected to it for one ISDN S0 BRI terminal Long bus point to poin...

Page 227: ...ion If there are a DECT base station and an S0 terminal supplied with 40 V other than the base station on the same card the base station will be powered with a 40 V available only on an AXL cabinet Fi...

Page 228: ...transmission service on channel D between the network and a terminal 4 13 4 2 Functional description see Figure 4 35 The LT2 card provides the following functions interface with one ISDN primary rate...

Page 229: ...5000 AMT PTD PBX 0058 4 6 EN Description des sous ensembles 01 2011 Page 229 Figure 4 43 OVERVIEW OF THE LT2 CARD LT2 CARD J7 J4 Console RUN LT2 X E1 T1 BIER CRCE BLER ER RAI LOF AIS LOS COM PBX_MATRI...

Page 230: ...LT2 CARD CONNECTORS NAME FUNCTION CHARACTERISTIC CONTACTS J1 96 pin connector backplane connection J2 and J3 Not used E1 T1 ISDN or PCM line connection transmit and receive pair RJ45 8pin connector Pi...

Page 231: ...Off On steady Flashing Call status No signalling over channel D and no ongoing call At least one ongoing call Presence of signalling on channel D but no ongoing call level 2 established Status of the...

Page 232: ...PCM PRI SF 0 dB ISDN T1 at 1 544 Mbps export OFF OFF ON OFF PCM PRI SF 7 5 dB ISDN T1 at 1 544 Mbps export OFF OFF ON ON PCM PRI SF 15 dB ISDN T1 at 1 544 Mbps export OFF ON OFF OFF Extended PCM PRI E...

Page 233: ...the microswitch TABLEAU 4 47 Configuration of microswitch CA8 on the LT2 card 2 2 CA8 1 CA8 2 CA8 3 CA8 4 CA8 SWITCH PCM TYPE ON OFF ON ON Extended PCM ESF 7 5 dB PCM T1 at 1 544 Mbps export ON ON OFF...

Page 234: ...HE CA5 MICROSWITCH ON THE LT2 CARD CA5 1 CA5 2 CA5 3 CA5 4 CA5 SWITCH PCM TYPE OFF Line coding B8ZS Binary 8 zero suppression ON Line coding AMI Alternate Mark Inversion OFF Remote alarm type A ON Rem...

Page 235: ...etting ON 24 TS PCM in CCITT mode OFF OFF OFF Rated transmission level factory setting OFF OFF ON Line length 0 35 m 0 3 505 20 cm OFF ON OFF Line length 25 65 m 82 6 492 24 cm OFF ON ON Line length 5...

Page 236: ...itch the card to programming mode Represents the microswitch TABLEAU 4 51 CONFIGURATION OF THE CA4 MICROSWITCH ON THE LT2 CARD CA6 1 CA6 2 CA3 1 CA3 2 CA2 1 CA2 2 SWITCH LINE IMPEDANCE OFF OFF ON ON O...

Page 237: ...Page 237 4 13 4 5 Installation and wiring The LT2 card cannot be hot plugged in a working iPBX The iPBX must be powered off before inserting the card This card must be connected with cable No HG4731 C...

Page 238: ...ard memory and an Ethernet LAN Tunnelling function for iPBX networking using an IP network as a medium for the signalling channel the Voice over IP VoIP gateway function which uses the VOIP4 8 VOIP4E...

Page 239: ...stra 5000 AMT PTD PBX 0058 4 6 EN Description des sous ensembles 01 2011 Page 239 Figure 4 44 OVERVIEW OF THE PT2 CARD PT2 CARD J1 J7 1 2 1 J8 1 9 J6 CA1 ON PROG FLASH 234 ONSOLE 25 2 04 8 48 48 28 0...

Page 240: ...N port compatible with the 10 Base T or 100 Base TX standards and compliant with IEEE specification 802 Pin 1 TPTX Pin 2 TPTX Pin 3 TPRX Pin 6 TPRX Pins 4 5 7 and 8 NC console RJ45 connector reserved...

Page 241: ...ufacturer reserved 4 13 5 4 Hardware configuration The PT2 card has a CA1 configuration microswitch 1 Factory delivery configuration in bold characters TABLEAU 4 54 HARDWARE CONFIGURATION OF THE PT2 C...

Page 242: ...ystem must be powered off before it is plugged This card must be connected with cable No HG4731 The system is connected to the Ethernet LAN by plugging the RJ45 connector of the PT2 card into an avail...

Page 243: ...The CS1 card enables two X 25 synchronous interfaces to be connected in V28 or V10 mode Figure 4 46 HOW TO USE A CS1 OR CA1 CARD BUILT INTO AN IPBX system DCE DCE ETTD DTE C asynchronous serial link...

Page 244: ...l Aastra 5000 Page 244 01 2011 Description des sous ensembles Figure 4 47 OVERVIEW OF THE CS1 CARD CR2 CR1 SW1 3 2 1 SW2 3 2 1 1 6 J2 AB 1 6 J3 AB J1 CS1 CARD CS1 X SYNCHRONOUS PORT 1 SYNCHRONOUS PORT...

Page 245: ...RONOUS CONNECTORS ON THE CS1 CARD NAME FUNCTION CHARACTERISTIC CONTACTS J1 96 pin connector backplane connection SYNCHRONOUS PORT 1 front view Connecting equipment 0 1 SYNCHRONOUS PORT 2 front view Co...

Page 246: ...l TABLEAU 4 57 PRESENTATION OF CS1 CARD INDICATORS 4 13 6 4 Hardware configuration The SW1 and SW2 microswitches are used to select V10 or V28 mode TABLEAU 4 58 HARDWARE CONFIGURATION OF THE CS1 CARD...

Page 247: ...24 SIGNAL NAME ETTD ISO 2110 25 PINS DIRECTION CS1 DTE CS1 CARD CONNEC TORS FUNCTION CCITT EIA CS1 Port1 Port 2 104 RD RD NDE 3 2 Received data 103 ED ST TD NDR 2 3 Transmitted data 108 TDP DTR DTR 20...

Page 248: ...rt 2 104 RD RD NDE 3 3 Received data 103 ED ST TD NDR 2 2 Transmitted data 108 TDP DTR DTR 20 5 card present output 106 PAE CTS CTS 5 4 flow control input 102 TS GND SGND 7 7 0 V return for junction o...

Page 249: ...d with 4 RS232 ports used to connect 4 asynchronous terminals for data transmission max speed 19200 bit s XON XOFF flow control is used Note The V24 V10 interface is compatible with V24 V28 RS232C equ...

Page 250: ...OF CA1 CARD CONNECTORS TE0 TE3 NAME FUNCTION CHARACTERISTIC CONTACTS J1 96 pin connector backplane connection 1 TE0 to TE3 Connecting equipment items 0 to 3 2 LINE NO PIN NO TE3 TE2 TE1 TE0 FUNCTION 1...

Page 251: ...ion des sous ensembles 01 2011 Page 251 Indicators The indicators are located on the card circuit and not on the front panel TABLEAU 4 63 PRESENTATION OF THE CA1 CARD INDICATORS NAME STATE EXPLANATION...

Page 252: ...the CA1 card The straps are not shown in this table TABLEAU 4 65 CONNECTING A DCE CA1 TO A DTE PC OR VT100 CONSOLE EQUIPMENT NUMBER CONNECTOR SWITCH V10 MODE V28 MODE 0 J2 SW1 1 J3 SW2 2 J4 SW3 3 J5 S...

Page 253: ...M OR V24 ADAPTER CIRCT DESIGNATION DCE DIRECTION CA1 DCE CONNECTORS CA1 CARD FUNCTION CCITT EIA CA1 9 PIN 25 PIN TE0 to TE3 104 RD RD NDE 2 3 3 Received data 103 ED ST TD NDR 3 2 1 Transmitted data 10...

Page 254: ...les 4 13 7 CP1 card 4 13 7 1 Description The CP1 card carries out circuit packet switching for X 25 protocol used to transmit data in packet mode in a B channel of a Num ris link Figure 4 49 OVERVIEW...

Page 255: ...l connections Indicators The indicators are located on the card circuit and not on the front panel TABLEAU 4 67 PRESENTATION OF THE CP1 CARD INDICATORS 4 13 7 3 Hardware configuration Jumper SW1 must...

Page 256: ...tes of an M6500 network on a call set up over the ISDN public network a Transfix lease line at 64 or 128 kb s 4 13 8 2 Functional description The MUM card can be used in three different ways as a sing...

Page 257: ...N Description des sous ensembles 01 2011 Page 257 Figure 4 50 OVERVIEW OF THE MUM CARD MUM CARD RUN SYNC SERIAL WAN INTERFACE RST MUM X PBX_MATRIX_CARTE_MUM RJ_FAV_01_01 MUM CARD FRONT PANEL J1 A B 1...

Page 258: ...MUM CARD CONNECTORS NAME FUNCTION CHARACTERISTIC CONTACTS J1 96 pin connector backplane connection Sync Serial Wan Interface DB15 connector Connection to a QSIG private point to point link X24 V11 Pi...

Page 259: ...ard includes an RST push button used to reset the card reserved manufacturer 4 13 8 4 Hardware configuration The hardware configuration of the MUM card is described in Document 7 see section 1 3 4 13...

Page 260: ...on off hook detection Voice transmission and conversion in digital form from the UCV card to the analogue sets Each of the 16 PCM TSs exchanged with the UCV card is the medium for the voice carried ov...

Page 261: ...tion and Maintenance Manual Aastra 5000 AMT PTD PBX 0058 4 6 EN Description des sous ensembles 01 2011 Page 261 Figure 4 51 OVERVIEW OF THE LA16X CARD L15 L8 J1 PBX_MATRIX_XL_LA16X_COTE_01_01 L7 L0 LA...

Page 262: ...nts for connecting an analogue terminal are the voltage and current measured across the station during conversation must be U 12 4 V and I 25 mA line resistance taking the set into account 600 Ohms al...

Page 263: ...rrent This voltage may vary between 43 V and 56 V The maximum line resistance for a 22mA current is 1000 Ohm The maximum line current for a 200 Ohm resistance is 40 mA With the set on hook the permane...

Page 264: ...on The LA16X 8 card is used to connect 8 analogue set lines to an iPBX 4 14 2 2 Functional description The LA16X 8 card is functionally identical to the LA16X card see Section4 14 1 2 except that it p...

Page 265: ...tch 4 14 3 2 Installation and wiring The LA16X 8 card can be hot plugged in an AXD AXL AXS or AXS12 iPBX in normal operation The other constraints relating to installing and wiring the LA16X card are...

Page 266: ...he LA16X card see section 4 14 1 2 except for the following differences it ensures interfacing with only 8 analogue sets the parameters for converting digital signals into analogue signals and from an...

Page 267: ...card cannot be hot plugged in a working iPBX The iPBX must be powered off before inserting the card An LA8 card cannot be plugged into AXD and AXL expansion cabinets either The other constraints rela...

Page 268: ...D channel at 8 kbit s on each of the lines connected to a digital set Voice transmission between each of the 16 PCM TSs exchanged internally with the UCV card and the B channel at 64 kbit s on each of...

Page 269: ...or AXS12 iPBX in normal operation It is essential to respect the standards between weak and strong currents The distance between the telephone cable and the source of interference electrical conductor...

Page 270: ...Page 270 01 2011 Description des sous ensembles Maximum line length 0 4 mm wire about 1000 m 0 6 mm wire about 1800 m The cards must be connected with cables with the following references HG4765B HG4...

Page 271: ...ion The LN16X 8 card is used to connect 8 digital set lines to an iPBX 4 14 6 2 Functional description The LN16X 8 card is functionally identical to the LN16X card see Section4 14 5 2 except that it p...

Page 272: ...S or AXS12 iPBX in normal operation It is essential to respect the standards between weak and strong currents The distance between the telephone cable and the source of interference electrical conduct...

Page 273: ...Description des sous ensembles 01 2011 Page 273 Maximum line length 0 4 mm wire about 1000 m 0 6 mm wire about 1800 m The cards must be connected with cables with the following references HG4765B HG4...

Page 274: ...cal to the LN16X card see Section 4 14 5 2 except that it provides an interface with only 8 digital sets 4 14 8 3 Physical description see Figure 4 57 Connectors TABLEAU 4 75 DESCRIPTION OF THE LN8 CA...

Page 275: ...iPBX The iPBX must be powered off before inserting the card An LN8 card cannot be plugged into AXD and AXL expansion cabinets either The other constraints relating to installing and wiring the LN8 ca...

Page 276: ...d to connect 4 digital and 4 analogue set lines to an iPBX 4 14 9 2 Functional description The LM8 card performs the functions of both the LA8 card see Section4 14 4 2 and those of the LN8 card see Se...

Page 277: ...red off before inserting the card An LM8 card cannot be plugged into AXD and AXL expansion cabinets either The constraints for wiring are those relating to connection with analogue sets see Section4 1...

Page 278: ...been left example of use hotel customer reception The LED signal command is sent to the central unit UCV card which activates a high voltage current generator built into the card providing the power...

Page 279: ...stra 5000 AMT PTD PBX 0058 4 6 EN Description des sous ensembles 01 2011 Page 279 Figure 4 59 OVERVIEW OF THE LH8 CARD A7 A0 LH8 X PBX_MATRIX_CARTE_LH8 RJ_FAV_01_01 J1 J1 J2 J3 J4 1 4 1 4 J4 J5 J3 J2...

Page 280: ...escription The LH16X card has the same features as the LA16X card see Section4 14 1 2 plus an extra feature that lights up an LED to inform the user connected that a message has been left example of u...

Page 281: ...llation and wiring The LH16X card can be hot plugged in an AXD AXL AXS or AXS12 iPBX in normal operation The LH16X card has the same installation and wiring details as those of the LA16X card see Sect...

Page 282: ...ctional description The LH16X 8 card has the same features as the LA16X 8 card see Section4 14 2 2 plus an extra feature that lights up an LED to inform the user connected that a message has been left...

Page 283: ...ation and wiring The LH16X 8 card can be hot plugged in an AXD AXL AXS or AXS12 iPBX in normal operation The LH16X 8 card has the same installation and wiring details as those of the LA16X card see Se...

Page 284: ...twork detection of the line busy tone this function is ensured by a daughter card DTOC card a DTOC card can be associated with each line The release signal polarity inversion must be sent by the publi...

Page 285: ...escription des sous ensembles 01 2011 Page 285 Figure 4 62 OVERVIEW OF THE LR4 CARD D1 1 D1 2 D1 3 D1 4 S1 2 ON 3 4 1 2 S1 1 ON 3 4 1 2 S1 3 ON 3 4 1 2 S1 4 ON 3 4 1 2 J1 J4 J2 1 4 J1 1 4 J3 LR4 CARD...

Page 286: ...is assigned to a network line TABLEAU 4 80 PRESENTATION OF THE LR4 CARD INDICATORS NAME FUNCTION CHARACTERISTIC CONTACTS J1 96 pin connector backplane connection J4 to J11 Couples of connectors used...

Page 287: ...THE S1 MICROSWITCH ON THE LR4 CARD Two S2 microswitches are used to configure the billing frequency on a card fitted with FTXC daughter cards Represents the microswitch TABLEAU 4 82 CONFIGURATION OF T...

Page 288: ...The FTXA and FTXC daughter cards are not fitted with microswitches The hardware configuration required for installing the FTXC card is implemented from the S2 microswitch on the LR4 card see Tableau...

Page 289: ...rer protocols etc Several types of signalling can be used COLISEE pulse signalling for connection to the COLISEE network COLISEE pulse signalling in master or slave mode for connection to another priv...

Page 290: ...290 01 2011 Description des sous ensembles Voice transmission and conversion in digital form from the UCV card to the analogue sets The PCM TSs exchanged with the UCV card are the medium for voice car...

Page 291: ...current generator for this purpose Power supply the LI1 card receives several supply voltages on the backplane connector J1 5 V 5 V used for the operation of its internal circuits 48 V used for the op...

Page 292: ...tor backplane connection L0 RJ45 connector carries voice over an analog TL 0 Pin 3 LRB0 Pin 4 LRA0 Pin 5 LERB0 Pin 6 LERA0 L1 RJ45 connector carries voice over an analog TL 1 Pin 3 LRB1 Pin 4 LRA1 Pin...

Page 293: ...GURING THE LI1 CARD CONNECTOR INDICATORS NAME Card STATE EXPLANATION L0 RT0 RX TX BUSY Red Green Green Status of the line circuit busy circuit in transmit mode circuit in receive mode L1 RT1 RX TX BUS...

Page 294: ...a two wire TL voice communications are carried in both directions on the same pair LA and LB by overlapping electrical states with a four wire TL one pair is dedicated to reception and the other pair...

Page 295: ...ite 3 LRB0 orange 4 LRA0 white 5 LERB0 green 6 LERA0 white 7 NC brown 8 NC white 1 NC Signalling L0 RJ45 Equipment 0 blue 2 T01 white 3 R01 orange 4 R00 white 5 TB00 green 6 TA00 white 7 GNDL brown 8...

Page 296: ...itch Figure 4 66 WIRING A 2 WIRE E M ANALOGUE TL 1 2 3 4 5 6 7 8 L0 LERB 0 LERA 0 1 2 3 4 5 6 7 8 L1 iPBX A iPBX B LERB 1 LERA 1 3 4 2 1 ON OFF 3 4 2 1 ON OFF 1 2 3 4 5 6 7 8 RT0 TA 00 GNDL 1 2 3 4 5...

Page 297: ...TL 1 2 3 4 5 6 7 8 L0 LERB 0 LERA 0 1 2 3 4 5 6 7 8 L1 iPBX A iPBX B LERB 1 LRB 0 LRB 1 LRA 0 LRA 1 LERA 1 3 4 2 1 ON OFF 3 4 2 1 ON OFF 1 2 3 4 5 6 7 8 RT0 TA 00 GNDL 1 2 3 4 5 6 7 8 RT1 TA 10 TB 00...

Page 298: ...print detailed telephone traffic reports Figure 4 69 OVERVIEW OF THE BTX CARD 4 14 15 2Functional description The BTX card is used to record store sort and edit on request from a set with interactive...

Page 299: ...J8 Stocko 3 pin connector External buffer power supply Pin 1 GND Pin 3 12 V PRN RJ45 connector connection to a PC or printer Pin 1 TX Pin 2 RX Pins 3 4 5 and 6 GND Pin 7 CTS Pin 8 RTS CHARGE RJ45 conn...

Page 300: ...ATION OF THE BTX CARD JUMPERS NAME STATE EXPLANATION LD1 On steady green On green red alternating Green flashing Red flashing Normal buffer operation iPBX data received on the serial ticket port Pre a...

Page 301: ...Direct callback from the call log Loading and saving of directories logs and the set s parameters Digital sets are connected to iPBXs through the following cards For the AXS iPBX EXT1 S 8 digital set...

Page 302: ...T1 S12 8 analogue sets can be connected EXT1 S6 4 analogue sets can be connected For AXS AXL AXD iPBXs LA16X 16 analogue sets connectable LA16X 8 8 analogue sets can be connected LA8 8 analogue sets c...

Page 303: ...ughter card see Section 4 4 3 and or An EIP daughter card 8 32 channels on the UCV card IP sets communicate with an iPBX through an Ethernet LAN Connection to the LAN is via a standard Ethernet cable...

Page 304: ...ta communications equipment DCE modem This communication is possible on iPBXs fitted with CS1 cards for connection in packet mode via an X25 network CA1 cards for connection to an asynchronous data te...

Page 305: ...ongoing call An attendant console can be either a digital set with programmable keys for example an M760 or an attendant console on PC for example an Aastra i2070 Software Attendant Console Aastra XS...

Page 306: ...ortal Figure 5 1 EXTERNAL MUSIC UCV wiring Nota Make a loop between GND 3 and ETM 5 to check that the external music is present 5 6 2 Common bell 5 6 2 1 Overview The iPBX has a restricted night servi...

Page 307: ...rms are assigned by MMC AXD Carte IUCT Secteur 230V 1 interface SLAT type TAT 524 La sonnerie d alarme est command e par le relais R3 Il est mis votre disposition un contact sec sur J10 courant max 1...

Page 308: ...votre disposition un contact sec sur J10 courant max 1 A Sonnerie alternative type 1000 Interface sonnerie SLAT 11 12 J10 R3 2 1 Secteur 230V 1 interface SLAT type TAT 524 La sonnerie d alarme est com...

Page 309: ...any others see Figure 3 1 in Section 3 for the cabinets earth connection Safety of energy distribution Apply the usual precautions relating to mains power supply In case of danger disconnect the powe...

Page 310: ...heck Location Environment Space requirement Electrical installation 6 2 1 2 Location Unpacking installation operation service and storage The location must be large enough to host the iPBX and a workt...

Page 311: ...ral conditions The room should be clean dry and well ventilated to allow free airflow Temperature The temperature of the room must be controlled and kept between 5 C 41 F and 40 C 104 F Humidity The d...

Page 312: ...comply with the standard NF C 15100 Make sure there are sufficient sockets for other equipment as required Nota Do not use an extension cable between the power source and the iPBX power supply module...

Page 313: ...llation and Maintenance Manual Aastra 5000 AMT PTD PBX 0058 4 6 EN Installation and activation 01 2011 Page 313 HJ3970BA01D980353483 HJ3970B LT2 QTY 1 1 2 Caption 1 Product description 2 Product sales...

Page 314: ...T 1 The cabinets in an A2XD or A3XD version can be placed on a piece of furniture on top of one another A minimum clearance is required for air circulation 55 mm on the left hand side and at the back...

Page 315: ...ATION COMMENTS Fit the securing brackets on the sides of the cabinets using the screws supplied 4 per bracket The brackets offer only one mounting option flush with the front panel of the rack Identif...

Page 316: ...X 0058 4 6 EN Installation and Maintenance Manual Aastra 5000 Page 316 01 2011 Installation and activation Fix the securing brackets on the rack using screws Table 1 OPERATION DETAILS OF THE OPERATION...

Page 317: ...furniture on top of one another 3 When mounting a cabinet on a wall AXS AXS12 or AXS6 the front panel of the cabinet can face upwards or downwards However we recommend turning it upwards A minimum cle...

Page 318: ...be fitted install the captive nuts on the holes selected Lift the cabinet and align the bracket attachment holes with those of the rack Fix the securing brackets on the rack using screws On a wall Mar...

Page 319: ...this cabinet all connections are made on the front panel of the various sub assemblies of the cabinet CONTRAINTE Always use the recommended cable see section Installation and wiring specifications fo...

Page 320: ...tton to I For a system with only several cabinets In systems with 2 or 3 cabinets first power on the expansion cabinet s I O push button in position I then the main cabinet 6 2 4 2 Viewing the status...

Page 321: ...ion and telephony flow seperation the address indicated on this screen will be dedicated to the telephony network in association with the one defined for network administration in the ADMINISTRATION N...

Page 322: ...utomatically assigned an address and is are automatically activated The values assigned are IPADR 1 and IPADR 2 in case of two EIP cards Attention This feature may result in IP address clashes It is a...

Page 323: ...n be modified on the following screens These services are used by the TMA application and to manage IP terminals Refer to the document 15 Note It is however possible to activate these services later f...

Page 324: ...ry setting TMA 1 DHCP value 0 or 1 This field allows the use 1 yes or non use 0 no of the DHCP service integrated into Aastra X series terminals If an external DHCP server is used the integrated DHCP...

Page 325: ...If the DHCP value 1 the screen is displayed Enter y to configure the integrated DHCP service SUBNET MASK subnet mask dedicated to IP and SIP terminals BEGIN RANGE and END RANGE Address range dedicated...

Page 326: ...s 67xxi A53xxip and i7xx They are not obligatory on simple networks The system then restarts automatically and the its IP network link can be set up via the LAN access Start up is now complete and you...

Page 327: ...ole must be connected to the same network as the Aastra series system CPU card LAN port Open a web browser installed on the operating console Internet Explorer for instance Enter the IP address define...

Page 328: ...AMT PTD PBX 0058 4 6 EN Installation and Maintenance Manual Aastra 5000 Page 328 01 2011 Installation and activation The AMP welcome screen is displayed...

Page 329: ...nt Portal in local access mode via the COM port PPP protocol The PPP exchange protocol can set up a network type connection between two systems on a serial point to point link 6 2 6 2 1 Connectors Acc...

Page 330: ...specifications A modem of the type communication cable between two computers must be installed Use Device manager to check the presence of this pseudo modem If the modem is not installed proceed as fo...

Page 331: ...and Maintenance Manual Aastra 5000 AMT PTD PBX 0058 4 6 EN Installation and activation 01 2011 Page 331 Click Next Tick the option install the hardware I manually select from a list then choose Modem...

Page 332: ...n and activation In the following screen tick the option Do not detect my Modem Click Next Select the modem Communication cable between two computers then choose a communication port Click Next The ne...

Page 333: ...al Aastra 5000 AMT PTD PBX 0058 4 6 EN Installation and activation 01 2011 Page 333 Configuring the PPP connection In Control Panel Click Network connections Select Create a new connection Tick succes...

Page 334: ...astra 5000 Page 334 01 2011 Installation and activation Enter a name for this network connection Select the device Communication cable between two computers In the next screen indicate the restriction...

Page 335: ...Login user Password guest The PPP connection characteristics are displayed using the Windows ipconfig command By default the IP addresses 192 168 0 101 and 192 168 0 102 are used for the system and fo...

Page 336: ...MP via serial link Open a web browser installed on the operating console Internet Explorer for instance Enter the address reserved for this access mode https 192 168 0 101 secure access mode Some secu...

Page 337: ...te An SSH client Secure Shell is used to connect securely to a remote server thanks to the SSH protocol Using an appropriate communication software application putty for example proceed as follows Run...

Page 338: ...00 Page 338 01 2011 Installation and activation mode Default access login admin Default access password admin Access to the AMP interface is provided in VT100 mode See Aastra Management Portal Operati...

Page 339: ...t and follow the start up progress on the PC Upon display of Identification starting Press Ctrl I The screen then displays the different configuration modes Select T mode to enter the pre configuratio...

Page 340: ...o the different fields Enter successively the system parameters using the Return key to change line After the last line is validated a summary of the network parameters is displayed for confirmation A...

Page 341: ...card s is are automatically assigned an address and is are automatically activated The values assigned are IPADR 1 and IPADR 2 in case of two EIP cards Attention This feature may result in IP address...

Page 342: ...MT_PTD_PBX_0101 The licence number declaration screen is then displayed Enter the corresponding value optional it may be entered later from AMP Press Return to confirm after entering y or n The system...

Page 343: ...ummary of the network parameters is displayed for confirmation If the values are correct press Return to confirm after pressing y The next screen is used to configure call distribution Press Return to...

Page 344: ...validated a summary of the network parameters is displayed for confirmation If the values are correct press Return to confirm after pressing y The next screen is used to configure the numbering plan...

Page 345: ...The numbering length field defined on the previous screen contains the internal number length to take into account 1 to 4 If this value is valid the fields first last modem IVB hscx common subscriber...

Page 346: ...his ASCII string will be truncated to 20 characters Managing the assignment of numbers to subscriptions Create a general purpose subscription If automatic creation is authorised for each subscriber eq...

Page 347: ...then restarts automatically and the its IP network link can be set up via the LAN access Start up is now complete and you can configure the site from the user interface Remarque You can configure auto...

Page 348: ...agement Preliminary operation Contact AASTRA s customer service to obtain the values Enter Identifier and Enter Key which will be required during the procedure described below You also need to provide...

Page 349: ...dure the manufacturer s default login and password are regenerated and can be used again The manufacturer s default access code is also reset in the menu TELEPHONY SYSTEM Configuration Users System ac...

Page 350: ...the site This form is then converted to a format csv compatible with the Aastra X series The file thus generated can be imported from AMP Menu System Software maintenance Massive import Refer to Sect...

Page 351: ...card or CPU card EIP Adding an expansion cabinet Adding a power module Changing to DUPLEX configuration for AXD Software operations Updating the iPBX software Backing up the configuration Restoring t...

Page 352: ...card it is advisable to stop the IPS card before powering off the iPBX Note that there is a minor risk of information loss if the IPS card is powered off before it is stopped For cards that can be re...

Page 353: ...make a second backup to save the system s new configuration Procedure Back up the customer configuration Check the compatibility between the card to be installed and its slot in the main or expansion...

Page 354: ...354 01 2011 Installation and activation Check the status of the indicators of the added card and those of the CPU card Activate the card from the operating console Program any additional equipment ass...

Page 355: ...be saved on hard disk or floppy Immediately after installing and programming any new components you should make a second backup to save the system s new configuration Procedure Check the compatibility...

Page 356: ...figuration Procedure Important Before removing the card to be equipped from the cabinet check that it is hot unpluggable See Section 6 3 2 Remove the card on which you will be installing the daughter...

Page 357: ...ese two daughter cards have 8 or 32 channels each for signal processing The internal IP address of the IP cards must be declared on the same sub network as that of the CPU card See Aastra Management P...

Page 358: ...es the use of spacers The EIP cards are screwed onto the cards Combining 32 channel and 8 channel EIP cards Both EIP cards must not have the same capacity on the same UCV card For example a CPU card m...

Page 359: ...r off the iPBX Remove the UCV card on which you will be installing the daughter card Install the EIP cards on the appropriate connectors Installing a daughter card on a card requires the use of spacer...

Page 360: ...ove the passive UCV D card Install the EIP cards on the appropriate connectors Re insert the passive UCV D card fitted with EIP cards See Aastra Management Portal operating manual for the different ph...

Page 361: ...ce Manual Aastra 5000 AMT PTD PBX 0058 4 6 EN Installation and activation 01 2011 Page 361 6 3 6 2 Adding EIP card s for AXL AXS AXS12 and AXS6 configuration Same procedure as in Simplex AXD configura...

Page 362: ...of the cabinets and colour codes see Sections 4 5 4 1 Install the cable on the front panel of the expansion cabinet cards Install the battery cabinet if available Connect the two battery leads Make s...

Page 363: ...e battery cable to the 48 V BATT connector of the power supply module located on the front panel of the power supply module on an AXL iPBX Connect one end of the mains cable to the power supply module...

Page 364: ...nnection cable BHT8212A Install the cable on the front panel of the expansion cabinet cards Install the battery cabinet if available Connect the two battery leads Make sure the polarity is correct Con...

Page 365: ...dure applies to the power modules of an AXD An ADS350XD power supply module is added to a simplex AXD cabinet in order to secure the iPBX operation It is installed in place of the VADS ventilation mod...

Page 366: ...2011 Installation and activation to O Insert the power supply module in its slot and push it fully home Secure the power supply module onto the iPBX structure using its two screws Connect the mains c...

Page 367: ...adding new components first back up the data Procedure Back up the customer configuration Check the compatibility of the card to be inserted UCV D RUCV D and its slot in the main expansion cabinet If...

Page 368: ...iPBX configuration See Aastra Management Portal operating manual Selecting duplex configuration enables the system to take into account the second UCV D and RUCV D card and ensure as soon as possible...

Page 369: ...gement Portal operating manual The same procedure for all these cabinet types From the buttons on the CPU card front panel you have to distinguish between two types of restart operations Restart with...

Page 370: ...cable connected between the COM port of the CPU card and the PC COM port Open a Hyperterminal window and configure the connection as follows Bits per second 115200 bits s Data bits 8 Parity none Stop...

Page 371: ...ra Management AM 7450 Nota During the restart phase following the upgrade phase communications are interrupted 6 7 2 Upgrading the software from AMP The function is executed from the AMP in the menu S...

Page 372: ...e PBX system to be updated The CDROM system edition is in the file name SYS5000 1_R1 1A_AA_00 tar gz 11AA The iPBX system edition is in the menu System Info Software Identification file UCV1LV111_Gen1...

Page 373: ...f the path is known enter it directly in the corresponding field The file for the new version of the Aastra 5000 application is available in the A5000_Infra folder or sub folder of the CD ROM AX_R5000...

Page 374: ...ownloading phase At the end of the downloading operation if the system version needs to be updated the system proposes it automatically In this case the system must be updated refer to the System vers...

Page 375: ...sponding field The file for the new version of the integrated OS is available in the A5000_Infra folder of the CD ROM SYS5000 1_R1 2A_A4_00 tar gz example Select Download A message indicates the progr...

Page 376: ...o modes IMMEDIATE DEFERRED These two modes are explained in the Aastra Management Portal operating manual Immediate switchover Enter the new unlocking key for release R5 2 The system restarts automati...

Page 377: ...een to access AMP It is advisable to close and restart it The next phase is to validate or save this new release definitely See to the next paragraph Delete checkbox By ticking this box and validating...

Page 378: ...ssociated with the working R5 2 will be retained for upgrade to later releases The different modes are From AMP From Aastra Management AM 7450 TBC Nota During the restart phase following the upgrade p...

Page 379: ...ily You can validate it through the menu SYSTEM Restart request IMPORTANT NOTES As long as the new version is not validated it remains in test a red frame is displayed in the menu area indicating that...

Page 380: ...ect Confirm The system restarts automatically with the previous release This menu is also directly accessible via the TELEPHONY SERVICE menu by clicking the quick link Validate the active software ver...

Page 381: ...ve 10x CPU card Check the passive card s downloading phase message passive Uc 1 0b download At the end of the passive card downloading phase 20 minutes for a 1 GB compact flash card and 30 minutes for...

Page 382: ...et Explorer for example Enter the IP address 192 168 0 101 the default value defined for this connection type via the operating console in secure mode https 192 168 0 101 secure access mode Connectors...

Page 383: ...ention Do not forget to back up using at w Configuring the PPP connection In Control Panel Click Network connections Select Create a new connection In New connection wizard clickNext Tick successively...

Page 384: ...uest Accessing the AMP user interface Open a web browser installed on the operating console Internet Explorer for instance Enter the address reserved for this access mode https 192 168 0 101 secure ac...

Page 385: ...a PC on the operator ISDN line or on an S0 S2 bus Configuring the ISDN modem access on the Aastra X series system S0 Call without ID at Yes menu 414 Examples of external ISDN modems Olitec ISDN USB V2...

Page 386: ...the connection to the PBX Login user Password guest Click Properties then successively tick the boxes as indicated below in each tab In the Modem properties tab Choose the modem type on the list prop...

Page 387: ...efault value Click OK Access to the AMP browser Open a web browser installed on the operating console Internet Explorer for instance Enter the address reserved for this access mode https 192 168 1 101...

Page 388: ...ll the others are routed over the LAN port the connection would not be set up 6 11 3 1 CONNECTIONS ISDN cable router RJ45 LD4X or LT2 or operator RJ45 Ethernet cable RJ45 RJ45 PBX CONFIGURATION S0 or...

Page 389: ...CF card is mandatory in R5 3 This migration is made using a USB key connected to the PBX and via the menu SYSTEM Software maintenance Compact flash migration which makes it possible either to back up...

Page 390: ...That the available space on the USB key in case of backup or on the compact flash card in case of restore is enough for the operation In case of error a dialogue box appears and the required operation...

Page 391: ...ue box indicates that the backup has not been performed correctly In this case the data has not been fully stored on the key The key is not removed automatically it will be removed upon exiting the me...

Page 392: ...nformation about the procedure see the document AMT PTD PBX0058 the section on changing from a 1 GB compact flash card to a 2 GB compact flash card and activating a new system During restart in TOTAL...

Page 393: ...ow is displayed during the restore operation The restore operation takes place like the backup operation in 6 phases Here again the operations may last several minutes This restore operation takes pla...

Page 394: ...hile data was being copied in phase x System error exit and retry means that no key is connected or that the maintenance software cannot execute the restore action Forbidden function version in test m...

Page 395: ...ete the maintenance if required Maintenance operations affect the iPBX availability The equipment can have one of the following states Full Mission Capable All major services of the equipment are full...

Page 396: ...ota Only a hardware problem prevents the active card from working correctly otherwise an intentional removal of the active card triggers a switchover to the passive card which takes over and becomes a...

Page 397: ...predefined intervals or according to recommended criteria in order to reduce the probability of failure or degradation of the system s operation It includes Some preventive control operations Some pre...

Page 398: ...e repaired Faulty subassemblies are returned to the manufacturer s repair centre in the exchange batch reusable packaging accompanied with a fault sheet describing the anomaly observed 7 2 7 List of i...

Page 399: ...096A Main cards UCV D BHJ0032A RUCV D delivered with an external cable for connecting the main cabinet BHJ4856A IUCV D without i button BHJ4855B UCV DS card daughter cards 32 channel EIP BHJ0022A 8 ch...

Page 400: ...ipment cards LA16X BHJ4431A LA16X 8 BHJ4431B LA8 HJ4714 LN16X BHJ4475A LN16X 8 BHJ4475B LN8 HJ4715 LM8 BHJ4726A LH8 HJ4716 LH16X BHJ4830A LH16X 8 BHJ4830B LR4D with DTOC LR4 without DTOC FTXA LR4 daug...

Page 401: ...2 and AXS6 SUB ASSEMBLIES ITEM CODE Power supply modules ADS300X BHR6953D ADS150X BHR0119A UCv card daughter cards 32 channel EIP BHJ0022A 8 channel EIP BHJ0022B ADPCM16V on EXT1 S and EXT1 S12 CPU ca...

Page 402: ...HJ4715A LM8 BHJ4726A LH8 HJ4716A LH16X BHJ4830A LH16X 8 BHJ4830B LR4D with DTOC LR4 without DTOC FTXA 50 Hz charge detector FTXC 12 16 KHz charge detector BHJ4717F HJ4717A HJ2817A HJ2818A LI1 cable B...

Page 403: ...on front panel battery polarity inversion protection F300 fuse accessible on the power supply card PK925F PK184M 3 15 A 6 3 A ADS300X power supply module fuses mains protection accessible on front pan...

Page 404: ...module BRC0038AAFR AXD expansion cabinet comprising 1 RUCV D card 1 ADS350XD power supply module delivered with an external cable for connecting the main cabinet BRC0032AAAA AXD expansion cabinet comp...

Page 405: ...fault report message is posted in the log A fault report can be a software error detected by a software module a software errors detected by the operating system a software error detected in a memory...

Page 406: ...section describes all the operations required to remove the element It is displayed in the form of a table with two columns the first column lists only the main actions to be performed the second colu...

Page 407: ...PBX AVAILABILITY FULL MISSION CAPABLE PARTIAL MISSION CAPABLE NO MISSION CAPABLE AVAILABILITY NUMBER AND TYPE OF LIST OF TOOLS REQUIRED TASK DURATION LIST OF INGREDIENTS AND CONSUMABLES USED OPERATION...

Page 408: ...procedure tools etc Cable references are not always given in the sheets to make the connections of the subassemblies to be installed the operator must refer to the labels attached to the cables The m...

Page 409: ...lacing a VADS ventilation module SHEET E 6 Replacing fuses in the power supply module AXD iPBX SHEET E 7 Replacing fuses in the power supply module AXL and AXS iPBX SHEET E 8 Replacing a UCV D CPU car...

Page 410: ...nce SHEET E 1REPLACING AN ADS300XD POWER SUPPLY MODULE AVAILABILITY No mission capable if power supply module is not duplicated Full mission capable if power supply module is duplicated OPERATORS s 1...

Page 411: ...on if it is an iPBX with multiple cabinets power off the power supply module of the main cabinet then those of the expansion cabinets Disconnect the mains cable Disconnect the mains cable on the front...

Page 412: ...n and Maintenance Manual Aastra 5000 Page 412 01 2011 Maintenance SHEET E 2REPLACING AN AXL POWER SUPPLY MODULE AVAILABILITY No mission capable 1 operator on site DURATION 15 minutes 1 standard tool c...

Page 413: ...ont panel of the power supply module Pull out the power supply module using its handles and remove it Check the functional technical state of the new power supply module Check that the functional tech...

Page 414: ...f it is the power supply module of a main cabinet in an iPBX with multiple cabinets also power off the power supply module of the expansion cabinets I O switch on O Disconnect the external cables Disc...

Page 415: ...the new power supply module Insert the power supply module in its slot and secure it with its screws Connect the fan cable to the power supply Screw on the mains unit at the back of the cabinet Conne...

Page 416: ...Connect the mains cable and if required the backup battery connector on the rear panel of the cabinet Power on the power supply module I O switch on I If it is the power supply module of the main cab...

Page 417: ...oved Refer to Section 6 4 Stopping the system AXD AXL AXS AXS12 and AXS6 Error No bookmark name given Disconnect the external cables Disconnect the mains cable and if required the backup battery conne...

Page 418: ...Connect the power supply cable to the CPU card Refit the backplane Connect the backplane to the main card Reinstall the expansion cards Place the guide rails Insert the card in its slot and lock it i...

Page 419: ...fore starting any operation Check the functional technical state of the new VADS ventilation module Check that the functional technical state of the new ventilation module is compatible with the old o...

Page 420: ...e remote operator before starting any operation Power off the power supply module Refer to Section 6 4 Stopping the system AXD AXL AXS AXS12 and AXS6 Error No bookmark name given Avertissement For a d...

Page 421: ...Unclip the fuses from the fuse holder Check the continuity of the fuses using the multimeter W position Table 10 OPERATION DETAILS OF THE OPERATION COMMENTS Check the compliance of the new fuses See...

Page 422: ...x configuration if it is an iPBX with several cabinets First power on the power supply module in the expansion cabinets then power on the power supply module in the main cabinet Check the status of th...

Page 423: ...e case of remote operation contact the remote operator before starting any operation Power off the cabinet s power supply module Refer to Section 6 4 Stopping the system AXD AXL AXS AXS12 and AXS6 Err...

Page 424: ...er located between the I O switch and the connector Utiliser un outil par exemple un petit tournevis t te plate comme levier comme l illustre la figure suivante Unclip the fuses from the fuse holder C...

Page 425: ...Connect the cables Disconnect the mains cable and if appropriate the backup battery connector on the front panel of the power supply module AXL at the back of the cabinet AXS and AXS12 Power on the i...

Page 426: ...e procedures followed Refer to 1 In the case of remote operation contact the remote operator before starting any operation Power off the iPBX Refer to Section 6 4 Stopping the system AXD AXL AXS AXS12...

Page 427: ...Slide the card along the card guides until it clicks into place Lock the card in place using the 1 4 turn locks see Figure 4 1 Perform the wiring exactly as in the old cabinet Power on the iPBX For an...

Page 428: ...d UCV D card takes over and becomes active After a switchover the duration of which depends on the configuration 15 s to 1 min the passive CPU card takes over and becomes active in the following three...

Page 429: ...the card in place using the 1 4 turn locks see Figure 4 1 Nota The UCV D card can be hot plugged in an operational AXD iPBX Activate the passive UCV D card from the AMP See Section 1 3 Document 1 Not...

Page 430: ...Page 430 01 2011 Maintenance SHEET E 9REPLACING A RUCV D CARD AVAILABILITY Partial mission capable if the RUCV D card is not duplicated Full mission capable if the RUCV D card is duplicated OPERATORS...

Page 431: ...n of the card For a card with micro switches check that these latter are configured as they were on the old card unless the configuration has been changed in which case see Section 4 5 As the card may...

Page 432: ...g three cases if the active card is removed if the active card remains idle for 2 minutes if a hardware failure is detected on the active RUCV D card in this case a hardware fault detection is perform...

Page 433: ...nt by the system Perform a software check Check the software release of the card on the AMP see document 1 Contact your distributor if the details do not coincide Check the RUCV D card indicators For...

Page 434: ...ny operation Disable the IUCV D card from the AMP Refer to the document AMP Operating manual Disconnect the cables Disconnect the external cables from the card and mark the cables for refitting Pull o...

Page 435: ...cators For a card fitted with indicators check that the yellow and or green indicators on the front panel are on and that no red indicator is on refer to Section 4 4 to check that the operating condit...

Page 436: ...opping the system AXD AXL AXS AXS12 and AXS6 Error No bookmark name given For a system with several cabinets first power off the main cabinet then the expansion cabinet Nota It is advisable to stop th...

Page 437: ...new cabinet Install the cables exactly like in the old cabinet On the front panel of the expansion cards On the front panel of the IUCV D card On the front panel of the UCV D card s If the iPBX has an...

Page 438: ...nce Manual Aastra 5000 Page 438 01 2011 Maintenance Check the UCV D card s system and application software releases using the AMP Refer to the document 1 Restore the data of the old configuration Tabl...

Page 439: ...nd AXS6 Error No bookmark name given For a system with several cabinets first power off the main cabinet then the expansion cabinet Nota It is advisable to stop the IPS card before powering off the iP...

Page 440: ...the iPBX has an expansion cabinet at the back of the cabinet On the front panel of the power supply module Connect the mains cable Connect one end of the mains cable to the power supply module of the...

Page 441: ...te operator before starting any operation Power off the iPBX Refer to Section 6 4 Stopping the system AXD AXL AXS AXS12 and AXS6 Error No bookmark name given For a system with several cabinets first p...

Page 442: ...bel with the i Button s identifier number the i Button s identifier label only not the product identification label Stick the i Button s identification label on the back of the new cabinet If required...

Page 443: ...talled all equipment has been connected to a grounded power point Power on the iPBX or an iPBX with several cabinets first power on the expansion cabinet by setting the I O switch on the power supply...

Page 444: ...6 4 Stopping the system AXD AXL AXS AXS12 and AXS6 Error No bookmark name given Nota It is advisable to stop the IPS card before powering off the iPBX Disconnect the cables Disconnect the mains cable...

Page 445: ...the cards in place using the 1 4 turn locks see Figure 4 1 Close the new cabinet Secure the cover Fit the cover slightly to the rear of the cabinet and push it forward Tighten the two securing screws...

Page 446: ...on contact the remote operator before starting any operation Power off the iPBX Refer to Section 6 4 Stopping the system AXD AXL AXS AXS12 and AXS6 Error No bookmark name given For a system with sever...

Page 447: ...ective ground Fit the new cabinet Connect the mains cable Connect one end of the mains cable to the power supply module s of the expansion cabinet and the other end to a grounded mains power point Att...

Page 448: ...re starting any operation Power off the iPBX Refer to Section 6 4 Stopping the system AXD AXL AXS AXS12 and AXS6 Error No bookmark name given First power off the main cabinet then the expansion cabine...

Page 449: ...tion In the case of an AXS AXS12 AXS62 cabinet do not connect the mains cable The cabinet must first be closed Fit the new cabinet Connect the mains cable once the cabinet is closed if it is an AXS AX...

Page 450: ...AMT PTD PBX 0058 4 6 EN Installation and Maintenance Manual Aastra 5000 Page 450 01 2011 Maintenance...

Page 451: ...6 EN Installing and using the IPS card 01 2011 Page 451 8 Installing and using the IPS card The installation and use of the IPS card are described in a special manual see document 13 Caution From R5 1...

Page 452: ...AMT PTD PBX 0058 4 6 EN Installation and Maintenance Manual Aastra 5000 Page 452 01 2011 Installing and using the IPS card...

Page 453: ...9 FUNCTIONAL DIAGRAMS This chapter contains six diagrams Functional diagram of an Aastra XD in simplex configuration Plate 9 1 Functional diagram of an Aastra XD in duplex configuration Plate 9 2 Fun...

Page 454: ...AMT PTD PBX 0058 4 6 EN Installation and Maintenance Manual Aastra 5000 Page 454 01 2011 Functional diagrams...

Page 455: ...E T S Y 3 S U B L I A M E C I O 6 8 4 3 8 3 3 S U O N O R H C N Y 3 S T N E M E C N U O N N A 3 6 6 8 4 G N I G R A H R E F F U B D E I F I N 5 G N I G A S S E M 3 5 X X X X 2 R O 0 R E T N I R 0 8 0...

Page 456: ...S B U 3 R E V R E S N O I T A S I N O R H C N Y 3 T N E M E G A N A M L I A M E C I O 6 S U O N O R H C N Y 3 S T N E M E C N U O N N A 3 6 6 S E S U T A T 3 S E D O D N A G N I H C I T W S 3 4 0 S E...

Page 457: ...Synchronous States and codes States and Codes ISDN Private system eg PBX base IP Sets Download Backup Printer PBX N PBX 3 PBX 2 PCM channels E1 T1 T0 S0 S0 PCM TS Switching bus System Music source Uni...

Page 458: ...2 49 XPANSION CARDS 5 6 4IME BASE 4IME BASE 2EFERENCE CLOCK 2EFERENCE CLOCK 034 0 8 SLAVE 0 8 SLAVE BIT SYNCHRONISATION 4 SYNCHRONISATION 4IME BASE NTERNAL REFERENCE 2EFERENCE CLOCK 034 BIT SYNCHRONI...

Page 459: ...the procedure described in the appendix to this document Deactivate the firewall in order to authorise http and https requests see the procedure described in the appendix to this document Connect the...

Page 460: ...ponds to the configuration of the country in which the system will be installed If necessary modify the value proposed otherwise press n to keep the proposed value Validate the modifications with the...

Page 461: ...eturn key after confirming or rejecting them by pressing y or n 3 Configuring AM7450 cohabitation If the AM7450 application must be installed later on the same server type in y Validate the modificati...

Page 462: ...e of terminals A6xxd 312i and DECT IP base stations RFPs in the TFTP server storage directory The SYSLOG service is configured manually and via the menu Telephony service System Expert Acces processor...

Page 463: ...stra 53xx sets AMT PTD TR 0014 The TMA service is used by TMA and to manage IP and TDM terminals Refer to the document Installation manual Aastra 53xxip and Aastra 67xxi Aastra 53xx sets AMT PTD TR 00...

Page 464: ...RVER PARAMETER The default value is 2345 but it can be modified This value can also be displayed and modified in the AMP menu Subscribers 67xxi terminals parameters Parameters LLDP ENABLED This field...

Page 465: ...s SUBSCRIBER This field is used to assign a subscription number as day and reduced number to call distribution 0 This number is assigned if it corresponds to an internal subscription which can be adde...

Page 466: ...ng them by pressing y or n 10 Configuring the numbering plan length Press Return to confirm after entering y or n If the answer is y enter the corresponding values The field is used to define the inte...

Page 467: ...the first internal subscription that can be created automatically LAST This field contains the last internal subscription that can be created automatically FIRST DID This field is used to create the...

Page 468: ...n the external block or assign it a voice mail box if creation is authorised Then update its LDAP directory record with the internal number and possibly DID number Then assign this subscription to the...

Page 469: ...values displayed are correct and confirm by pressing Return Then restart the system mandatory The configuration phase is complete Initial installation is complete and you can now configure the site se...

Page 470: ...Enter the IP address defined for the system https IP secure access mode Note Address defined while installing the Redhat OS corresponding to the IP address of the A5000 Server network card Some securi...

Page 471: ...Installation and Maintenance Manual Aastra 5000 AMT PTD PBX 0058 4 6 EN INSTALLING A5000 SERVER Non redundant 01 2011 Page 471 The AMP welcome screen is displayed...

Page 472: ...rate the licence See Installation code below In Menu TELEPHONY SYSTEM Info Licences enter successively The identification number The IP address of the virtual machine The system IID number Important A...

Page 473: ...RA will have access to AMP in manufacturer mode see the document AMT_PTD_PBX_0080 for information about password management Preliminary operation Contact AASTRA s customer service to obtain the values...

Page 474: ...procedure the manufacturer s default login and password are regenerated and can be used again Restart the A5000 Server application so this reset operation can be taken into account The manufacturer s...

Page 475: ...To avoid repetitive tasks on AMP massive import consists in first creating in an Excel form a set of configuration data listed for the site This form is then converted to a format compatible csv with...

Page 476: ...SI FTP TFTP etc and display their status from the SYSTEM Configuration Services menu of Aastra Management Portal See Aastra Management Portal operating manual 10 7 2 Declaring an NTP time server It ma...

Page 477: ...Redhat 5 4 may equally be fully reinstalled without going through the upgrade phase In this case refer to document Red Hat OS Installation manual Then reinstall the Aastra 5000 Server R5 2 software 1...

Page 478: ...al window go to the menu File Open in a terminal Type in the command cat etc redhat release 10 8 4 Installing the A5000 Server R5 2 application Since this phase of the procedure is the same as the one...

Page 479: ...9 2 Upgrading the software from AMP A software upgrade may be of several types New and complete officially available release SA example X_A5000_R5 2_SP1_B700 tar gz Software upgrade for a given SA re...

Page 480: ...tallation and Maintenance Manual Aastra 5000 Page 480 01 2011 INSTALLING A5000 SERVER Non redundant Two media types can be used CDROM USB key Insert the CD in the AMP client PC on which the software u...

Page 481: ...e Manual Aastra 5000 AMT PTD PBX 0058 4 6 EN INSTALLING A5000 SERVER Non redundant 01 2011 Page 481 10 9 2 1 Loading the application The available modes are PC import iPBX USB key 10 9 2 1 1By PC impo...

Page 482: ...e file using the Browse key If the path is known enter it directly in the corresponding field The file to be loaded is available in the A5000_Infra folder of the A5000_R5000 2_R5 2_A5_01 tar gz CD ROM...

Page 483: ...4 6 EN INSTALLING A5000 SERVER Non redundant 01 2011 Page 483 Select Download A message indicates the progress of the downloading phase Click Validate The switchover window is then activated See Sect...

Page 484: ...n the Aastra Management Portal operating manual AXD AXL AXS AXS12 A5000 Server Operating manual The system restarts automatically after the switchover phase In case of deferred switchover the upgrade...

Page 485: ...e previous release It is not possible to carry out a restore operation on this version It is advisable to validate the new version as quickly as possible once you observe a normal operation Procedure...

Page 486: ...AM 7450 See the document Aastra Management 7450 AM 7450 User manual 10 10 Upgrading the redundant A5000 server See Installation manual for redundancy and double attachment on A5000 Server 10 11 Backin...

Page 487: ...not recognised automatically Therefore you have to indicate to the web browser that the company is a reliable certification authority For Aastra X series AXD AXL and AXS iPBXs Open a web browser insta...

Page 488: ...N Installation and Maintenance Manual Aastra 5000 Page 488 01 2011 Appendices In the following screen select the Certification access path tab then click the root certificate in the example Aastra Cli...

Page 489: ...Installation and Maintenance Manual Aastra 5000 AMT PTD PBX 0058 4 6 EN Appendices 01 2011 Page 489 Click Install certificate The installation then starts Click Next Click Next...

Page 490: ...e 490 01 2011 Appendices Click Finish A security warning is displayed Click Yes The certificate is installed Click OK The installation is complete all the sites certified through the root name in the...

Page 491: ...pen a web browser installed on the operating console Internet Explorer for instance Enter the IP address defined for the system https IP secure access mode Note Default address in factory setting 192...

Page 492: ...ual Aastra 5000 Page 492 01 2011 Appendices 11 2 ACTIVATING DEACTIVATING SELINUX IN RED HAT 5 From the PC on which AASTRA 5000 is installed SELinux is activated or deactivated in the SELinux tab of th...

Page 493: ...the ports required by the application to work properly This paragraph specifies the Red Hat configuration elements required for ACS installation To access the firewall configuration menu Click System...

Page 494: ...AMT PTD PBX 0058 4 6 EN Installation and Maintenance Manual Aastra 5000 Page 494 01 2011 Appendices The following table gives the list of ports to open for the A5000 server installation...

Page 495: ...Installation and Maintenance Manual Aastra 5000 AMT PTD PBX 0058 4 6 EN Appendices 01 2011 Page 495 Additional items on the list of TCP ports used by the internal servers of A5000 Server...

Page 496: ...ration of Aastra 5000 systems during first installation It is advisable to keep an original copy of this file in Excel format This basic form comprises 3 tabs allowing respectively the massive creatio...

Page 497: ...on the second line line 2 indicate the invariable internal codes for these parameters These codes are used by the Aastra 5000 system software in the corresponding menu to interpret the values to be ta...

Page 498: ...rom the default settings of Excel 010 which becomes 10 in column F in the previous example Depending on the system configuration some columns do not need to be filled in single company extension chara...

Page 499: ...Click Save The converted file is then available for massive import from the AMP in the menu System Software maintenance Massive import Note If this file still needs to be modified before import when r...

Page 500: ...rnal record creation tab For correspondence with the possible options and values as well as their syntax see Section 4 2 2 of the Aastra Management Portal Operating Manual Document 1 Correspondence wi...

Page 501: ...s per subscriber For correspondence with the possible options and values as well as their syntax see Section 4 3 7of the Aastra Management Portal Operating Manual Document 1 Refer also to the respecti...

Page 502: ...Page 502 01 2011 Appendices 11 4 6 Multi lines tab For correspondence with the possible options and values as well as their syntax see Section 4 3 11 of the Aastra Management Portal Operating Manual D...

Reviews: