background image

9

4  Product description

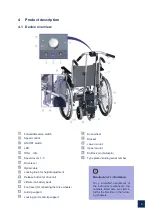
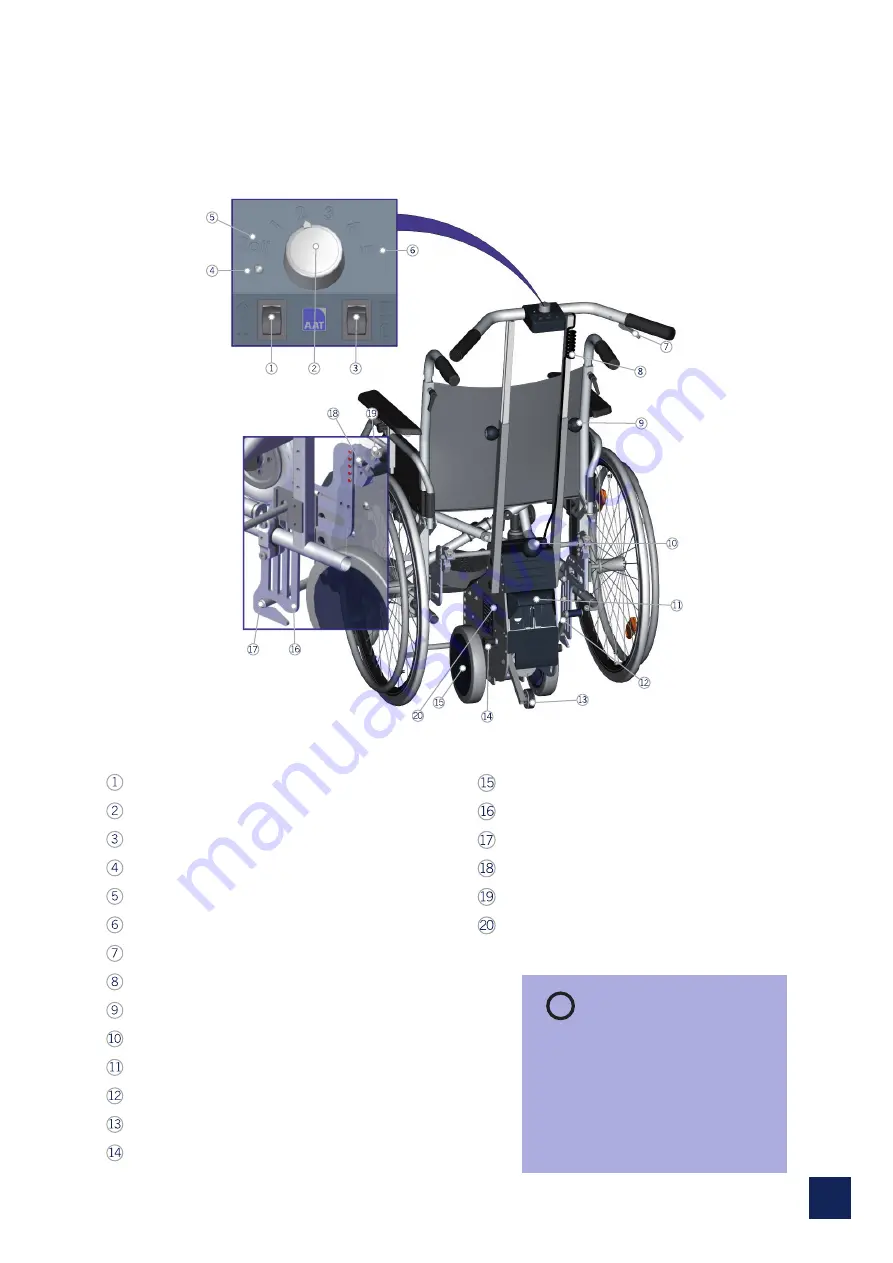
4 1  Device overview

  Forward/Reverse switch
  Speed control
  ON/OFF switch
 LED
  ROLL - Idle
  Speed levels 1 - 5
  Drive lever
  Spiral cable
  Locking knob for height adjustment
  Release button for drive unit
  Lithium-ion battery pack
  Foot lever (for retracting the drive wheels)
  Anti-tip support
  Locking pin for anti-tip support

  Drive wheel
 Bracket
  Lower mount
  Upper mount
  Ball lock pin (Quickpin)
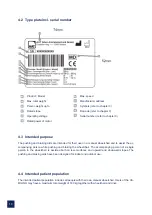
  Type plate including serial number

i

Manufacturer’s information:

For  a  simplifi ed  assignment  of 

the individual components, the 

numbers listed here are cited in 

full for the fi rst time in the follow-

ing chapters.

Summary of Contents for CAMILINO

Page 1: ...www camilino de EN 2023 02 6 1 The pushing and braking aid Translation of the original user manual CAMILINO ...

Page 2: ...on Product seminars Showroom exhibition devices Re use Complaints Rental devices With our professional service concept we at AAT prove once again our high claim of quality and offer our clients an all inclusive package We are at your service AAT service concept Customer service at its best Service and repairs Phone 49 0 74 31 12 95 550 Phone 49 0 74 31 12 95 552 Fax 49 0 74 31 12 95 540 E mail ser...

Page 3: ... proper functioning There is an increased risk of injury In the event of an infringement claims for warranty and liability are exclud ed The product is state of the art and complies with the associated safety related requirements Neverthe less a low level of residual risks cannot be ruled out Please observe the safety instructions to this end People with visual and reading impairments or intellect...

Page 4: ...attery pack 15 5 2 Adjusting the handle unit 15 5 3 Upper and lower mounting rod 16 5 4 Switching on the device 16 5 5 Fixing the CAMILINO to the wheelchair 17 6 Removal 18 7 Operation 19 7 1 Driving with the CAMILINO 20 7 2 Folding the anti tip support out in 21 7 3 Overcoming obstacles 22 7 4 Deactivating the drive 22 7 5 Switching off the CAMILINO 22 7 6 Transportation 23 8 Care and maintenance...

Page 5: ...nt of reading disabilities cover training content in more depth verbally The user manual must be kept in a safe place after reading through it It does not consist exclusively of flame retardant substances Keep the CAMILINO away from sources of ignition The CAMILINO may interfere with highly sensitive electromagnetic fields of other electronic devices e g anti theft devices Stability tests were per...

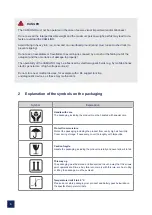
Page 6: ...d battery pack below above the specified temperature limits 2 Explanation of the symbols on the packaging DANGER The CAMILINO must not be operated in the case of severe visual impairment and or blindness Do not exceed the total permissible weight and the maximum person weight as this may lead to de fects or overload the CAMILINO Avoid driving in heavy rain ice snow and on unsurfaced ground sand mu...

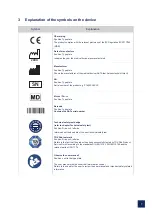
Page 7: ...e Position Type plate Barcode Position Type plate Contains the AAT serial number Technical safety test badge refer to chapter Technical safety test Position Drive unit left side Informs about the due date of the next technical safety test TÜV Süd test mark Position Drive unit left side Refers to the fact that the product has been successfully tested by TÜV Süd Product Service GmbH according to the...

Page 8: ...otal permissible weight 180 kg person wheelchair CAMILINO Braking rated slope with a total weight of up to 120 kg 17 6 Braking rated slope with a total weight of up to 180 kg 10 5 Follow the user manual Always overcome kerbs obstacles backwards Attention Never use as a seat in a vehicle ...

Page 9: ... drive unit Lithium ion battery pack Foot lever for retracting the drive wheels Anti tip support Locking pin for anti tip support Drive wheel Bracket Lower mount Upper mount Ball lock pin Quickpin Type plate including serial number i Manufacturer s information For a simplified assignment of the individual components the numbers listed here are cited in full for the first time in the follow ing cha...

Page 10: ...ir use on a manual wheelchair and to assist the ac companying person while pushing and braking the wheelchair The accompanying person of a single person in the wheelchair is assisted both on level surfaces and upward and downward slopes The pushing and braking aids have been designed for indoor and outdoor use 4 4 Intended patient population The intended patient population includes all people with...

Page 11: ...roduct the operator is not physically and mentally able to operate the device safely in the case of severe visual impairment and or blindness more than one person shall be transported simultaneously the operator does not have adequate eyesight the braking effect is lost due to rain wet conditions snow or black ice the braking effect does not set in escalators or travelators shall be overcome medic...

Page 12: ...cturer s information Static stability sideways Observe the wheelchair manufacturer s information Maximum surmountable obstacle height Lower than 30 mm overcome forwards higher than 30 mm backwards Max obstacle height Observe the wheelchair manufacturer s information and chapter 7 3 Storing operating temperature Device 40 C to 65 C 25 C to 50 C Storing operating temperature Battery pack 20 C to 65 ...

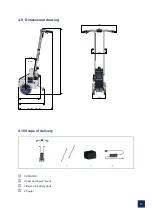
Page 13: ...1 bearb gepr Werkstoff Datum Name Toleranzen Zeichnungsnummer Baugruppe Benennung BL Oberfläche Werkstück kanten DIN ISO 13715 0 3 0 3 Maßstab Revision Status AAT Alber Antriebstechnik GmbH Rauheit Reihe 3 01 02 2021 Kramer P1203 1 2 1 1 www aat online de Fax 07431 1295 36 Tel 07431 1295 0 D 72458 Albstadt Ehestetter Weg 11 A0 DIN ISO 2768 1 m DIN ISO 2768 2 m DIN ISO 1302 3 In Bearbeitung Camilin...

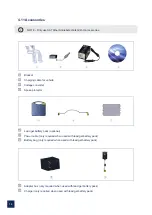
Page 14: ... Antriebstechnik GmbH accessories i Lead gel battery pack optional Power cable only required when used with lead gel battery pack Battery bag only required when used with lead gel battery pack Adapter box only required when used with lead gel battery pack Charger only required when used with lead gel battery pack ...

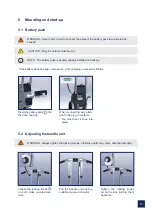
Page 15: ...g 5 2 Adjusting the handle unit WARNING Always tighten the locking screws otherwise parts may come detached abruptly If the battery pack has been removed e g for charging proceed as follows When connecting pay atten tion to the plug in contacts You must hear it snap into place Loosen the locking knobs on both sides counterclock wise Pull the handle unit out to a suitable ergonomic height Tighten t...

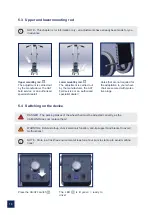
Page 16: ...ld service or an authorised specialist dealer 5 4 Switching on the device DANGER The parking brakes of the wheelchair must be adjusted correctly as the CAMILINO does not replace them WARNING Before start up check electronic function anti tip support and bracket to avoid malfunctions i NOTE Store in a frost free environment at least one hour prior to start up to avoid malfunc tions Press the ON OFF...

Page 17: ...sen both ball lock pins Quickpins before retract ing the CAMILINO Press in the central release pin with your thumb and pull out the Quickpin Set the speed control to ROLL to activate idling Operate and hold the drive lever to deactivate the brake The CAMILINO can now be moved forwards and back wards Push the CAMILINO under the wheelchair from behind Insert the lower mounting rod into the lower bra...

Page 18: ...e other side of the bracket If the CAMILINO has been ac tivated it must be deactivated by setting the idle speed Refer to the detailed proce dure in chapter 7 4 Deacti vating the drive Press the ON OFF switch to switch the CAMILINO off i 6 Removal Remove the CAMILINO from the wheelchair Perform the installation steps performed while mounting in reverse order 1 Detach the CAMILINO from the bracket ...

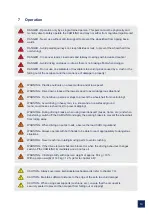
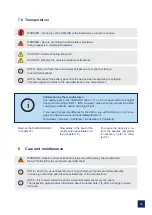
Page 19: ... from overturning WARNING Avoid driving in heavy rain ice snow and on unsurfaced ground sand mud loose crushed rock to prevent slipping WARNING During driving breaks when using local transport buses trams etc and when transferring switch off the CAMILINO and apply the parking brakes to prevent the wheelchair from rolling away WARNING When driving on public roads observe the road traffic regulation...

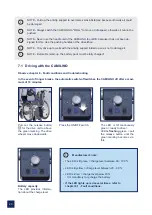
Page 20: ... note The LED is lit green charge level between 60 100 LED is lit yellow charge level between 20 60 LED is lit red charge level below 20 It is mandatory to recharge the battery If the LED lights up red several times refer to chapter 9 1 Fault conditions i NOTE Fold up the anti tip support to overcome kerbs obstacles because otherwise it could be damaged i NOTE Always switch the CAMILINO to ROLL to...

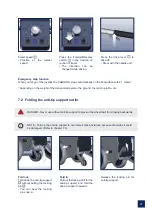
Page 21: ...e within 1 meter1 1 depending on the weight of the transported person the ground the terrain profile etc Fold in Pull out thelocking bolt for the anti tip support and fold the anti tip support upwards Release the locking pin for anti tip support Fold out Fold down the anti tip support without pulling the locking pin You can hear the locking pin snap in DANGER Never use without anti tip support to ...

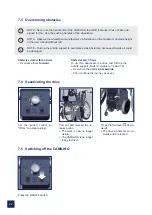
Page 22: ...it could be damaged Obstacles smaller than 30 mm Overcome them forward Obstacles over 30 mm To do this deactivate the drive and fold up the anti tip support Refer to chapters 7 4 and 7 2 Overcome the obstacle backwards Then continue the journey as usual 7 4 Deactivating the drive Set the speed control to ROLL to activate idling Pull out and release the re lease button The mark is now no longer vis...

Page 23: ...med by the manufacturer the AAT field staff or the authorised specialist shop i NOTE Perform a visual inspection prior to each start up If parts are visibly defective or missing contact the authorised specialist shop or the manufacturer i NOTE It is recommended to perform a technical safety test every two years The inspection plate provides information about the latest date Tip After a change in o...

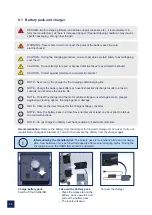
Page 24: ...tect the charger and the motor vehicle voltage converter against oils greases aggressive cleaning agents thinning agents or damage i NOTE Observe the user manual for the charger voltage converter i NOTE Store the battery pack in a frost free environment at least one hour prior to start up to avoid malfunctions i NOTE Do not charge the battery near heat sensitive or flammable materials Recommendati...

Page 25: ...tery pack While doing so pull the release tab on the battery pack backwards The lock is released Connect the voltage converter and the charger Switch on the voltage con verter Warning tone low voltage LED green battery full approx 6 hours LED orange battery is charging Charge the battery pack in the motor vehicle ...

Page 26: ...26 Information on the charger Observe the manufacturer s information in the charger s user manual i Charger camilino Battery capacity 16 Ah Possible error LED does not light up Contact the manufacturer ...

Page 27: ...g to the manufacturer s information i NOTE Do not use a high pressure cleaner i NOTE Do not use abrasive or aggressive agents if necessary test on an inconspicuous area first i NOTE Do not use substances containing alcohol i NOTE Do not use acidic substances such as orange cleaner If you want to disinfect the CAMILINO carry out a wipe disinfection Wipe the surfaces of the CAMILINO with mild househ...

Page 28: ...echnik GmbH or their specialist dealers for disposal 8 4 Long term storage If the CAMILINO is not used for an extended period of time e g over several months observe the following information Observe the wheelchair manufacturer s information if the wheelchair is to be stored No moisture shall reach the inner parts of the device Store in dry rooms and avoid excessive air humidity Cover with film if...

Page 29: ...technical safety test before each reuse Training is required in order to be able to perform the technical safety testing For more information please visit www aat online de 8 6 Reuse change in operator The term reuse is used when the AAT product of patient X is to be used for another patient Y In addition there is a reuse when a patient receives a different wheelchair and therefore requires new ad...

Page 30: ...perature 8 x The motor does not stop 9 x Current flow while motor stationary Problem Check and possible remedy The CAMILINO cannot be switched on Is the battery pack plugged in correctly No Plug in correctly Is the battery pack empty Yes Charge Does the problem persist Yes Notify the manufacturer the AAT field service the authorised specialist dealer The CAMILINO does not drive CAMILINO switched o...

Page 31: ...tructural changes or improper use of the CAMILINO or its accessories use of the CAMILINO beyond the total permissible weight improper charging of the battery pack Warranty Liability The manufacturer of the CAMILINO AAT Alber Antriebstechnik GmbH cannot be held liable for any possible damage in the following cases The CAMILINO has been handled improperly Repairs assembly or other work have been per...

Page 32: ...32 Notes ...

Page 33: ...33 Notes ...

Page 34: ...34 Notes ...

Page 35: ...accordance with Annex VIII Rule 1 and 13 complies with the basic safety and performance requirements and applicable parts of the following regulations and standards 2017 745 EU ISO 7176 21 ISO 7176 14 EN 12184 EN 12182 EN ISO 10993 1 IEC 60335 2 29 A1 A2 in conjunction with IEC 60335 1 2011 65 EU EN IEC 63000 The products are marked with in compliance with the regulations This declaration is only ...

Page 36: ...AAT Alber Antriebstechnik GmbH Postfach 10 05 60 72426 Albstadt Germany Phone 49 0 74 31 12 95 0 Fax 49 0 74 31 12 95 35 info aat online de www aat online de Serial number ...

Reviews: