background image

2  

AB myPilot User Guide

AB myPilot User Guide

  3

Labeling

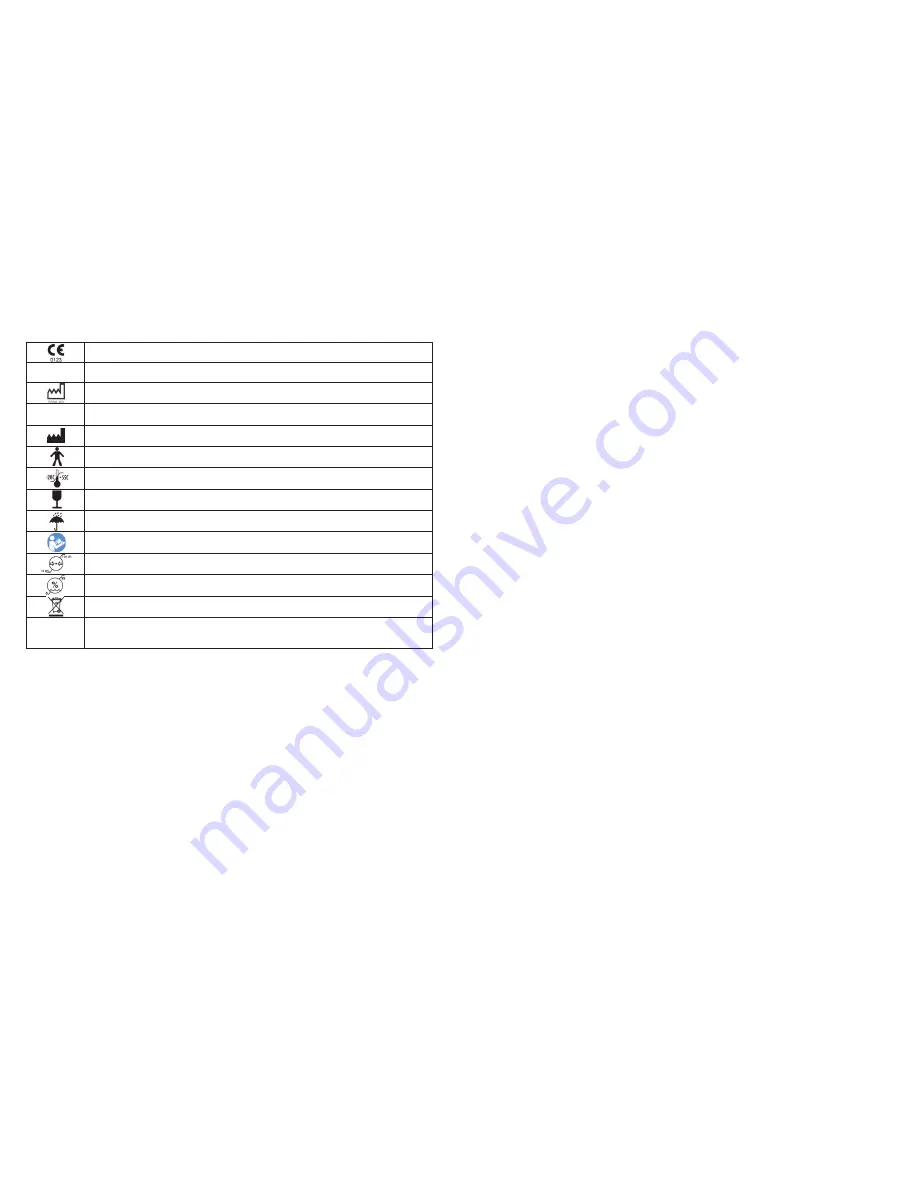
Labeling symbols and their meanings:

Warnings and Cautions

WARNINGS

• 

Do not use the AB myPilot remote control when it is plugged into power sources  

  such as wall outlets.

• 

Do not use or store the AB myPilot in shirt pockets if the recipient has a pacemaker,  

  due to a risk of interference. Contact a health care professional for more information.

CAUTIONS


• 

The AB myPilot comes with power supplies specifically designed for the AB myPilot. Do  

  not use other power supplies not supplied by Advanced Bionics or a Phonak distributor.  
  For replacement power supplies, contact Advanced Bionics. 

• 

Do not use the AB myPilot when instructed not to use electronic devices on airplanes.

European Community Mark of Conformity. Authorized to affix the CE Mark in 2013

REF

• 

The AB myPilot should not come within 1/2” (1 cm) of the Naída CI while  

  stimulating the implant. Doing so could cause the Naída CI to lose communication  
  with the AB myPilot. If this happens, power cycle the Naída CI by briefly removing  
  and then reattaching the battery.

• 

If the AB myPilot stops being transmitting commands to the Naída CI, it might  

  be necessary to re-pair the AB myPilot with the Naída CI. Follow the steps in the


  Pairing the AB myPilot

 section of this user guide.

• 

If volume commands from the AB myPilot to the Naída CI seem erratic, position  

  the AB myPilot within 12” (30 cm) of the Naída CI. If the problem persists, re-pair  
  the AB myPilot and the Naida CI.

• 

The digitally-coded, inductive transmission technology used in the AB myPilot  

  prevents interference from most other devices. When operating the AB myPilot  
  near a computer terminal or other strong electromagnetic fields, it may be  
  necessary to be at least 24” (60 cm) away to ensure proper operation. If the Naída  
  CI does not respond to the AB myPilot because of an unusual field disturbance,  
  move away from the disturbing field.

• 

Do not use the AB myPilot in locations where it is forbidden to use electronic devices.

• 

X-ray radiation (e.g. CT scans, MRI scans) may adversely affect the correct  

  functioning of the AB myPilot. We recommend that you turn the AB myPilot off  
  before undergoing X-ray procedures and leave it outside the room.

• 

The Naída CI and the AB myPilot are given a unique communication network code  

  during the fitting to prevent interference from or with Naída CIs worn by other recipients.

• 

High-powered electronic equipment, larger electronic installations and metallic  

  structures may significantly reduce the operating range.

• 

Use only original Advanced Bionics accessories.

• 

Do not make any changes or modifications to the AB myPilot.

• 

Opening AB myPilot might damage it. If problems occur which cannot be resolved  

  by following the remedy guidelines in the 

Troubleshooting

 section of this user  

  guide, consult your hearing care professional.

• 

The AB myPilot may only be repaired by an authorized service center.

• 

The battery may only be replaced by an authorized service center.

• 

Do not remove the cover.

Model number

Date of manufacture

Serial number

Manufacturer

Type of Protection: B

Store at temperatures between -20˚C (-4˚F) and +55˚C (131˚F)

Fragile

Do not get wet

See Instructions for Use

Suitable for atmospheric range between 70 kPa and 106 kPa, which is equivalent to  

3000 m above sea level to 380 m below sea level

Suitable for exposure to relative humidity between 0-95%

Dispose of in accordance with applicable national and local regulations

The AB myPilot carries a rating of IP40. This rating indicates that the AB myPilot is 

protected against the following conditions: protection against particles greater 

than 1 mm, not intended for use in water

SN

IP40

Summary of Contents for myPilot

Page 1: ...lish French Spanish German Dutch Portuguese AdvancedBionics com 029 M306 85 Rev A 2013 Advanced Bionics AG and affiliates All rights reserved Advanced Bionics AG Laubisrütistrasse 28 8712 Stäfa Switzerland 41 58 928 78 00 2013 ...

Page 2: ...user guidefor the AB myPilot ...

Page 3: ...24 60 cm away to ensure proper operation If the Naída CI does not respond to the AB myPilot because of an unusual field disturbance move away from the disturbing field Do not use the AB myPilot in locations where it is forbidden to use electronic devices X ray radiation e g CT scans MRI scans may adversely affect the correct functioning of the AB myPilot We recommend that you turn the AB myPilot o...

Page 4: ...sion 19 Program Ambiguity 20 AB myPilot Battery Status 20 ZoomControl Screen Optional for Bilateral Recipients Only 20 Direct Access of ZoomControl Screen 20 Access via Menu 20 21 Menu Functions 21 24 Menu Overview 21 ZoomControl Optional for Bilateral Recipients Only 22 Naída CI Listening Check 22 24 Lock Keypad 24 AB myPilot Version 24 Settings 25 30 Quick Access 25 Home Screens 25 Clock 25 27 D...

Page 5: ... used program Getting Started Charging the Battery and General Battery Information For safety reasons recharge the battery only with chargers supplied by Advanced Bionics During the charging process the battery symbol on the Home screen will flash Once the battery is fully charged the battery symbol will stop flashing and remain visible Charging an empty battery typically takes about 90 minutes It...

Page 6: ...a solid red LED and will not stimulate the implant while in this mode At this time the AB myPilot will not be able to communicate with the Naída CI The Naída CI will have to be power cycled restarted by removing and then reattaching the PowerCel in order for the AB myPilot to resume communication with the Naída CI Also if a powered AB myPilot is placed too close to a C1 implant for example if a re...

Page 7: ... will interact with the Naída CI To begin the pairing process have the Naída CI you want to pair within 12 30 cm of the AB myPilot Attach the PowerCel Zn Air Battery Pak or power adapter to the Naída CI commencing the Pairing Window five minute time out If the AB myPilot has never been paired upon turning it on the AB myPilot screen will read The AB myPilot needs to be paired with your hearing ins...

Page 8: ...ch Naída CIs are paired to the AB myPilot To access this function Select the center button From the main menu select Setting From the Settings menu select Pairing 1 2 From the Pairing menu select Clear Pairing 3 Press the center button from the main menu select Settings 1 From the Settings menu select Pairing 2 From the Pairing menu select either Scan for Devices or Pair Devices From either of the...

Page 9: ...the AB myPilot are applied to both Naída CIs simultaneously unless otherwise specified by the recipient The order of the program sequence is set by the hearing care professional during the fitting process For further information on hearing programs please ask the hearing care professional Direct Control Mode In the direct control mode each key selects the indicated program number The program names...

Page 10: ...vel which was defined by the hearing care professional during the fitting process The baseline level is depicted by the longer midline on the sensitivity scale The recipient is able to increase the sensitivity 10 clicks above this line or decrease the sensitivity 10 clicks below To change the Volume settings of the left or right Naída CI individually go to the Volume screen by pressing either or w...

Page 11: ...t to read the status of both the AB myPilot and the Naída CI s battery levels In order to read out and display battery status information the AB myPilot must be within about 12 30 cm of the Naída CI Hold the AB myPilot as shown in the picture below In the event that the readout process fails for example because the Naída CIs are out of range the AB myPilot will display a question mark followed by ...

Page 12: ...the recipient should recharge the battery as soon as possible ZoomControl Screen Optional for Bilateral Recipients Only If you are a bilateral Naída CI recipient and the Naída CIs are equipped with ZoomControl this special feature allows you to choose the direction in which to focus the hearing system left or right The ZoomControl screen is only accessible from the standard mode Direct Access of t...

Page 13: ...ally goes to the Listening Check menu From the menu you can select the desired input source you would like to listen to If you select T Coil make sure you are synced to either a loop or Phonak myLink Provide input to the FM transmitter to assess audio quality If you select Wireless you will be listening to whatever audio source is being streamed through the ComPilot i e Bluetooth device FM battery...

Page 14: ...Main Menu Select Settings then Quick Access Choose the following menu option Store Settings Select this point and press to store the current program and volume setting Recall Setting Select this point and press to recall the stored program and volume setting ON OFF Button Enter this sub menu to define the behavior of the ON OFF button Select one of the following options a Status Readout a short pr...

Page 15: ...oose the 24 hour Format Press the center button Select Settings Clock Time Format and 24 Hour Date The AB myPilot has an internal date which is shown when it enters the sleep mode Set Date Date Format You may choose between two different date formats To Choose the DD MM YYYY Format Press the center button Select Settings Date Press the center button Select Settings and then Clock Select Set Time 1...

Page 16: ...t time is automatically extended The AB myPilot will briefly display a sleep mode screen before switching off the backlight Auto Keypad Lock The AB myPilot can be configured to automatically lock the keys when switching off the backlight 3 1 2 3 Press the center button Select Settings and then Display Select Contrast 1 2 In the contrast screen use the key to decrease and the key to increase the co...

Page 17: ... not occur with normal use keeping the AB myPilot 4 10 cm or more away from the body Therefore it is recommended that pacemaker recipients do not keep the AB myPilot in a shirt pocket Troubleshooting No Response Screen 1 2 1 2 Situation Remedy AB myPilot turns OFF automatically Most Probable Cause Battery is depleted Charge AB myPilot AB myPilot becomes unresponsive ABmyPilotmayhaveencountered a s...

Page 18: ... from the list on http www AdvancedBionics com contact Condition Maximum Operating Temperature Minimum 0 C 32 F 45 C 115 F Storage Temperature 20 C 4 F 55 C 131 F Model Number CI 5245 XXX Description Naída CI Sound Processor Advanced Bionics AG Laubisrütistrasse 28 8712 Stäfa Switzerland 41 58 928 78 00 This instrument is certified under FCC ID KWC MYPILOT1 IC 2262A MYPILOT1 Notice 1 This device c...

Page 19: ......

Page 20: ...mode d emploide AB myPilot Partenaires pour une meilleure audition ...

Page 21: ... le Naída CI ne répond pas aux signaux du AB myPilot en raison d un champ électromagnétique perturbant inhabituel éloignez vous du champ perturbant N utilisez pas le AB myPilot dans des lieux où il est interdit d utiliser des appareils électroniques Les rayons X par ex imagerie médicale CT IRM peuvent sérieusement affecter le fonctionnement correct du AB myPilot Nous vous recommandons d éteindre l...

Page 22: ...lot 19 Ambiguïté du programme 20 État de la batterie du AB myPilot 20 Écran ZoomControl en option pour utilisateurs bilatéraux uniquement 20 Accès direct à l écran ZoomControl 20 Accès par le menu 20 21 Fonctions de menu 21 24 Présentation du menu 21 ZoomControl en option pour utilisateurs bilatéraux uniquement 22 Testeur d écoute pour Naída CI 22 24 Verrouillage 24 Version de AB myPilot 24 Réglag...

Page 23: ... utilisé Démarrage Chargement de la batterie et informations générales relatives à la batterie Pour des raisons de sécurité rechargez la batterie uniquement avec des chargeurs fournis par Advanced Bionics Un symbole pile clignote sur l écran d accueil pendant le processus de charge Une fois la batterie entièrement chargée le symbole pile arrête de clignoter et reste visible Le chargement d une bat...

Page 24: ...Le Naída CI aura une LED allumée en rouge en continu et ne stimulera pas l implant dans ce mode À ce moment le AB myPilot ne peut pas communiquer avec le Naída CI Le Naída CI doit être redémarré en retirant et en remettant la PowerCel pour que le AB myPilot reprenne la communication avec le Naída CI De même si un AB myPilot alimenté est placé trop près d un implant C1 par exemple si un utilisateur...

Page 25: ...avant l interaction du AB myPilot avec le Naída CI Pour débuter le processus d appariage placez le Naída CI que vous voulez apparier dans une plage de 30 cm du AB myPilot Connectez la PowerCel le compartiment de piles Zn Air ou l adaptateur d alimentation au Naída CI ce qui lance la fenêtre d appariage délai de 5 minutes Si le AB myPilot n a jamais été apparié à l allumage l écran du AB myPilot af...

Page 26: ...s Naída CI appariés au AB myPilot Pour accéder à cette fonction Sélectionnez le bouton central Dans le menu principal sélectionnez Réglages Dans le menu Réglages sélectionnez Appariage 1 2 Dans le menu Appariage sélectionnez Supp appariage 3 Appuyez sur le bouton central dans le menu principal sélectionnez Réglages 1 Dans le menu Réglages sélectionnez Appariage 2 Dans le menu Appariage sélectionne...

Page 27: ...e effectués par le AB myPilot sont appliqués aux deux Naída CI simultanément sauf indication contraire de l utilisateur L ordre de la séquence de programmes est défini par l audiologiste lors du processus de réglage Pour de plus amples informations sur les programmes auditifs veuillez consulter votre audiologiste Mode contrôle direct En mode contrôle direct chaque bouton sélectionne le numéro de p...

Page 28: ...iste lors du processus de réglage Le niveau de base est représenté par la médiane plus longue sur la plage de réglage de la sensibilité L utilisateur peut augmenter la sensibilité de 10 clics au dessus de cette ligne ou diminuer la sensibilité de 10 clics en dessous Pour modifier les paramètres de Volume Naída CI gauche ou droit individuellement accédez à l écran Volume en appuyant sur ou dans l é...

Page 29: ...on Contrôle batterie permet à l utilisateur de lire l état des niveaux des batteries du AB myPilot et des Naída CI Afin de lire et d afficher les informations d état de la pile le AB myPilot doit être à une distance maximale de 30 cm du Naída CI Tenez le AB myPilot comme indiqué sur l image ci dessous Si le processus de lecture échoue par exemple parce que les Naída CI sont hors plage le AB myPilo...

Page 30: ...isateur doit recharger la batterie dès que possible Écran ZoomControl en option pour utilisateurs bilatéraux uniquement Si vous êtes un utilisateur bilatéral et que les Naída CI sont équipés de ZoomControl cette fonction spéciale vous permet de choisir la direction dans laquelle cibler le système auditif gauche ou droite L écran ZoomControl est uniquement accessible en mode standard Accès direct à...

Page 31: ...e automatiquement au menu Test audio Dans le menu vous pouvez sélectionner la source d entrée souhaitée que vous voulez écouter Si vous sélectionnez Bobine inductive assurez vous d être synchronisé à une boucle ou à myLink de Phonak Produisez une entrée sonore au niveau de l émetteur afin d évaluer la qualité audio Si vous sélectionnez Sans fil vous écouterez une source audio diffusée par le ComPi...

Page 32: ...hoisissez l option de menu suivante Mémoriser prog vol sélectionnez ce point et appuyez pour enregistrer le programme et le réglage du volume actuel Rappel du réglage sélectionnez ce point et appuyez pour rappeler le programme et le réglage du volume enregistrés Bouton MARCHE ARRÊT accédez à ce sous menu pour définir le comportement du bouton MARCHE ARRÊT Sélectionnez l une des options suivantes a...

Page 33: ... Appuyez sur le bouton central Sélectionnez Paramètres Heure Format heure et 24 heures Date Le AB myPilot contient une date interne qui s affiche quand il entre en mode Veille Réglage date Format date Vous pouvez choisir entre deux formats de date différents Pour choisir le format JJ MM AAAA Appuyez sur le bouton central Sélectionnez Réglages Date Appuyez sur le bouton central Sélectionnez Réglage...

Page 34: ...e est automatiquement prolongé Le AB myPilot affiche brièvement un écran de mode Veille avant d éteindre le rétroéclairage Auto verrouillage LeABmyPilotpeutêtreconfigurépourverrouillerautomatiquementlestoucheslorsdel extinction du rétroéclairage 3 1 2 3 Appuyez sur le bouton central Sélectionnez Réglages puis Affichage Sélectionnez Contraste 1 2 Dans l écran Contraste utilisez la touche pour dimin...

Page 35: ...ce ne devrait se produire en utilisation normale en maintenant le AB myPilot à 10 cm ou plus du corps Il est donc recommandé aux utilisateurs de stimulateur cardiaque de ne pas conserver le AB myPilot dans une poche de chemise Dépannage Écran Pas de réponse 1 2 1 2 Figure A Figure B Situation Cause la plus probable Remède Le AB myPilot s ARRÊTE automatiquement La batterie est vide Chargez le AB my...

Page 36: ...tistrasse 28 8712 Stäfa Suisse 41 58 928 78 00 Cet appareil est certifié conforme à FCC ID KWC MYPILOT1 IC 2262A MYPILOT1 Notification 1 Cet appareil est en conformité avec la section 15 des règlements FCC et avec la norme RSS 210 de l industrie du Canada L utilisation est soumise aux conditions suivantes 1 Cet appareil ne doit pas causer d interférences nocives et 2 Cet appareil doit accepter tou...

Page 37: ......

Page 38: ...Guía de usuariode AB myPilot Compañeros para una mejor audición ...

Page 39: ...to Si el Naída CI no responde al AB myPilot debido a una interferencia de campo inusual aléjese del campo que genera la perturbación No utilice el AB myPilot en lugares en los que esté prohibido emplear dispositivos electrónicos La irradiación de rayos X por ejemplo exploraciones con TAC o RM podría afectar negativamente al correcto funcionamiento del AB myPilot Recomendamos que apague el AB myPil...

Page 40: ...rama 20 Estado de la batería del AB myPilot 20 Pantalla ZoomControl opcional solo para usuarios bilaterales 20 Acceso directo de la pantalla ZoomControl 20 Acceso a través del menú 20 21 Funciones del menú 21 24 Información general sobre el menú 21 ZoomControl opcional solo para usuarios bilaterales 22 Comprobación de audición del Naída CI 22 24 Bloqueo del teclado 24 Versión myPilot 24 Ajustes 25...

Page 41: ...ntroducción Carga e información general de la pila Por razones de seguridad recargue la pila únicamente con cargadores suministrados por Advanced Bionics Durante el proceso de carga el símbolo de la pila parpadeará en la pantalla de inicio Una vez que la pila se cargue completamente el símbolo de la pila dejará de parpadear y seguirá siendo visible La carga completa de una pila dura aproximadament...

Page 42: ...do de error El Naída CI mostrará un LED rojo fijo y no estimulará el implante mientras se encuentre en este modo En ese momento el AB myPilot no podrá comunicarse con el Naída CI Para que pueda volver a establecerse la comunicación entre el AB myPilot y el Naída CI este último tendrá que reiniciarse tendrá que sacar y volver a colocar la pila PowerCel Además si se coloca un AB myPilot activado dem...

Page 43: ...Bionics tendrá que emparejarlo al Naída CI El emparejamiento se tiene que completar antes de que el AB myPilot interactúe con el Naída CI Para empezar el proceso de emparejamiento tendrá que situar el Naída CI que quiera emparejar con el AB myPilot a menos de 30 cm 12 de éste Conecte la PowerCel el paquete de pilas Zn Air o el adaptador de alimentación al Naída CI lo que dará comienzo a la ventana...

Page 44: ...ede identificar los Naída CI que están emparejados con el AB myPilot Para acceder a esta función Seleccione el botón central Desde el menú principal seleccione Ajustes Desde el menú Ajustes seleccione Emparejamiento 1 2 Desde el menú Emparejamiento seleccione Borrar emparejamiento 3 Pulse el botón central a continuación desde el menú principal seleccione Ajustes 1 Desde el menú Ajustes seleccione ...

Page 45: ...nformación de la página 22 En caso de ser bilateral si está emparejado a ambos Naída CI todos los cambios de programa hechos con el AB myPilot se aplicarán a ambos Naída CI simultáneamente a menos que el usuario especifique lo contrario El orden de la secuencia del programa lo establece el audioprotesista durante el proceso de programación Para obtener más información sobre programas auditivos con...

Page 46: ... de la sensibilidad La pantalla de la sensibilidad muestra los ajustes de la sensibilidad incluido el nivel inicial definido por el audioprotesista durante el proceso de programación El nivel inicial está representado por la línea media más larga en la escala de la sensibilidad El usuario puede aumentar la sensibilidad 10 unidades por encima de esta línea o disminuirla en 10 unidades por debajo Pa...

Page 47: ...er el estado de los niveles de pila tanto del AB myPilot como de los Naída CI Para que se pueda leer y mostrar la información del estado de la batería el AB myPilot debe estar a menos de 30 cm 12 del Naída CI Sujete el AB myPilot como se muestra en esta imagen En caso de que falle el proceso de lectura por ejemplo si los Naída CI se encuentren a demasiada distancia el AB myPilot mostrará una señal...

Page 48: ...ía recargar la pila tan pronto como sea posible Pantalla ZoomControl opcional solo para usuarios bilaterales Si es un usuario bilateral con Naída CI y estos están equipados con ZoomControl esta función especial le permitirá elegir la dirección en la que quiere centrar el sistema auditivo izquierda o derecha La pantalla ZoomControl solo es accesible desde el modo estándar Acceso directo de la panta...

Page 49: ...mente al menú Test de audición Desde el menú puede seleccionar la fuente de entrada que le gustaría escuchar Si selecciona Bobina inductiva asegúrese de que está sincronizado con un bucle o con myLink de Phonak Proporcione una entrada al transmisor FM para evaluar la calidad sonora Si selecciona Inalámbrico escuchará cualquier fuente de audio que se esté transmitiendo a través del ComPilot por eje...

Page 50: ...cceso rápido Elija la siguiente opción de menú Guardar vol progr seleccione esta opción y púlsela para almacenar los ajustes de volumen y programa actuales Recuerdo de ajustes seleccione esta opción y púlsela para recuperar los ajustes de volumen y programa guardados Botón Encend Apagar acceda a este menú secundario para definir el comportamiento del botón Encender Apagar Seleccione una de las sig...

Page 51: ...el botón central Seleccione Ajustes y Reloj Formato hora y 24 horas Fecha El AB myPilot incorpora una fecha interna que se muestra cuando entra en el modo de espera Fijar fecha Formato fecha Puede elegir entre dos formatos de fecha diferentes Pare elegir el formato DD MM AAAA Pulse el botón central Seleccione Ajustes y Fecha Pulse el botón central Seleccione Ajustes y a continuación Reloj Seleccio...

Page 52: ...nde automáticamente El AB myPilot mostrará brevemente una pantalla de modo en espera antes de apagar la iluminación Autobloqueo del teclado El AB myPilot se puede configurar para bloquear automáticamente las teclas cuando se apague la iluminación 3 Pulse el botón central Seleccione Ajustes y a continuación Pantalla Seleccione Contraste 1 2 En la pantalla de contraste utilice la tecla para disminui...

Page 53: ...ias con el uso normal mantenga el AB myPilot a una distancia de 10 cm 4 o más del cuerpo Por lo tanto se recomienda que los usuarios de marcapasos no lleven el AB myPilot en un bolsillo del pecho Solución de problemas Pantalla sin respuesta 1 2 1 2 Figura A Figura B Situación Causa más probable Solución El AB myPilot se apaga automáticamente La pila se ha agotado Cargar el AB myPilot El AB myPilot...

Page 54: ...strasse 28 8712 Stäfa Suiza 41 58 928 78 00 Este audífono está certificado según las siguientes normativas ID FCC KWC MYPILOT1 IC 2262A MYPILOT1 Aviso n º 1 Este dispositivo cumple con el apartado 15 de las normas de la FCC y con la norma RSS 210 de Industry Canada El funcionamiento de este dispositivo está determinado por las dos condiciones siguientes 1 El dispositivo no puede provocar interfere...

Page 55: ......

Page 56: ...Gebrauchsanweisungfür AB myPilot Partner für Bestes Hören ...

Page 57: ...ng zwischen dem Naída CI und AB myPilot aufgrund einer ungewöhnlichen Feldstörung unterbrochen wird entfernen Sie sich aus dem Störfeld VerwendenSieABmyPilotnichtinUmgebungen indenendieNutzungelektronischer Geräte verboten ist Röntgenstrahleneinwirkung z B durch CT oder MRT Scans kann die Funktionsfähigkeit von AB myPilot beeinträchtigen Wir empfehlen AB myPilot vor einer Röntgenstrahlenuntersuchu...

Page 58: ...rogrammunklarheit 20 AB myPilot Akku Status 20 ZoomControl Bildschirm optional nur für bilaterale Anwender 20 Schnellzugriff auf den ZoomControl Bildschirm 20 Zugang über Menü 20 21 Menüoptionen 21 24 Menüoptionen Übersicht 21 ZoomControl optional nur für bilaterale Anwender 22 Naída CI Listening Check 22 24 Tasten sperren 24 AB myPilot Version 24 Einstellungen 25 30 Schnellzugriff 25 Hauptbildsch...

Page 59: ...d automatisch das zuletzt verwendete Programm ausgewählt Erste Schritte Den Akku laden und Allgemeine Informationen zum Akku Laden Sie den Akku aus Sicherheitsgründen ausschließlich mit einem Ladegerät von Advanced Bionics Während des Ladevorgangs blinkt das Batteriesymbol auf dem Hauptbildschirm Sobald der Akku voll geladen ist blinkt das Batteriesymbol nicht mehr bleibt aber sichtbar Das Auflade...

Page 60: ...ne rote LED auf Das Implantat wird in diesem Modus nicht stimuliert In dieser Zeit kommuniziert AB myPilot nicht mit dem Naída CI Das Naída CI muss erneut eingeschaltet werden PowerCel vom Soundprozessor trennen und wieder anschließen damit AB myPilot die Kommunikation zum Soundprozessor wieder aufnehmen kann Die Kommunikation zwischen AB myPilot und einem C1 Implantat z B wenn der Anwender am and...

Page 61: ...em Naída CI koppeln Die Kopplung muss abgeschlossen sein ehe AB myPilot auf das Naída CI zugreifen kann Um den Kopplungsprozess zu starten führen Sie erst AB myPilot zum Naída CI das Sie kop peln möchten Abstand ca 30 cm Schließen Sie den PowerCel Akku oder Zink Luft Batterie einsatz oder den Power Adapter am Naída CI an um das Kopplungsfenster zu öffnen insg 5 Minuten Wenn AB myPilot bisher noch ...

Page 62: ...elten Naída CIs können auch genauer identifiziert werden Dazu gehen Sie wie folgt vor Drücken Sie die mittlere Taste Wählen Sie im Hauptmenü den Punkt Einstellungen Wählen Sie im Menü Einstellungen den Punkt Kopplung 1 2 Wählen Sie im Menü Kopplung den Punkt Kopplung löschen 3 Drücken Sie die mittlere Taste wählen Sie im Hauptmenü den Punkt Einstellungen 1 Wählen Sie im Menü Einstellungen den Punk...

Page 63: ...beide Naída CIs eines bilateralen Implantatträgers mit AB myPilot gekoppelt wird jede über AB myPilot ausgeführte Änderung an beiden Naída CIs gleichzeitig vorgenommen sofern der Anwender nichts anderes bestimmt Die Hörprogrammreihenfolge wird von Ihrem Audiologen während der Anpassung bestimmt Für weitere Informationen zu den Hörprogrammen wenden Sie sich bitte an Ihren Audiologen Modus Direktzug...

Page 64: ... Die voreingestellte Empfindlichkeit wird durch die verlängerte Mittellinie auf der Empfindlichkeitsskala angezeigt Der Anwender kann die Empfindlichkeit um bis zu 10 Stufen über dieser Linie erhöhen oder um bis zu 10 Stufen unter dieser Linie reduzieren Um die Lautstärke an einem einzelnen Naída CI rechts oder links zu ändern öffnen Sie den Lautstärke Bildschirm indem Sie im Hauptbildschirm entwe...

Page 65: ...adestand der Naída CI Soundprozessoren auslesen Um den Batterieladestand auszulesen und anzuzeigen muss AB myPilot etwa im Abstand von 30 cm zum Naída CI gehalten werden Halten Sie AB myPilot dabei so wie in der Abbildung gezeigt Sollte das Auslesen der Informationen fehlschlagen etwa weil sich das Naída CI außerhalb der erforderlichen Reichweite befindet ist anstelle des Naída CI Akkuladestatus u...

Page 66: ...hnell wie möglich wieder aufzuladen ZoomControl Bildschirm optional nur für bilaterale Anwender Wenn Sie ein bilateraler Naída CI Anwender sind und an Ihren Naída CIs die Funktion ZoomControl aktiviert haben können Sie die Richtung auswählen in die Sie Ihren Hörfokus legen wollen links oder rechts Der ZoomControl Bildschirm ist nur im Standard Modus verfügbar Schnellzugriff auf den ZoomControl Bil...

Page 67: ...ck Menü In diesem Menü können Sie die Eingangsquelle auswählen die Sie überprüfen möchten Wenn Sie T Spule wählen müssen Sie entweder mit einer Induktionsschleife oder mit myLink synchronisiert sein Sprechen Sie in den FM Sender um die Audioqualität zu überprüfen Wenn Sie Drahtlos wählen hören Sie die Audioquelle die drahtlos über den ComPilot übertragen wird z B Bluetooth Gerät FM batteriebetrieb...

Page 68: ...as Hauptmenü zu gelangen Wählen Sie Einstellungen und anschließend Schnellzugriff Wählen Sie eine der folgenden Menü Optionen Speichere Prog Vol Speichern der aktuellen Hörprogramm und Lautstärke Einstellungen Einstellungen zurücksetzen Zurücksetzen auf zuvor gespeicherte Hörprogramm und Lautstärke Einstellungen AN AUS Taste Öffnen Sie dieses Untermenü um die spezifische Funktion der EIN AUS Taste...

Page 69: ...ste Wählen Sie Einstellungen Uhr Uhrzeitformat und 24 Stunden Datum AB myPilot verfügt über eine integrierte Datumsanzeige die erscheint sobald das Gerät in den Schlafmodus tritt Datum einstellen Datumsformat Das Datum kann in einem der folgenden Formate angezeigt werden TT MM JJJJ Format Drücken Sie die mittlere Taste Wählen Sie Einstellungen Datum Drücken Sie die mittlere Taste Wählen Sie Einste...

Page 70: ...lten der Hintergrundbeleuchtung wird kurz der Schlafmodus Bildschirm eingeblendet Auto Tastensperre Die Tastensperre der AB myPilot kann so eingestellt werden dass die Tasten mit dem Abschalten der Hintergrundbeleuchtung automatisch gesperrt werden 3 Drücken Sie die mittlere Taste Wählen Sie Einstellungen dann Display Wählen Sie Kontrast 1 2 Im Kontrast Bildschirm können Sie über die Taste den Kon...

Page 71: ...sonen die einen Herzschrittmacher tragen sollten AB myPilot nicht in ihrer Brusttasche aufbewahren Fehlerbehebung Bildschirm Keine Antwort 1 2 1 2 Abbildung A Abbildung B Situation Wahrscheinlichste Ursache Lösung AB myPilot schaltet sich automatisch AUS Der Akku ist leer Laden Sie AB myPilot auf AB myPilot reagiert nicht Es liegt womöglich ein Software Problem vor Starten Sie AB myPilot neu Der B...

Page 72: ...asse 28 8712 Stäfa Schweiz 41 58 928 78 00 Dieses Gerät ist wie folgt zertifiziert FCC ID KWC MYPILOT1 IC 2262A MYPILOT1 Hinweis 1 DiesesGerätentsprichtdenAnforderungenausTeil15derFCC BestimmungenundderRSS 210 Industry Canada Für den Betrieb müssen die folgenden zwei Voraussetzungen erfüllt sein 1 Dieses Gerät darf keine schädlichen Interferenzen verursachen 2 Dieses Gerät muss den Empfang von Int...

Page 73: ......

Page 74: ...gebruiksaanwijzingvoor de AB myPilot Partners in goed horen ...

Page 75: ...inal of andere sterke elektromagnetische velden Wanneer de Naída CI vanwege een ongebruikelijk storingsveld niet reageert op de AB myPilot ga dan verder weg van het storingsveld Gebruik de AB myPilot niet op plaatsen waar het verboden is om elektronische apparaten te gebruiken Röntgenstraling bijv CT scans MRI scans kan de werking van de AB myPilot nadelig beïnvloeden We adviseren u om de AB myPil...

Page 76: ...Ambiguïteit van programma 20 Batterijstatus van AB myPilot 20 ZoomControl scherm optioneel alleen voor bilaterale gebruikers 20 Rechtstreekse toegang tot scherm ZoomControl 20 Toegang via menu 20 21 Menufuncties 21 24 Menu overzicht 21 ZoomControl optioneel alleen voor bilaterale gebruikers 22 Naída CI Listening Check 22 24 Toetsen vergrendelen 24 Versie van AB myPilot 24 Instellingen 25 30 Snelke...

Page 77: ...lecteerd Aan de slag De batterij opladen en algemene informatie over de batterij Om veiligheidsredenen mag de batterij alleen worden opgeladen met laders die door Advanced Bionics worden geleverd Tijdens het oplaadproces knippert het batterijsymbool op het startscherm Als de batterij volledig is opgeladen stopt het batterijsymbool met knipperen en blijft het zichtbaar Het opladen van een lege batt...

Page 78: ...aat niet gestimuleerd Er is dan geen communicatie mogelijk tussen de AB myPilot en de Naída CI De Naída CI moet volledig opnieuw worden opgestart door de PowerCel te verwijderen en terug te plaatsen om de communicatie tussen de AB myPilot en de Naída CI weer te activeren En als een ingeschakelde AB myPilot te dicht bij een C1 implantaat wordt gehouden bijvoorbeeld als een gebruiker een ouder impla...

Page 79: ...owerCel of het Zn luchtbatterijpak of bevestig de stroomadapter aan de Naída CI om het koppelingsvenster time out van vijf minuten te starten Als de AB myPilot nooit eerder is gekoppeld wordt het volgende bericht op het scherm weergegeven wanneer de AB myPilot wordt ingeschakeld The AB myPilot needs to be paired with your hearing instruments De AB myPilot moet gekoppeld worden met uw hoortoestelle...

Page 80: ...ettings Instellingen de optie Pairing Koppelen 1 2 Selecteer in het menu Pairing Koppelen de optie Clear Pairing Koppeling wissen 3 Druk op de middelste knop en selecteer Settings Instellingen in het hoofdmenu 1 Selecteer in het menu Settings Instellingen de optie Pairing Koppelen 2 Selecteer in het menu Pairing Koppelen de optie Scan for Devices Naar apparaten zoeken of Pair Devices Apparaten kop...

Page 81: ...CI s is gekoppeld worden alle programmawijzigingen die met de AB myPilot zijn gedaan tegelijkertijd op beide Naída CI s toegepast tenzij de gebruiker anders heeft aangegeven De volgorde van de programmalijst wordt door de audioloog tijdens de aanpassing ingesteld Uw audioloog kan u meer informatie verstrekken over luisterprogramma s Modus voor rechtstreekse bediening In de modus voor rechtstreekse...

Page 82: ...sing heeft ingesteld Het basisniveau wordt aangegeven met de langste middellijn op de gevoeligheidsschaal De gebruiker kan de gevoeligheid wijzigen tot 10 klikken boven of onder deze lijn Als u de Volume instellingen van het linker of rechter Naída CI afzonderlijk wilt wijzigen gaat u naar het scherm Volume door op of te drukken terwijl het startscherm wordt weergegeven Het scherm Volume is niet b...

Page 83: ...n van de batterijniveaus van zowel de AB myPilot als de Naída CI s Om informatie over de batterijstatus uit te lezen en weer te geven moet de AB myPilot zichineenstraalvancirca30cm 12inch van de Naída CI bevinden Houd de AB myPilot zoals op de afbeelding is weergegeven Wanneer de uitlezing mislukt bijvoorbeeld omdat de Naída CI s zich buiten het bereik bevinden wordtopdeABmyPiloteenvraagteken gevo...

Page 84: ...en werkt de AB myPilot nog circa een uur De gebruiker moet de batterij echter zo snel mogelijk opnieuw opladen ZoomControl scherm optioneel alleen voor bilaterale gebruikers AlsueenbilateralegebruikervandeNaídaCIbentendeNaídaCI szijnvoorzienvanZoomControl kunt u met deze speciale functie de richting kiezen waarin u het hoorsysteem wilt richten links of rechts Het scherm ZoomControl kan alleen vanu...

Page 85: ...Luistercontrole van de AB myPilot weergegeven In het menu kunt u de inputbron selecteren waarnaar u wilt luisteren Als u T Coil Luisterspoel selecteert moet u er zeker van zijn dat u bent gesynchroniseerd met een lus of myLink van Phonak Spreek en of maak geluid in de FM zender om de audiokwaliteit te beoordelen Wanneer u Wireless Draadloos selecteert luistert u naar de audiobron die via de ComPil...

Page 86: ...uick Access Snelkeuze Kies de volgende menu optie Store Settings Instellingen opslaan Selecteer deze optie om het huidige programma en de huidige volume instelling op te slaan Recall Setting Instelling ophalen Selecteer deze optie om het opgeslagen programma en de volume instelling op te roepen ON OFF Button Aan uitknop Activeer dit submenu om de werking van de aan uitknop te bepalen Selecteer een...

Page 87: ...uursnotatie te selecteren Druk op de middelste knop Selecteer Settings Instellingen Clock Klok Time Format Tijdnotatie en 24 Hour 24 uur Date Datum De AB myPilot heeft een interne datum die wordt weergegeven wanneer de slaapmodus wordt geactiveerd Datum instellen Datumnotatie U kunt uit twee verschillende datumnotaties kiezen Ga als volgt te werk om de notatie DD MM JJJJ te selecteren Druk op de m...

Page 88: ...jft de achtergrondverlichting automatisch langer aan Op de AB myPilot wordt kort een slaapmodusscherm weergegeven voordat de achtergrondverlichting wordt uitgeschakeld Automatische toetsvergrendeling De AB myPilot kan zo worden geconfigureerd dat de toetsen automatisch worden vergrendeld wanneer de achtergrondverlichting wordt uitgeschakeld 3 1 2 3 Druk op de middelste knop Selecteer Settings Inst...

Page 89: ...ers mogelijk Interferentie zou bij normaal gebruik niet mogen optreden wanneer u de AB myPilot 10 cm of meer bij het lichaam vandaan houdt Dragers van een pacemaker worden dan ook geadviseerd om de AB myPilot niet in hun overhemd te dragen Problemen oplossen Scherm No Response Geen reactie 1 2 1 2 Afbeelding A Afbeelding B Situatie Meest waarschijnlijke oorzaak Oplossing AB myPilot schakelt automa...

Page 90: ... Advanced Bionics AG Laubisrütistrasse 28 8712 Stäfa Zwitserland 41 58 928 78 00 Dit apparaat is gecertificeerd volgens FCC ID KWC MYPILOT1 IC 2262A MYPILOT1 Kennisgeving 1 Dit apparaat voldoet aan deel 15 van de FCC regels en aan RSS 210 van Industry Canada De werking is onderhevig aan de volgende twee omstandigheden 1 Dit apparaat mag geen schadelijke interferentie veroorzaken en 2 ditapparaatdi...

Page 91: ......

Page 92: ...manual do usuáriopara o myPilot da AB Parceiros para Melhor Audição ...

Page 93: ... CI não responde ao myPilot da AB devido a uma perturbação incomum de campo afaste se do campo de perturbação NãoutilizeomyPilotdaABemlocaisondeéproibidoousodedispositivoseletrônicos A radiação de raios X por exemplo exames de tomografia computadorizada ou ressonância magnética pode prejudicar o funcionamento correto do seu aparelho auditivo Recomendamos desligar o myPilot da AB antes dos procedim...

Page 94: ...de do Programa 20 Status da Pilha do myPilot da AB 20 Tela do ZoomControl Opcional Somente para Usuários Bilaterais 20 Acesso Direto da Tela do ZoomControl 20 Acesso pelo Menu 20 21 Funções do Menu 21 24 Visão Geral do Menu 21 ZoomControl Opcional Somente para Usuários Bilaterais 22 Verificador de Escuta Naída CI 22 24 Bloqueio de Teclado 24 Versão do myPilot da AB 24 Configurações 25 30 Acesso Rá...

Page 95: ...arregamento e Informações Gerais da Pilha Por razões de segurança recarregue a pilha somente com carregadores fornecidos pela Advanced Bionics Durante o processo de carregamento o símbolo da pilha na Tela inicial irá piscar Depois que a pilha estiver totalmente carregada o símbolo da pilha irá parar de piscar e permanecerá visível O carregamento de uma pilha vazia dura normalmente cerca de 90 minu...

Page 96: ... modo de erro O Naída CI exibirá uma luz de LED vermelha sólida e não estimulará o implante enquanto estiver nesse modo Nesse momento o myPilot da AB não estará apto a se comunicar com o Naída CI O Naída CI terá que ser ligado e desligado novamente reiniciado com a remoção e colocação da PowerCel para o myPilot da AB retomar a comunicação com o Naída CI Além disso se um myPilot da AB carregado é p...

Page 97: ...deve ser completado antes do myPilot da AB interagir com o Naída CI Para começar o processo de emparelhamento tenha o Naída CI que você quer emparelhar dentro de 30 cm 12 do myPilot da AB Coloque a powerCel Pacote de Pilha Zinco Ar ou o adaptador de energia no Naída CI iniciando a Janela de Emparelhamento tempo de cinco minutos Se o myPilot da AB nunca foi emparelhado ao ligá lo a tela do myPilot ...

Page 98: ... AB Para acessar essa função Selecione o botão central No menu principal selecione Configuração No menu Configurações selecione Emparelhamento 1 2 No menu Emparelhamento selecione Desmarcar Emparelhamento 3 Pressione o botãocentral no menu principal selecione Configurações 1 No menu Configurações selecione Emparelhamento 2 Do menu Emparelhamento selecione Rastreamento por Dispositivos ou Emparelha...

Page 99: ...a AB são aplicadas simultaneamente a ambos os Naída CI salvo indicação em contrário por parte do usuário A ordem da sequência do programa é fixada pelo profissional de cuidados auditivos durante o processo de ajuste Para maiores informações sobre programas auditivos pergunte ao profissional audiologista Modo de Controle Direto No modo de controle direto cada tecla seleciona o número indicado do pr...

Page 100: ...uindo o nível base que foi definido pelo profissional de cuidados auditivos durante o processo de ajuste O nível base é retratado pela linha central maior na escala de sensibilidade O usuário pode aumentar a sensibilidade até 10 cliques acima dessa linha ou diminuir a sensibilidade 10 cliques abaixo Para alterar as configurações de Volume do Naída CI esquerda individualmente vá até a tela Volume p...

Page 101: ...rio leia o status dos níveis de pilha do myPilot da AB e do s Naída CI De modo a ler e exibir informações de status da pilha o myPilot da AB deve estar cerca de 30 cm 12 do Naída CI Segure o myPilot da AB como mostrado na imagem abaixo Caso o processo de leitura falhe por exemplo por causa que o Naída CI está fora de alcance o myPilot da AB irá exibir um ponto de interrogação seguido pela mensagem...

Page 102: ...hora entretanto o usuário deve recarregar a pilha assim que possível Tela do ZoomControl Opcional Somente para Usuários Bilaterais Se você é um usuário Naída CI bilateral e os Naída CI estão equipados com ZoomControl esse recurso especial permite que você escolha a direção na qual focar o sistema de audição esquerda ou direita A tela ZoomControl é acessível somente pelo modo padrão Acesso Direto d...

Page 103: ...passa imediatamente para o menu Verificador de Escuta Do menu você pode selecionar a fonte de entrada desejada que você gostaria de ouvir Se você selecionar a Bobina Telefônica garanta que você esteja sincronizado com um gancho ou Phonak myLink Providencie uma entrada para o Transmissor FM para avaliar a qualidade de áudio Se selecionar Sem Fio você estará ouvindo a qualquer fonte de áudio sendo t...

Page 104: ...figurações então Acesso Rápido Escolha a seguinte opção do menu Configurações Armazenadas Selecione esse ponto e pressione para armazenar o programa e definição de volume atuais Recuperar Configuração Selecione esse ponto e pressione para recuperar as definições armazenadas de programa e volume Botão LIGAR DESLIGAR Entre nesse sub menu para definir o comportamento do botão LIGAR DESLIGAR Escolha u...

Page 105: ...ara Escolher o Formato 24 horas Pressione o botão central Selecione Configurações Relógio Formato de Hora e 24 horas Data O myPilot da AB possui uma data interna que é exibida ao entra no modo de suspensão Ajustar Data Formato de Data Você pode escolher entre dois tipos diferentes de formato de data Para Escolher o Formato DD MM AAAA Pressione o botão central Selecione Configurações Data Pressione...

Page 106: ...nu otemporizadorderetroiluminaçãoéestendidoautomaticamente O myPilot da AB irá exibir brevemente um tela do modo de suspensão antes de desligá la Bloqueio de Teclado Automático O myPilot da AB pode ser configurado para bloquear automaticamente as teclas ao desligar a retroiluminação 3 1 2 3 Pressione o botão central Selecione Configurações e então Display Selecione Contraste 1 2 Na tela de contras...

Page 107: ...o normal mantendo o myPilot da AB 10cm 4 ou mais de distância do corpo Portanto recomenda se que os usuários de marca passo não mantenham o myPilot da AB no bolso da camisa Solução de Problemas Nenhuma Tela de Resposta 1 2 1 2 Figura A Figura B Situação Causa Mais Provável Solução O myPilot da AB DESLIGA automaticamente A pilha está descarregada Carregue o myPilot da AB O myPilot da AB não respond...

Page 108: ...tact Advanced Bionics AG Laubisrütistrasse 28 8712 Stäfa Suíça 41 58 928 78 00 Este aparelho é certificado por FCC ID KWC MYPILOT1 IC 2262A MYPILOT1 Aviso 1 Este aparelho está em conformidade com a seção 15 das regras da FCC e com a RSS 210 da Industry Canada O funcionamento está sujeito às duas condições a seguir 1 Este dispositivo pode não causar interferências nocivas e 2 Este dispositivo deve ...

Page 109: ......

Reviews: