background image


44


alarm. You can get connected to the main drive by dialling or sending the SMS and program it by manual 
inserting the telephone numbers. 
 

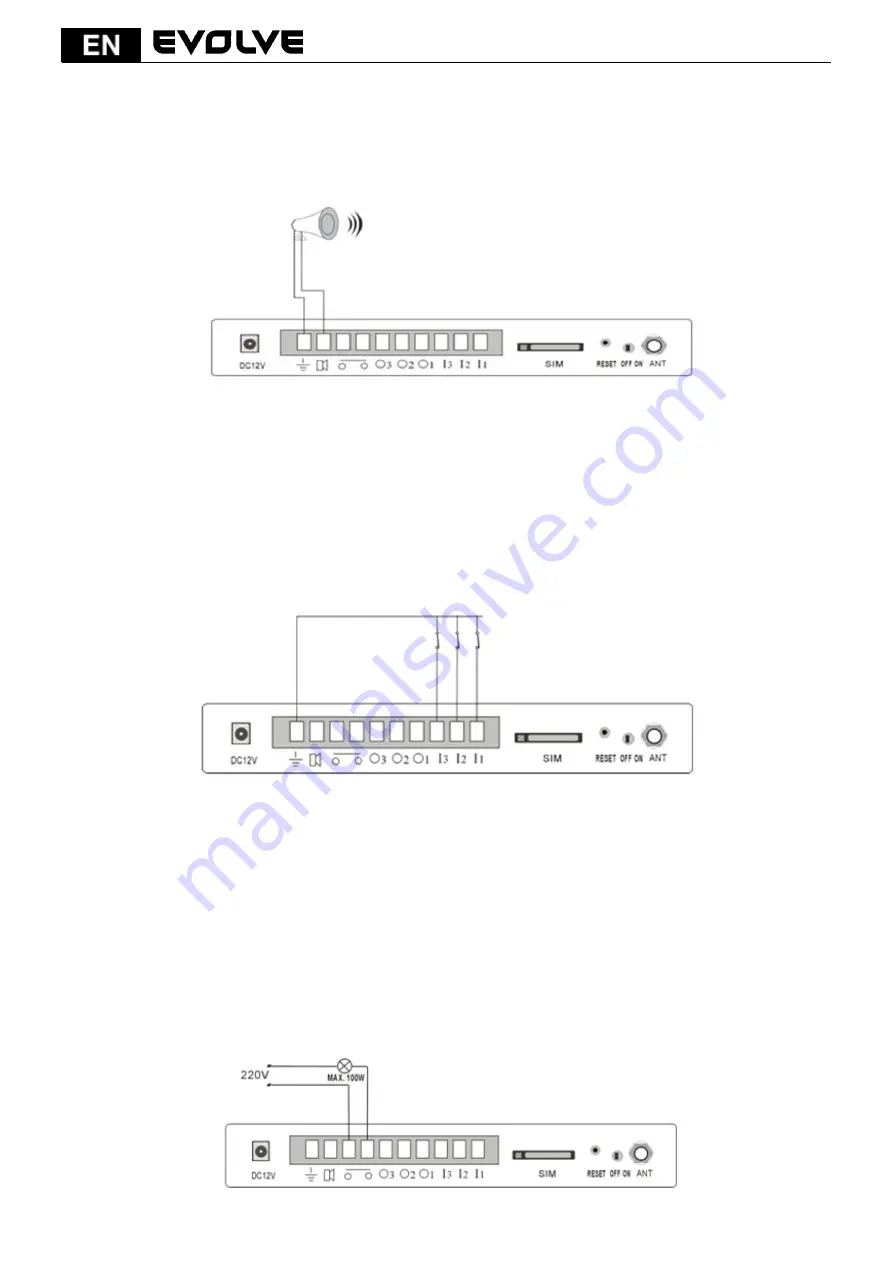
4. Connecting the siren to the alarm 

Connect the black wire to the grounding (GND) and the red wire to the siren. 


5. Connecting the wire sensors 

There are three connectors available for connecting the wire sensors. The inputs are independent and 
they aren´t coded as different zones. When the sensors are activated, the alarm sends an SMS: 

Wired 

Activated (1~3) (wire sensor activated (sensor number)).


The sensors must be the N0 typ (they are open in the normal state). 
There can be used more sensors on one input if their contacts are connected to the alarm by series. 
There can be connected any number of the wire sensors onto the alarm inputs if their total resistance 
doesn´t exceed 220 ohms.  


6. Connecting the switching devices (household appliances) 

There are three outputs with the open collector 

O1, O2 and O3) available and one internal relay is with 

the phone control option. The internal relay is activated if the alarm triggers and it can be 
deactivated/reactivated by the telephone commands or SMS messages. It is possible to use them for 
example for switching on the external lights. 


ATTENTION! 

The relay contacts are dimensioned to the current 6 A, so it is not possible to connect the 

device directly over the input power 1000 W (it will cause the contacts damage). Connecting the device 
with the higher input power (e. g. convector heater) is necessary to solve by using the external contactor 
or the output relay.


Black


Red


Summary of Contents for Evolve Sonix

Page 1: ...ttage garage garden house caravan and so on It is always recommended to use another system of securing and or to have the particular property insured The product isn t a professional security system and it is not possible to consider it unreserved instrument for securing the property For the right function of the product it is recommended to check it and test it by yourself at least once a quarter...

Page 2: ...uide 1 Inserting the SIM card into the alarm Press the yellow point on the device with the nib or another tip The SIM card holder will slide out Insert the SIM card into it and slide it back Make sure that the SIM card s metal contacts are downwards Now press the SIM card holder back into the device Before inserting the SIM card into the alarm use it first in the normal mobile phone and make these...

Page 3: ...he alarm by series There can be connected any number of the wire sensors onto the alarm inputs if their total resistance doesn t exceed 220 ohms 6 Connecting the switching devices household appliances There are three outputs with the open collector O1 O2 and O3 available and one internal relay is with the phone control option The internal relay is activated if the alarm triggers and it can be deac...

Page 4: ... go on the panel RELAY1 RELAY2 These two connectors will close up for 3 minutes after the alarm notification You can start power the camera at the alarm activation by using them The function can be deactivated using the order 16 1 or anytime by sending the SMS or dialling the number 94 1 or 94 0 SIREN This output provides the signal tone of the siren and it is necessary to connect the siren to it ...

Page 5: ...th group into the alarm 123456 55 13905950005 will save the telephone number for the fifth group into the alarm There are seven preset SMS types available but you can change them The first five messages are for setting the wireless detectors for the zones 1 5 The sixth message is for the wireless detectors of the zones 6 16 The seventh message is for the wire ports I1 I2 I3 When the first wireless...

Page 6: ... you can answer the call straight without the necessity entering the password and turn off the alarm from the distance or reset the device By pressing the 3 1 you switch on the siren and by pressing 3 0 you turn it off by pressing 4 1 you can eavesdrop what s happening in the room and by pressing 4 0 you end the eavesdropping by pressing 93 1 you can talk to the intruder by the alarm where you can...

Page 7: ...the zones only via the SMS commands 31 Change the password Entering the new password 1 6 bit 38 Alarm activation for the zone wireless zones 1 16 wire zones 21 23 Note for each zone activation 39 Alarm deactivation for the zone wireless zones 1 16 wire zones 21 23 Note for each zone deactivation 50 Displaying the numbers preset to the alarm main drive controlling only via SMS 51 Phone number of th...

Page 8: ...lso the main drive on which the green warning light will shine continuously The partial activation this activates the alarm for the situation when somebody is at home and so the inner sensors are deactivated and only the outside sensors stay active The people inside can comfortably move without activating the alarm but whoever would try to break into the house from the outside he she will activate...

Page 9: ...n that the reset of the device was successful All the registered sensors were deleted from the alarm main drive Now recode again using the procedure described above only those sensors that are available The system reset will not affect the content of the preset SMS messages The basic consignment contains 1 pc Alarm main control drive 1 pc Antenna 1 pc Wireless PIR detector 1 pc Wire mini siren 110...

Page 10: ...y 1 The battery in the remote control is rusted 2 The battery is low 1 Remove the rust 2 Change the battery The warning of the door sensor and PIR shines permanently The battery is low Change the battery Dialling is slow The main drive has saved different numbers Set the numbers again and exactly according to the instructions The main drive doesn t receive the signals from the sensors The code was...

Reviews: