background image


2106123MNAA | WI-FI ANTENNA KIT | 7 


11.


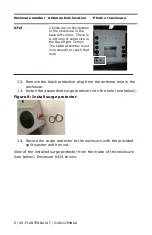
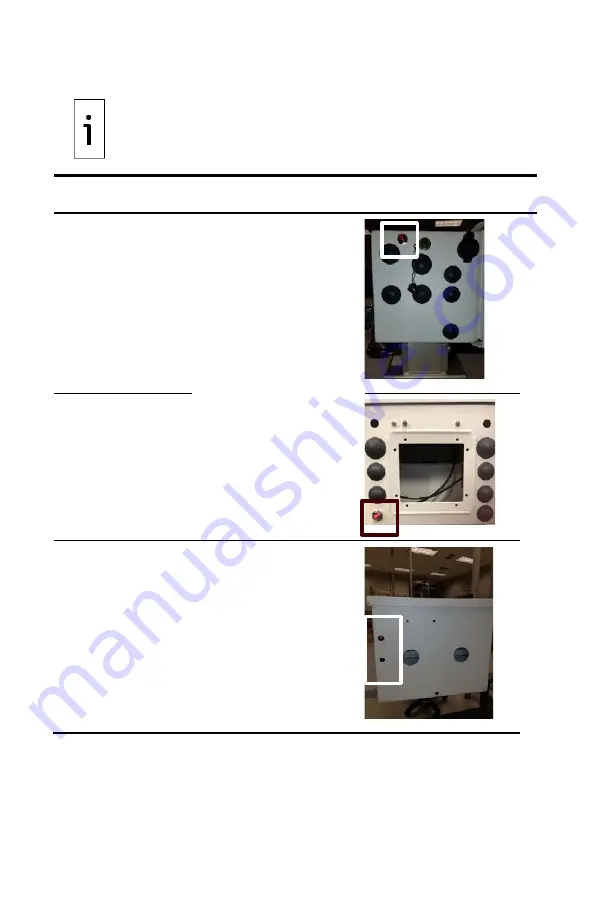
Identify the enclosure used and the location of the antenna 

hole. 


IMPORTANT NOTE: The 8 AH, 13 AH, 16 AH, and 26 AH 

batteries fit in the 6410 enclosure with the antenna surge 

protector installed. 

Enclosure number  Antenna hole location 

Photo of enclosure 

6410 

On the Left side of the 

enclosure, in the upper 

left corner.  


6413 

On the bottom of the 

enclosure, in the back left 

corner 


6890 

2 holes are on the bottom 

left of enclosure, both are 

usable  


Summary of Contents for 2106049

Page 1: ...sy wireless access for configuration Measurement made easy Introduction This document will define the procedures and list the parts required to install a Wi Fi antenna IMPORTANT NOTE To enable and configure Wi Fi for secure access refer to the XSeriesG5 XFC or XRC user manuals ...

Page 2: ...ams etc to protect this product the network its system and interfaces against any kind of security breaches unauthorized access interference intrusion leakage and or theft of data or information ABB Inc and its affiliates are not liable for damages and or losses related to such security breaches any unauthorized access interference intrusion leakage and or theft of data or information Although ABB...

Page 3: ...jury This symbol and with the signal word WARNING indicates a potentially dangerous situation Failure to observe this safety information will result in death or severe injury The text may state the hazard how to avoid the hazard and the result if not followed The bolt is for electrical warnings the exclamation point is for general warnings IMPORTANT NOTE This symbol indicates operator tips particu...

Page 4: ...kit contents Photo Name Photo Name 1 SMA Fittings 5 Surge protector 2 Antenna 6 SMA plug to jack adapter 3 Terminator plug 7 Cable assembly 4 FCC IC tag 8 Ground cable Cable assembly part numbers for enclosures Kit number Cable length Enclosures 2106049 001 24 inches 6410 2106049 002 32 inches 6413 6713 2106049 003 44 inches 6890 2 6 3 8 4 5 7 1 ...

Page 5: ...r the required length when ordering the kit 2 Installation procedures 1 Locate the cable clamp on the upper right corner of the board Put the straight end of the cable assembly through the cable clamp Figure 2 Cable clamp 2 Attach the right angle SMA fitting of the cable to the board ANT 1 connector J42 Figure 3 Attach at ANT 1 ...

Page 6: ...attached to the ground post located near the enclosure s door Allow enough length for a service loop of approximately 1 inch from the surge protector to the ground post 6 Remove the crimp ring terminal from the surge protector See number 1 in the following photo Figure 6 Crimp ring terminal 7 Crimp the surge protector terminal ring to the ground cable 8 Re attach the crimped terminal with ground c...

Page 7: ... and 26 AH batteries fit in the 6410 enclosure with the antenna surge protector installed Enclosure number Antenna hole location Photo of enclosure 6410 On the Left side of the enclosure in the upper left corner 6413 On the bottom of the enclosure in the back left corner 6890 2 holes are on the bottom left of enclosure both are usable ...

Page 8: ...The Cable assembly is not long enough to reach that hole 12 Remove the black protective plug from the antenna hole in the enclosure 13 Install the assembled surge protector into the hole see below Figure 8 Install surge protector 14 Secure the surge protector to the enclosure with the provided split washer and hex nut View of the installed surge protector from the inside of the enclosure see below...

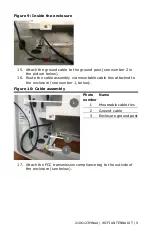
Page 9: ... 2 in the picture below 16 Route the cable assembly via mountable cable ties attached to the enclosure see number 1 below Figure 10 Cable assembly Photo number Name 1 Mountable cable ties 2 Ground cable 3 Enclosure ground post 17 Attach the FCC transmission compliance tag to the outside of the enclosure see below 2 3 1 ...

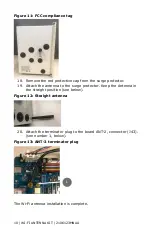
Page 10: ...the surge protector 19 Attach the antenna to the surge protector Keep the Antenna in the straight position see below Figure 12 Straight antenna 20 Attach the terminator plug to the board ANT 2 connector J43 see number 1 below Figure 13 ANT 2 terminator plug The Wi Fi antenna installation is complete 1 ...

Page 11: ...2106123MNAA WI FI ANTENNA KIT 11 This page is intentionally blank ...

Page 12: ...3313 Ph 1 661 833 2030 Texas Office Pleasanton 150 Eagle Ford Road Pleasanton TX 78064 Ph 1 830 569 8062 We reserve the right to make technical changes or modify the contents of this document without prior notice With regard to purchase orders the agreed particulars shall prevail ABB does not accept any responsibility whatsoever for potential errors or possible lack of information in this document...

Reviews: