Maintenance / Repair
IM/265D/V-EN-02 265Dx,
265VS
79
Pos: 25.4 /Überschriften/1.1/1-spaltig/D - F/Demontage @ 5\mod_1162976675906_3101.doc @ 45386
12.1 Removal
Pos: 25.5 /Wartung / Reparatur/Druck/Druckmessumformer/Allgemein/Demontagehinweise @ 1\mod_1147936535984_3101.doc @ 12694
Warning - General risks
Before removing or disassembling the device, check for hazardous process conditions such
as pressure on the device, high temperatures, aggressive or toxic media, and so on.
Read the instructions in the sections "Safety" and "Electrical connection", and perform the
steps outlined there in reverse order.
Pos: 25.6 /Wartung / Reparatur/Druck/Druckmessumformer/Druckmessumformer 265Dx, 265Vx/Demontage / Montage der Prozessflansche @ 5\mod_1164106582078_3101.doc @ 49098
12.1.1 Removing / Installing the process flange
Caution - Risk of irreparable damage to measuring system
If remote seals are mounted on the measuring equipment, the process flange must not be
removed.
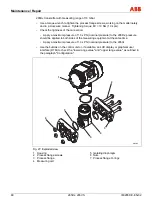
1.
Slacken the process flange screws by working on each in a crosswise manner (hexagon
head, SW 13 mm (0.51 inch)).
2.
Carefully remove the process flange, making sure that the isolating diaphragms are not
damaged in the process.
3.
Use a soft brush and suitable solvent to clean the isolating diaphragms and - if necessary -
the process flange.
Caution - Potential damage to parts
Do not use sharp or pointed tools.
4.
Insert the new process flange O-rings in the process flange.
5.
Attach the process flange to the measuring cell.
Caution - Potential damage to parts
Do not damage the isolating diaphragms.
The surfaces of both process flanges must be at the same level and at a right angle to the
electronics housing.
6.
Check that the process flange screw thread can move freely: Manually turn the nut until it
reaches the screw head. If this is not possible, use new screws and nuts.
7.
Lubricate the screw thread and seats of the screw connection using, for example, "Anti-Seize
AS 040 P" (supplier: P.W. Weidling & Sohn GmbH & Co. KG, Münster, Germany).
Important
In the case of oil and grease-free designs, clean the measuring chambers again if necessary
once the process flange has been installed.
8.
265Dx/265Vx transmitters with measuring ranges of
≥
60 mbar:
- First, use a torque wrench to tighten the process flange screws/nuts to a joining torque of
M
J
= 10 Nm (1.0 kpm), working in a crosswise manner.
- Then tighten them fully by turning each nut or screw again (in a crosswise manner) by the
tightening angle
α
A
= 180°, working in two stages of 90° each.
Summary of Contents for 265DS
Page 87: ......

