background image


Page 15


© Copyright 2021 ABB. All rights reserved. 


Installation


Equipment Included In Shipment


Included in  a  shipment  of  an 827E  inverter  system  are  an inverter shelf  or  shelves  (each equipped 

with a System Controller and a Distribution Disconnect Module) and inverters and/or blank panels 

quantities as specified on the inverter system order.


CAUTION: 


Loads and Inverters may be damaged if their AC voltages are not matched. Shelves and 


Inverters are available for both 120 Vac and 240 Vac applications.


CAUTION: 


Inverters may be damaged or may not function properly with improper DC input 


voltage. Shelves and Inverters are available for both 

−48 

Vdc and +24 Vdc applications.


Verify equipment received before installing the inverter system


• 

Verify product received matches the order


• 

Verify the correct inverter input voltage and output voltage


• 

Verify the correct shelf / system input voltage and output voltage


Contact ABB immediately if there is a question about the configuration of the system.


Tools and Test Equipment Required


The tools necessary to install and test the inverter system include items such as a  typical  Phillips 

head  screwdriver,  torque  wrenches,  a  ratcheting  wrench  set,  wire  cutters,  a  calibrated  digital  

multimeter, wire crimp tool and die set, etc. No unusual tools are required.


CAUTION: Read this manual thoroughly before attempting to connect, operate, or service an inverter 

system. Pay particular attention to these sections:


• 

Safety


• 

Considerations for Multiple

-

Shelf Systems


Summary of Contents for 827E

Page 1: ...Page 1 Copyright 2021 ABB All rights reserved PRODUCT MANUAL 827E Modular Inverter System 48 V 24 V Input 120 Vac 240 Vac Output Jl ll ll ...

Page 2: ...System Controller Install Remove 29 Modem Install Remove 30 Distribution Monitor Install Remove 31 Distribution Disconnect Module Install Remove 32 Initial Turn On Setpoints and Adjustments 33 Shelf Turn On and Operational Checkout 33 Adjusting Setpoints 35 Specifications 37 Features Reference 40 AC Output Distribution 40 Inverter 40 Distribution Disconnect Module DDM 40 Distribution Monitor DM 41...

Page 3: ...Page 3 Copyright 2021 ABB All rights reserved Troubleshooting 57 Safety 63 Safety Statements 63 Warning Statements and Safety Symbols 64 Precautions 65 Revision History 66 Jl ll ll ...

Page 4: ...ure 10 AC Output Connections 21 Figure 11 Common Trip Ratings for 10 30 Amp Range 23 Figure 12 Grounding Electrode Conductor GEC Connections 24 Figure 13 Alarm Outputs 26 Figure 14 DB9 Pin out 27 Figure 15 Inverter Install Remove 28 Figure 16 System controller Removal Installation 29 Figure 17 Modem Installation 30 Figure 18 Distribution Monitor Distribution Disconnect Module Removal and Installat...

Page 5: ... 21 Table 4 Typical Trip Ratings for 10 30 Amp AC Circuit Breakers 22 Table 5 Grounding Electrode Conductor Connections GEC 24 Table 6 Alarm Outputs 25 Table 7 Inverter Shelf Interface Cable Connection 27 Table 8 Setpoint Resolution 36 Table 9 Specifications Inverter 37 Table 10 Specifications Inverter System 38 Table 11 Troubleshooting Alarm Conditions 60 Table 12 Troubleshooting Corrective Actio...

Page 6: ...eeded on any power equipment complete engineering and field service groups are available in Galion Ohio to assist you in any way possible 1 877 546 3243 US Option 2 1 972 244 9288 Int l Option 2 PARTS ORDERING For spare part ordering please contact 1 972 244 WATT 9288 or toll free at 877 546 3243 to request a quote RETURN REPAIR For repair and return please contact 1 972 244 WATT 9288 or toll free...

Page 7: ...ll allow faster service when calling ABB to order accessories spare parts or request field service First locate the product information label This is typically located on the upper front of the equipment frame or on the rear of the frame Fill in the part number as it appears on the label in the space below PART NUMBER SERIAL NUMBER DATE CODE Jl ll ll ...

Page 8: ... N X This enables the system to supply uninterrupted AC power in the event that an inverter fails Summary 120 Vac and 240 Vac systems Line to Neutral systems Inverter Systems Single Shelf Inverter Systems to 7 2 kVA 19 23 25 and 26 rack compatible Frame Inverter Systems to 28 8 kVA Expandable by Inverter and Shelf addition Hot Insertion Inverters AC Output Distribution Panels Option Maintenance By...

Page 9: ... Vdc Input 23 Only typical1 Inverter Inverter Positions System N 1 full 240 Vac System N 1 full 1 6 50 kVA 60 kVA 6 0 kVA 7 2 kVA 25A 6 0 kVA 7 2 kVA 2 12 110 kVA 120 KVA 13 2 kVA 14 4 kVA 55A 13 2 kVA 60A 14 4 kVA 3 18 170 kVA 180 kVA 20 4 kVA 21 6 kVA 85A 20 4 kVA 90A 21 6 kVA 4 24 270 kVA 280 K 27 6 kVA 28 8 kVA 115A 27 6 kVA 120A 28 8 kVA System Configurations Inverter systems are available as...

Page 10: ...ings may be viewed for both the system and each individual inverter System Controllers in each shelf are independent Refer to the System Controller segment in the Features Reference section Distribution Disconnect Module DDM The Distribution Disconnect Module DDM located to the right of the System Controller provides an AC disconnect and shelf distribution monitoring via the Distribution Monitor D...

Page 11: ...reserved Figure 1 19 inch and 23 inch Systems and Shelves a 19 Inch System Distribution Disconnect Module Inverters System Controller Module 19 00 18 31 8 72 a 23 Inch System Module Designations SC00 DM15 01 02 03 04 05 06 23 00 22 31 8 72 ...

Page 12: ... reserved Figure 2 Modules Front View Fans Retaining Screw LCD Display Control Buttons Serial Port Modem Option AC Load Disconnect Breaker 100A Distribution Monitor LED Distribution Disconnect Module Inverter LEDs Handle System Controller ...

Page 13: ... Identification 240 Vac Inverter 120 Vac Inverter Left Side View Alarm Relay Output Connector AC Opening Connector Pin Out DC Opening for 1 1 2 conduit Product Information part number serial number revision level voltages etc Right Side View Figure 4 Side Views of a System Shelf ...

Page 14: ...Page 14 Copyright 2021 ABB All rights reserved ...

Page 15: ...Vdc and 24 Vdc applications Verify equipment received before installing the inverter system Verify product received matches the order Verify the correct inverter input voltage and output voltage Verify the correct shelf system input voltage and output voltage Contact ABB immediately if there is a question about the configuration of the system Tools and Test Equipment Required The tools necessary t...

Page 16: ...he frame ground cable A separate connection to the Central Office Ground System must be used for frame grounding purposes NOTE List 8 system comes equipped with an adaptor plate for 19 to 23 mounting NOTE Optional 25 and 26 mounting kits are available for 23 shelves J438827E List 5 and List 6 respectively Refer to Figure 5 for mounting dimensions Once the system has been removed from the shipping ...

Page 17: ...nch shelf shown b Optional 25 Mounting Brackets Refer to List 5 in 438827E c Optional 26 Mounting Brackets Refer to List 6 in 438827E The height between mounting holes for a 19 inch shelf is the same however the width between holes is 18 31 Figure 5 Mounting 23 25 and 26 ...

Page 18: ...o the Mechanical Installation section before making any electrical connections Figure 6 and Figure 7 are basic wiring diagrams showing typical connections with and without the maintenance bypass panel Refer to the T Drawing 438827ET for complete details GEC Neutral Strap First shelf only Grounding Electrode Conductor GEC Grounding Electrode Conductor GEC Connection First shelf only Figure 6 AC Wir...

Page 19: ...ng for the opening is included in a bag attached to the system 5 Attach BAT cables to BAT Terminal on individual inverter backplanes via a 1 4 on 5 8 two hole lug one connection per module Refer to Figure 8 and Figure 9 for BAT input location Refer to Table 2 for more details 6 Attach BAT cables to BAT Terminals on individual inverter backplanes via a 1 4 on 5 8 two hole lug one connection per mod...

Page 20: ...d Wire Size all BAT BAT 1 4 on 5 8 two hole lug 8 AWG per connection BAT BAT 24 Vdc Input System 24 Vdc Ground 48 Vdc Input System Ground 48 Vdc Table 2 wire and terminals for Individual DC inputs BAT and BAT Figure 8 Shelf Rear View Figure 9 DC Input Connections BAT BAT 4 Lugs not provided ...

Page 21: ...n Monitor ConduitSize 1 4 Screw Terminal Term Block rated for 85 amps Compression 6 AWG 100A CB for 19 inch system or 100A CB for23 inch system 1 The modular nature of the system allows individual inverters to work in parallel load share By calculating the actual load and adding 1 additional inverter the system will be configured for N 1 redundancy adding a second would be N 2 etc When configured ...

Page 22: ...special situations where commercial AC breakers do not meet the required trip times contact technical support for other options Table 4 Typical Trip Ratings for 10 30 Amp AC Circuit Breakers Number of 48 V Inverters Avail Trip Current A 10 A Trip Time msec 15 A Trip Time msec 20 A Trip Time msec 25 A Trip Time msec 30 A Trip Time msec Min Max Min Max Min Max Min Max Max 3 84 400 2000 700 3000 1250...

Page 23: ... planes Separately Derived System NEC Article 100 defines a separately derived system as follows A premises wiring system whose power is derived from a battery from a solar photovoltaic system or from a generator transformer or converter windings and has no direct electrical connection including a solidly connected grounded circuit conductor to supply energy from the serving utility to the wiring ...

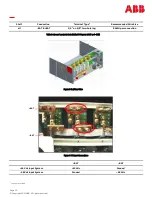
Page 24: ...ed from National Electric Code NEC Article 250 95 for proper cable sizing requirements for externally run cables State and local codes or customer specific requirements can take precedence Terminal Type Recommended Wire Size 1 4 on 5 8 two hole lug 6 AWG or as required see note above Figure 12 Grounding Electrode Conductor GEC Connections GEC Neutral Bond Strap Ground Electrode GEC Connection Stud...

Page 25: ...lay 2 Orange Red Red Orange Green Red Open on Alarm Common K2 2 Close on Alarm Series Parallel 17 5 18 Plant Load Plant Load Plant Load NC K3 relay 1 COM K3 relay 1 NO K3 relay 1 Brown White White Brown Slate White Open on Alarm Common K3 1 Closed on Alarm Series Parallel 7 19 6 Plant Load Plant Load Plant Load NC K3 relay 2 COM K3 relay 2 NO K3 relay 2 Red Blue Blue Red White Slate Open on Alarm ...

Page 26: ...Connections A Serial Interface A 9 pin serial interface is provided on the front panel that allows connection to the serial port on a PC Communication to the System controller is then through the Envision software NOTE Connection to a PC requires a PC data transfer null cable This serial interface complies with the PC AT standard Recommended Interface Cables are ABB P N 6370189P 1 This cable is in...

Page 27: ...lf Each System Controller must be modem equipped to provide remote access in multi shelf systems Figure 14 DB9 Pin out Terminal Capacity Terminal Type Recommended Wire Size 20 GA Maximum DB9 Male gold 22 GA PIN FUNCTION I O DESCRIPTION 1 DCD I Carrier Detect Unused 2 RXD I Receive Data 3 TXD O Transmit Data 4 DTR O Data Terminal Ready Unused 5 GND System Ground 6 DSR I Data Set Ready Unused 7 RTS ...

Page 28: ...er system is modular in design which allows components to be easily removed or installed while the system is operating without interrupting power delivered to the load Install Inverter Refer to Figure 15 1 When adding a new inverter remove the blank panel where the new inverter will be inserted and set it aside 2 Firmly insert the inverter into the shelf 3 Push firmly on the front of the module un...

Page 29: ... Install Remove The System Controller may be removed or installed while the system is operating without interrupting power delivered to the load Install System Controller Refer to Figure 16 1 Insert the System Controller into the leftmost shelf position 2 Push lightly on the front of the module until it is against face of the shelf 3 Tighten retaining screw 4 When installation is complete the cont...

Page 30: ...the modem is removed Refer to Figure 17 3 Replace the System Controller by following the instructions in the System Controller Install Remove section Figure 17 Modem Installation Modem Install Remove Install Modem Refer to Figure 17 1 Remove the System Controller from the shelf per the System Controller Install Remove section 2 Insert the modem into position and push lightly until the modem is com...

Page 31: ...MAJ alarm signals and INVERTER MAJOR LED Install Distribution Monitor Refer to Figure 18 1 Insert the distribution monitor into Distribution Disconnect Module using the formed handle 2 Secure the distribution monitor screws located at the top and bottom of the DM front panel 2 screws total 3 Shortly after installation the green OK LED on the distribution monitor will illuminate Within 60 seconds t...

Page 32: ...on all inverters of the shelf CAUTION Do not turn CB1 to ON unless all inverters of the shelf are in STANDBY 4 Place CB1 in the ON up position The green OK LED on the Distribution Monitor will light The System Controller will update this may take a minute or so the red INVERTER MAJOR LED will extinguish and the individual inverters will come on line with their green OK LEDs illuminating 5 Tighten ...

Page 33: ...on Disconnect Modules 2 Check power wiring for errors Measure inputs and outputs to GND for shorts 3 Apply power to the DC inputs of all shelves 4 All inverter STANDBY LEDs ON LEDs briefly cycle ON then OFF as the inverters initialize 5 Verify that i System Controllers INVERTER MAJOR LED ON ii Distribution Monitors OK LED OFF iii Each Inverter STANDBY LED ON 6 Wait for System Update to complete Du...

Page 34: ...n its shelf and the inverter OK LEDs all turn ON 13 Observe that Each Inverter green OK LEDs is ON Each Distribution Module green OK LEDs are ON Each System Controller red INVERTER MAJOR LED is OFF and Each System Controller green LED is ON 14 If no alarms are present the displays will appear as follows 15 The system displays will appear as follows if there are any alarm conditions 16 Pressing the...

Page 35: ...e will be flashing and can be changed by the use of the arrow key Pressing SEL at this time will either ACCEPT or CANCEL the setpoint change Failure to do anything within 15 seconds will result in the system defaulting to the previous setpoint When viewing the screens there will be a letter combination or a number located on the left side of the display These represent the following a GL Global se...

Page 36: ...RMS I Output Eff Current 1 0 10 Aac INV MAX PEAK I Output p p Current 1 0 20 Aac INV HI CR FACT Crest Factor 2 0 039 nominal load None Output Frequency 1 Period 39m S Hz Inv Temp 1 0 1 0 C Inv Temp 2 0 1 0 C OF CAPACITY 0 10 REDUNDAND IMs Redundant Inv 0 1 None INVERTERS 15 1 As Shipped INV MAX PEAK I GL 28 0 Aac s INV HI CR FACT GL 2 80 s PLANT LO VOLTS 15 100 Vac s SHELF 1 4 GL 1 s OF CAPACITY 1...

Page 37: ...minimum 27 0 Vdc 42 5 to 60 0 Vdc 49 6 Vdc minimum 54 0 Vdc 42 5 to 60 0 Vdc 49 6 Vdc minimum 54 0 Vdc 35 0 A maximum 35 0 A maximum 35 0 A maximum 668 W maximum 1337 W maximum 1337 W maximum Breaker customerprovided 40 A minimum per installed module 40 A minimum per installed module 40 A minimum per installed module Output per module Output Voltage10 Output Current 5 Aac maximum 10 Aac maximum 5 ...

Page 38: ... 0 to 45 C continuous 40 to 85 C Humidity 95 Non condensing Shock This equipment in its shipping container withstands shock developed shipping without physical damage or degradation of the electrical performance Vibration This equipment in its shipping container withstands vibration encountered inshipping without physical damage or degradation of the electrical performance Installation Area Instal...

Page 39: ...3 10 V m Conducted Immunity IEC 61000 4 6 Level 3 Input Power Ports GR1089 ISSUE 6 IEC 61000 4 6 Level 2 Telecom Ports GR1089 ISSUE 6 Earthquake Office Vibration NEBS Zone 4 level 3 Voltage Dips Interruptions and Variations IEC 61000 4 11 EN55024 CISPR24 GR1089 Section 10 DC Power Port Telecommunication load equipment ...

Page 40: ...ntroller ON indicates output failure due to an inverter internal fault Internal faults include Inverter output voltage exceeds the high voltage shutdown point Over temperature Any failure condition that disables the inverter output Flashing indicates minor failures that cause output failure Minor faults include Loss communications with the System Controller Internal high temperature Loss of freque...

Page 41: ...mber is a summation alarm indicator and reports plant status in a variety of ways depending on the condition The reported conditions are defined in the condition chart provided in the Troubleshooting section Inverter Major LED red is a summation alarm indicator and reports plant status in a variety of ways depending on the condition The reported conditions are defined in the condition chart provid...

Page 42: ... wave voltage has a crest factor of 1 414 Nonlinear loads such as electronics without power factor correction will have crest factors higher than 1 414 Each inverter meters its crest factor The metered crest factor can be displayed through the System Controller To enable this feature change the setpoint to the desired value between 0 and 5 0 Be certain to display and note the reported crest factor...

Page 43: ...menu each time the switch is depressed Continually pressing the switch will eventually return to the System Status Screen Main Screen Left Arrow Minus Symbol Menu Navigation Selects the menu item to the left Inverter Select Decreases the Inverter Number Inverter Status Navigation Moves to the previous item Adjustment Reduces a setpoint value Right Arrow Plus Symbol Navigation Selects the menu item...

Page 44: ...vailable from the System Controller See Figure 20 for a diagram of menu structure System Status Screen Main Screen Upon initial start up the system will perform an LED test and will attempt to recognize the system components During this period the FAIL lamps on the inverters will flash This will take a few minutes The System Controller LCD will display the System Update screen during this time 120...

Page 45: ...ctive selection or may scroll to the next selection by the use of the arrow keys Pressing the BACK key will take the user back to the main screen Plant Selecting PLANT from the main menu allows the plant status to be viewed The PLANT menu will appear as follows Use the arrow keys followed by the SEL button to select an option Plant Status STAT plant presents plant status in a sequence of screens P...

Page 46: ...ber in a sequence of screens Press or to move through the sequence of screens Note The following screens are dynamic and only appear if the module is installed SC System Controller DM Distribution Monitor The table is further defined as follows Serial number of module Assembly part number of module EC level of module 120 VAC X AAC SYSTEM GOOD s PLANT ALM BATT SETPT INV SEL ACDM 827E STAT CTRL INFO...

Page 47: ... ALM presents all active plant alarm status One of the following screens will display When alarms are active press SEL to view the alarms in a sequence of screens Press or to move through the sequence of screens Example Note The number preceding the alarm indicates the module designation see Figure 1 120 VAC X AAC SYSTEM GOOD s PLANT ALM BATT SETPT INV SEL ACTIVE ALARMS NONE SEL ACTIVE ALARMS NONE...

Page 48: ... MAX RMS I GL 12 5 Aac s REDUNDANT IMs 15 1 s PLANT LO VOLTS 15 95 Vac s OF CAPACITY 15 80 s GL Global 00 System Control 15 Distribution Monitor 1 6 Inverters Global Setpoints that affect multiple modules of the same type Press SEL while viewing a setpoint to move to the adjustment screen for that setpoint Press the and buttons on the adjustment screen to adjust the value Press SEL on the adjustme...

Page 49: ...ion and control of each individual inverter Press or to move through the sequence of inverters 01 through 06 Press SEL move to the menu of the selected inverter The default selection will be flashing Use the arrow keys to switch between the sub menus 120 VAC X AAC SYSTEM GOOD s PLANT ALM BATT SETPT INV SEL INVERTER SELECT 01 s SEL INVERTER SELECT 01 s IM INVERTER 01 STAT CTRL INFO s 01 I OUT PEAK ...

Page 50: ...GM D UN CAL 01 INV TEMP 1 26 deg C 01 LO VOLT OUT NORMAL ERROR 01 INV TEMP 2 27 deg C 01 HI VOLT OUT NORMAL ERROR 01 INV STATUS NORMAL FAILED 01 HI PEAK I NORMAL ERROR Note Status screens are view only 01 indicates Inverter Position 01 See Figure 1 Inverter Control CTRL provides individual inverter standby run mode control IM INVERTER 01 STAT CTRL INFO s 120 VAC X AAC SYSTEM GOOD s PLANT ALM BATT ...

Page 51: ...ge the active selection indicated by flashing Press SEL to change the inverter to the active selection If a change is made the system prompts to ACCEPT or CANCEL Press arrow keys to toggle between CANCEL and ACCEPT Press SEL to confirm the selection Failure to press a button within 15 seconds will CANCEL the change IM 0192 IM SI10A120PME CONTROL CHANGE CANCEL ACCEPT IM 8500946P IM 0412 IM CLEI N A...

Page 52: ...CT ai SKB Flll 41 ClL I 1 OfC VACOY ti GL OUDSAL aa mm11ooNmot 1S Dl TR IIU l ION MOD AClll 1 MAR IS WLLIEDIIPIA OIIOUTPUK a Mc a11our a Aac 8TAT_ IM 1Mft CIIE8TFACT01l IRIEl OWIR f IIEIIUIIICY IW _11 INV _11 1 IW TANa 11 ol al M NIIElnElt 01 a MTC 1N l i Oa al IWIIODE 8AIIE Sl Dll t 1W RUN IIOOE voe I LI IIWIE MOO IW l HllEIIIPAlAIWOIMNl Er HIIIAILVDC 11 11 El m LOll IIT llll Tl h LOvat TOIITOl l...

Page 53: ...24 Vdc input inverter systems inverters will turn off and an Inverter MN alarm will occur When the plant recovers DC Input is restored the Inverter MN lamp will extinguish MN Form C alarm will retire and the system will restart automatically and provide output To learn more about any of these features refer to the Features Reference section To learn about adjusting the settings of the inverter or ...

Page 54: ...n the output voltage returns Note that the inverter output currents are load sharing after the short is cleared A fuse or circuit breaker trip time will shorten as more inverters are present in the system Trip time curves for circuit breakers and fuses are usually found in their datasheets Use 28 amps per inverter short circuit current to determine the trip time from the datasheet curve Figure 21 ...

Page 55: ...t plug which is critical to no break maintenance and upgrade HERE IS HOW IT WORKS Figure 23 shows Inverter One running in the shelf and powering the load The Inverter One voltage is shown on Ch1 and its current is on Ch4 Then Inverter Two is plugged into the shelf The Inverter Two output relay is open and stays open until the Inverter Two voltage phase synchronizes with the Inverter One voltage ph...

Page 56: ...ers in a multi shelf system must be connected together for the shelves to be able to supply AC power to the same distribution and have their output waveforms phase synchronized To prevent damage to inverters the proper power up sequence must be followed See Shelf Turn On and Operational Checkout The alarm setpoints for AC voltage AC current and DC voltage must be set the same on all shelves Each S...

Page 57: ...s are not securely fastened Connectors are not secure Blown fuses Tripped circuit breakers Always check these external factors before concluding that your system is faulty If for instance the unit stops due to overheating it may have been overloaded the ambient temperature may be too high the ventilation slots could be blocked or a cooling fan may be out of order It is possible that a voltage sett...

Page 58: ... Multiple Inverter Fail Inverter High Temperature Inverter Communication Loss Inverter Hi DC Rail V Inverter Calibration Loss Inverter Lo DC Input Voltage Inverter Lo Output Voltage Inverter Hi Output Voltage Inverter Hi Peak Output Current Inverter Hi RMS Output Current Inverter Hi Crest Factor Inverter Frequency Lock Fail Inverter Output Fuse Fail Plant Voltage Alarm Lo or Hi Output Voltage Plan...

Page 59: ...f inverter 2 Reduce ambient temperature to within specifiedoperating limits 3 Replace Inverter Hi Peak OutputCurrent 1 Examine Inverter currents menu path INV Inv STAT 2 If current is much higher than currents on otherInverters Replace Inverter Hi Crest Factor 1 Examine Inverter currents menu path INV Inv STAT 2 If crest factor is much higher than on other InvertersReplace Inverter Hi RMS Output C...

Page 60: ...voltage 1 Verify DC input fuses or circuit breakers not cleared 2 Restore input voltage to Inverter to within operating range Failed Inverter Replace Inverter Inverter Fail LED ON All Inverters Lo input voltage 1 Verify DC input fuses or circuit breakers not cleared 2 Restore input voltage to Inverters to within operating range Lo Output Voltage Excessive Load 1 Verify Excessive VA load menu path ...

Page 61: ...rn On and Operational Checkout section Inverter Standby LED ON Initialization inprocess Wait for initialization to complete Manual Standby Manually return the Inverter Mode to RUN menu path INV Inv CTRL INV MODE RUN ACCEPT CB1 AC Load Disconnect OPEN Close CB1 Clear load fault if necessary Failed Inverter Replace Inverter Controller Minor LED ON Plant Frequency DM Frequency Error may cause a false...

Page 62: ...5 Remove the Inverter 16 Repeat steps 8 through 10 for each inverter in the shelf 17 Repeat from step 7 for each shelf 18 Replace failed Inverters observed as Plant Hz Fault in step 14 19 Reinsert all inverters 20 Operate MBS to THE INVERTER position or Turn ON all load circuit breakers to reconnect all loads to the system 21 Turn ON system per the Shelf Turn On and Operational Checkout section Sy...

Page 63: ... labels or in the product documentation DC output cables must be dressed to avoid damage to the conductors caused by routing around sharp edges or routing in areas where wires could get pinched and undue stress on the connectors External protectors fuses or circuit breakers must be sized as required by the National Electric Code NEC and or local codes Refer to the equipment ratings to assure curre...

Page 64: ...ge This symbol is used to identify the presence of hazardous AC or DC voltages It may also be used to warn of hazardous energy levels One of these two symbols or equivalent may be used to identify the presence of rectifier and battery voltages The symbol may sometimes be accompanied by some type of statement for example Battery voltage present Risk of injury due to high current Avoid contacting co...

Page 65: ...es are present in the unit and on the interface cables that can shock or cause serious injury When equipped with ringer modules hazardous voltages will be present on the ringer output connectors Use the following precautions in addition to proper job training and safety procedures Use only properly insulated tools Remove all metallic objects key chains glasses rings watches or other jewelry Wear s...

Page 66: ...verter shelves and systems and enhanced Troubleshooting section Issue 31 Updated Inverter Minimum Start up Voltage Specifications Issue 32 Added Special room cooling note in Specifications updated Troubleshooting section reformatted Issue 33 Added note to not reinsert a module with LEDs ON ...

Page 67: ...t any responsibility whatsoever for potential errors or possible lack of information in this document We reserve all rights in this document and in the subject matter and illustrations contained therein Any reproduction disclosure to third parties or utilization of its contents in whole or in parts is forbidden without prior written consent of ABB Copyright 2021 ABB All rights reserved ABB 601 Shi...

Reviews: