264
ACQ550-U1 User’s Manual
Maintenance
Internal enclosure fan replacement
IP54 / UL type 12 enclosures have an additional internal fan to circulate air inside the
enclosure.
Frame sizes R1…R4
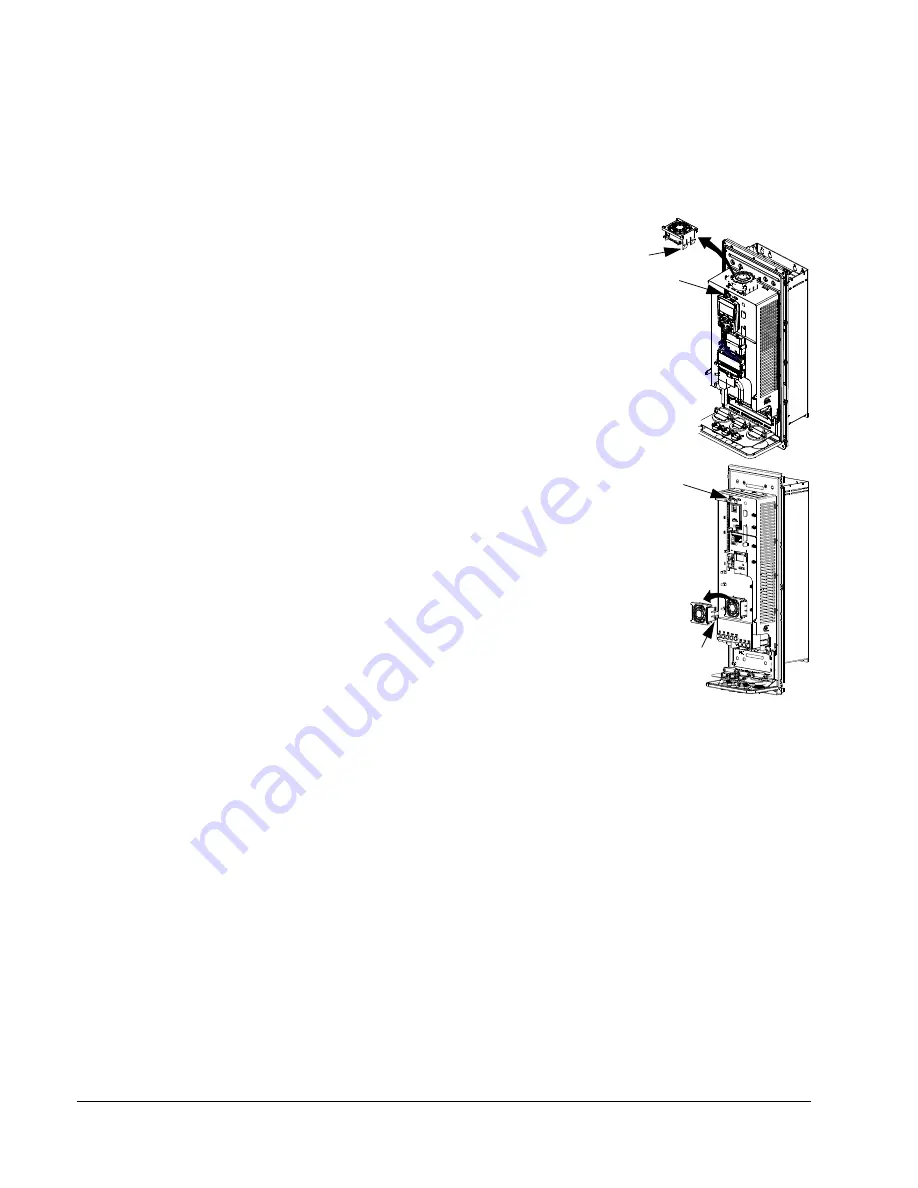
To replace the internal enclosure fan in frame sizes R1 to
R3 (located at the top of the drive) and R4 (located in front
of the drive):
1. Remove power from the drive.
2. Remove the front cover.
3. The housing that holds the fan in place has barbed
retaining clips at each corner. Press all four clips toward
the center to release the barbs.
4. When the clips/barbs are free, pull the housing up to
remove from the drive.
5. Disconnect the fan cable.
6. Install the fan in reverse order, noting that:
•
The fan air flow is up (refer to the arrow on fan).
•
The fan wire harness is toward the front.
•
The notched housing barb is located in the right-rear
corner.
•
The fan cable connects just forward of the fan at the
top of the drive.
Frame sizes R5 and R6
To replace the internal enclosure fan in frame sizes R5 or R6:
1. Remove power from the drive.
2. Remove the front cover.
3. Lift the fan out and disconnect the cable.
4. Install the fan in reverse order.
5. Restore power.
4
3
5
FM
R1…R3
3AUA000000404
3
4
5
R4
Summary of Contents for ACQ550-U1-011A-6
Page 1: ...ACQ550 User s Manual ACQ550 U1 Drives 1 200 hp ...
Page 4: ......
Page 10: ...10 ACS550 U1 User s Manual Table of contents ...
Page 42: ...42 ACQ550 U1 User s Manual Start up control with I O and ID Run ...
Page 56: ...56 ACQ550 U1 User s Manual Control panel ...
Page 68: ...68 ACQ550 U1 User s Manual Application macros ...
Page 250: ...250 ACQ550 U1 User s Manual Fieldbus adapter ...
Page 266: ...266 ACQ550 U1 User s Manual Maintenance ...
Page 314: ...314 ACQ550 U1 User s Manual Index ...


