54 Control unit
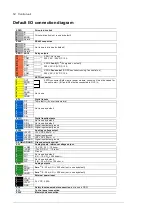
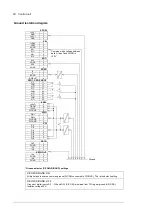
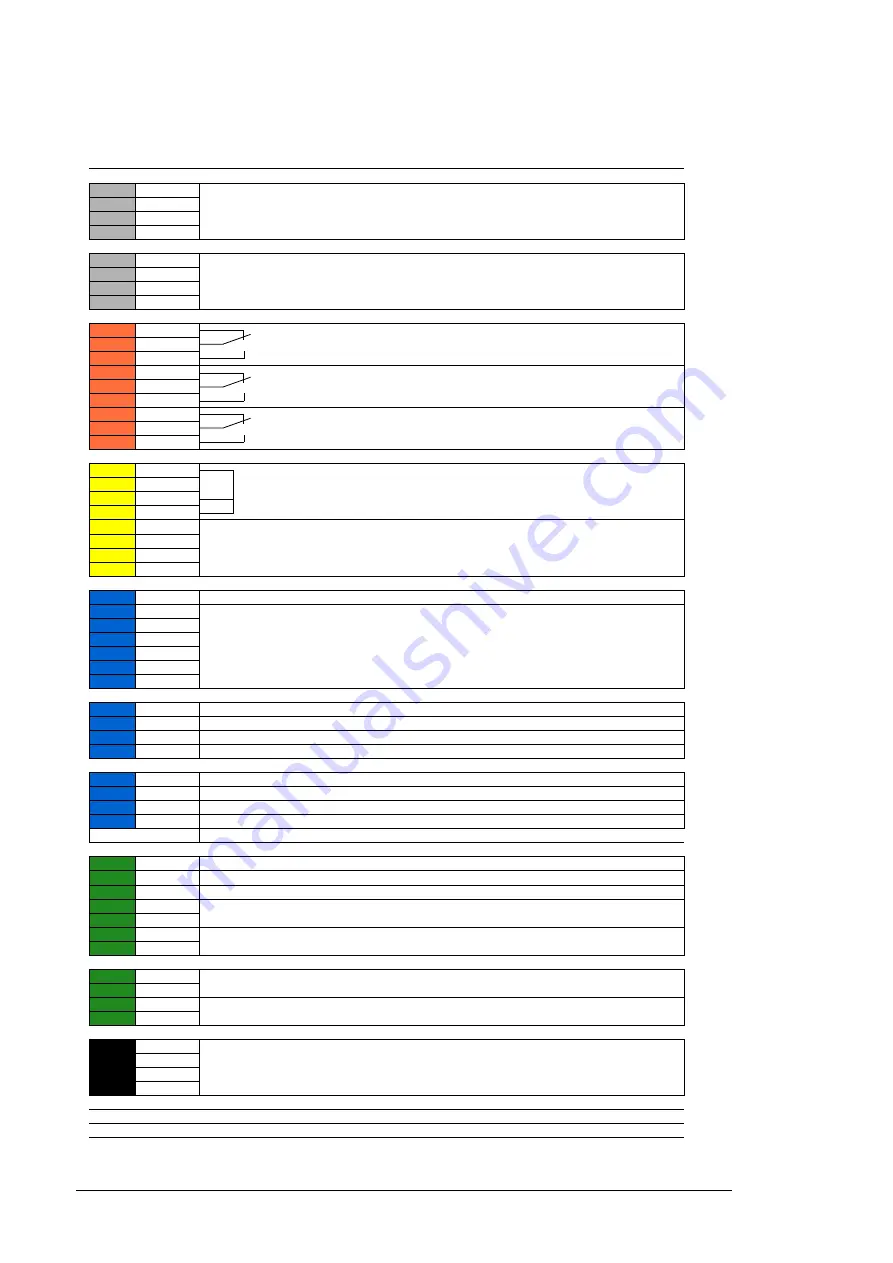
Default I/O connection diagram
XD2D
Drive-to-drive link
1
B
Drive-to-drive link (not in use by default)
2
A
3
BGND
4
Shield
X485
RS485 connection
5
B
Not in use (not in use by default)
6
A
7
BGND
8
Shield
XRO1…XRO3
Relay outputs
11
NC
XRO1: Not in use
250 V AC / 30 V DC / 2 A
12
COM
13
NO
21
NC
XRO2:
Fault(-1)
2)
(Energized = no fault)
250 V AC / 30 V DC / 2 A
22
COM
23
NO
31
NC
XRO3:
Fan control
(DC/DC converter running, fan control on)
250 V AC / 30 V DC / 2 A
32
COM
33
NO
XSTO
XSTO connector
1
OUT
XSTO connector. Both circuits (power module, control unit) must be closed for
the unit to start. (IN1 and IN2 must be connected to OUT.)
8)
2
SGND
3
IN1
4
IN2
5
IN1
Not in use
6
SGND
7
IN2
8
SGND
XDI
Digital inputs
1
DI1
Temp fault
2)
(0 = overtemperature)
2
DI2
Not in use by default.
3
DI3
4
DI4
5
DI5
6
DI6
7
DIIL
XDIO
Digital input/outputs
1
DIO1
Not in use by default
2
DIO2
Not in use by default
3
DIOGND
Digital input/output ground
4
DIOGND
Digital input/output ground
XD24
Auxiliary voltage output
5
+24VD
+24 V DC 200 mA
6)
6
DICOM
Digital input ground
7
+24VD
+24 V DC 200 mA
6)
8
DIOGND
Digital input/output ground
DICOM=DIOGND
Ground selection switch
7)
XAI
Analog inputs, reference voltage output
1
+VREF
10 V DC,
R
L
1…10 kohm
2
-VREF
-10 V DC,
R
L
1…10 kohm
3
AGND
Ground
4
AI1+
Not in use by default.
0(2)…10 V,
R
in
> 200 kohm
3)
5
AI1-
6
AI2+
Not in use by default.
0(4)…20 mA,
R
in
= 100 ohm
4)
7
AI2-
XAO
Analog outputs
1
AO1
Zero
2)
0…20 mA,
R
L
< 500 ohm (not in use by default)
2
AGND
3
AO2
Zero
2)
0…20 mA,
R
L
< 500 ohm (not in use by default)
4
AGND
XPOW
External power input
1
+24VI
24 V DC, 2.05 A
2
GND
3
+24VI
4
GND
X12
Safety functions module connection
(not in use in DDC)
X13
Control panel connection
X205
Memory unit connection
Summary of Contents for ACS880-1607
Page 1: ...ABB industrial drives Hardware manual ACS880 1607 DC DC converter units ...
Page 4: ......
Page 12: ...12 Introduction to the manual ...
Page 34: ...34 Mechanical installation ...
Page 40: ...40 Guidelines for planning electrical installation ...
Page 52: ...52 Electrical installation ...
Page 68: ...68 Start up ...
Page 80: ...80 Maintenance 7 3 4 5 6 ...
Page 82: ...82 Maintenance 3 4 5 6 7 8 9 9 ...
Page 85: ...Maintenance 85 12 Install and tighten the two screws 10 11 12 ...
Page 92: ...92 Maintenance 3 6 4 5 4 7a 7b 7b ...
Page 93: ...Maintenance 93 9 8 8 10 11 ...
Page 96: ...96 Maintenance 4 8 6 7 5 3 ...
Page 97: ...Maintenance 97 9 ...
Page 118: ...118 Dimensions Dimension drawings Frame 1 R8i bottom cable entry ...
Page 119: ...Dimensions 119 Frame 1 R8i top cable entry ...
Page 122: ...www abb com drives www abb com drivespartners 3AXD50000023644 Rev B EN 2017 01 30 Contact us ...

