background image


20

4  SET-UP AND CONFIGURATION 

4.1 Keyboard 

functionality 

 
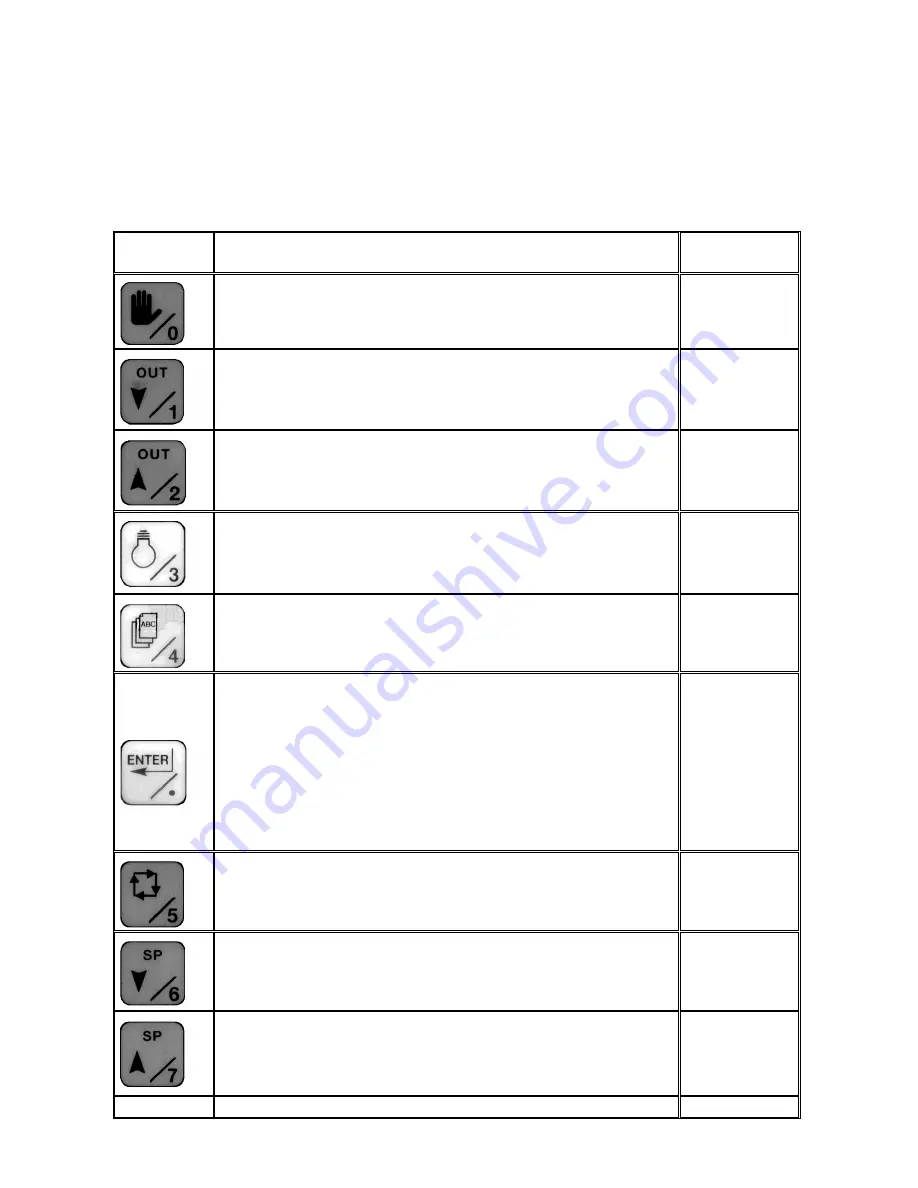
All the keys have dual functionality, except the ENTER key. Blue background keys are the ones whose 
second function is only used in Controller option (AW402). The selection between numbers and functions is 
automatically recognised by the instrument. 
 

KEY PRIMARY 

FUNCTION 

SECONDARY 
FUNCTION 


MANUAL SELECTOR 
Selects manual mode in Controllers (AW402). 

 
0: digit zero 
when allowed 


DECREASE OUTPUT  
Decreases output in Controller (AW402) when in manual mode. 

 
1: digit 1 when 
allowed 


INCREASE OUTPUT  
Increases output in Controller (AW402) when in manual mode. 

 
2: digit 2 when 
allowed 


LIGHT  
Light up / down the display. 


3: digit 3 when 
allowed 


MENU  
Calls for the menu and, inside a menu, cycles the parameters. 

 
4: digit 4 when 
allowed 


ENTER: decimal point is not used, any parameter needing it already 
includes the decimal point in the correct position.  
Enter function: allows the user to enter the displayed menu or parameter; 
once entered, allows parameter to be modified. A parameter can be 
changed (set) when the cursor appears on the display. Once the cursor 
has appeared, whether or not the parameter has been changed, the 
Enter key confirms the displayed value.  
In display mode Enter key allows to call the Warnings & Messages page. 


None 


AUTOMATIC SELECTOR  
Selects Automatic/Manual operation mode in Controllers (AW402). 

 
5: digit 5 when 
allowed 


SETPOINT DOWN ARROW  
Decreases Set Point in Controllers (AW402). 

 
6: digit 6 when 
allowed 


SETPOINT UP ARROW  
Increases Set Point in Controllers (AW402) 

 
7: digit 7 when 
allowed 


Summary of Contents for AW400 Series

Page 1: ...Instruction Manual IM AW4TX Issue 5 Chlorine Transmitter AW400 Series ...

Page 2: ...ovative design and development to incorporate the latest technology The UKAS Calibration Laboratory No 0255 is just one of the ten flow calibration plants operated by the Company and is indicative of our dedication to quality and accuracy Information in this manual is intended only to assist our customers in the efficient operation of our equipment Use of this manual for any other purpose is speci...

Page 3: ...er supply 15 3 4 2 Digital I O pc board 16 3 4 2 1 Digital Outputs 16 3 4 2 2 Digital Inputs 17 3 4 3 Analog input output pc board 17 3 4 3 1 Temperature compensation 18 3 4 4 Serial communication board 18 3 4 5 Cable glands 18 4 SET UP AND CONFIGURATION 20 4 1 Keyboard functionality 20 4 2 Display 22 4 3 Channel definition This menu allows to select the type of sensor associated to each channel 2...

Page 4: ...6 1 4 1 OXIDATION potential with NEGATIVE values arrangement 48 6 1 4 2 OXIDATION potential with POSITIVE values arrangement 48 6 1 5 Chlorine Chlorine Dioxide Ozone 49 7 START UP 51 7 1 Preliminary operations 51 7 1 1 Getting started 51 7 1 2 Personalization of Parameters 52 7 2 Controller PID tuning 52 8 MAINTENANCE 53 8 1 Periodical operations 53 8 1 1 Automatic sensitivity check during dual po...

Page 5: ...PID Control Channel 1 only 02 Sensor Type Channel 1 Chlorine Cell 1 Sensor Type Channel 2 No second input channel 0 Chlorine Cell 1 pH 6 ORP 7 Additional 4 20mA input output re transmission or flow input 8 Sensor Type Channel 3 No third input channel 0 Chlorine Cell 1 pH 6 ORP 7 Transmitter Voltage 115V AC 50 60 Hz 1 230V AC 50 60 Hz 2 ...

Page 6: ...ation class II pollution degree 2 2 2 Glossary PARAMETER SYMBOL pH pH ORP oxidation reduction potential mV Dissolved Oxygen O2 Residual Chlorine Cl Chlorine Dioxide CD Ozone O3 Temperature T These symbols are also used in displayed indications Not supported at this time 2 3 General Description AW400 Monitor Controller Family includes 2 Types of instrument Transmitter Instrument Type 1 A group of t...

Page 7: ...Digital outputs through relays Rating 24 Vdc and 24 Vac 2 A max Contact output status can be selected as NO or NC separately for each contact by a specific selection in the Configuration menu Serial communication port RS232 RS422 and RS485 with RJ45 plug in sockets The protocol used is illustrated in a dedicated section at the end of this manual Alarm level setting High and Low alarm for channel 1...

Page 8: ...s during operation 10 C to 50 C if the instrument is expected to be installed in the sunlight a sunshade protection is strongly recommended Thermal drift within 0 2 of f s for a 10 C temperature variation Relative humidity 80 with temperature up to 31 C with linear decrease down to 50 with temperature 40 C Accuracy within 0 2 of f s Transmitter response time measure is refreshed at each microproce...

Page 9: ...eds to be installed thus achieving great flexibility and relevant cost benefits for the user The different p c boards are mounted in four separate layers according to the following scheme FIRST LAYER OF P C BOARDS bottom Power supply pc board Digital I O pc board with expanded function board Serial data link port Power supply board Digital output board Digital input board ...

Page 10: ...C BOARDS Analog Input Output THIRD LAYER OF P C BOARDS Main Board FOURTH LAYER OF P C BOARDS Top Analog I O pc board channel cards Channel 1 Channel 2 optional Channel 3 optional CPU pc board Display and Keyboard pc board ...

Page 11: ...C B D ANALOG I O Channel 1 Type of chann Calibration data Input signals pH mV O2 Cl CD O3 mA Output signal 0 20 or 4 20 mA A POWER SUPPLY power supply to all pc boards and components ANALOG I O Channel 2 Type of chann Calibration data Input signals pH mV O2 Cl CD O3 mA Output signal 0 20 or 4 20 mA ANALOG I O Channel 3 Type of chann Calibration data Input signals pH mV O2 Cl CD O3 mA Output signal...

Page 12: ...ght MicroChem 2 3 kg MicroChem 2 c w sunshade 4 Kg Housing bottom 180 7 2 31 1 2 220 9 n 5 cable glands PG 11 allow enough space for wiring Rear view 250 10 300 12 hole ø 9 5 for sunshade wall mounting hole ø 9 5 for wall mounting of sunshade n 4 cable glands optional 400 16 400 16 120 4 8 31 1 2 31 1 2 31 1 2 250 10 120 4 8 125 5 120 4 8 ø16 0 4 Fig 1 AW400 dimensions WARNING When installing AW40...

Page 13: ...ning Power supply cable allow enough clearance for wiring 180 7 2 allow enough clearance for wiring n 2 holes ø 6 5 for wall mounting n 2 screws c w inserts for wall mounting are supplied Power supply cable Caution Danger Follow instructions written on Instruction Bulletin 800 32 minimum clearance 0 00 n 2 slots 6 5 R 3 25 n 2 screws c w inserts supplied for wall mounting 500 20 minimum clearance ...

Page 14: ...ontal pipe mounting AW400 2 vertical pipe mounting 1500 60 minimum clearance for cover opening n 2 brackets c w screws supplied for 2 pipe mounting Power supply cable Power supply cable 2 pipe n 2 brackets c w screws supplied for 2 pipe mounting 1500 60 minimum clearance for cover opening Caution Danger follow the instructions written on Istruction Bulletin Caution Danger follow the instructions w...

Page 15: ...sive substances enough space has to be left around the transmitter to allow easy operation and maintenance the transmitter should be mounted at a height of 1 6 1 7 m from floor level to make normal reading maintenance and calibration operations easier in outdoors installations a sunshade is strongly recommended power supply according to instrument tag should be available ...

Page 16: ...er Supply pc board reverse side Jumper set for 110 Vac Jumper set for 220 Vac WARNING Only qualified personnel should conduct the tasks described in this section of the manual The transmitter is not fitted with a switch therefore a disconnecting device such as a switch or circuit breaker conforming to local safety standards must be fitted to the final installation It must be fitted in close proxim...

Page 17: ...nchorage must also prevent conductors abrasion Cable anchorage has to satisfy the following requirements the bushing inside the cable gland is designed to suit cables with 6 10 mm diameter assuring an IP 68 seal Tighten it correctly making sure you prevent the cable to be pushed further inside the transmitter causing damage to the hardware or danger to the operator cable has not be fixed with a sc...

Page 18: ... dedicated to each specific type of instrument as detailed under each specific instrument section Fig 5 shows how the terminal number assigned to each CCO on the I O pc board The rating of relays are 24 Vdc or 24 Vac 5 A max 95 115 mW Characteristics of commutation are max voltage 380Vac 300Vdc max current 8A max capacity 50W 270W in alternate current 2000W in direct current CCO 1 CCO 2 CCO 3 CCO ...

Page 19: ...P sensors it is recommended to fix the cable near the sensor so that it doesn t move at the outlet of the cable gland The wear of the cable at that point is thus prevented The 0 20 mA or 4 20 mA signal INPUT is on terminals 5 and 6 when these terminals are used for the 0 4 20 mA INPUT install a 100 Ω resistor 0 1 accuracy across terminals 5 and 6 Use two cores shielded cables for 4 20 mA output si...

Page 20: ...s measurements as these parameters are not influenced by operating temperature 3 4 4 Serial communication board AW400 supports serial communication standards RS232 and RS422 485 by connection of a modular telephone jack RJ45 The 9 poles terminal board supports all three standards The pin out of the RJ45 connectors and 9 pin terminal board is illustrated in Section 11 3 in this manual dealing with ...

Page 21: ...with other cables never run CCO cables or wires with other cables Pleases notice that cable gland for power supply cable includes the cable protector this avoids dangerous cable abrasion and bending at the point of its inlet in the transmitter ANO1 ANO2 ANO3 ANI1 ANI2 ANI3 Power Supply Serial communication CCO1 7 ANI 1 2 CCI1 2 Fig 8 Recommended use of cable glands ...

Page 22: ...hen allowed MENU Calls for the menu and inside a menu cycles the parameters 4 digit 4 when allowed ENTER decimal point is not used any parameter needing it already includes the decimal point in the correct position Enter function allows the user to enter the displayed menu or parameter once entered allows parameter to be modified A parameter can be changed set when the cursor appears on the displa...

Page 23: ...e inside menus and change parameters I n i ti a l D i s p l a y P a s s w o r d M e n u C o n f i g u r a t i o n C a li b r a t i o n C h a n n e l D e f i n i t i o n P r e s s M E N U K e y I n s e r t P a s s w o r d 1 2 n E N T E R K e y M E N U K e y M E N U K e y E N T E R K e y M E N U K e y m o v e s to t h e n e x t c h o ic e o f m e n u E N T E R K e y e n te r s th e C o n f i g u r a...

Page 24: ...lled on Channel 2 When three sensors are installed the process values are displayed on two different pages Press END key to toggle form one page to the other Channel 1 Measure 1 2 5 2 p H 1 5 5 C Channel 1 Temperature Channel 2 Measure 0 1 1 4 O 3 0 1 5 8 C l Channel 3 measure On the second page appears Channel 1 Measure 1 2 5 2 p H 1 5 5 C Channel 1 Temperature Channel 2 Temperature 1 6 4 C 1 1 2...

Page 25: ...NEL3 pH CHANNEL1 mV CHANNEL2 mV CHANNEL3 mV CHANNEL1 O2 CHANNEL2 O2 CHANNEL3 O2 CHANNEL1 O3 CHANNEL2 O3 CHANNEL3 O3 CHANNEL1 CL note2 CHANNEL2 CL note2 CHANNEL3 CL note2 CHANNEL1 CD CHANNEL2 CD CHANNEL3 CD CHANNEL1 T CHANNEL2 T CHANNEL3 T CHANNEL1 mA note3 CHANNEL2 mA CHANNEL3 mA Only when channel 2 pc board is installed Only when channel 2 pc board is installed Not Supported Please refer to the m...

Page 26: ... the probe supplied with the system i e 0 2 or 0 10 ppm 3 Sensors with a 4 to 20 mA output can be attached to the transmitter and the units and range can be set within the channel configuration software and then the sensor output can be displayed on the screen see section 2 2 for the range of units that can be selected Not available OPERATION DISPLAY PROCESS PASSWORD XXXXX MENU MODE MENU MENU MODE...

Page 27: ...ation menu END key switch off power to the instrument then power it up again while keeping key 9 CANCEL pressed If the language selected was different from Italian it is necessary to select again the desired language as this operation sets back instrument to default English language 4 4 Set up menu The set up menu is structured in three different submenus and namely Configuration to set the genera...

Page 28: ...ure value C or F default is C Temperature set define temperature at which operate temperature compensation when the thermo resistance is faulty default is 20 C Altitude not supported CCI in OR when AW400 is installed on a water analytical unit and another Micro2Chem is driving the cleaning sequence for all the sensor installed on the water analytical unit the AW400 that is not driving the cleaning...

Page 29: ...t OR CCI NO YES FF Smoothing Channel 1 Smoothing Channel 2 Smoothing Channel 3 Digital I O Set Digital Outputs Digital I O Set Digital Inputs END key to exit men Only when Channel 2 pc board is installed Only when Channel 3 pc board is installed Configuration MENU key to search language ENTER key to select language Enter Configuration submenu Enter Language submenu Search next Configuration item C...

Page 30: ...o work in conjunction with optional ABB devices sequence A Water Analytic Unit and sequence B Sequential Cleaning Unit If the hydraulic cleaning system used is different from the a above specified devices then select B option and use the output contacts as directed in Figure 10 to drive the solenoid valves The cleaning sequence consists of the following four phases T1 Analysis Normal operation pha...

Page 31: ...iguration T See Paragraph 4 4 1 4 2 See Paragraph 4 4 1 4 3 Keyboard test pressing any key the display will show the corresponding number 0 9 or function ENTER END To exit this submenu press END key and keep it pressed for 3 seconds until the display shows Display test once entered this submenu the display shows cyclically in all the 32 writing locations of the display all the characters present T...

Page 32: ...rtinent Pt100 in order to verify the correct sensor operation in an easy and fast way In analog output mode the instrument allows to check correct functionality of the 4 20 mA output operating the OUT increase and OUT decrease keys the output value indicated on display can be changed and with a multimeter connected to the pertinent channel output terminals 1 2 it can be verified that the current o...

Page 33: ...el 1 Out Span Output Settings Channel 2 Channel 2 0 20 4 20 mA Channel 2 Out Zero Channel 2 Out Span Output Settings Channel 3 Channel 3 0 20 4 20 mA Channel 3 Out Zero Channel 3 Out Span Only when Channel 2 pc board is installed Only when Channel 3 pc board is installed Menu Output setting In the following table the default values of Out Zero and Out Max are presented Minimum span and maximum ran...

Page 34: ...o 20 mA make following hardware modification on Analog In put Output board Identify Jumper IP1 and JP2 on board see figure 11 Remove JP1 cut copper this jumper is factory made by default Install Jumper in JP2 position Fig 11 Jumper position for 4 20 to 0 20 mA output signal modification JP1 copper to be cut JP1 JP2 ...

Page 35: ...in figure 12 below if the measured value reaches the high alarm level AW400 generates an alarm message but a second alarm condition is triggered only after the measure lowers below the set dead band and then rises again above the HI alarm level A similar procedure of opposite sign is performed for low alarm To identify contacts for alarm retransmission see the operation description for each instru...

Page 36: ...dband Alarms Channel 2 Channel 2 Low Alarm Channel 2 High Alarm Channel 2 Deadband Alarms Channel 3 Channel 3 Low Alarm Channel 3 High Alarm Channel 3 Deadband Only when Channel 2 pc board is installed Only when Channel 3 pc board is installed Configuration Alarms Press Enter Key to access value Enter again to accept value ...

Page 37: ...alled Freezes measured value of all Channels installed Table 4 Digital Inputs Funcionality for Transmitter Digital outputs Transmitter Type CCO1 CCO2 CCO3 CCO4 CCO5 CCO6 CCO7 Without Cleaning HI Alarm Ch 1 LO Alarm Ch 1 HI Alarm Ch 2 1 LO Alarm Ch 2 1 HI Alarm Ch 3 2 HI Alarm Ch 3 2 Watch dog With Cleaning HI Alarm Ch 1 LO Alarm Ch 1 HI Alarm Ch 2 1 LO Alarm Ch 2 1 Washing command Washing command ...

Page 38: ...ms 1 decrease and 2 increase The Automatic mode is selected pushing button 5 The set point is modified with the push bottoms 6 decrease and 7 increase The output signal to drive the control element can be either a 4 20 mA analog signal or two contacts increase decrease The user can choose to control the final element according to the characteristics of the device used The END key consents to chang...

Page 39: ...HLP Enter No Yes Default No Factor to compute Max output based on Flowrate value FFH Numeric entry in 100 Default 1 100 Factor to compute Min output based on Flowrate value FFL Numeric entry in 100 Default 0 0 Absolute High limit on output when limits based on flowrate are active MAX ABS Numeric entry in Default 100 Range 0 100 Gain factor applied on flowrate signal GAIN Numeric entry in Default 1...

Page 40: ...a controller PID loop to drive its final control element until the deviation is completely eliminated It produces a corrective signal proportional to the error and the length of time the controlled variable has been different from set point Integral action is expressed as the length of time in minutes required for it to produce an output change equal in magnitude to that produced by proportional a...

Page 41: ...0 and 10 of the controller s output range Absolute maximum limit of the control output is set with the parameter Abs Max The Gain is multiplication factor of FF term 5 2 2 3 Sampling and or Flow Pacing Controller Process with dead time which is often the case for Chlorine dosage can be best controlled with this strategy Therefore this menu is made available automatically when the instrument detect...

Page 42: ...ariable from the set point In the control with contacts the PID algorithm is not active and the output is calculated in function of the Gain parameter The Gain parameter is functionally similar to the Proportional Action explaining with an example considering constant the difference between set point and process variable contact will be closed longer if Gain parameter is low while it will be close...

Page 43: ...c M Manual Fields of display are configured as in the following draft Process measured value Process Temperature 1 2 5 2 p H 1 5 5 C 1 2 0 0 S P 1 6 O U T A Set point Output Automatic Manual A M If the instrument is configured to perform additional functions beside operating as a controller for example to monitor another parameter with a second or third sensor installed on channel 2 or 3 the indic...

Page 44: ...ion of Channel 2 analysis 1 Analog output PID Control output Measured value retransmission of Channel 1 analysis 1 Controller Mod AW402 With 3 Channels installed Contacts output Measured value retransmission of Channel 1 analysis Measured value retransmission of Channel 2 analysis 1 Measured value retransmission of Channel 3 analysis 1 If the two sensors channels are identical and the PID option i...

Page 45: ...ease HI Alarm Ch 3 if Ch 3 installed LO Alarm Ch 3 if Ch 3 installed Watch dog Controller Model AW402 With Cleaning Analog output PID HI Alarm Ch 1 1 LO Alarm Ch 1 1 HI Alarm Ch 2 2 LO Alarm Ch 2 2 Washing command See Par 4 4 1 3 Washing command See Par 4 4 1 3 Watch dog Controller Model AW402 With Cleaning Contacts out PID HI Alarm Ch 1 1 LO Alarm Ch 1 1 PID control output decrease PID control ou...

Page 46: ...ation procedure pressing the END key the calibration procedure is aborted and the display returns to the main menu 6 1 1 Calibration Menu Calibration menu allows a dual point calibration procedure for the Monitors In every dual point calibration the first number P1 is the lower value point and the second P2 is the higher value point The instrument has P1 and P2 values assigned by default as shown ...

Page 47: ...dise the sensor sensitivity The double point calibration gives the maximum accuracy because it allows to set both the slope and the offset of the curve giving displayed pH value as a function of the mV from the probe sensitivity pH f mV The first point can be calibrated by 7 pH buffer solution 0mV and the second point can be calibrated by 4pH buffer solution 6 1 3 1 Double point calibration The ca...

Page 48: ...f the 7 standard buffer solution rinse it thoroughly with de mineralised water dry it and immerse it in the 4 pH std buffer solution Stir softly but continuously the probe in this way a lower stabilisation time will be required Wait till the value in XX XX is stabilised XX XX is stable and correct the pH value in YY Y Confirm by pressing the ENTER key Previously stored values are overwritten in no...

Page 49: ...slope and the offset of the curve giving displayed ORP value as a function of the mV from the probe sensitivity The calibration of ORP Monitor is not usually required however the two point calibration procedure is foreseen in the transmitter software NOTE Calibration procedures are different if the arrangement oxidation potential with negative value or oxidation potential with positive value is us...

Page 50: ...thoroughly with de mineralised water dry it and immerse it in the second standard solution Stir softly but continuously the probe in this way a shorter stabilisation time would be required Wait until the measurement is stabilised no more variations of XXXX shown on the display If needed correct the ORP value pressing the ENTER key and inserting the correct value according to the second buffer solu...

Page 51: ... the correct value Open the sample flow to the cell with a chlorine concentration zero or near zero Let the system stabilise and then take a sample from the drain tube Perform laboratory analysis of the chlorine species being measured free or total or of the chlorine dioxide concentration Correct the 0 000 if needed according to the lab analysis Confirm with the ENTER key If the following message ...

Page 52: ...mple is a chlorine dioxide solution and the displayed indication is desired to be in ppm ClO2 multiply the DPD analysis reading by 1 9 WARNING It is advisable to repeat the calibration after 24 hours and after 2 or 3 days ...

Page 53: ... in the process sensor cable is not run with other cables 0 4 20 mA wiring is not run with other cables digital contacts wiring is correct 7 1 Preliminary operations 7 1 1 Getting started Power the transmitter up and perform the following steps 1 Turn on power supply 2 Enter Configuration menu and set the desired language for the display messages 3 If the displayed measured value is not in agreeme...

Page 54: ...dication 5 If it is desired to operate the controller with the average value of 2 or 3 identical sensors select PID in the Channel installation menu 6 If it is desired that the transmitter calculates the difference between two identical sensors input values set a value in the Delta parameter 7 If required select a dumping value for each channel input 8 Modify the Password in the Configuration menu...

Page 55: ...o low the display will show the message Bad In Refer to the I B pertinent to each specific sensor for details on how to fix the problem If the message Fault appears the signal generated by the sensor is abnormally high Refer to the I B pertinent to each specific sensor for details on how to fix the problem 8 1 2 Sensor signal check The signal generated by the sensor and by the temperature sensing ...

Page 56: ...re before the starting of the cleaning sequence Both the displayed measure and the 4 20 mA output signal are frozen at that last value Access denied is displayed when the inserted password is not correct password is displayed when the menu key is pressed the correct password must be entered in order to access the menu 9 1 2 Error messages These messages are displayed when something is not correct ...

Page 57: ...h alarm on channel 2 A3H high alarm on channel 3 the value set for delta has been overcome AVE the instrument is computing the average of two measures same parameter and the averaged value is indicated on the first line of the display instead of the measure of the first channel Stop When CCI in OR parameter is set to YES it means that output s is are frozen because either CCI1 or CCI2 or both is a...

Page 58: ...odes Mode 1 Standard PC mode Default setting by Factory 1 Start bit 8 Data Bits the Least Significant Bit LSB is transmitted first 1 Stop Bit Mode 2 Optional setting 1 Start bit 8 Data Bits the Least Significant Bit LSB is transmitted first 1 Even Parity bit 1 Stop Bit NOTE When operating in RS232 mode the character definition must be set as Mode 1 Mode 2 is active optionally only when operating i...

Page 59: ...e Command I A byte has two fields the Command field 3 bits and the I A field 5 bits There are the following commands type Interrogate Change Acknowledge Response The command descriptions are covered in the following section NUM Number The number of data bytes transferred or requested The NUM must be in a range of 00 32 decimal LO ADD Lower Address Bits The least significant 8 bits of a 16 bit addr...

Page 60: ...2 Change This message sends up to 20H bytes of new data to the addressed AW400 01111110 A0H I A NUM LO ADD HI ADD Data 1 XXXXXXX Data N LRC 3 Acknowledge This message signals the addressed AW400 that its last echoed change message was received correctly the AW400 performs the change requested 01111110 80H I A AW400 to Host 1 Response This message furnishes the data requested by the INTERROGATE com...

Page 61: ...2 2 Transaction B Example Host sends two bytes of new data to be loaded into the AW400 at data link address 03 beginning at hexadecimal memory address 1000 H 1 Host sends change message 01111110 10100011 00000010 00000000 00010000 00001000 00001100 11001001 SOH Command NUM LOADD HIADD Data1 Data2 LRC I A 2 AW400 sends response message 01111110 00100011 00000010 00000000 00010000 00001000 00001100 ...

Page 62: ... transmission to PC 3 Tx OUT Data transmission to PC GND Ground 4 Rx Data transmission fromPC Data transmission to and from PC 5 Rx Data transmission fromPC 6 GND Ground GND Ground Data transmission to and from PC Table 13 RJ45 Jack serial Communication connector pin out RJ45 Jack Fig 16 RJ45 Connector layout For RS232 and RS485 use shielded cables two cores twisted pair wire section 0 5 1 0 mm2 F...

Page 63: ...h a 220 Ohm resistor then an identical resistor is to be activated in parallel to obtain a 110 Ohm loop impedance If no such resistor is present on the Host side then a 110 Ohm resistor is selected on the AW400 serial board The terminator resistance selection is made by installing a jumper on JP1 or JP2 for RS422 or RS485 respectively the 110 Ohm resistor is selected by jumper between pin 1 2 whil...

Page 64: ... float 0X005E DefTemp Default temperature for termo compensation int 0X0062 AltUnits Altitude Units meters feet int 0X0064 Sigma Sigma enabled or not float 0X0066 sK1 Sigma K1 parameter float 0X006A sK2 Sigma K2 parameter float 0X006E Hyst 3 Smoothing for each channel int 0X007A wType Wash Type T17AU T17SU char 0X007C wT 4 9 Wash Timers T1 T4 float 0X00A0 Out_LO 3 Min output value for 3 channels f...

Page 65: ...loat 0X0184 PH BAND int 0X0188 TIME CYCLE float 0X018A CONTACT GAIN float 0X018E DZ int 0X0192 1C 2C int 0X0194 PA Table 15 PID1 Data Memory Map PID 2 DATA int 0X0196 Reserved float 0X0198 PB Proportional Band float 0X019C TR Reset Time float 0X01A0 MR Manual Reset float 0X01A4 TD Rate Time float 0X01A8 SP Set Point float 0X01AC CZ Control Zone int 0X01B0 RSW Direct Reverse Action float 0X01B2 SPA...

Page 66: ...TATE 8 CCI state float 0X0204 dev 2 PID 1 2 DEV float 0X020C out 2 PID 1 2 OUT float 0X0214 ff 2 PID 1 2 FF int 0X021C HIAL Ch1 3 3 HI Alarm Channel 1 3 int 0X0222 LOAL Ch1 3 3 LO Alarm Channel 1 3 int 0X0228 PID1 A M PID1 Auto Manual int 0X022A PID2 A M PID2 Auto Manual Table 17 Output Data Memory Map ...

Page 67: ...0 4 4 Electromagnetic compatibility Part 4 Testing and measurement techniques Section 4 Electrical fast transient burst immunity test CM 2kVp on power cable CM 2kVp on I O analog digital cable CM 1kVp on serial cable EN 61000 4 5 Electromagnetic compatibility Part 4 Testing and measurement techniques Section 5 Surge immunity test CM 4kVp DM 2kVp on power cable CM 2kVp DM 1kVp on I O analog digital...

Page 68: ...Display Board AW401115 CPU Board AW401055 Analogue I O Board AW401015 Digital I O Serial Board AW401119 Ribbon Cable CPU to PSU AW401116 Ribbon Cable Digital I O to CPU AW401117 Interconnect Cable PSU to Digital I O AW401118 PG11 Cable Gland AW401121 PG11 Blanking Disc AW401122 ...

Page 69: ...67 Notes ...

Page 70: ...68 ...

Page 71: ...ater Gas Industrial Analytics Instrumentation pH Conductivity and Dissolved Oxygen Transmitters and Sensors Ammonia Nitrate Phosphate Silica Sodium Chloride Fluoride Dissolved Oxygen and Hydrazine Analyzers Zirconia Oxygen Analyzers Katharometers Hydrogen Purity and Purge gas Monitors Thermal Conductivity Customer Support We provide a comprehensive after sales service via a Worldwide Service Organ...

Page 72: ...om The Company s policy is one of continuous product improvement and the right is reserved to modify the information contained herein without notice Printed in UK 06 09 ABB 2009 ABB Limited 9 Moorbrook Southmead Industrial Park Didcot Oxfordshire OX11 7HP UK Tel 44 0 1235 512000 Fax 44 0 1235 512020 ...

Reviews: