background image

GoFa CRB 15000

Unboxing the cobot- Get Started Guide

Version 1.0

TM

Summary of Contents for CRB 15000

Page 1: ...GoFa CRB 15000 Unboxing the cobot Get Started Guide Version 1 0 TM...

Page 2: ...gwLVwp9 Free online video tutorials For a detailed video guide on how to get started access our online tutorial here https to abb K TEQmUN Product manual You can also access product manuals for furthe...

Page 3: ...allation two trained persons with knowledge of mechanical and electrical installation maintenance repair work assemble this cobot You also need A wrench or a hex key fit for M10 screws A 0 4mm or smal...

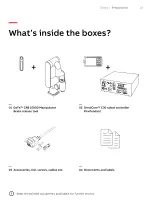
Page 4: ...Fa CRB 15000 Manipulator Brake release tool 03 Accessories incl screws cables etc 02 OmniCore C30 cobot controller FlexPendant 04 Documents and labels Keep the printed documents and labels for further...

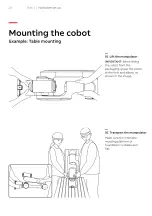
Page 5: ...Table mounting 01 Lift the manipulator IMPORTANT When lifting the cobot from the packaging grasp the cobot at the foot and elbow as shown in the image 02 Transport the manipulator Make sure the intend...

Page 6: ...acethecontroller LiftthecontrollerfromC30 boxandplaceitonan appropriatetable Ensuretheheight weight andstabilityofthetable Mountthecoversiftheyare available Inthiscase you alsoneedtopluginthe Ethernet...

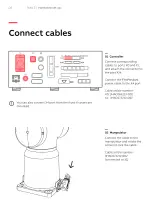
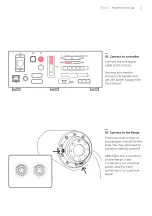
Page 7: ...C073212 002 connected to X1 06 Step 2 Hardware set up 01 Controller Connect corresponding cables to ports X0 and X1 and attach the connector to the port X14 Connect the FlexPendant power cable to the...

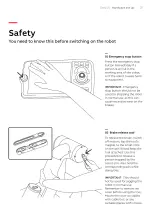
Page 8: ...se tool To release the brake switch off motors tap the tool s magnet to the small circle on the axis lid and keep the tool attached Use this procedure to release a person trapped by the cobot arm Also...

Page 9: ...Switch on the robot 01 Press the button 02 FlexPendant Follow the instruction on the FlexPendant screens and press the enabling device to switch on the FlexPendant 08 Step 2 Hardware set up...

Page 10: ...e Lead through button to enable it 02 Move the cobot Grab the arm and move the robot to a suitable position for mounting grippers and tools You may need to press and hold the enabling device at the sa...

Page 11: ...ount the gripper You may need to prepare M6 screws for mounting IMPORTANT Switch off the robot for this step Make sure you install the Software for your gripper or create a new appropriate tool config...

Page 12: ...24V power supply from the X19 port 03 Connect to the flange Follow the instructions of your gripper manual for this step You may also need to build the cable by yourself ABB offers two connectors on t...

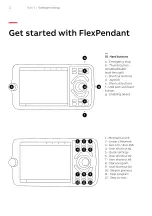
Page 13: ...rtcut buttons f USB port and reset button g Enabling device 1 Mechanical unit 2 Linear Reorient 3 Axis 123 Axis 456 4 User shortcut 1 5 Quick settings 6 User shortcut 2 7 User shortcut 3 8 Start progr...

Page 14: ...02 User interface 1 Operator messages 2 Event log 3 Status Quick settings 4 Applications 5 Home button 6 Open applications 7 Control panel 8 Quick settings 13 Step 3 Software set up 1 2 3 4 5 6 7 8...

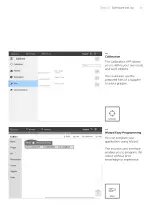
Page 15: ...obots You can configure the cobot safety using this SafeMove APP on the FlexPendant which allows you to set up safety zones for the cobot ASI setting The ASI arm side interface on the sixth axis is de...

Page 16: ...You could also use the prepared files of a supplier to add a gripper Wizard Easy Programming You can program your application using Wizard The intuitive user interface enables you to program the cobo...

Page 17: ...he latest updates and information about our cobots visit our website https solutions abb cobots ABB cobot social media Follow us to stay updated search ABB Robotics on Facebook YouTube LinkedIn Twitte...

Reviews: