1
WARNING: To ensure the drive is not unexpectedly started, turn
off and lock-out or tag power source before proceeding. Failure to
observe these precautions could result in bodily injury.
WARNING: All products over 25 kg (55 lbs) are noted on the
shipping package. Proper lifting practices are required for these
products.
WARNING: Because of the possible danger to person(s) or
property from accidents which may result from the improper use
of products, it is important that correct procedures be followed.
Products must be used in accordance with the engineering
information specified in the catalog. Proper installation,
maintenance and operation procedures must be observed.
The instructions in the instruction manuals must be followed.
Inspections should be made as necessary to assure safe
operation under prevailing conditions. Proper guards and other
suitable safety devices or procedures as may be desirable or as
may be specified in safety codes should be provided, and are
neither provided by ABB nor are the responsibility of ABB. This
unit and its associated equipment must be installed, adjusted
and maintained by qualified personnel who are familiar with the
construction and operation of all equipment in the system and the
potential hazards involved. When risk to persons or property may
be involved, a holding device must be an integral part of the driven
equipment beyond the speed reducer output shaft.
DODGE
®
PARA-FLEX
®
Couplings:
Includes ATEX Approved Couplings
These instructions must be read thoroughly before installation or operation. This instruction manual was accurate at the time of printing. Please see
baldor.com
for updated instruction manuals.
Note! The manufacturer of these products, Baldor Electric Company, became ABB Motors and Mechanical Inc. on
March 1, 2018.
Nameplates, Declaration of Conformity and other collateral material may contain the company name of Baldor Electric Company and the brand
names of Baldor-Dodge and Baldor-Reliance until such time as all materials have been updated to reflect our new corporate identity.
FLANGE INSTALLATION
1. For the TAPER-LOCK
®
and QD flanges, install bushing in
the flange per instructions included with bushing or find the
instruction manuals at www.baldor.com.
2. Check the axial float of the shafts. Position the shafts at the
mid-point of the float. Where Limited End Float is required
or Sleeve Bearings are used, consult Mechanical Power
Transmission Support for application assistance.
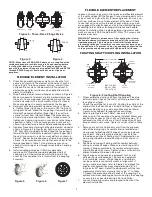
3. Referring to Figure 1 and Table 1, observe the “B”
dimension for the coupling size being installed. Mount and
position the flanges on the shafts so that dimension “B” is
achieved when the shafts are in their final position.
For the TAPER-LOCK and QD flanges, secure the flange
assembly to the shaft by positioning the assembly onto the
shaft allowing for small axial movement which will occur
during tightening procedure. Alternately torque hardware to
recommended torque setting. For the clearance fit straight
bore (FBX) flange, tighten the set screws to values listed in
Table 2. Align flanges using precision equipment such as
dial indicators or laser equipment.
If precision equipment is not available, scales, straight
edges, and calipers can be used as less accurate means of
alignment. If using a scale or calipers, refer to Figure 3 and
check the angular misalignment by measuring dimension
“B” at four places 90° apart. Adjust the equipment until
the four measurements do not vary more than value “C” in
Table 1. If using a straight edge, check the parallel offset
by laying the straight edge across the outside diameter of
the flanges in four places 90° apart. The gap between the
flange and straight edge should not exceed 1/32” (0.79mm).
To achieve maximum coupling performance, align the
coupling as accurately as possible during initial installation.
4. Remove any anti-rust lubricants or oil from the grooved
side of the clamp rings. Loosen but do not remove clamp
ring screws until only one or two threads are engaged and
proceed to the section on flexible element installation.
Two-Piece Flange Styles
PX40 STANDARD TAPER-LOCK
Flange
Internal
Clamp Ring
Flexible
Element
B
Flexible
Element
Flange
Internal
Clamp Ring
PX140 thru 320 TAPER-LOCK
Flexible
Element
Flange
External
Clamp Ring
B
B
B
B
PX50-120QD FLANGE ASSEMBLY
PX140-200QD FLANGE ASSEMBLY
Figure 1 - Two-Piece Flange Styles
Three-Piece Flange Styles
1. Disassemble the clamp rings from the flanges. Place the
external clamp rings on the shafts with the grooved side
facing the shaft end.
2. For the TAPER-LOCK flange, install the bushing in the
flange per instructions included with bushing.
3. Check the axial float of the shafts. Position the shafts at the
mid-point of the float. Where Limited End Float is required
or Sleeve Bearings are used, consult Mechanical Power
Transmission Support for application assistance.
4. Referring to Figure 2 and Table 1, observe the “B”
dimension for the coupling size being installed. Mount and
position the flanges on the shafts so that dimension “B” is
achieved when the shafts are in their final position.
For the TAPER-LOCK flange, secure the flange assembly
to the shaft by positioning the assembly onto the shaft
allowing for small axial movement which will occur during
tightening procedure. Alternately torque setscrews to
recommended torque setting. For the clearance fit straight
bore (FBX) flange, tighten the set screws to values listed in
Table 2. Align flanges using precision equipment such as
dial indicators or laser equipment.
If precision equipment is not available, scales, straight
edges, and calipers can be used as less accurate means of
alignment. If using a scale or calipers, refer to Figure 3 and
check the angular misalignment by measuring dimension
“B” at four places 90° apart. Adjust the equipment until
the four measurements do not vary more than value “C” in
Table 1. If using a straight edge, check the parallel offset
by laying the straight edge across the outside diameter of
the flanges in four places 90° apart. The gap between the
flange and straight edge should not exceed 1/32” (0.79mm).
To achieve maximum coupling performance, align the
coupling as accurately as possible during initial installation.
5. Remove any anti-rust lubricants or oil from the element side
of the clamp rings. Assemble clamp rings on the flanges
engaging only one or two threads and proceed to the
section on flexible element installation.


