130
EL3000
CONTINUOUS GAS ANALYZERS | OI/EL3000-EN REV. D
… 9 Calibration
Magnos206 – notes for calibration
Calibration methods
• Automatic calibration:
zero point/end-point calibration or substitute gas calibration
(factory-set if the substitute gas component is set up) or
single point calibration
• Manual calibration:
Zero point/end-point calibration or substitute gas
calibration (factory-set if the substitute gas component is
set up) or single point calibration
Substitute gas calibration
If the test gases for the calibration are not available,
e.g. because they cannot be filled in test gas bottles or because
their components are not compatible with one another, the
Magnos206 can be factory-set in accordance with the order for
calibration with a substitute gas.
In addition to the measuring range of the sample component, a
measuring range for the substitute gas component is then set
up at the factory; normally this is O
2
in N
2
. This setting is
documented in the device data sheet.
Substitute gas calibration is a zero point / end-point calibration
of the substitute gas component. The zero points and end
points of the measuring ranges of all sample components in
Magnos206 are then corrected electronically by the values
established during the calibration.
Note
• If the analyzer is set to calibration with a substitute gas, the
substitute gas calibration must always be carried out in
order to calibrate all sample and substitute gas components.
• A zero point/end point calibration either only in the sample
components or in the substitute gas measuring ranges
results in an erroneous calibration of the analyzer module.
Single-point calibration
Magnos206 long-term sensitivity drift is less than 0.25 % of
measured value per year.
Therefore, in measuring ranges from 0 to 5 vol.-% to
0 to 100 vol.-% O
2
, it is sufficient to perform an offset correction
routinely only.
This so-called single-point calibration can be done at any point
of the characteristic curve as this causes a parallel shift of the
characteristic curve.
It is recommended to additionally perform an end-point
calibration at least once a year, depending on the measurement
task.
Note
Sensitivity drift can be short-term up to 1 % of the measured
value per week.
Suppressed measuring ranges
If suppressed measuring ranges are set up in the Magnos206
analyzer with a suppression ratio greater than 1:5, then a special
adjustment of the standard built-in pressure sensor has been
made at the factory; in this case, no substitute gas calibration
has been set up in the analyzer.
Highly suppressed measuring ranges ≥
95 to 100 Vol.-% O
2
should be calibrated for maximum possible accuracy with N
2
at
the zero point and 100 Vol.-% O
2
at the end point.
Single-point calibration is also preferable with 100 Vol.-% O
2
or a
test gas concentration within the measuring range is possible.
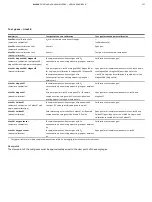
Test gases – Magnos206
Analyzer
Test gas for zero point calibration and single-point
calibration
Test gas for the end-point calibration
Magnos206
Oxygen-free process gas
Process gas with a known O
2
concentration
Magnos206
suppressed measuring range
• Zero point calibration: pure nitrogen or hydrogen-free
operating gas
• Single-point calibration: 100 Vol.-% O
2
or test gas
with O
2
concentration in the measuring range
Test gas with O
2
concentration near the end point of the
measuring range
Magnos206
with single-point calibration
Test gas with O
2
concentration in an existing measuring
range or ambient air.
—
Magnos206
with substitute gas calibration Oxygen-free process gas or substitute gas (O
2
in N
2
)
Substitute gas, for example dried air
Dew point
The dew point of the test gases must be approximately equal to the dew point of the sample gas.


