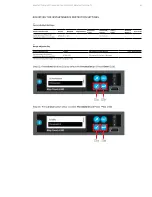
P R OT EC T I O N SE T T I N G S SE T U P FO R EK I P TO U C H T R I P U N I T S
49
17
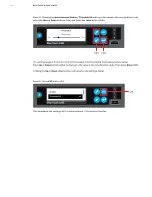
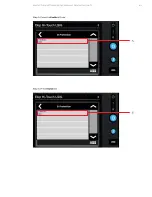
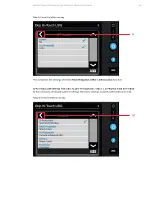
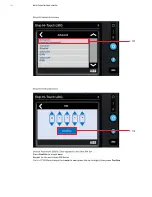
Step 16. Select Functions
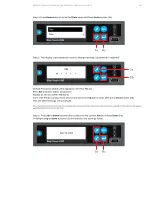
Step 17. Select 2I Mode
16
Page 1: ...OPER ATING INSTRUCTIONS Protection settings setup for Ekip Touch Trip Units...
Page 2: ......
Page 3: ...gs 006 040 Protection Setting Setup 006 025 XT5 XT7 XT7M and Emax 2 026 040 XT2 and XT4 041 052 Arc flash mitigation RELT 2I Protection setup 053 055 Appendix for changing language back to English 056...
Page 4: ...s Settings table for breaker Please fill in values from coordination study in reference table below Settings Value Traditional Study ABB Ekip Touch Standards Reference Reference Reference Protection S...
Page 5: ...4 x In to 1 x In in 0 001 In steps 3 60 s in 1s steps XT5 3 48s in 1s steps XT7 XT7M 3 144s in 1s steps Emax 2 3 144s in 1s steps Short Time Protection S Protection Selective Short Circuit 51 50TD XT...
Page 6: ...c Alarm LED d Home push button e Single touch color touchscreen display f iTEST push button g Service connector c b a g e An EKIP TT Battery Pack or Ekip T P Test Programming is required for COLD unpo...
Page 7: ...OTECTION SETTINGS SETUP FOR EKIP TOUCH TRIP UNITS 7 Step 3 Press the HOME button 3 Step 4 Press the bottom left icon six sub icons Step 2 Turn on the Ekip TT using the switch on the side of the unit 3...
Page 8: ...144 seconds Emax 2 t1 144 seconds Range Adjustability Protection Function Frame Threshold Pickup Range Time Delay Range Long Time Protection L Protection Overload 49 XT5 0 4 x In to 1 x In in 0 001 In...
Page 9: ...irst PIN box Press Confirm to accept zero Repeat for the next three PIN boxes On the 5th PIN box change from zero to one press the up triangle then press Confirm This will allow Protection Settings to...
Page 10: ...ess the minus icon or the plus icon to change to the value in the coordination study maintaining the press will advance the settings faster Then press Confirm NOTE The value is given as both absolute...
Page 11: ...us icon to change to the value in the coordination study maintaining the press will advance the settings faster Then press Confirm NOTE The value is given in seconds and can be set within the range 3...
Page 12: ...T TIME PROTECTION SETTINGS The default setting for Short Time Protection is OFF or ENABLE OFF 13 14 Step 14 Press Enable off row Factory Default Settings Protection Function Frame Enabled Trip Enabled...
Page 13: ...PROTECTION SETTINGS SETUP FOR EKIP TOUCH TRIP UNITS 13 Step 15 Press Enable On 15 16 ADJUSTING THE SHORT TIME CURVE TYPE OR FUNCTION Step 16 Press the Function t k ANSI 50TD row...
Page 14: ...14 EKIP TOUCH TRIP UNITS Step 17 Press the Function per the coordination study ADJUSTING THE SHORT TIME PICK UP OR THRESHOLD I2 Step 18 Press the Threshold I2 4 0In row 17 18...
Page 15: ...coordination study The setting range is from 0 6 to 10 0 of the breaker s nominal rating rating plug value Press the minus icon or the plus icon to change to the value in the coordination study mainta...
Page 16: ...4s Press the minus icon or the plus icon to change to the value in the coordination study maintaining the press will advance the settings faster Then press Confirm NOTE The value is given in seconds a...
Page 17: ...TTINGS SETUP FOR EKIP TOUCH TRIP UNITS 17 23 24 ADJUSTING THE INSTANTANEOUS PROTECTION SETTINGS ADJUSTING THE INSTANTANEOUS PICK UP OR THRESHOLD I3 Step 24 Press the Threshold I3 4 0 in row Factory De...
Page 18: ...Press the minus icon or the plus icon to change to the value in the coordination study maintaining the press will advance the settings faster Then press Confirm NOTE The value is given as both absolu...
Page 19: ...for Ground Fault Protection is OFF or ENABLE OFF Step 28 Press the Enable off row NOTE For breakers using external neutral CT for ground fault protection change the breaker configuration from 3P to 3...
Page 20: ...20 EKIP TOUCH TRIP UNITS Step 29 Press Enable On The Ground Fault G Protection Function is now Enabled 30 ADJUSTING THE GROUND FAULT CURVE OR FUNCTION Step 30 Press the Function t k ANSI 50TD row 29...
Page 21: ...TECTION SETTINGS SETUP FOR EKIP TOUCH TRIP UNITS 21 32 Step 31 Press the Function per the coordination study ADJUSTING THE GROUND FAULT PICK UP OR THRESHOLD I4 Step 32 Press the Threshold I4 0 200In r...
Page 22: ...Version I4 Max 1200A Press the minus icon or the plus icon to change to the value in the coordination study maintaining the press will advance the settings faster Then press Confirm NOTE The value is...
Page 23: ...to 1 00 Seconds Press the minus icon or the plus icon to change to the value in the coordination study maintaining the press will advance the settings faster Then press Confirm NOTE The value is give...
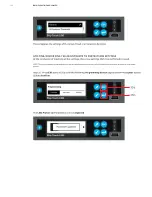
Page 24: ...ITS APPLYING CONFIRMING ADJUSTMENTS TO PROTECTION SETTINGS At the conclusion of inputting all the settings these new settings MUST be confirmed to be saved Step 37 Press the left arrow key 38 Step 38...
Page 25: ...PROTECTION SETTINGS SETUP FOR EKIP TOUCH TRIP UNITS 25 Step 38 Then press Confirm The LSIG Protection Parameters are now Updated...
Page 26: ...1SDA066989R1 Ekip Programming ZEAEKPPGM 1SDA076154R1 Powered via USB port on laptop computer 26 EKIP TOUCH TRIP UNITS Ekip TT Step 1 Insert the Ekip TT Plug End B into Ekip Touch Trip Unit Service Con...
Page 27: ...TINGS SETUP FOR EKIP TOUCH TRIP UNITS 27 Step 3 Press ESC button 3a or Enter Button 3b Step 4 Press Enter Button 4 on the Protection Icon Step 2 Turn on the Ekip TT using the switch on the side of the...
Page 28: ...001 Zero appears in the first PIN box Press Enter button 7a to accept zero Repeat for the next three PIN boxes On the 5th PIN box change from zero to one press the Up button 7b then press Enter button...
Page 29: ...lue In and can be set within the range 0 4 In to 1 0In in 0 001 steps 8a 8b The setting range is from 0 4 to 1 0 of the breaker s nominal rating rating plug sensor value Press Up or Down buttons 8a to...
Page 30: ...r Down buttons 10a to change to the value in the coordination study Then press Enter button 10b and this screen will be displayed Holding the Up or Down 10a buttons will advance the settings faster NO...
Page 31: ...own button 12a to select S Protection and Press Enter button 12b 12a 12b Range Adjustability Protection Function Frame Threshold Pickup Range Time Delay Range Short Time Protection S Protection Select...
Page 32: ...isplayed ADJUSTING THE SHORT TIME CURVE TYPE OR FUNCTION Step 15 Press Down button 15a to select Function and Press Enter button 15b 15a 15b Step 16 Press Down 16a and or Enter 16b button to select th...
Page 33: ...shold I2 setting to the value in the coordination study using the Up and Down buttons 18a and Press the Enter button 18b 18a 18b The setting range is from 0 6 to 10 of the breaker s nominal rating rat...
Page 34: ...Press the Enter button 20b 20a 20b The setting range is from 0 05 to 0 8 Seconds UL Version t4 Max 0 4s Press Up or Down buttons 20a to change to the value in the coordination study Then press Enter b...
Page 35: ...5 5 x In Range Adjustability Protection Function Frame Threshold Pickup Range Time Delay Range Instantaneous Protection I Protection Short Circuit 50 XT2 XT4 1 5 x In to 15 x In in 0 1 In steps1 1 I3...
Page 36: ...ordination study Then press Enter 24b Holding the Up or Down 24a buttons will advance the settings faster Step 25 Press ESC button 25 25 This completes the settings of the Instantaneous I Protection f...
Page 37: ...x In in 0 001 In steps 0 1 1 0s in 0 05s steps1 1 UL version t4 max 0 4s NOTE For breakers using external neutral CT for Ground Fault Protection change the breaker configuration from 3P to 3P N Go to...
Page 38: ...29a to select Function and Press Enter button 29b ADJUSTING THE GROUND FAULT PICKUP OR THRESHOLD I4 Step 31 Press Down button 31a to select Threshold I4 and Press Enter button 31b Step 30 Press Down...
Page 39: ...ettings faster Then press Enter button 32b NOTE The value is given as both absolute value Amperes and in relative value In and can be set within the range 0 1 In to 1 0 In in steps of 0 001 In ADJUSTI...
Page 40: ...E This process applies to changing one or more settings parameters within the trip unit and can be completed at any point in the above process This completes the settings of the Ground Fault G Protect...
Page 41: ...djust formatting to match smaller text and adjust to The default setting for Arc flash mitigation RELT 2I Protection is OFF or ENABLED OFF PROTECTION SETTINGS SETUP FOR EKIP TOUCH TRIP UNITS 41 Step 1...
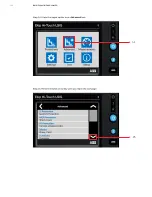
Page 42: ...42 EKIP TOUCH TRIP UNITS 4 Step 3 Press the upper center icon Advanced Icon Step 4 Press the 2I Protection Second I Protection row 3...
Page 43: ...PROTECTION SETTINGS SETUP FOR EKIP TOUCH TRIP UNITS 43 6 Step 5 Press the Enable off row Step 6 Press Enable On 5...
Page 44: ...ination study The setting range is from 1 5 to 15 0 of the breaker s nominal rating rating plug value Press the minus icon or the plus icon to change to the value in the coordination study maintaining...
Page 45: ...is completes the settings of the Arc Flash Mitigation RELT 2I Protection Function APPLYING CONFIRMING THE ARC FLASH MITIGATION RELT 2I PROTECTION SETTINGS At the conclusion of inputting all the settin...
Page 46: ...46 EKIP TOUCH TRIP UNITS Step 11 Then press Confirm This display is presented The Arc Flash RELT 2I Advanced Protection Parameter is now Updated 11...
Page 47: ...PROTECTION SETTINGS SETUP FOR EKIP TOUCH TRIP UNITS 47 Step 12 To activate the Arc Flash RELT 2I Advanced Protection once it has been enabled follow the below Step 13 Press Settings 12 13...
Page 48: ...48 EKIP TOUCH TRIP UNITS Step 14 Press the upper center icon Advanced Icon Step 15 Press the down arrow key until you reach the last page 14 15...
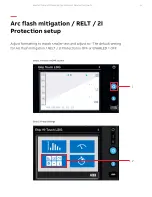
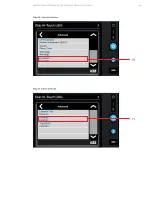
Page 49: ...PROTECTION SETTINGS SETUP FOR EKIP TOUCH TRIP UNITS 49 17 Step 16 Select Functions Step 17 Select 2I Mode 16...
Page 50: ...Activation Step 19 Enter password Default Password 00001 Zero appears in the first PIN box Press Confirm to accept zero Repeat for the next three PIN boxes On the 5th PIN box change from zero to one p...
Page 51: ...PROTECTION SETTINGS SETUP FOR EKIP TOUCH TRIP UNITS 51 Step 20 Select Active 20 Step 21 Once Active press the Home button 21...
Page 52: ...52 EKIP TOUCH TRIP UNITS Step 22 Select Confirm Step 23 2I Mode is now active 22...
Page 53: ...are using SPANISH as that has been the most prevalent language showing up Three Easy Steps to change back 1 Configuracion 2 Sistema 3 Lenguaje Change Espanol to English Step 1 Press the lower left Con...
Page 54: ...54 EKIP TOUCH TRIP UNITS Step 3 Press the Lenguaje Espanol row 3 Step 4 Use the up down arrows to scroll to English 4...
Page 55: ...PROTECTION SETTINGS SETUP FOR EKIP TOUCH TRIP UNITS 55 Step 5 Press English 5 This completes language parameter settings...
Page 56: ...56 EKIP TOUCH TRIP UNITS How to set date and time XT5 XT7 XT7M and Emax 2 Step 1 Press the bottom left icon six sub icons Step 2 Press the lower left icon Settings Icon 1 2...
Page 57: ...PROTECTION SETTINGS SETUP FOR EKIP TOUCH TRIP UNITS 57 Step 3 Press the down arrow key to find the System menu Press System 3 Step 4 Press Date to set the current date 4...
Page 58: ...ssword is required Default Password 00001 Zero appears in the first PIN box Press Confirm to accept zero Repeat for the next three PIN boxes On the 5th PIN box change from zero to one press the up tri...
Page 59: ...PROTECTION SETTINGS SETUP FOR EKIP TOUCH TRIP UNITS 59 Step 8 Press the plus and minus to adjust date Press confirm Step 7 Press Time to set the current time 8 7...
Page 60: ...60 EKIP TOUCH TRIP UNITS 1b 1a Step 1 Press ESC button 1a or Enter Button 1b 2b 2a Step 2 Press Up button 2a to select Settings icon and Press Enter button 2b 3a 3b Step 3 Press Down button 3a to find...
Page 61: ...ssword 00001 Zero appears in the first PIN box Press Enter button 5b to accept zero Repeat for the next three PIN boxes On the 5th PIN box change from zero to one press the Up button 5a then press Ent...
Page 62: ...n buttons 8a to adjust to the current Time and Press Enter 8b Holding the Up or Down buttons 8a will advance the settings faster Step 9 Press ESC button and Confirm settings if prompted 7a 7b Step 7 P...
Page 63: ...PROTECTION SETTINGS SETUP FOR EKIP TOUCH TRIP UNITS 63...
Page 64: ...n without prior written consent of ABB Inc Copyright 2023 ABB All rights reserved 9AKK108467A8630 REV A SEPTEMBER 2023 We reserve the right to make technical changes or modify the contents of this doc...