background image

Power Break® II Devices 

Draw-Out Device Installation 


Table  4.  Illustration of  the  rejection-scheme  logic,  showing  which  switches  may  be 
installed in which substructures. 

Rejection

Feature

Draw-Out 

Position 

Indicator


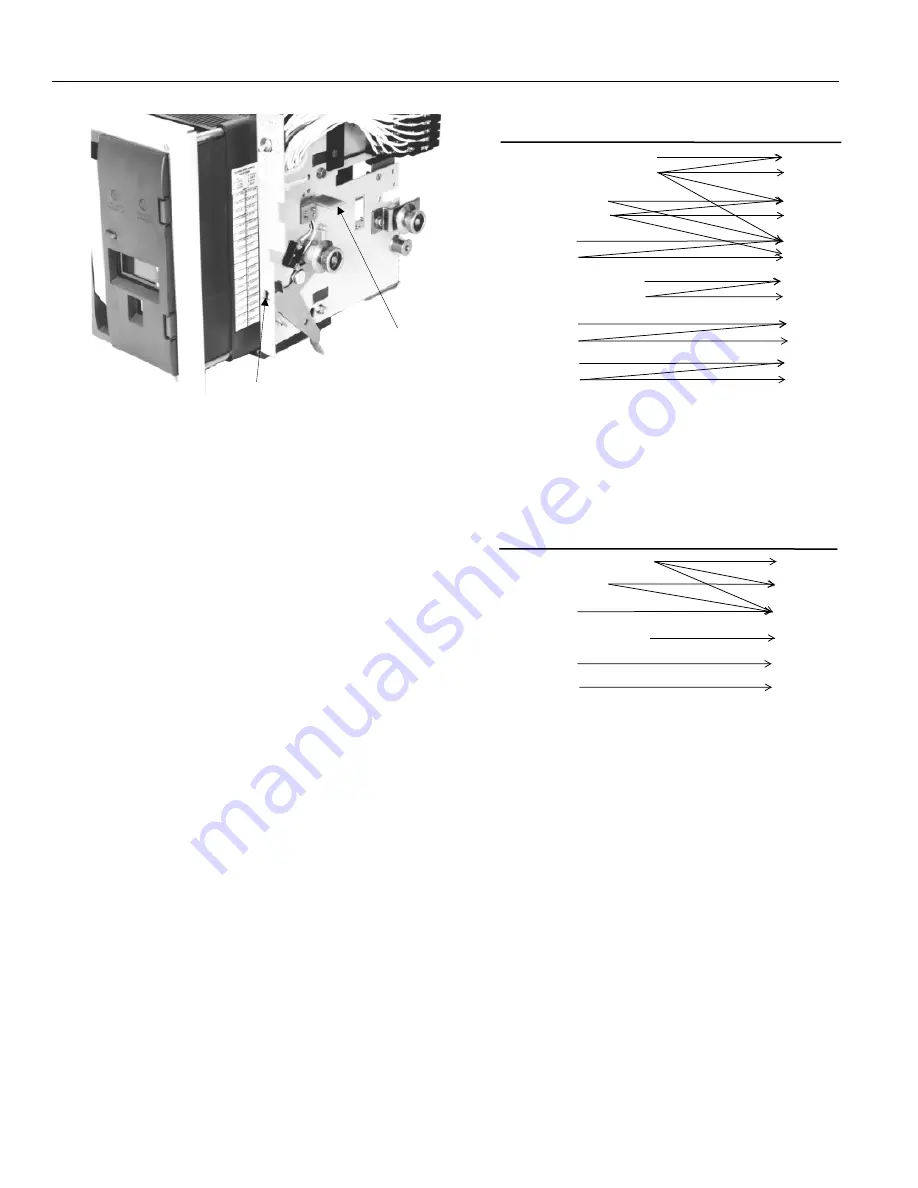
Figure 3. Right side of the device, showing the rejection feature, draw-out position indicator, and 
electric operator cutoff switch. 

Draw-Out Position Indicator. Indicates whether the device is 
in the connected, test, or disconnect position.
Electric  Operator  Cutoff  Switch.  Prevents  cycling  of  the 
spring-charging  motor  during  installation  or  removal  of  a 
device.
Draw-Out Interlock.  This  feature trips a  closed device if  the 
wrench  interlock  is  deliberately  defeated.  The  device  is 
tripped before the primary disconnects part as the device is 
racked out and before the primary disconnects engage as the 
device is racked in.

Rejection Feature. This feature prevents insertion of a device 

into a  substructure of  lower ampere  rating or  higher short-
circuit rating. It  does  not  reject  a  device  with  incompatible 
control wiring. See the label on the device or Tables 1 or 2 for 
the  proper  substructure  catalog  number.  (Also  shown  in 
Figure 8.)

Tables 3 and 4 illustrate the rejection scheme logic. Note that 

devices  may  be  safely  used  in  higher-rated  substructures. 
However, local and industry codes and standards require that 
conductors be sized to the substructure. Therefore, installing 
devices in  substructures with higher ratings is possible, but 
not economical.
Draw-Out Padlock Accessory. When a padlock is installed, this 
feature works with the racking shaft lockout plate to prevent 
engagement of the racking shaft wrench.
Shutter  Actuator.  A  stud  actuates  the  optional  shutter 
accessory.
By-Pass  Switch  Actuator.  Operates  the  optional  by-pass 
switch accessory.
Lifting  Bar.  The  Lifting  Bar,  catalog  number  TDOLB,  is 
available  for  safe  handling  of  the  draw-out  device,  as 
illustrated in Figures 4 and 5. 

Note:  In  the  circuit  breaker  catalog  number,  replace  “X”  with  "G"  for 
EntelliGuard ®    Trip unit or “B” for MicroVersaTrip Plus™ or MicroVersaTrip 
PM™ Trip Units or with “D” for Power+™ Trip Units

Table 3. Illustration of the rejection-scheme logic, showing which circuit breakers may 
be installed in which substructures. 

Note: In the switch catalog number, replace “X” with "W"


for EntelliGuard ®  

Control


U

nit

s

 or with


Y

” for Power+™ 

Control

 Unit

s

SPSDOS08
SPSDOS16
SPSDOS20
SPSDOS25
SPSDOS30
SPSDOS40


SSD08X

SSD08X

202, X204, X208


SSD16X

210, X216


SSD20X

220


SSD25X

210, X220, X325


SSD30X

330


SSD40X

440

Substructure

SPSDOS08

SPSDOS16

SPSDOS20

SPSDOS25

SPSDOS30

SPSDOS40

Substructure

Breaker

SSD08X

SSD08X

202, X204

, X208 

SHD08X

202, X204, X208

SSD16X

210,X216            

SHD16X

210,X216

SSD

20X

2

2

0


SHD

20X

2

2

0

SSD25

X210,X220,X325


SHD25X

210,X220,X325

SSD30X

330


SHD30X

330

SSD40X

440


SHD40X

440

SP

H

DOS08

SP

H

DOS16

SP

H

DOS20

SP

H

DOS25

SP

H

DOS30

SP

H

DOS40

Switch

2


Summary of Contents for GE Power Break II GEH6271

Page 1: ...GEH6271 INSTALLATION INSTRUCTIONS Power Break II Devices Draw Out 800 4000 Ampere Frames ...

Page 2: ...ble at the time of its publication While efforts have been made to ensure accuracy the information contained herein does not cover all details or variations in hardware and software nor does it provide for every possible contingency in connection with installation operation and maintenance Features may be described herein that are not present in all hardware and software systems ABB Industrial Sys...

Page 3: ...iftingBar attachedto a draw out devicefor liftingwith a hoist 3 6 Deviceinstalledon rails ready to be pushed into the substructure 4 7 Wrench attachedto the devicerackingshaft 4 8 Compartmentpositionindicatoron the front of the device 4 9 Withdrawingthe substructurerails 5 10 Rotatingthe deviceforward for inspection 5 List of Tables 1 Catalognumbers of draw out circuitbreakersand correspondingsubs...

Page 4: ...ustrated in Figures 1 2 and 3 PrimaryDisconnects Primary power is fed through multiple finger primary disconnects when the device is in the connected position Secondary Disconnects Control power is provided through the secondary disconnects in the test and connected positions only All accessories terminate at dedicated positions regardless of the combination of accessories installed Rollers The ro...

Page 5: ...and standards require that conductors be sized to the substructure Therefore installing devices in substructures with higher ratings is possible but not economical Draw Out Padlock Accessory When a padlock is installed this feature works with the racking shaft lockout plate to prevent engagement of the racking shaft wrench Shutter Actuator A stud actuates the optional shutter accessory By Pass Swi...

Page 6: ... end of the racking shaft with the supplied wrench catalog number TDORT and rotate the shaft clockwise to draw the device into the TEST or CONNECTED position as illustrated in Figure 7 The compartment position indicator is shown in Figure 8 NOTE If the device does not fit the structure check the rejection relationship illustratedin Figure 8 to verifythat a correctly rated device is being installed...

Page 7: ...rails ready to be pushed into the substructure Figure 7 Wrench attached to the device racking shaft Figure 8 Compartment position indicator on the front of the device Racking Tool Substructure Rejection Feature 06 in minimum Device Rejection Feature Compartment Position Indicator 4 ...

Page 8: ...EST or DISCONNECTED position The compartment position indicator is shown in Figure 8 Pull the substructure rails out as far as possible until they drop into the horizontal locked position as illustrated in Figure 9 From the DISCONNECTED position pull the device out on the rails until the front rollers fall into the detent as illustrated in Figure 6 The device can now be rotated about the front rol...

Page 9: ...ed grease Check primary and secondary disconnecting surfaces for signs of abnormal wear or overheating If required clean contacts with a suitable solvent Discoloration of silvered surfaces is not harmful unless atmospheric conditions cause deposits such as sulfides on the contact surfaces Check to see that all anchor bolts and structure bolts are tight Inspect all cable or bus connectionsfor signs...

Page 10: ...hall prevail ABB Inc does not accept any responsibility whatsoever for potential errors or possible lack of information in this document We reserve all rights in this document and in the subject matter and illustrations contained therein Any reproduction or utilization of its contents in whole or in parts is forbidden without prior written consent of ABB Inc Copyright 2019 ABB All rights reserved ...

Reviews: