Action
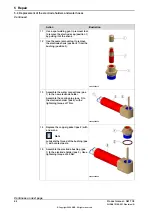
Unscrew the knurled screw (pos. 1).
4
Remove the pressure washer (pos. 2) keeping the protecting cover (pos. 3) in place.
5
Remove the protecting cover (pos. 3), weight about 2.5 kg.
6
Perform the required repair work.
7
Make sure that the working space is cleaned and that all equipment is removed before
restarting the welding.
8
Reassembling the protective cover
Action
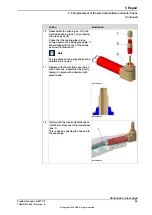
Reassemble the protecting cover (pos. 3).
1
Reassemble the pressure washer (pos. 2).
2
Tighten the knurled screw by hand (pos. 1).
3
Make sure that the working space is cleaned and that all equipment is removed before
restarting the welding.
4
80
Product manual - GWT C9
3HAA010198-001 Revision: A
© Copyright 2022 ABB. All rights reserved.
5 Repair
5.3.1 Remove/reassemble the protective cover
Continued
Summary of Contents for GWT C9
Page 1: ...ROBOTICS Product manual GWT C9 ...
Page 62: ...This page is intentionally left blank ...
Page 124: ...This page is intentionally left blank ...
Page 126: ......
Page 127: ......


