Turbocharger VTR..4
Seite / Page 35
Demontage und Montage
Kap. / Chap. 5
Disassembly and assembly
ABB Turbo Systems Ltd
10020
- M -
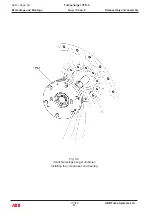
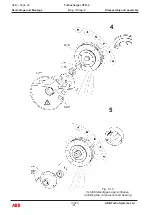
- Press on the box spanner (90050) and make a
mark on the oil slinger (32180) corresponding to
the radial extension of "O-mark" (right) (see fig.
5-10/4).
Note
Angel of torque, see sec. 4.3.
- Tighten the cap nut (32157) by hammering on the
tommy bar (90260) until the second mark on the
box spanner (90050) corresponds to the marking
on the oil slinger (32180). Support the box spanner
(90050) with your hand when doing this operation
(see fig. 5-10/4).
Caution !
In order to ensure a better true run, turn
the rotor between each stroke of the
hammer with the box spanner (90050)
and the cap nut by 180°.
- If none of the tongues on the locking plate (32114)
correspond to a groove in the cap nut, tighten the
latter (do not loosen) until correct locking is en-
sured.
Note
Do not bend the tongue on the locking
plate until the the check of the true run
at the oil slinger has been completed.
Caution !
Check the true run B2 at the oil slinger;
max. tolerance see table on the next
page.
- If the tolerance is exceeded, consult a service sta-
tion (see chap. 8).
Caution !
If the true run is OK bend the tongue of
the locking plate (32114).
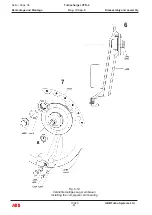
- Fit the nipple (32185) with socket screws (32181)
and locking washer (32182).
- Steckschlüssel (90050) aufstecken und in der
radialen Verlän gerung der "0-Marke" (rechte) am
Schmierrad (32180) eine Markierung anbringen (s.
Fig. 5-10/4).
Hinweis
Anzugswinkel, siehe Abschn. 4.3.
- Die Hutmutter (32157) durch Schlagen mit dem
Hammer auf den Drehstift (90260) festziehen,
bis die zweite Markierung auf dem Steckschlüs-
sel (90050) mit der Markierung am Schmierrad
(32180) übereinstimmt. Dabei den Steckschlüssel
(90050) von Hand stützen (s. Fig. 5-10/4).
Vorsicht !
Um einen besseren Rundlauf zu ge-
währleisten, den Rotor zwischen den
einzelnen Schlägen mit Steckschlüs-
sel (90050) und Hutmutter jeweils um
180
o
drehen.
- Stimmt die Lage keiner Zunge des Sicherungs-
bleches (32114) mit einer Nut der Hutmutter über-
ein, dann diese weiter festziehen (nicht lösen), bis
einwandfrei gesichert werden kann.
Hinweis
Zunge des Sicherungsbleches noch
nicht biegen bis die Rundlaufkontrolle
am Schmierrad abgeschlossen ist.
Vorsicht !
Rundlauf B2 am Schmierrad kontrol-
lieren; max. Toleranz siehe Tabelle auf
nächster Seite.
- Bei einem Rundlauffehler der ausserhalb der Tole-
ranz liegt ist eine Service-Stelle zu kontaktieren (s.
Kap. 8).
Vorsicht !
Ist der Rundlauf OK, Zunge des Siche-
rungsbleches (32114) biegen.
- Nippel (32185) mit Zyl.-Schrauben (32181) und
Federring (32182) montieren.
Summary of Contents for HT846493
Page 4: ......
Page 5: ...0 Preliminary remarks Vorbemerkungen ...
Page 6: ......
Page 18: ......
Page 19: ...1 Instructions on safety and hazards Sicherheits und Gefahrenhinweise ...
Page 20: ......
Page 34: ......
Page 35: ...2 Putting into operation Inbetriebnehmen ...
Page 36: ......
Page 53: ...3 Operation and maintenance Betrieb und Unterhalt ...
Page 54: ......
Page 99: ...Troubleshooting Beheben von Störungen 4 ...
Page 100: ......
Page 107: ...Disassembly and assembly Demontage und Montage 5 ...
Page 108: ......
Page 162: ......
Page 163: ...Taking out of operation Ausserbetriebnehmen 6 ...
Page 164: ......
Page 180: ......
Page 181: ...Appendix Anhang 7 ...
Page 182: ......
Page 184: ... 10021 ABB Turbo Systems Ltd E Seite Page 2 ABB Turbocharger VTR 4 Anhang Kap Chap 7 Appendix ...
Page 228: ......
Page 229: ...Approved lubricating oils Zugelassene Schmieröle 8 1 ...
Page 230: ......
Page 235: ...ABB Switzerland Ltd Turbocharging Bruggerstrasse 71a CH 5401 Baden Switzerland ...

