background image


Page 3


© 2021 ABB. All rights reserved.


QUICK START GUIDE


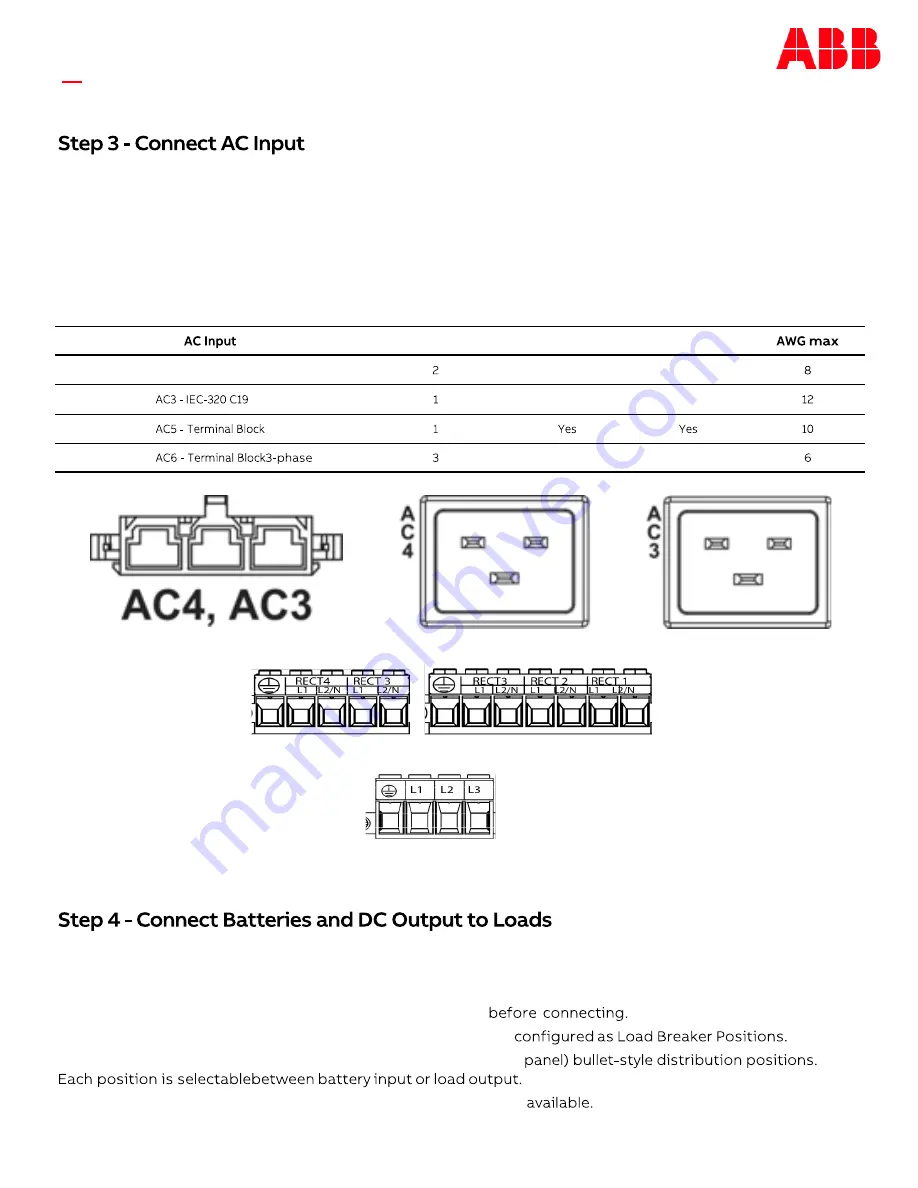
Connect 120/208/220VAC at rear of each rectifier shelf.


Danger: Turn OFF and lock

-

out tag

-

out the AC source before making AC connections. When connecting to AC 

mains, follow all local and national wiring rules.


Caution: When routing AC ensure cables do not come in contact with sharp or rough surfaces that may damage 

insulation and cause a short circuit. 


Rectifiers numbers are labeled at each AC input.


AC terminal connections are labeled at each position (L1, L2/N, and Gnd).


The figure to the right shows the DC circuit of the system.


Battery connections may be made to bullet

-

style distribution positions configured as Battery Breaker Positions or 

direct to the battery bus 

(23”

 systems only).


CAUTION: Verify battery voltage and polarity with a voltmeter                                                                                                


Load connections are made to bullet

-

style distribution positions                                                       


Distribution panels are each equipped with 20 

(19”

 panel) or 26 

(23”


Breaker sizes up to 250A, TPS fuses to 70A and GMT fuses to 12A are 


AC5 

-

 TB 

19”


AC5 

-

 TB 

23”


AC6 

-

 TB19

” 

3

-

phase


Rectifiers                                                                per Feed


19”


23”


AC1 

-

 Molex mini

-

fit SR


Yes


Yes


Yes


AC1 

-

 Molex


AC3 

-

 IEC


Summary of Contents for Infinity S

Page 1: ...g a minimum of twelve six on each side 12 24 screws provided Torque to 35 in lb 7 3 Nm 5 16 socket NES48 23 AC1 PS4 DC1E LVBD 19 23 wide AC input AC1 Molex AC3 IEC 320 C19 AC5 Term Block AC6 3 Phase Term Block 19 only of Power Slots of Distribution Panels 1 or 2 LVBD option ICI Read and follow all safety statements and precautions in this guide Jl 1111 11111 1 Controller Pulsar Plus Controller is ...

Page 2: ...to 35 in lb DC reference ground lug 5 16 or 3 8 on 1 centers not provided Torque to 160 in lb Note If connecting chassis ground to frame surface remove nonconductive frame coating and apply antioxidant for connection 19 AC inputs DC Reference CO Ground Chassis Ground AC cover removed Direct Battery Connections DC Reference CO Ground Chassis Ground AC inputs 1 2 Battery Returns AC inputs 3 4 23 ...

Page 3: ...n positions configured as Battery Breaker Positions or direct to the battery bus 23 systems only CAUTION Verify battery voltage and polarity with a voltmeter Load connections are made to bullet style distribution positions Distribution panels are each equipped with 20 19 panel or 26 23 Breaker sizes up to 250A TPS fuses to 70A and GMT fuses to 12A are AC5 TB 19 AC5 TB 23 AC6 TB19 3 phase Rectifier...

Page 4: ... Battery shown Upper Breaker position for Battery Lower Breaker position for Load Correct Breaker orientation for insertion Alarm Pin Load Return Connections Bus behind Load Connections Return Bus Adapters Face lug studs to the rear Load Connections 1108 COn l OICI 1 sruds on S 8 Qinllglnble Battery Bruk r 1 UUCIS on5 CMCB S OtrottBall ry cem c on 3 8 SIUC Sonl Landings 1 4 20studson5 8 centers Lu...

Page 5: ...nnium II See the Galaxy Millennium II Controller Users Guide for details Step 6 Connect Controller Signals 1 Connect per site engineering instructions Pulsar Plus Connect to J1 J2 J3 J4 and J5 See Information Controller Connections All controller connections are accessible on the left side of the controller with the controller installed Millennium II see Galaxy Millennium II Controller Users Guide...

Page 6: ...fy and edit controller basic configuration parameters per site engineering instructions Pulsar Plus per Galaxy Pulsar Plus Product Manual Millennium II per Galaxy Millennium II Controller Users Guide closed to fully seat the Rectifier Verify the s1 de the converter into the converter slot approximately 3 4 ofthe way Open the faceplate by sliding the faceplate latch tothe left until the faceplate r...

Page 7: ...ng and the typical setting for most networks Controller Alarm Status The display changes colors Green Normal Amber Minor Alarm Red Critical Major Alarm Some alarms may occur during initial installation example thermal probe fail or Major Minor communication fail Clear these alarms Via Controller Display follow the menu path Menu Control Operation Clear Events or Uninstall Equipment Via web pages o...

Page 8: ... with a Daisy Chained series of probes connected to J2 The Probes monitor battery temperature and voltage ES771 required to monitor voltage Bolt the Probe under the terminal connector hardware NOT under the connecting lug IEC Style Molex mini fit SR Style CC848847368 No plug CC848822420 Parameter Range Valve Reg Default Flooded NiCd 50 to 60V 58 50 40 to 51V 44 00 IEC Style CC848847368 No plug Mol...

Page 9: ...QUICK START GUIDE Ordering Codes Descriptions CC109142980 QS873A Thermal Probe Ordering Codes Descriptions ES771A Voltage Monitor Card G 10 ES771A to ES771A or controller wireset Temperature Measurement Temperature and Voltage Measurement ...

Page 10: ...primary customer alarm outputs J4 is a 20 pin latching connector Alarm Inputs Default alarm descriptions may be changed as needed using web pages or Easyview2 J4 is a 10 pin latching connector Standard Controller Alarm Output Defaults Pin Color Option 1 Color Option 2 PCR Power Critical 1 BL BL 11 W BL BK 2 O O 12 W O BK 3 G G 13 W G BK 4 BR W 14 W W BK 5 S BK 15 W BK W 6 BL BL W 16 R BL R 7 O O R...

Page 11: ...Options 1 75A with AC5 and AC6 50A with AC1 and AC3 Rectifier Input Recommended AC Breaker AC1 AC3 AC5 AC6 Eco Rectifier ac 200 240 Vac 50A 40A 20A 20A 40A dc 30 to 150 Vdc 11A max 50A 15A 15A NE075AC48ATEZ Alarm Output Cables Alarm Input Cables CC848890137 5 ft CC848890153 5 ft ...

Page 12: ...uilding cabling grounded at both ends Grounding Bonding Network Connect to an Isolated Ground Plane Isolated Bonding Network or an Integrated Ground Plane Mesh Bonding Network or Common Bonding Network Installation Environment Install in Network Telecommunication Facilities OSP or where NEC applies Battery return may be either Isolated DC return DC I or Common DC return DC C These documents are av...

Page 13: ... ordering guide Size as required by the National Electric Code NEC and or local codes Safety Tested Limits Refer to the equipment ratings to assure current does not exceed Continuous Load List 1 60 of protector rating Maximum Load List 2 typically end of discharge 80 of protector rating GMT Style Fuses Use only fuses provided with safety caps Field wired Conductors Follow all National Electric Cod...

Page 14: ... equipped with ringer modules hazardous voltages will be present on the ringer output connectors Use the following precautions in addition to proper job training and safety procedures Use only properly insulated tools Remove all metallic objects key chains glasses rings watches or other jewelry Follow Lock Out Tag Out LOTO procedures customer specified site specific or general as appropriate Disco...

Page 15: ...Page 15 2021 ABB All rights reserved QUICK START GUIDE Notes ...

Page 16: ...eed particulars shall prevail ABB AG does not accept any responsibility whatsoever for potential errors or possible lack of information in this document We reserve all rights in this document and in the subject matter and illustrations contained therein Any reproduction disclosure to third parties or utilization of its contents in whole or in parts is forbidden without prior written consent of ABB...

Reviews: