Note
Action
xx2200000047
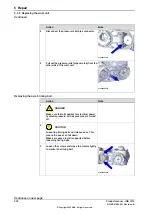
Remove the screws (dark-colored in the figure).
3
xx2200000539
Separate the wrist unit.
4
Connect the power supply to axis-3 motor and
release the axis-3 brake to move the axis 3 to zero
position. Then, disconnect the power supply.
Note
The robot is not connected to the controller during
replacement, power must be supplied to the con-
nector R1.MP according to the section
power to connector R1.MP on page 56
.
5
Refitting the wrist unit
Use these procedures to refit the wrist unit.
Refitting the wrist unit
Note
Action
Connect the power supply to axis-3 motor and
release the axis-3 brake to move the axis 3 to -
90°. Then, disconnect the power supply.
Note
The robot is not connected to the controller during
replacement, power must be supplied to the con-
nector R1.MP according to the section
power to connector R1.MP on page 56
.
1
Route the cable package into the wrist unit.
2
Continues on next page
Product manual - IRB 1010
235
3HAC081964-001 Revision: B
© Copyright 2022 ABB. All rights reserved.
5 Repair
5.4.4 Replacing the wrist unit
Continued
Summary of Contents for IRB 1010
Page 1: ...ROBOTICS Product manual IRB 1010 ...
Page 8: ...This page is intentionally left blank ...
Page 14: ...This page is intentionally left blank ...
Page 36: ...This page is intentionally left blank ...
Page 46: ...This page is intentionally left blank ...
Page 80: ...This page is intentionally left blank ...
Page 306: ...This page is intentionally left blank ...
Page 312: ...This page is intentionally left blank ...
Page 326: ...This page is intentionally left blank ...
Page 328: ...This page is intentionally left blank ...
Page 332: ......
Page 333: ......


