Note/Illustration
Action
xx0200000406
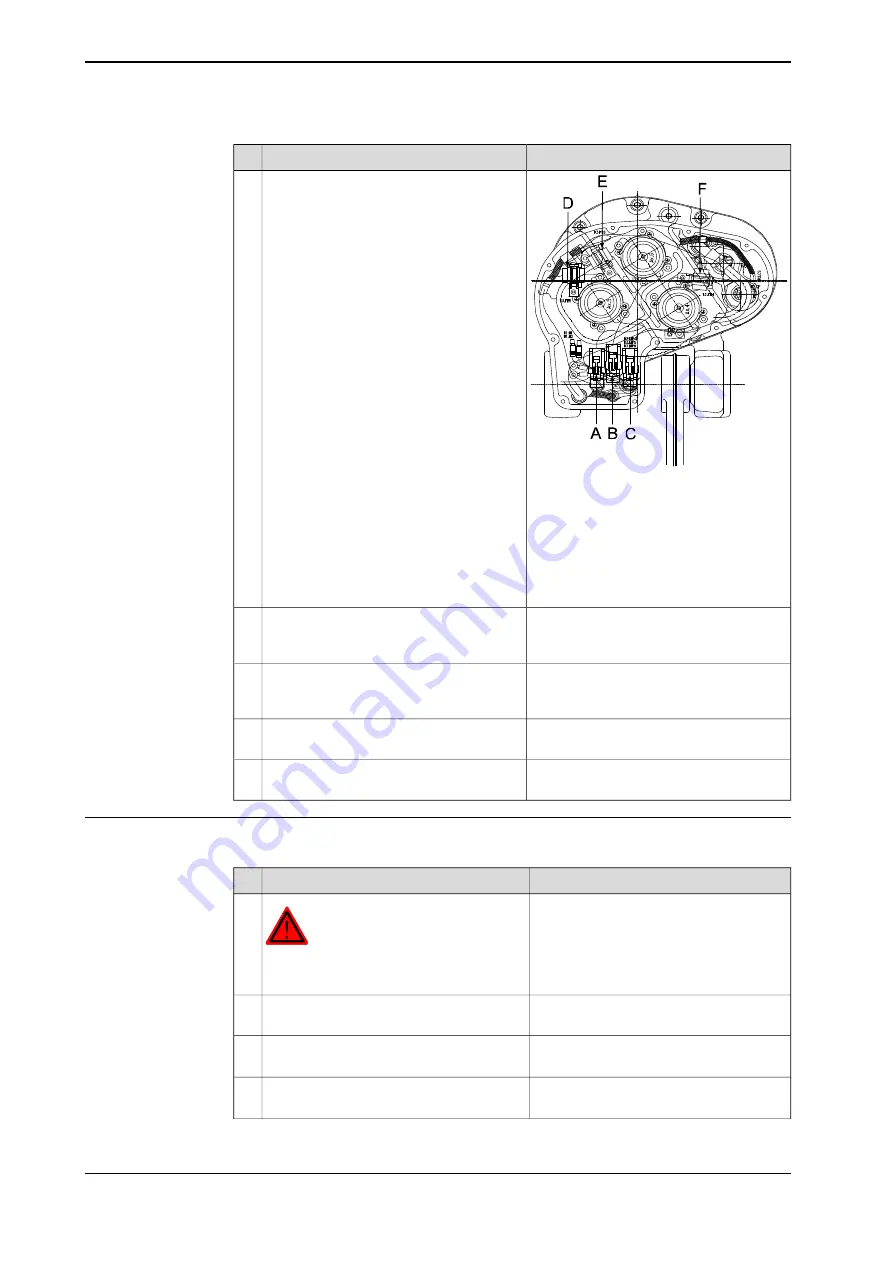
Disconnect the connectors R3.MP4-6 and
R3.FB4-6.
4
A R3.MP5
B R3.MP6
C R3.MP4
D R3.FB5
E R3.FB6
F R3.FB4
Remove the connection box by unscrewing
its three attachment screws and plain
washers.
5
Use a marker pen to mark out the position
of the motors, if same motors are to be re-
fitted.
6
Remove the attachment screws and plain
washers from the motors.
7
Remove the motors by gently lifting them
straight out (horizontal movement).
8
Refitting, motor axis 4
The procedure below details how to refit the motor, axis 4.
Note/Illustration
Action
DANGER
Turn off all electric power, hydraulic and
pneumatic pressure supplies to the robot!
1
Check that the assembly surfaces are clean
and the motor unscratched.
2
Spare part no. is specified in
Fit a new
o-ring
on the motor.
3
Art. no. is specified in
.
Lubricate the gear with bearing grease.
4
Continues on next page
192
Product manual - IRB 2400
3HAC022031-001 Revision: P
© Copyright 2004-2018 ABB. All rights reserved.
4 Repair
4.7.5 Replacement of motors, axes 4-6, IRB 2400/10/16
Continued
Summary of Contents for IRB 2400 Series
Page 1: ...ROBOTICS Product manual IRB 2400 ...
Page 8: ...This page is intentionally left blank ...
Page 18: ...This page is intentionally left blank ...
Page 204: ...This page is intentionally left blank ...
Page 220: ...This page is intentionally left blank ...
Page 232: ...This page is intentionally left blank ...
Page 234: ...This page is intentionally left blank ...
Page 240: ......
Page 241: ......


