3 Replacement procedures
Navigator 550 | Hydrazine wet-section| Spares replacement procedures |
INF13/114–EN
3
3.3 Replacing the constant-head assembly, pressure switch
assembly and pressure switch cable
Part numbers:
Constant-head assembly: AW503 075
Pressure switch assembly: AW503 077
Pressure switch cable: AW503 085
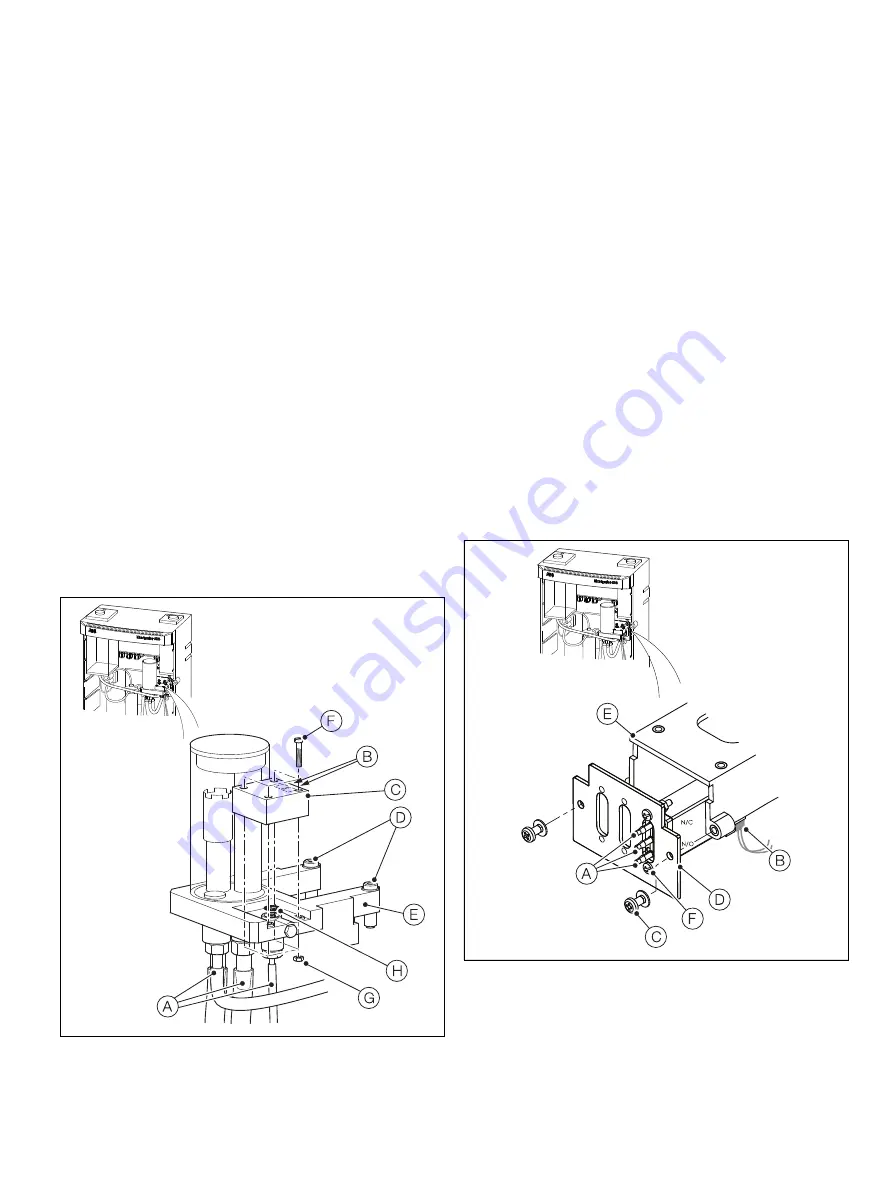
Referring to Fig. 3.5:
1. Remove all tubing
A
to the constant-head assembly.
2. Carefully disconnect the 2 spade connectors
B
at the rear
of pressure switch
C
. If replacing the cable, refer to Section
3.1, page 2, for cable connection details and remove /
discard the cable.
3. Unscrew the 2 securing screws
D
on the upper faces of the
constant head body support arms
E
and remove the
constant-head assembly complete with pressure switch.
4. If replacing the pressure switch, unscrew the 4 retaining
screws
F
(note that the nuts
G
are constrained in the
support bracket and may fall out when screws are removed).
5. Fit a replacement pressure switch and new O-ring
H
in the
reverse order of removal – note the orientation (LOW) is
always uppermost.
6. If replacing the cable, fit in the reverse order of removal and
connect the 2 spade connectors
B
to the rear of the
pressure switch, otherwise re-connect the existing spade
connectors.
7. Secure the constant-head assembly, complete with pressure
switch, in the reverse order of removal.
3.4 Replacing the solenoid valve assembly and solenoid
valve cable
Part numbers:
Solenoid valve assembly: AW503 053
Solenoid valve cable: AW503 080
Referring to Fig. 3.6:
1. Remove all tubing connected to the valve
A
.
2. Unclip the valve cable connector
B
from the valve body. If
replacing cable(s), refer to Section 3.1 for cable connection
details and remove / discard the cable.
3. Unscrew the 2 retaining screws
C
that hold the plate
D
to
the bracket
E
and withdraw the valve assembly
A
and
plate
D
.
4. Unscrew the 2 valve securing screws and nuts
F
and
remove the valve.
5. Ensure the valve cable connector is facing downwards and fit
the new valve assembly to the plate
D
using the 2 valve
securing screws and nuts
F
.
6. Refit the plate
D
to the bracket
E
using the 2 retaining
screws
C
.
7. If replacing the cable, fit in the reverse order of removal and
re-clip the cable connector
B
to the underside of the new
valve body.
8. Reconnect all tubing to the new valve.
Fig. 3.5 Replacing the constant-head assembly, pressure switch assembly
and pressure switch cable
Fig. 3.6 Replacing the solenoid valve assembly and solenoid valve cable
IN/OUT


