background image


Modifications reserved 

Page 28/50


6.2.2


Paralleling of UPS-Cabinets 

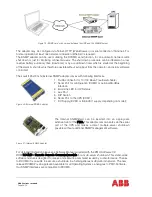
For the correct performance of different parallel functions and operations the parallel units communicate 

continuously between each other. This is achieved by means of the so-called communication BUS-
Lines. 

After terminating the input and output cabling of each single UPS, it is necessary to connect the units 

together to form the parallel system. For this purpose a communication BUS line is connected 

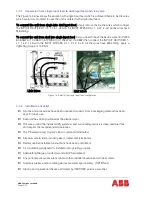
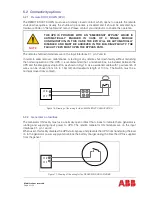
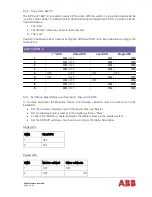
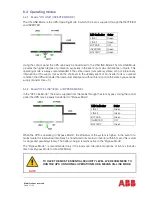
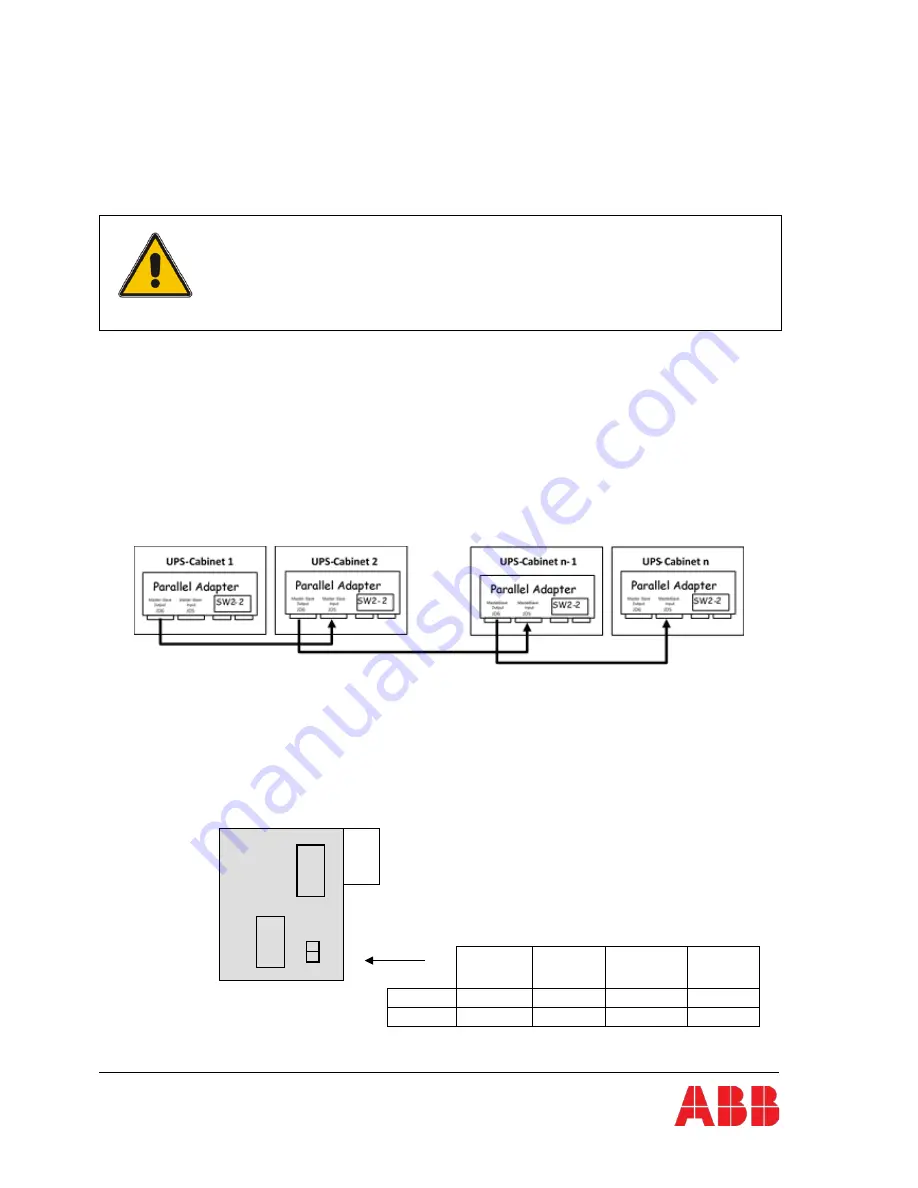
sequentially between the units. Connect communication BUS lines according to Figure 22. 


NOTE 

CONNECT THE BUS CABLES ONLY WITH SWITCHED OFF UPS AND 
OPENED PARALLEL ISOLATORS IA2. RESPECT THE FOLLOWING 

CONNECTION SEQUENCES.


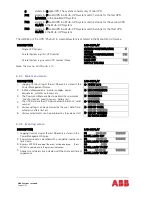
1.


Fit the Parallel Adapter over the Connector JD8 on all UPS-cabinets 

2.


Set DIP Switch SW2-2 on each Parallel Adapter depending on the UPS Cabinet in the parallel 

cabinet configuration (see section 6 chapter 6.1.2.2.2) 

3.


Connect PORT JD6 on Parallel Adapter of UPS-Cabinet 1and PORT JD5 of Parallel Adapter of 

UPS-Cabinet 2 with the corresponding BUS-Cable; 

4.


Connect PORT JD6 on Parallel Adapter of UPS-Cabinet 2 and PORT JD5 of UPS-Cabinet 3 

with the corresponding BUS-Cable 

5.


Continue in the same manner for the remaining UPS-Cabinets. 


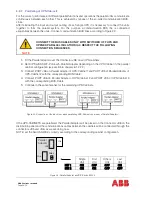
Figure 22: Connection of the Bus Lines when paralleling UPS-Cabinets by means of Parallel Adapters. 


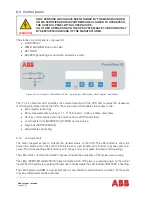
If the UPS-CABINETS are paralleled, the Parallel Adapter will be placed on the Connector JD8 on the 
distribution panel and the communications cables between the cabinets will be connected through the 

connectors JD5 and JD6, as we are doing now. 

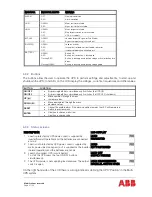
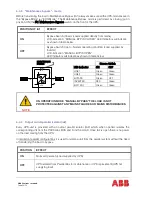
NOTE: set the Switch SW2-2 correctly according to the corresponding cabinet configuration. 


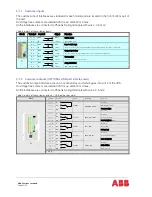
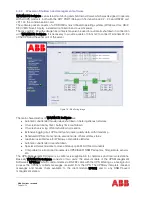
Figure 23: Parallel Adapter and DIP Switch SW2-2


  Single 

Unit 

First 

Unit 

Others 

Unit 

Last 

Unit 

SW 1 

ON 

OFF 

OFF 

ON 

SW 2 

ON 

ON 

OFF 

OFF 

Parallel  

Adapter 


JD 5 


SW2-2


JD6


 JD8 

Summary of Contents for PowerWave 33 Series 3

Page 1: ... Copyright 2017 ABB All rights reserved User Manual PowerWave 33 Series 3 60 120 kW ...

Page 2: ... PERFORMED BY A SERVICE ENGINEER FROM THE MANUFACTURER OR FROM AN AGENT CERTIFIED BY THE MANUFACTURER This user manual contains guidelines for delivery installation and commissioning of the UPS and is intended for personnel who plan the installation commissioning use and service of the UPS The reader is expected to know the fundamentals of electricity wiring electrical components and electrical sc...

Page 3: ...itioning of the UPS and battery cabinet 14 4 2 Electrical installation 16 4 3 Block diagram 17 4 4 Wiring 17 4 4 1 Conversion from single input feed to dual input feed and vice versa 20 4 4 2 Installation checklist 20 5 Connectivity 21 5 1 Customer interface 21 5 1 1 Customer inputs 22 5 1 2 Customer outputs OPTIONAL USB port Relay card 22 5 2 Connectivity options 23 5 2 1 Remote SHUT DOWN EPO 23 ...

Page 4: ...aintenance bypass mode 36 6 4 4 Output switch parallel isolator ia2 36 6 5 Operation procedures 37 6 5 1 Start up procedure 37 6 5 2 Shutdown procedure 38 6 5 3 Load Transfer from Inverter operation to Maintenance Bypass 39 6 5 4 Load Transfer from Maintenance Bypass to Inverter operations 40 7 Maintenance 42 7 1 User responsibilities 42 7 2 Preventative maintenaince 42 7 3 Deep battery test 42 7 ...

Page 5: ...electrical components and electrical schematic symbols NOTE READ THE INFORMATION IN ORDER TO AVOID EQUIPMENT DAMAGE The only user operations permitted are Use of the LCD control panel LCD and of the maintenance bypass Start up and shut down of the UPS user field except during commissioning start up Operation of additional connectivity modules SNMP adapters and their software Modem GSM or modem Eth...

Page 6: ...s symbol in conjunction with the signal word WARNING indicates a potentially dangerous situation Failure to observe the related safety note may cause personnel injury or death or equipment damages IMPORTANT NOTE This symbol indicates operator tips particularly useful or important information for the use of the product This symbol and wording does not indicate a dangerous situation PE Protective Ea...

Page 7: ...operating the UPS must be in the range 0 C to 40 C The Ideal temperature also recommended to achieve a long life of the UPS and VRLA batteries is 20 C to 25 C The relative humidity should be below 95 non condensing and the max altitude without de rating is 1000m above sea level 2 2 CE marking and declaration of safety and emc conformity The product has the CE marking in compliance with the followi...

Page 8: ...UPS MODEL Dimensions w o packaging in mm Dimensions with std packaging in mm Dimensions w wooden box in mm PWAxxxx PowerWave 33 S3 60kW 615 x 19541 x 480 615 x 19782 x 480 615 x 19923 x 480 873x2133x873 884x2182x730 PWAxxxx PowerWave 33 S3 80kW PWAxxxx PowerWave 33 S3 100kW PWAxxxx PowerWave 33 S3 120kW 1 without adjustable feet 2 with adjustable feet adjusted all downwards 3 with adjustable feet ...

Page 9: ...EIPT OTHER CLAIM FOR SHIPPING DAMAGE MUST BE FILED ALSO IMMEDIATELY AND THE CARRIER MUST BE INFORMED WITHIN 7 DAYS OF RECEIPT OF THE EQUIPMENT THE PACKING MATERIALS SHOULD BE STORED FOR FURTHER INVESTIGATION Figure 2 TiltWatch indicator left when intact and right when tipping has occurred 3 2 Storage The packing of the goods protects it from mechanical and environmental damage UPS and Battery cabi...

Page 10: ...ccessory box placed on top of the UPS does not fall down Lower the accessory box with the help of a stool or ladder make sure you are safe by doing that The std content of the accessory box is user manual 2x painted sockets screws 4x feet and keys 3 Remove the bubble film by removing the small type pieces by hand 4 Disassemble the front and back fixing bars see Figure 3 right inside here below as ...

Page 11: ...side view of the lower part of PowerWave 33 S3 with the socket base 5 Figure 5 front view of the lower part of PowerWave 33 S3 showing the adjustable feet 6 Figure 6 side view of the lower part of PowerWave 33 S3 showing the socket and its screws ...

Page 12: ...the edges are not protected 3 Remove the accessories form its location see Figure 8 on the next page The std set of accessories is user manual 2x painted sockets screws 4x feet and keys 4 Tear out the 2x humidity absorber One is inside the front part of the UPS open the door using the keys and then tear out the absorber The other one is at the back as shown in Figure 9 next page 5 Follow the steps...

Page 13: ...ved Page 13 50 3 Figure 8 Photograph of the accessories zone PowerWave 33 S3 front bottom 4 Figure 9 Photographs showing the 2x humidity absorber One on the inside front part of the UPS left and another on the rear right ...

Page 14: ...ling Any kind of dust or corrosive explosive gases must be absent Fire protection standards are respected The place is vibration free The floor material should be non flammable and strong enough to support the heavy load Cabling can be performed easily Available front accessibility of 1m from front of the unit for service or maintenance Only front access is necessary for service and maintenance If...

Page 15: ...Cabinets 60 80 100 120 UPS battery cabinets in row A Back clearance for ventilation forced air outlet 0 mm 100mm 4 B Front clearance needed to allow a correct door opening 1000 mm C Maximum door opening angle 115 D Top Clearance Top clearance is only needed if there is no side clearance 400 mm 4 Battery cabinet requires 100mm clearance for natural ventilation The UPS does not require any back clea...

Page 16: ...F EXPOSURE TO DANGEROUS VOLTAGES PHYSICAL INJURY OR DEATH MAY FOLLOW OR DAMAGE MAY OCCUR TO THE UPS OR THE LOAD EQUIPMENT IF THESE INSTRUCTIONS ARE IGNORED To ensure correct operation of the UPS and its ancillary equipment it is necessary to provide the appropriate wiring and with fuse protection in accordance with the prescribed local standards or with the local regulations law Alternatively refe...

Page 17: ...e the recommended cable sections and fuse rating in the tables 6 and 7 which are according to IEC 60950 1 Table 5 SINGLE INPUT FEED CABLE LINKS TO ACHIEVE SINGLE INPUT ARE OPTIONAL Rated output power Fuse A Type gL or CB quantity x A Cable A quantity x mm2 Cable D quantity x mm2 Fuse E Type gR or CB quantity x A Cable E quantity x mm2 60 kW 3x100 5x 1x35 5x 1x35 2x160 2x 1x50 80 kW 3x125 5x 1x50 5...

Page 18: ...ency Input Freq correspond to the values indicated on the type plate of the UPS The type plate Figure 1 is on the inside part of the door in a center position Make sure that the total power of the load is equal or lower than the rated power of the UPS Output power indicated on the type plate of the UPS PE wiring is performed in accordance with the prescribed IEC Standards or with local regulations...

Page 19: ...verview and tightening torque PW33 S3 Model Input Rectifier Input Bypass Output Batt N Batt PE Tightening torque Nm 60 kW 2xM8 1xM8 1xM8 2xM8 1xM10 5xM8 5xM8 12 3 M8 25 1 M10 80 kW 2xM8 1xM8 1xM8 2xM8 1xM10 5xM8 5xM8 12 3 M8 25 1 M10 100 kW 2xM8 1xM8 1xM8 2xM8 1xM10 5xM8 5xM8 12 3 M8 25 1 M10 120 kW 2xM8 1xM8 1xM8 2xM8 1xM10 5xM8 5xM8 12 3 M8 25 1 M10 ...

Page 20: ...ing apply a tightening torque of 12 3 Nm Link wires Link wires Figure 14 Detail of the single input feed configuration 4 4 2 Installation checklist All units and accessories have been unpacked properly Some packaging material has been kept for future use Each unit has been positioned at the planned spot The area around the installed UPS system s and surrounding devices is clean and dust free and r...

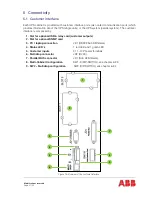
Page 21: ...d by 1 Slot for optional USB relay card customer outputs 2 Slot for optional SNMP card 3 PC laptop connection JD1 RS232 Sub D9 female 4 Status LED s 1 red LED and 1 green LED 5 Customer inputs X1 1 10 Phoenix terminals 6 Multidrop connector JR2 RJ 45 7 Parallel BUS connector JD1 Sub D25 female 8 Multi Cabinet Configuration SW1 9 DIP SWITCH see chapter 6 2 3 9 SW2 Multidrop configuration SW2 DIP SW...

Page 22: ...1 3 IN 12Vdc Function on request to be defined X1 2 GND GND GEN_OPERATION X1 1 IN 12Vdc NC Generator ON 5 1 2 Customer outputs OPTIONAL USB port Relay card The customer output interfaces are on an optional relay card which goes into slot 2 of the UPS All voltage free contacts are rated 60 VAC max and 500 mA max All the interfaces are connected to Phoenix Spring terminals with wires 0 5 mm2 Table 9...

Page 23: ...hut down facility without disturbing the normal operation of the UPS it is recommended that a terminal block be installed between the UPS and the emergency stop button as shown in Fig 13 Use a screened cable with 1 pair section of wires can be chosen from 0 5 to 1 5mm2 and maximum length of 100 m The Switch must be a normally closed dry contact Figure 16 Drawing of the wiring for the REMOTE SHUT D...

Page 24: ...r slave shutdown in heterogeneous networks On screen autonomy time battery time countdown On screen server log off and shutdown procedure Extensive logging of all UPS activity and power quality data with timestamp Scheduled UPS economy mode service mode other systems status Graphical user interface for Windows compatible platforms Automatic unattended local shutdown Special software modules to clo...

Page 25: ...uation The real Battery autonomy time of the whole parallel system is computed continuously Maintenance on a redundant unit may be executed without annoyance to the management system supervisor In order to be managed a UPS can be integrated into a network in two ways 1 By means of the server which is being powered by the UPS and is integrated in the network In most of the cases the server is used ...

Page 26: ...ial Port for configuration COM2 or optional ModBus interface 3 Error Link LED for UPS status 4 Aux Port 5 DIP Switch 6 Serial Port to the UPS COM1 7 DC Supply 9 VDC or 9 36 VDC supply depending on model Figure 20 External SNMP Adapter The Internal SNMP Card can be inserted into an appropriate extension slot of the PMC This adapter communicates via the serial port of the UPS and makes a direct mult...

Page 27: ...corresponding unit from the parallel system Once the parallel isolator IA2 of a unit is open that unit module is isolated from the rest of the parallel system and therefore does not provide power to the output For example if you perform the command LOAD TO BYPASS on any unit all the units will transfer the load simultaneously to mains and if you perform the command LOAD TO INVERTER on any unit all...

Page 28: ...ending on the UPS Cabinet in the parallel cabinet configuration see section 6 chapter 6 1 2 2 2 3 Connect PORT JD6 on Parallel Adapter of UPS Cabinet 1and PORT JD5 of Parallel Adapter of UPS Cabinet 2 with the corresponding BUS Cable 4 Connect PORT JD6 on Parallel Adapter of UPS Cabinet 2 and PORT JD5 of UPS Cabinet 3 with the corresponding BUS Cable 5 Continue in the same manner for the remaining...

Page 29: ... UPS 1 ON OFF ON ON 2 ON OFF ON ON 3 ON OFF ON ON 4 ON OFF ON ON 5 OFF OFF OFF OFF 6 OFF OFF ON ON 7 ON OFF OFF ON 8 ON OFF ON ON 9 ON OFF ON ON 6 2 4 Multidrop Master Slave configuration Dip switch SW2 To correctly implement the Multidrop feature the following operation must be carried out on the installation Set the customer interface board in the master frame as Master Set all remaining board s...

Page 30: ...nts such as U I f P Q S load battery runtime and others Perform commands like start up and shut down of UPS and others Load transfer from INVERTER to BYPASS and vice versa Diagnosis SERVICE MODE Adjustments and testing 6 3 1 Led indicators The mimic diagram serves to indicate the general status of the UPS The LED indicators show the power flow status and in the event of mains failure or load trans...

Page 31: ...ON OFF ON OFF By pressing both keys simultaneously it switches the UPS ON By pressing both keys simultaneously it switches the UPS OFF shutdown UP Move upwards through the menu Increase values DOWN Move downwards through the menu decrease values RESET Cancel the audible alarm If the alarm condition remains the LED will remain red Return to previous menu ENTER Confirms a chosen menu item Confirms a...

Page 32: ...the Power Management Display EVENT LOG MEASUREMENTS 2 In Menu Measurements monitor voltages power frequencies currents autonomy etc MEASUREMENTS COMMANDS 3 The Command Menu enables to perform the commands Load to inverter Load to bypass battery test COMMANDS UPS DATA 4 The UPS Data are the UPS personalized information serial number UPS DATA SET UP USER 5 Various settings can be performed by the us...

Page 33: ...Active Output Power of all three phases ACTIVE POWER KW 00 0 00 0 00 0 12 Reactive Output Power of all three phases REACTIVE POWER kVAr 00 0 00 0 00 0 13 Apparent Output Power of all three phases APPARENT POWER KVA 00 0 00 0 00 0 14 Output Power of all three phases OUTPUT POWER 00 00 00 15 Battery capacity BATT CAPACITY 00 16 Battery temperature BATTERY TEMPERATURE 00 0 17 Booster BST Inverter INV...

Page 34: ...RIPTION LCD DISPLAY 1 Set up Language SET LANGUAGE SET DATE AND TIME 2 Set up Date and Time SET DATE AND TIME SET UP BATT TEST DD MM YY HH MM SS 3 Set up battery test SET BATTERY TEST SET GENERATOR OP DAY OF MONTH 1 31 HOUR OF DAY 1 24 REPETITIVE Y N YES NO 4 Set up operation with Gen Set SET GENERATOR OP NO MORE SETTINGS BATT CHARGE LOCK YES NO BYPASS LOCK YES NO 6 3 10 Set up service DESCRIPTION...

Page 35: ...r time 0 6 4 2 Mode OFF LINE ECO or BYPASS MODE In the OFF Line Mode the load is supplied from the mains through the static bypass Using the control panel the UPS may be easily transferred to Bypass Mode When the UPS is operating in Bypass Mode the efficiency of the system is higher In the event of a mains failure the load will automatically be transferred from mains to inverter within 5 msec this...

Page 36: ...table below Bypass Switch LED Indicator ON OFF LINE 1 Green Green LINE 2 Green Green BYPASS Green OFF INVERTER RED Green BATTERY Green Green NOTE ON OPERATION MODE MANUAL BYPASS THE LOAD IS NOT PROTECTED AGAINST ANY MAINS FAILURES OR MAINS DISTURBANCES 6 4 4 Output switch parallel isolator ia2 Every UPS unit is provided with an output parallel isolator IA2 which when opened isolates the correspond...

Page 37: ... fuses for the supply of UPS System in the Input Distribution 2 Close Input Switch IA4 and Bypass Switch IA3 The LED indicator LINE 1 on UPS Module is lit green On LCD Display LOAD OFF SUPPLY FAILURE will appear 3 UPS 1 Press both ON OFF Main Buttons to switch on UPS Wait until the LED indicators will appear as shown below LED Indicator Colour LINE 1 Green LINE 2 Green BYPASS OFF INVERTER Green BA...

Page 38: ...ate as shown below LED Indicator Colour LINE 1 Green LINE 2 Green BYPASS Green INVERTER RED BATTERY Green 13 Connect Load to the UPS Output Insert fuses in output Distribution Board Verify on control Panel that the load is on bypass 14 Open Maintenance Bypass Switch IA1 On LCD MANUAL BYP IS OPEN will appear 15 Check on LCD the Output Powers Voltages Currents and Frequencies 16 Load transfer to Inv...

Page 39: ...F Buttons on UPS Control Panel On the LCD LOAD OFF SUPPLY FAILURE will appear and the LED indicator will indicate as shown below LED Indicator Colour LINE 1 Green LINE 2 OFF BYPASS OFF INVERTER OFF BATTERY Green 3 Open all Parallel Isolator Switches IA2 4 Open battery fuses breakers on external battery cabinets or racks 5 Open the Input Switch IA4 and Bypass Switch IA3 6 Open the main fuses breake...

Page 40: ...een INVERTER RED BATTERY Green 4 Press simultaneously the two ON OFF buttons on the UPS control panel PMD on all control panels On the LCD s message LOAD OFF SUPPLY FAILURE will appear and the mimic panel will show LED Indicator Colour LINE 1 Green LINE 2 OFF BYPASS OFF INVERTER OFF BATTERY Green 5 Open the Output Switch IA2 Input Switch IA4 and Bypass Switch IA3 on all UPSs 6 Open battery fuses b...

Page 41: ...F buttons on the UPS control panel PMD Unit will start up and after about 60 seconds the mimic panel will show LED Indicator Colour LINE 1 Green LINE 2 Green BYPASS Green INVERTER Red BATTERY Green 6 Make sure that the bypass LED is green then open the Maintenance Bypass Switch of each unit position OFF 7 The message MANUAL BYP IS OPEN will appear on the LCD and the mimic panel will show as below ...

Page 42: ...ty and reliability of the UPS system When the UPS is commissioned the commissioning field service engineer will attach a service record book to the front of the UPS and this will be used to record the full service history of the UPS During a preventative maintenance the field service engineer might carry out some or all of following checks Status and function check of UPS and batteries UPS and bat...

Page 43: ...de 7 4 Battery maintenance disposal and recycling The battery maintenance shall be done by a certified Service Partner To ensure an optimum operation of the UPS system and a continuous and efficient protection of the connected load it is recommended to check the batteries every 12 months Batteries contain dangerous substances that will harm the environment if thrown away If you change the batterie...

Page 44: ...prescribed tolerance The input power to UPS is too low or missing If site power appears to be OK check the input circuit breakers etc supplying the UPS OUTPUT SHORT There is a short circuit at the output of UPS on load side Check all output connections and repair as required OVERLOAD Load exceeds the UPS rated power Identify which piece of equipment is causing the overload and remove it from the U...

Page 45: ...treatment 9 1 UPS and material disposing Whenever the UPS has to be disposed it is mandatory to contact any local recycling or disposing treatment facility They will assure a proper disposing of the unit recycling separation for special treatment etc ...

Page 46: ...Modifications reserved Page 46 50 10 Attachments 10 1 Technical data sheet ...

Page 47: ...Contact us www abb com ups ups sales ch abb com Copyright ABB All rights reserved Specification subjects to change without notice ...

Page 48: ......

Page 49: ... Copyright 2016 ABB All rights reserved Technical data sheet PowerWave 33 Serie 3 60 120 kW ...

Page 50: ... on the description of the Fuse E in tables 13 and 14 Type gR or CB 140730 9 1 Added Acoustic noise acc to IEC 62040 3 figures 30 07 2014 9 2 Added rated short time withstand current ICW figure 9 3 Added Eco mode efficiency linear load figure 9 3 Added AC AC efficiency in normal mode linear load figures for each model 9 7 Added head dissipation without load figures 9 8 Corrected the recommended wi...

Page 51: ...ut characteristics 6 4 Output characteristics 7 5 Battery characteristics 9 6 User interface communication 10 6 1 Display mimic diagram 10 6 2 Customer inputs 11 6 3 Customer outputs optional usb port relay card 11 7 Installation planning 12 8 Heat dissipation 13 9 Cable and fuse recommendations 14 ...

Page 52: ...e When operating in parallel configuration each POWERWAVE 33 can take the leadership role avoiding single points of failure in the parallel chain ensuring the highest level of power availability The most demanding Data Canters starts with low power before achieving its full capacity It is in this case essential to be able to recover the missing power requirement without risk for the applied load P...

Page 53: ...th height depth 615x1954x480 or with feet 615x1978x480 mm Weight w o batteries 198 206 228 230 kg Acoustic noise acc to IEC 62040 3 in normal mode at 25 C at 100 50 Load 64 59 64 60 64 61 64 59 dBA in battery mode at 25 C at 100 50 Load 64 59 64 60 64 61 64 59 SAFETY Access operator Degree of protection against hazards and water ingress IP 20 ELECTROMAGNETIC COMPATIBILITY Compliant to IEC 62040 2 ...

Page 54: ...state r m s 380 220 400 230 415 240 VAC Tolerance referred to 400 230V 10 15 at 100 load 20 15 at 80 load 30 15 at 60 load Frequency rated 50 Hz Tolerance referred to 50Hz 30 40 Current r m s rated with battery charged and input 400 230V 92 122 152 183 A Current r m s maximum with charging batt and input 400 230V 101 134 167 201 A Total harmonic distortion THDi 4 at 100 load In rush current A or o...

Page 55: ... in normal mode battery mode 1 5 1 5 Total harmonic distortion THDu 100 load normal mode Linear 2 0 Non linear acc to IEC 62040 3 4 0 Total harmonic distortion THDu 100 load battery mode Linear 2 0 Non linear acc to IEC 62040 3 4 0 Voltage unbalance and phase displacement 100 load unbalance 0 Voltage transient and recovery time 100 step load Linear 4 Non linear acc to IEC 62040 3 4 Transfer normal...

Page 56: ...AC efficiency in normal mode linear load 100 load 95 5 1 95 5 1 95 7 1 95 7 1 75 load 95 8 1 95 8 1 96 0 1 96 0 1 50 load 96 0 1 96 0 1 96 0 1 96 0 1 25 load 95 0 1 95 0 1 95 0 1 95 0 1 Eco mode efficiency linear load 99 0 Bypass automatic static switch Transfer time inverter bypass bypass inverter in eco mode 1 5 6 ms Rated current 87 116 145 174 A Fault clearing capability bypass mode for 20 ms ...

Page 57: ...x power charger capability 18 24 30 30 kW Floating voltage VRLA NiCd 2 25 1 40 VDC End of discharge voltage VRLA NiCd 1 65 1 05 R M S ripple current of the battery capacity 2 Temperature compensation optional Battery test automatic and periodic battery test selectable 1 Tolerances of 0 2 applies 2 With recommended fuses see section 1 9 3 IMPORTANT NOTES Autonomies 60 min are only allowed for loads...

Page 58: ...o perform commands like start up and shut down of UPS or load transfer from UPS to BYPASS and vice versa and finally it serves for the DIAGNOSIS SERVICE MODE for adjustments and testing The mimic diagram located under the logo Figure 1 serves to give the general status of the UPS The LED indicators show the power flow status and in the event of mains failure or load transfer from inverter to bypas...

Page 59: ...1 3 IN 12Vdc Function on request to be defined X1 2 GND GND GEN_OPERATION X1 1 IN 12Vdc NC Generator ON 6 3 Customer outputs optional usb port relay card The customer output interfaces are on an optional relay card which goes into slot 2 of the UPS All voltage free contacts are rated 60 VAC max and 500 mA max All the interfaces are connected to Phoenix Spring terminals with wires 0 5 mm2 Table 2 d...

Page 60: ...nce for ventilation forced air outlet 0 mm 100mm 4 B Front clearance needed to allow a correct door opening 1000 mm C Maximum door opening angle 115 D Top Clearance Top clearance is only needed if there is no side clearance 400 mm 4 Battery cabinet requires 100mm clearance for natural ventilation The UPS does not require any back clearance Accessibility Totally front accessible for start up and ma...

Page 61: ...nt to top Heat Dissipation with 100 linear load W 2850 3800 4750 5700 BTU 9730 12970 16220 19460 Heat Dissipation with 100 non lin load acc to 62040 3 W 3158 4211 5264 6316 BTU 10778 14371 17964 21557 Airflow 25 30 C with 100 non lin load m3 h 1600 1300 1500 1600 Heat Dissipation without load W 410 530 640 640 ...

Page 62: ... 3x160 5x 1x70 5x 1x70 2x250 2x 1x120 or 2x 2x50 42 45 batt blocks 2x 1x95 46 50 batt blocks 120 kW 3x200 5x 1x95 5x 1x95 2x300 2x 1x150 or 2x 2x50 42 45 batt blocks 2x 1x120 or 2x 2x50 46 50 batt blocks Table 5 DUAL INPUT FEED STANDARD VERSION Rated output power Fuse B Type gL or CB qty x A Cable B qty x mm2 Fuse C Type gL or CB qty x A Cable C qty x mm2 Cable D qty x mm2 Fuse E Type gR or CB Cab...

Page 63: ...Contact us www abb com ups ups sales ch abb com Copyright ABB All rights reserved Specification subjects to change without notice ...

Reviews: