

4
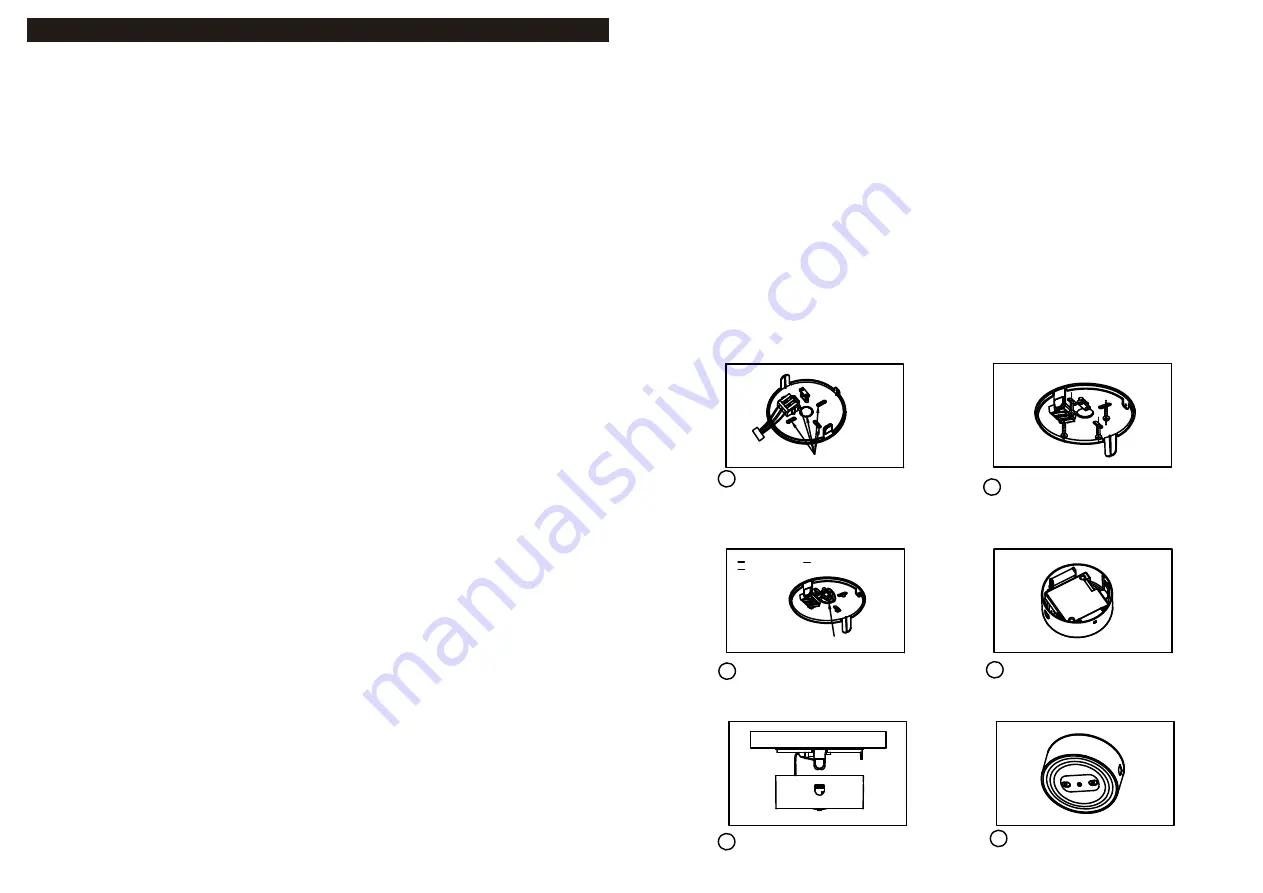
Connect battery connector.
Remove screw then open fixture,
Pull out AC cable connector from
PCBA knock out center hole on
back plate.
1
Install back plate on appropriate
ceilling surface.
2
Feed the power cable through
the knock hole and connect
to terminal block on fixture.
3
L Live (Brown)
N Neutral (Blue)
knock
VDE H03VVH2-F 0.75 X 2C
VDE H03VVH2-F 0.75 X 2C
INSTALLATION
SL Maintained or
N
on- maintained
CAUTIONS
3 of 4
2 of 4
INSTALLING AND CONNECTING
The luminaire should be connected to the voltage equivalent to that indicated on the type label.
The surface mounted luminaire is fitted with a terminal block suitable for loop-in-loop-out connection.
For further information on the different connection possibilities, see the instructions in this instruction
leaflet.
PLEASE NOTE!
Constant voltage is required and the batteries must be sufficiently charged for emergency lighting to
function properly. Failure to observe this requirement can damage the batteries, the light source or
in worst-cast scenario the luminaires electronics.
INSPECTION AND MAINTENANCE
The company strongly advises annual inspection of your emergency lighting installation.
English
Carefully read this instruction leaflet before installing or using the luminaire. This leaflet provides
important information about the correct installation, use, maintenance and disposal of this product.
Please observe the following guidelines:
1. The luminaire should only be installed by qualified personnel. Installation must be in accordance
with European installation requirements HD 60364 and additional local regulations.
2. This product may not be modified in any way what so ever or used for a purpose or in an environment
other than for which it is designed. Failling to observe these guidelines will invalidate the warranty
and the CE-compliance of this product.
3. The luminaire is suitable for indoor use only
4. Before installing the luminaire, the supply must be isolated.
5. The light source in this luminaire is non-replaceable.
The luminaire will, under no circumstances, be covered with insulating material or similar material
only PrimEvo
Replace the battery when the battery no longer meets its rated duration of operation (see the label of
battery replacing).
GENERAL INFORMATION
LED emergency light, down light style, self-contained lighting, for path way and door light used
optional.
LED light source provides low power consumption and long life. Enclosure is made by polycarbonate,
recessed mounting or surface mounting.
PRECAUTIONS
This product should be installed by a registered electrician in accordance with local standards and
electrical regulations. Take care to ensure the mains supply is isolated before installation. Check the
unit label for correct supply voltage and frequency.
SERVICE AND OPERATION
Normal Operation
: The green indicator light on the bottom unit stays on.
The LED will go out if the mains supply fails, if the internal charger is malfunctions, or if the unit is in
test mode. The fixture must be charged for 24 hours after installation.
Battery
: Sealed Nickel-Cadmium rechargeable battery pack. Batteries of a different type must not
be used. Batteries should be replaced by authorised service personnel only. If the unit no longer
maintains its rated battery backup test times. Should only be replaced by competent service
personnel with manufacturers battery pack. Old Battery's should be recycled.
Test Switch
: If pressed the test switch, LED indicator will go out and the fixture will operate from its
battery supply.
5
Press the test switch, indicator
will go out, emergency light will
light on.
6
S
na
p fixture housing ass
emble
on back plate, install screw,
r
estore power supply.
SM100E


