background image


1VAL255104-MB 

Rev C 


R-MAG

®

 Medium Voltage Outdoor Dead 

Tank Vacuum Magnetic Circuit Breaker  

Instruction Manual  
38kV 1250/2000A 


Summary of Contents for R-MAG 38kV 1250/2000A

Page 1: ...1VAL255104 MB Rev C R MAG Medium Voltage Outdoor Dead Tank Vacuum Magnetic Circuit Breaker Instruction Manual 38kV 1250 2000A ...

Page 2: ... OPERATIONAL CHECK PRIOR TO INSTALLATION ELECTRICAL CLOSE OPEN 9 8 INSTALLATION 9 8 1 Mounting 9 8 2 Grounding 9 8 3 Arrester Protection 10 8 4 Control Power 10 8 5 Final Inspection 10 9 INSPECTION MAINTENANCE AND ADJUSTMENT 11 9 1 Maintenance Steps 11 9 2 High Pot Test 12 9 3 Measuring Contact Travel 12 10 38 kV R MAG ELECTRICAL SPECIFICATIONS 24 10 1 Typical Current Transformer Connections 26 10...

Page 3: ...inet Layout 20 Figure 10 Typical Schematic Diagram 21 Figure 11 Typical Outline 1250 A 22 Figure 12 typical Outline 2000 A 23 Figure 13 Breaker Nameplate 28 List of Tables Table 1 R MAG 38 kV 31 5 kA Ratings 24 Table 2 R MAG 38 kV 40 kA Ratings 25 Table 3 Typical Current Transformer Connections 26 Table 4 Auxiliary Switch Current Specifications 27 Table 5 Control Board Voltage Requirements 27 All ...

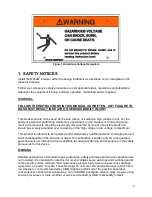
Page 4: ... voltage or low voltage compartment This product is intended to be operated and maintained by qualified persons thoroughly trained and knowledgeable of the hazards involved This publication is written only for such qualified persons and is not intended to be a substitute for adequate training and experience in the safety procedures for this device WARNING Detailed descriptions of standard repair p...

Page 5: ...tested at the factory prior to shipment This equipment was packed and shipped in factory new condition If damage is noted call the carrier at once for inspection and request an inspection report File a formal claim with the carri er supported with paid freight bill inspection report and invoice The local ABB Sales Office must be notified This must be done within 10 days of receipt or receiver assu...

Page 6: ...gized to maintain the warranty The mechanism and control compartment is equipped with heaters to reduce condensation 4 GENERAL DESCRIPTION 4 1 High Voltage Assembly Do not remove HV covers unless the breaker is visibly disconnected and grounded due to the risk of death or serious injury The high voltage section of the R MAG breaker consists of three individual phase assemblies Each phase of the R ...

Page 7: ... magnets inside the actuator are extremely powerful with the potential to trap fingers 4 4 Actuator Controller The actuator control board in the R MAG breaker consists of a power supply position indication switching assembly and capacitor charging system Refer to Appendix A for an overview of the actuator controller 5 STANDARD PRODUCTION TESTS Standard production tests include 1 Verification of al...

Page 8: ...he actuator has completed the stroke The additional movement of the operating rod after the contact closing causes the contact pressure spring to compress at the top of the operating rod This wipe allows for contact wear in service 6 2 Opening When the bottom coil is energized the magnetic flux opposes the force generated by the magnet assembly This reduces the holding force the armature is releas...

Page 9: ...lose button is pressed Note In the event of a malfunction or loss of source voltage the Ready light will not be illuminated 8 INSTALLATION The breaker must be vertical level and securely fastened Follow your company guidelines and codes for setting the height of the breaker securing the frame to the pole or foundation and making connections 8 1 Mounting The breaker is normally shipped suitable for...

Page 10: ...g the breaker the following points of inspection are recommended 1 Ensure the breaker is properly leveled and securely anchored 2 Make a final check of tightness of all hardware 3 Check that the heaters work 4 Verify that all barriers in high voltage compartment are in place if removed during inspection 5 Securely tighten terminal and ground connections 6 An A C Hi Pot test should be performed to ...

Page 11: ...ker reliability The following check list is a minimum guide 1 Check the phase assemblies for external damage and clean if contamination is evident 2 Lubricate wear points and all pins in linkage assemblies with grease Use only Dow Corning 55 silicone lubricants 3 Verify that the breaker operates correctly using the electrical controls 4 An AC Hi Pot test can be performed to verify the vacuum integ...

Page 12: ...g Connect the high voltage to the other set of terminals See Figure 11 Typical Outline 2000 A and Figure 12 Typical Outline 2000 A for positioning 2 Stand clear more than one meter from the breaker before energizing the high voltage source 3 Do not exceed 64 kV Test duration is one minute 4 If internal flashover occurs isolate the phases and test each one independently to identify the defective in...

Page 13: ...13 2 Connect the transducer to the rod s end as shown below 3 Connect the transducer to the motion analyzer ABB utilizes a Kocos ACTAS P14 4 Connect the AMP meter to the actuator coil cables ...

Page 14: ...the result is different from the suggested range of 0 157 in 0 177 in 4 0 mm 4 5 mm turn the pushrod s end clockwise to increase wipe or counter clockwise to decrease wipe depending on the adjustment needed to achieve a measurement within the specified range ...

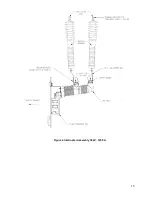
Page 15: ...15 Figure 4 Interrupter Assembly 38 kV 1250 A ...

Page 16: ...16 Figure 5 Interrupter Assembly 38 kV 2000 A ...

Page 17: ...17 Figure 6 Trip Handle ...

Page 18: ...0A 31 5kA 200kV BIL Figure 7 ABB R MAG Vacuum Interrupter Electrical Switching Life Curves 31 5 kA 10 100 1000 10000 100000 0 1 1 10 100 Current kA rms Life in Number of Operations 10 100 1000 10000 100000 0 1 1 10 100 Current kA rms Life in Number of Operations ...

Page 19: ...19 Type R MAG 38kV 40 kA Figure 8 ABB R MAG Vacuum Interrupter Electrical Switching Life Curves 40 kA ...

Page 20: ...20 Figure 9 High Voltage Cabinet Layout ...

Page 21: ...21 Figure 10 Typical Schematic Diagram ...

Page 22: ...22 Figure 11 Typical Outline 1250 A ...

Page 23: ...23 Figure 12 Typical Outline 2000 A ...

Page 24: ... Interrupting Ratings Symmetrical RMS 31 5kA Asymmetrical RMS 36 2kA TRV Peak for 100 Terminal Faults 71 1kV TRV Time to Peak T2 63µsec Peak Withstand Current Same as Close and Latch 81 9kA D C Component referred to time constant 45ms 40 Short Line Fault 28 35kA Out of Phase Switching Current 7 88kA Double Earth Fault IEC 27 4kA Load Current Switching 1250A 2000A Rated Back to Back Switching Class...

Page 25: ... Permissible Tripping Delay Y 2 seconds Reclosing Time 0 3 seconds Interrupting Ratings Symmetrical RMS 40 kA Short Time Current 40 kA TRV Peak for 100 Terminal Faults 71 7kV TRV Time to Peak T3 59µsec Peak Withstand Current Same as Close and Latch 104kA D C Component referred to time constant 45ms 40 Short Line Fault 36 1kA Out of Phase Switching Current 10 5kA Load Current Switching 1250A 2000A ...

Page 26: ... 5 X1 X4 400 5 X1 X4 800 5 X3 X5 450 5 X3 X5 900 5 X2 X5 500 5 X2 X5 1000 5 X1 X5 600 5 X1 X5 1200 5 2000 5 MULTI RATIO CURRENT TRANSFORMER 3000 5 MULTI RATIO CURRENT TRANSFORMER TERMINAL RATIO TERMINAL RATIO X3 X4 300 5 X3 X4 300 5 X1 X2 400 5 X4 X5 500 5 X4 X5 500 5 X3 X5 800 5 X2 X3 800 5 X1 X2 1000 5 X2 X4 1100 5 X2 X3 1200 5 X1 X3 1200 5 X2 X4 1500 5 X1 X4 1500 5 X2 X5 2000 5 X2 X5 1600 5 X1 ...

Page 27: ...PUTS AC KM10051 2 INCLUDES TRIP AND CLOSE 20 4 VOLTS TO 264 VOLTS OPENING COMMANDS CAN GO AS LOW AS 16 8 VAC 20 4 VOLTS TO 264 VOLTS OPENING COMMANDS CAN GO AS LOW AS 16 8 VAC BINARY INPUTS DC KM10051 INCLUDES TRIP AND CLOSE 20 4 VOLTS TO 264 VOLTS OPENING COMMANDS CAN GO AS LOW AS 16 8 VDC 20 4 VOLTS TO 264 VOLTS OPENING COMMANDS CAN GO AS LOW AS 16 8 VDC AUXILIARY POWER AC KM10031 20 4 VOLTS TO ...

Page 28: ...specific and change when knowledge of materials increases The materials used in this product are typical for electric and electronic devices All parts used in this product are recyclable When disposing of a R MAG or its parts contact a local waste handler who is authorized and specialized in disposing electronic waste including lead acid batteries These handlers can sort the material by using dedi...

Page 29: ...29 APPENDIX A INSTALLATION MAINTENANCE INSTRUCTIONS R MAG Medium Voltage Vacuum Power Circuit Breaker ...

Page 30: ...5 Unit Ready KM1004 Pins 9 and 10 35 4 6 Unit Not Ready KM1004 Pins 11 and 12 35 4 7 Circuit Breaker Remote Open KM1004 Pins 13 and 14 35 5 FEATURES 37 5 1 Temperature Protection 37 5 2 Actuator Close and Trip Coil Continuity Monitor 37 5 3 Wrong Position Auto Trip 37 5 4 Energy Failure Auto Trip 37 5 5 Reduced Power Consumption 38 5 6 RS 232 Port JTAG Communication Port 38 6 POWER CONSIDERATIONS ...

Page 31: ...g 46 Apx Figure 8 Standard Actuator Control Board and Pin Assignments 47 Apx Figure 9 Control Board with Terminal Numbering 54 Apx Figure 10 Control Board Simplified 54 Apx Figure 11 ED2 0 Control Board Parts and Mounting 55 List of Tables Apx Table 1 DIP Switch Thresholds 34 Apx Table 2 Output Contact Specifications 36 Apx Table 3 CB Operation vs Available Capacitor Charge 38 Apx Table 4 Circuit ...

Page 32: ...oftware configurations auxiliary contacts capacitor charge and switches the FET circuit to connect the capacitor voltage to the Magnetic Actuator coils following an open or close command The Capacitor Storage Unit consists of four 0 1 farad aluminum electrolytic capacitors connected in parallel to provide a total capacitance of 0 4 farads When called to energize the Magnetic Actuator coils the cap...

Page 33: ...re around 14 kΩ input Z There are seven different input channels Only six of them are used for the R MAG breaker channel 5 is not used 3 1 Remote Close KM1005 CH 1 Pins 1 and 2 The Remote Close input is used to close the breaker remotely The input impedance is approxi mately 15 kΩ 3 2 Remote Open KM1005 CH 2 Pins 3 and 4 The Remote Open input is used to trip the breaker remotely The input impedanc...

Page 34: ...osed When the circuit breaker is tripped by operating the manual trip handle the breaker will go into the Close Block mode This prevents any future closings until the trip handle is returned to the normal position The manual trip handle must be left in the down position for the switch to remain open i e locked open There is a padlock provision for locking the manual trip handle in the locked open ...

Page 35: ...ally open They close only when the circuit breaker is in the Closed position 4 3 Circuit Breaker Auxiliary Open KM1004 Pins 5 and 6 The Circuit Breaker Auxiliary Open contacts close whenever the breaker is in the Open position 4 4 Circuit Breaker Auxiliary Closed KM1004 Pins 7 and 8 An additional set of normally open contacts close whenever the breaker is in the Close position 4 5 Unit Ready KM100...

Page 36: ...um Actuating Time 5 0 milliseconds Maximum Releasing Time 3 0 milliseconds INSULATION Between Contacts and Coil 4000 Vrms 50 Hz 1 min Between Open Contact 1000 Vrms 50 Hz 1 min Resistance Roff 1000 MΩ at 500 VDC ENVIRONMENTAL CHARACTERISTICS Operating Temperature Range 50 to 55 Degrees C Storing Temperature Range 40 to 55 Degrees C Expected contacts life min operations Mechanical at 180 cpm 5 mill...

Page 37: ... successful close operation within 95 milliseconds after the close command is issued 5 4 Energy Failure Auto Trip If Dip Switch I1004 1 is set to the on position and then power is removed from the unit the breaker will automatically trip in approximately 4 minutes Make sure personnel and tools are cleared from breaker prior to the removal of the power unit due to risk of death or serious bodily in...

Page 38: ... capacitors The following voltage thresholds must be reached to complete the specified operations 1 The capacitor voltage threshold for an Open operation is 49 volts 2 The capacitor voltage threshold for a Close Open operation is 72 5 volts 3 The capacitor voltage threshold for an Open Close Open operation is 78 volts Error Reference source not found Apx Figure 5 Ready LED Continually Flashing and...

Page 39: ...wer than 10 Ω external resistances should be used to perform capacitor discharging In this case an external 10 Ω 25 watt resistor can be connected to KM1003 Pins 4 and 6 Approximately 20 seconds is needed to discharge the capacitors using the 10 Ω external resistor 6 2 Capacitor Life The standard 0 1 farad electrolytic capacitors are designed to be operated in the temperature range of 40 F to 185 ...

Page 40: ...y sufficient for O operations Ready LED blinking Ready contact closed Not ready contact opened Ready LED off Ready contact opened Not ready contact closed Capacitor Energy insufficient for any operations Ready LED off Ready contact opened Not ready contact closed Ready LED off Ready contact opened Not ready contact closed Close Coil continuity not right Ready LED blinking Ready contact closed Not ...

Page 41: ...41 7 STANDARD ACTUATOR CIRCUIT BOARD AND CONNECTION DIAGRAM Apx Figure 3 Standard Actuator Circuit Board and Connection Diagram ...

Page 42: ...1 Breaker Position CB Position KM1002 1 CAPACITOR PLUS 80 VDC KM1002 2 CAPACITOR PLUS 80 VDC KM1002 3 CAPACITOR MINUS 0 VDC KM1002 4 CAPACITOR MINUS 0 VDC KM1002 5 CLOSE COIL 80 VDC KM1002 6 CLOSE COIL 80 VDC KM1002 7 TRIP COIL 80 VDC KM1002 8 TRIP COIL 80 VDC KM1002 9 CLOSE COIL KM1002 10 CLOSE COIL KM1002 11 TRIP COIL KM1002 12 TRIP COIL Apx Table 6 KM1002 Power Output and Capacitor Link ...

Page 43: ...xiliary trip mode as opposed to the Protection Relay trip mode The Protection Relay mode has a lower switching threshold 7 VDC See section BINARY INPUTS for the switch and jumper locations The following represents the functional jumper and dip switch settings which are the shipped configuration Apx Figure 4 Standard Actuator Circuit Board and DIP Switch Settings ...

Page 44: ... FOR OPEN CLOSE OPERATION 15 SEC SINCE ANY OPERATION OR 30 SEC SINCE POWER UP NO ISSUE CHECK CLOSE COIL CONNECTIONS CONTINUITY POSSIBLE ISSUES 1 ED2 0 BOARD BAD 2 AUX SUPPLY LOW 3 FAULTY CAPACITORS OPEN CLOSED YES NO READY LED FLASHING Please contact an ABB sales representative for a replacement Apx Figure 5 Ready LED Continually Flashing ...

Page 45: ...45 Please contact an ABB sales representative for a replacement Apx Figure 6 Ready LED Off ...

Page 46: ... NOT CONNECTED CAPACITOR VOLTAGE LOW AUX SUPPLY MISSING OR LOW CB WILL NOT OPEN OPEN SIGNAL NOT CONNECTED OR UNDER SWITCHING THRESHOLD OPEN COIL BAD CAPACITOR VOLTAGE LOW AUX SUPPLY MISSING OR LOW ED2 0 Board Bad ED2 0 Board Bad Please contact an ABB sales representative for a replacement Apx Figure 7 Conditions for CB Not Opening Closing ...

Page 47: ...he capacitors The Control Unit monitors binary inputs and outputs hardware and software configurations position sensors capacitor charge and switches the FET circuit to connect the capacitor voltage to the magnetic actuator coils following an open or close command Warning Because of the risk of death or serious bodily injury capacitors must be fully discharged prior to troubleshooting Apx Figure 8...

Page 48: ...down 5 Remove the four 250 X 20 screws from the corners of the control board cover Follow these instructions for a quick setup check on a breaker that has operated previously 11 1 READY LIGHT IS OFF 1 Check pins 2 and 3 on KM1003 to confirm proper input voltage is applied 2 Verify that there is 18 VDC on terminals 1 to 3 on KM1001 3 Verify there is 80 VDC from KM1002 1 to 3 4 If correct voltage is...

Page 49: ...is closed verify I1001 shows 18Volts from terminal 1 to terminal 5 and approximately 0 volts from terminal 2 to terminal 6 Reverse this procedure if breaker is open 0V terminal 1 to 5 18V terminal 2 to 6 The Under Voltage UV function is enabled and input is open Inspect dip switch I1004 Ensure switches 2 3 4 and 5 are in the off down position disables UV or apply correct input voltage to pins 13 a...

Page 50: ...t a few seconds The opening command is not performed The opening command is not performed The opening coil is broken or damaged In this case only the closing operation is avail able open the circuit breaker the ready LED will be turned off and check the closing So circuit Disconnect the magnetic actuator from the plug to the left of the mechanism There are two Phillips head screws that keep the pl...

Page 51: ... input is open manual trip lever Check the manual trip lever to verify it is in the up normal position If it is verify the microswitch mounted on the mechanism side has continuity across the wires The capacitor bank is not connected Check the capacitor bank circuit Verify the capacitors are connected to the control board Ensure that there is 80 VDC across KM1002 ter minals 1 and 3 The ready LED on...

Page 52: ...e board is off by measuring the voltage at KM1003 terminals 2 and 3 It should be zero 5 Before proceeding discharge the capacitors by placing jumpers on KM1003 pins 4 and 5 The time constant is 66 minutes A smaller external resistor can be used for a quicker discharge but the discharge current should be restricted to 10 amperes maximum This means that no lower than 10 Ω 25 watt external resistance...

Page 53: ...on The following basic rules need to be observed 1 Handling of MABS1 CONTROL BOARD cards during assembly or replacement operation must be limited to the minimum time 2 Always hold a card by its edges 3 Avoid touching the components assembled on the module 4 Take care when connecting or disconnecting cables 5 Avoid bending the card during wiring connectors insertion 6 First fix the control board to...

Page 54: ...54 9 Perform this process in reverse order to reinstall the board Apx Figure 9 Control Board with Terminal Numbering Apx Figure 10 Control Board Simplified ...

Page 55: ...55 Apx Figure 11 ED2 0 Control Board Parts and Mounting ...

Page 56: ... 2510 1 800 929 7947 ext 5 Customer service group us abb com www abb com mediumvoltage All sales are subject to ABB Inc General Terms and Conditions of Sale While every effort has been made to assure accuracy the information in this document is subject to change without notice 1VAL255104 MB Rev C August 2012 ...

Reviews: