background image

REB500 manuals

Document numbers

Communication protocol manual IEC 61850

1MRK 511 450-UEN

Communication protocol manual IEC 60870-5-103

1MRK 511 451-UEN

Getting started guide

1MRK 505 404-UEN

1.5 

Symbols and conventions

1.5.1 

Symbols

GUID-FBABB9D6-60F3-4BFB-B9C9-9B2F65B5F7CE v3

The electrical warning icon indicates the presence of a hazard which could result in

electrical shock.

The warning icon indicates the presence of a hazard which could result in personal

injury.

The caution icon indicates important information or warning related to the

concept discussed in the text. It might indicate the presence of a hazard which

could result in corruption of software or damage to equipment or property.

The information icon alerts the reader of important facts and conditions.

The tip icon indicates advice on, for example, how to design your project or how to

use a certain function.

Although warning hazards are related to personal injury, it is necessary to understand that under

certain operational conditions, operation of damaged equipment may result in degraded process

performance leading to personal injury or death. Therefore, comply fully with all warning and

caution notices.

The tutor icon points to the tutorial of the REB500 configuration process and vice

versa (see 

Annex A

 and 

Annex B

).

1.5.2 

Document conventions

GUID-37C3ACF4-BD79-43C6-B37E-24B38EE69301 v3

A particular convention may not be used in this manual.

Abbreviations and acronyms in this manual are spelled out in the glossary. The glossary also

contains definitions of important terms.

Push button navigation in the LHMI menu structure is presented by using the push button

icons.
For example, to navigate the options, use 

 and 

.

HMI menu paths are presented in bold.

For example, select Main menu/Settings .

Signal names are presented in bold.

Section 1

1MRK 511 452-UUS Rev. A

Introduction

6

Distributed busbar protection REB500

Engineering manual

© 2020 Hitachi Power Grids. All rights reserved

Summary of Contents for Relion REB500

Page 1: ...tion REB500 Version 8 3 ANSI Engineering manual t1ainm1 nu Events Measurements Disturbance records Settings 2013 03 3010 53 10 j superUser joi jectname a Mainmenu I D D i 9 J e t SettirlgS confi ation...

Page 2: ......

Page 3: ...s 2013 03 30 10 53 10 j superUser joi jectname a Mainmenu I D D i 9 J e t SettirlgS confi ation rua gr ostics rests O L 19 39f I D I D Document ID 1MRK 511 452 UUS Issued October 2020 Revision A Produ...

Page 4: ...rms of such license This product includes software developed by the OpenSSL Project for use in the OpenSSL Toolkit http www openssl org This product includes cryptographic software written developed b...

Page 5: ...luding but not limited to personal injuries or death shall be the sole responsibility of the person or entity applying the equipment and those so responsible are hereby requested to ensure that all me...

Page 6: ...erning electrical equipment for use within specified voltage limits Low voltage directive 2006 95 EC This conformity is the result of tests conducted by ABB Power Grids in accordance with the product...

Page 7: ...ngs 15 4 2 File Open 15 4 3 File Save as 15 4 4 File Compare 15 4 5 File Exit 15 Section 5 Configuration 17 5 1 System installation 17 5 1 1 System data 18 5 1 2 File version management system 18 5 2...

Page 8: ...tion 34 6 16 Event memory 34 6 17 Time 35 Section 7 Tools 37 7 1 File verification 37 7 2 Reports 37 7 3 Export SCS data 38 7 4 Export Bay Model catalogues 38 7 5 Default values 38 7 6 Bay model viewe...

Page 9: ...LD CONF export BM 2 71 9 22 SLD CONF export BM 3 72 9 23 SLD CONF typical bays 1 73 9 24 SLD CONF typical bays 2 74 9 25 SLD CONF completion of single line diagram 75 9 26 SLD CONF Positioning of bay...

Page 10: ...4...

Page 11: ...d This mode should be used by selected trained users only 1 3 Revision history GUID C876BDE2 918C 4B31 BA00 4D4A4190BFDC v1 1 4 Product documentation GUID AE1A560D 7F68 4E95 807B ECB7C6DFE706 v2 For a...

Page 12: ...tion Although warning hazards are related to personal injury it is necessary to understand that under certain operational conditions operation of damaged equipment may result in degraded process perfo...

Page 13: ...phase names L1 L2 L3 and L0 should be read as phase A B C and N respectively The term Disturbance recorder should be read as Digital Fault Recorder in the document The term Single line diagram should...

Page 14: ...8...

Page 15: ...t breakers and disconnectors Before working on the equipment always ensure that unwanted operation is disabled or has no effect on persons or plant Strictly observe all safety precautions interlocks l...

Page 16: ...ary circuits of CTs conducting current There is a danger of contact with live parts when opening REB500 cubicle doors Electrostatic discharge can destroy components in the equipment Other safety instr...

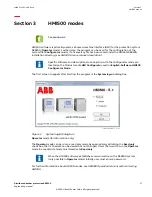
Page 17: ...to appear after starting the program is the System log on dialog box 15000002 IEC18000371 1 en vsdx IEC18000371 V1 EN US Figure 1 System login dialog box Operator mode for information only The Operato...

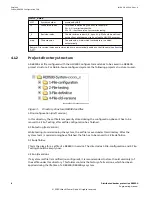
Page 18: ...al covers the Configurator mode and the REB500 setfile engineering process only Section 3 1MRK 511 452 UUS Rev A HMI500 modes 12 Distributed busbar protection REB500 Engineering manual 2020 Hitachi Po...

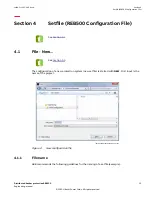
Page 19: ...d with NEW First input is the name of the project IEC18000564 IEC18000564 1 en vsdx IEC18000564 V1 EN US Figure 2 New configuration file 4 1 1 File name GUID AED0EBCC 2E9C 4A89 BA95 4F71A522F9F4 v2 AB...

Page 20: ...3 Directory structure REB500 setfiles 1 File configuration draft version In this directory the setfile is temporarily stored during the configuration phase It has to be moved to 2 File Testing after...

Page 21: ...e program will load the last used project by default However any another configured project can be opened via Open 4 3 File Save as GUID 8A1A95A0 3D08 4779 95B3 98D4E30C4DAC v1 An existing project set...

Page 22: ...16...

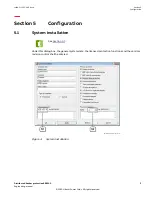
Page 23: ...neral system data the licensed protection functions and the version revision control shall be entered IEC18000566 IEC18000566 1 en vsdx IEC18000566 V1 EN US Figure 4 System installation 1MRK 511 452 U...

Page 24: ...ile name by default During configuration testing commissioning phase it is recommended to use preliminary versions such as 0 1 0 2 The commissioned file version shall be incremented to 1 0 For major c...

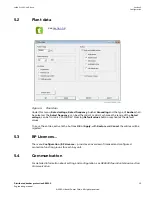
Page 25: ...t values To save the entries activate the buttons OK or Apply with Restore and Cancel the entries will be rejected 5 3 BP Licences GUID 401C043B 556F 4EC9 B89B 595ECA42B6BC v1 The menu Configuration B...

Page 26: ...ntains an image of the hardware the logical objects and assignments Before starting the configuration of the single line diagram it is recommended to study the Section 8 See Section 8 The Section 9 sh...

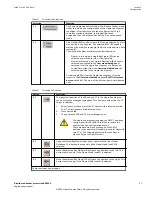
Page 27: ...now Table 3 Function of buttons Button Functions B1 The physical position of the CB and the CT in the single line diagram can be mutually exchanged swapped This button is only active if a CT object is...

Page 28: ...ted adjacent busbar connectors for special applications only B10 Interconnect two selected distant busbar connectors with reference for special applications only for example ring busbars B11 Interconn...

Page 29: ...n of the REB500 system cannot be guaranteed B16 By pressing the button B16 the complete bus zone arrangement is reassigned The reassignment might be necessary if an existing setfile has to be extended...

Page 30: ...ndow a Bay Model BM can either be selected from the Base Bay Models database models created by ABB or from the User Bay Models database models created by the user S4 S1 S3 V1 V2 S2 S4 S1 S3 V1 V2 S2 A...

Page 31: ...import to the single line diagram After pressing the button OK or Apply the menu Import options appears for the selected BM see Section 5 5 4 Table 6 Indications Selection Function V1 Single line dia...

Page 32: ...n option is selected after pressing the button OK the imported BM includes a pre defined LMI LED configuration If the LMI LED configuration option is not selected the BM will be imported without LMI L...

Page 33: ...gnment of the ABB References is started the node Id and device Id of the Bay Units and the Central Unit may change compared to the original setfile B2 The button B2 opens the Edit device menu for the...

Page 34: ...the CU rack contains a second DC DC converter for redundant power supply S2 Power supply voltage type Type 1 48 125VDC Type 2 125 250VDC S3 Set the number of BIO boards 1 BIO Board 9 Inputs 19 output...

Page 35: ...ection 9 36 This menu contains an overview of the BU device Id s Since the CU device creator process see Section 5 7 performs the complete network assignment physically and logically manual changes ar...

Page 36: ...nd configuration see REB500 Operating Manual section Event text configuration 5 11 LMI LED GUID B7842074 BCF2 4074 8EF9 0F6F11B83FAB v1 For detailed information about setting and configuration see REB...

Page 37: ...D 3696D654 9319 4D17 BEC0 DA95191B0C71 v1 For detailed information about setting and configuration see REB500 Technical Manual section CB pole discrepancy 6 5 Overcurrent release GUID 98246423 FB18 41...

Page 38: ...ut setting and configuration see REB500 Technical Manual section Voltage external release Supplementary information necessary for configuration The under voltage release criteria is performed with the...

Page 39: ...ut scaling 1 Phase to Ground independent of network grounding only one voltage measured Voltage transformer connections for U measurement ANSI18000583 ANSI18000583 1 en us Original vsdx ANSI18000583 V...

Page 40: ...or detailed information about setting and configuration see REB500 Commissioning Manual 6 15 CB inspection GUID 8DC1F221 26A4 4D4E 86EE 58D0F108A0F6 v1 For detailed information about setting and confi...

Page 41: ...bout setting and configuration see REB500 Technical Manual section Time synchronization and the specific subsection Additional settings 1MRK 511 452 UUS Rev A Section 6 Settings Distributed busbar pro...

Page 42: ...36...

Page 43: ...s and configurations in the setfile for example CU device creator not started An error level1 is mostly accompanied by errors level 2 and 3 These error messages side effect should be cleared after the...

Page 44: ...ormat at any time Depending on a selection this catalogue contains Bay Models from the Base model database or the User model database The catalogue comprises the selected models filter criteria busbar...

Page 45: ...later stage after the Bay Model engineering phase the settings have to be confirmed with Change value of all group individually Of course these values can also be locally adjusted individually for eac...

Page 46: ...iption Table 11 Indications Selection Function V1 Single line diagram of the selected BM Selection made under S3 V2 Description of the selected BM Selection made under S3 Example 2SSF5A1 BBP BFP 2 x s...

Page 47: ...ngs GUID BAC41B41 8392 49C3 86F5 A23684D5137C v1 For detailed information about setting and configuration see REB500 Operation Manual section Settings 1MRK 511 452 UUS Rev A Section 7 Tools Distribute...

Page 48: ...42...

Page 49: ...e Definitions GUID A7A2496D 6635 4F72 9217 F1AF44852B8B v2 1MRK 511 452 UUS Rev A Section 8 Annex A Configurator mode Definitions Distributed busbar protection REB500 43 Engineering manual 2020 Hitach...

Page 50: ...B127468 2751 4BD3 B405 D693381202C5 v2 IEC18000341 V1 EN US See Section 4 Section 8 1MRK 511 452 UUS Rev A Setfile 44 Distributed busbar protection REB500 Engineering manual 2020 Hitachi Power Grids A...

Page 51: ...l UM The Bay Unit Model contains the device type of the Bay Unit the image of the switchgear objects derived from the Bay Figure the licensed functions pre configured with basic settings to be worked...

Page 52: ...disconnectors while only one Bay Unit Model one Bay Unit is used This under the condition that the following limitations are not exceeded Maximum per bay unit 1 CB object 1 CT object represents 4I in...

Page 53: ...el MBM For example a Multiple Bay Model for a complete 1 breaker bay Multiple Bay Models are allowed if following limitations are not exceeded Number of CB objects number of bay units Number of CT obj...

Page 54: ...BU1 Trafo 05 Bay Topology BT Busbar Connectors Connection points between the Bay Fiures Circuit Breaker CB two state objects Open Closed inclusive CB close command Voltage Transformer VT analogue obje...

Page 55: ...adjacent Busbar Connectors If the number of bus connectors of adjacent Bay Models is identical these interconnects are automatically added by the tool Bus Interconnections QA1 ANSI18000620 V1 EN US 1M...

Page 56: ...odels within the same single line diagram Bus Interconnections have to be added manually For manual insertion of a Bus Interconnection select two Busbar Connectors and use the Connect button ANSI18000...

Page 57: ...ration the relevant system data shall be collected and the Bay Unit Central Unit hardware as well as their functional scope shall be defined evaluation of the order codes For the evaluation of the ord...

Page 58: ...binding single line diagram of the substation latest version The bus image implemented in the REB500 system will be based on this diagram ANSI18000828 V1 EN US Section 9 1MRK 511 452 UUS Rev A Annex...

Page 59: ...under the Configurator mode HMI500 Setfile Editor Under the setfile editor the complete system configuration setfile can be configured IEC18000829 V1 EN US See Section 3 1MRK 511 452 UUS Rev A Sectio...

Page 60: ...y Bay Model individual data The related inputs have to be made n times per system x n n number of different Bay Models per system Sequence of configuration As a guideline for the sequence of work item...

Page 61: ...BB System Number shall be used for the file name 5221 in this example 1 File New Create a new setfile IEC18000831 V1 EN US See Section 4 1 and Section 4 1 1 1MRK 511 452 UUS Rev A Section 9 Annex B Co...

Page 62: ...ttings will appear 1 System Installation 2 Plant Data 3 Default Values The default system data shall be worked over before starting any further detail configuration IEC18000832 V1 EN US See Section 4...

Page 63: ...the HMI500 tool saves a new version of the setfile under a new name The original file name for example 5221 mdb is extended by the version part for example 01 522101 mdb Licensed components The licens...

Page 64: ...voltage ph ph 2 Rated frequency 3 Grounding Network grounding 4 Busbar Busbar configuration single up to quadruple busbar optional transfer bus 1 breaker system IEC18000834 V1 EN US See Section 5 2 Se...

Page 65: ...le configuration phase prior to the Bay Model engineering under the window Single line diagram they are valid for the further configuration process If the entries are made at a later stage they have t...

Page 66: ...able Disturbance recorder Disturbance recorder licence The default values are valid for the complete protection system Voltage channels As an option the voltage channels can be implemented to disturba...

Page 67: ...e particular protocol specific settings are visible Max two IBB configurations connections c be realized per system IBB1 IBB2 For detailed information about IBB settings see REB500 Communication Proto...

Page 68: ...f single line diagram has finished For detailed information about SCS Diff Current Parameters setting see REB500 Communication Protocol Manual IEC 61850 IEC18000838 V1 EN US Section 9 1MRK 511 452 UUS...

Page 69: ...ith the button Copy Bay Model 1 Model Mode Before starting SLD CONF select Model mode Configuration of the single line diagram SLD CONF IEC18000839 V1 EN US See Section 5 5 1 1MRK 511 452 UUS Rev A Se...

Page 70: ...v3 Now the Select Bay Model window appears ANSI18000840 V1 EN US See Section 5 5 3 Section 9 1MRK 511 452 UUS Rev A Annex B Configurator mode System configuration 64 Distributed busbar protection REB...

Page 71: ...Bay Models according to the number of busbars see settings made under Plant data Busbar data 3 Select BM from table Select the BM suitable for the first bay of the single line diagram 4 Press OK ANSI1...

Page 72: ...d BM to be imported with or without PIO s 6 precision outputs per BU BM to be imported with a set of bay protection functions Variant available L V2 BM to be imported with or without LMI LED configura...

Page 73: ...Now the first Bay Figure is imported into the single line diagram ANSI18000843 V1 EN US 1MRK 511 452 UUS Rev A Section 9 Annex B Configurator mode System configuration Distributed busbar protection RE...

Page 74: ...urbance recorder Setting menus of the protection functions and switchgear objects Note While inserting the Bay Figure into the single line diagram the HMI500 tool has implemented the complete Bay Mode...

Page 75: ...n Disturbance recorder Setting menus Note Before duplicating the first Bay Model it is recommended to work over the bay specific configuration and settings menus with the user client setting values if...

Page 76: ...ox of the Bay Figure with a left mouse click Now the BM which is custom made for a line bay can be copied to the user model database template database ANSI18000846 V1 EN US Section 9 1MRK 511 452 UUS...

Page 77: ...e 3 Press OK to write the BM to the user model database 2 Provide a BM description ANSI18000847 V1 EN US 1MRK 511 452 UUS Rev A Section 9 Annex B Configurator mode System configuration Distributed bus...

Page 78: ...del database is finished Note The user model database and consequentially the Bay Model My Line 380kV can also be used for other stations ANSI18000848 V1 EN US Section 9 1MRK 511 452 UUS Rev A Annex B...

Page 79: ...kV including section Disconnector Configuration steps from 8 14 SLD CONF Select BM 1 to 8 22 SLD CONF Export BM 3 are ready Repeat the configuration steps done for the typical line feeder My line 380k...

Page 80: ...e User Bay Model database contains each typical bay of the station now IEC18000850 V1 EN US Section 9 1MRK 511 452 UUS Rev A Annex B Configurator mode System configuration 74 Distributed busbar protec...

Page 81: ...6D 6293 4CB6 8FBD 97BF8CBFB112 v3 In case of Multiple Bay Models change over to Figure mode select the relevant Bay Figure for example bus section disconnector figure and move it to the appropriate po...

Page 82: ...ur 2 Make labels visible Now the button Bus label visible shall be pressed After all Bay models have been imported to the SLD the busbar labels shall be made visible ANSI18000853 V1 EN US Section 9 1M...

Page 83: ...o make all necessary Bus Labels visible now Note At least one Bus Label should be visible at the end of each zone ANSI18000854 V1 EN US 1MRK 511 452 UUS Rev A Section 9 Annex B Configurator mode Syste...

Page 84: ...nge label appears Press Change label now Each text caption of the single line diagram can be worked over by the user 3 New label Write a new label client label and press OK ANSI18000855 V1 EN US Secti...

Page 85: ...le line diagram of the station Note The single line diagram configured in the REB500 setfile should now reflect the single line diagram of the station ANSI18000856 V1 EN US 1MRK 511 452 UUS Rev A Sect...

Page 86: ...cess Process bus zones mode 2 Bus zone assignment Under this mode the user can check whether the system has automatically assigned each busbar connector to a bus zone ANSI18000857 V1 EN US See Section...

Page 87: ...ial configuration of a standard bus single line diagram the bus zone assignment is performed completely by the configurator tool For complex bus configurations or for reconfiguration extension of exis...

Page 88: ...reassignment of the bus zone related signals I Os in the background The reconfiguration of a complex system setfile can induce a changed signal configuration compared to the original setfile These bus...

Page 89: ...CU or not Power supply type voltage range Set the number of BIO boards number of I O s Press Next CU device creator After the basic setfile configuration the single line diagram and the bay configurat...

Page 90: ...voltage range Set the number of BIO boards number of I O s Press Finish After the build process of the CU device creator was started once it can be repeated again for example to reflect subsequent co...

Page 91: ...defines the device allocation of the REB500 process bus network including the Device IDs of the Bay Units IEC18000862 V1 EN US See Section 5 8 1MRK 511 452 UUS Rev A Section 9 Annex B Configurator mod...

Page 92: ...Device structure Under the menu item Device Structure the system generated device labels of the CU and the Bus can be worked over with client specific labels 1 Select device line and press Edit IEC18...

Page 93: ...nfiguration hardware configuration and the assignments 1 Start verification Press Start Warning Of course the file verification tool can check the setfile internal configuration only It is the respons...

Page 94: ...ged if the default values generated by the configurator tool are not in accordance with the station parameters IEC18000865 V1 EN US See Section 6 Section 9 1MRK 511 452 UUS Rev A Annex B Configurator...

Page 95: ...otection system REB500 target A download can be realized under the HMI500 Operator mode only Setfile xxxxxx mdb IEC18000866 V1 EN US 1MRK 511 452 UUS Rev A Section 9 Annex B Configurator mode System c...

Page 96: ...Section 9 1MRK 511 452 UUS Rev A Annex B Configurator mode System configuration 90 Distributed busbar protection REB500 Engineering manual 2020 Hitachi Power Grids All rights reserved...

Page 97: ...91...

Page 98: ...den AB Grid Automation Products SE 721 59 V ster s Sweden Phone 46 0 10 738 00 00 https www abb com protection control 2020 Hitachi Power Grids All rights reserved Scan this QR code to visit our websi...
Reviews: