background image

10

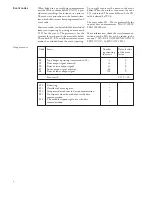
Data

Para-

Data

Values

meter

direct.

Measured values

Highest tap-changer position

V1

R,W

0…35

Lowest tap-changer position

V2

R,W

0…35

Present tap-changer position

V3

R

0…35

Control parameters

Remote control of  settings

V150

R,W

0 = main settings activated
1 = second settings activated

Event mask for output signals

V155

R,W

0…255, see event codes

Opening of password for remote settings

V160

W

1…999

Changing or closing of password
for remote settings

V161

W(P)

0...999

Activation of self-supervision output

V165

W

1 = self supervision output

is activated and IRF LED
is lit

LED test

V166

W(P)

1, 5..10, 21

Factory final test

V167

W(P)

1 = display segment test
2 = format EEPROM

Fault code generated by the

V169

R

0…255

self-supervision system
Data comm. address of the module

V200

R,W

1…254

Data transfer rate

V201

R,W

4.8 or 9.6 KBd

Programme version number

V205

R

119_

Event register reading

L

R

time, channel number and
event code

Re-reading of event register

B

R

time, channel number and
event code

Type designation of the module

F

R

SPCN 1D56

Reading of module state data

C

R

0 = normal state
1 = module been subject to
      an automatic reset
2 = overflow of event register
3 = events 1 and 2 together

Resetting of module state data

C

W

0 = resetting

Time reading and setting

T

R,W

00.000....59.999

R = data to be read from the module
W = data to be written to the module
(P) = writing enabled by a password

The event register can be read by the L com-
mand only once. Should a fault occur e.g. in
the data transfer, the B command can be used
to re-read the contents of the event register.
When required, the B command can be re-
peated. In general, the control data communi-
cator reads the event data and forwards the in-
formation to an output device continuously. The
control data communicator also resets abnor-
mal status data, so this data is normally a zero.

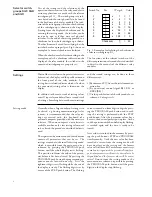
All settings allow reading and writing. However,
a condition for writing is that the remote set
password has been opened.

When settings are changed, the regulator mod-
ule checks that the given values are legal. If the
module is given a value outside the permitted
limits, either manually or by remote setting, the
module will  not store the new value but retains
the previous one.

Summary of Contents for SPAU 341 C

Page 1: ...AN T1 s n I I U n U r U x U RS 488 Ser No SPAU 341 C1 2 5 18 80 V 80 265 V 0 U1 U2 U3 SPCN 1D56 0 SPCU 1D50 fn 50Hz 60Hz REGISTERS SETTINGS 1 2 3 4 5 6 7 8 0 0 0 0 0 0 1 2 3 4 n I 1A 5A I n U U 100V 110V 120V SGF 1 SGF 2 Counter RSV Stability OPD I I I nt OPD SGF1 Tap pos low Tap pos high aux U ct nt 0146B SPCN 1D56 RESET STEP IRF POS 0112A PROGRAM MAN BLOCK TCO I U U 0061A SPC 000 9 LPS ...

Page 2: ...ral characteristics of D type modules 1MRS 750066 MUM EN Features Automatic or manual voltage control of trans formers using raise and lower signals Three phase overcurrent blocking and under voltage blocking Line drop compensation Parallel operation of transformers feeding the same busbar by the master slave negative reac tance or minimizing circulating current prin ciple Tap changer position mea...

Page 3: ...ger changes the voltage in steps a certain error has to be allowed This er ror called bandwidth is also set by the user If the measured voltage fluctuates within the band width the regulator is inactive Should on the other hand the measured voltage be outside these bandwidth limits an adjustable delay T1 starts This delay T1 remains active as long as the measured voltage is outside the hysteresis ...

Page 4: ...A 1A 100 110 120V U aux BLOCK RSV 1 2 3 4 5 6 7 8 9 10 15 16 TCO RAISE LOWER AUTO MAN TAP POS AUT MAN IRF RAISE LOWER I U Rx Tx SPA ZC 1 R S S R Auto SGF1 1 Raise Lower Serial port SGF2 1 Parallel RSV 1 1 Raise Lower U5 U6 U5 U1 U2 X0 X1 X1 X0 X2 X1 XXX U I U U SGF2 2 SGF2 8 RSV 1 2 Manual Lower Raise TCO Aut Blocking I U Aut Man TCO RSV SGF1 3 Rem Loc Block Block U U P1 S1 I ...

Page 5: ...tput LOWER Lower signal output I Overcurrent or overvoltage blocking output U Undervoltage blocking output SERIAL PORT Serial communication port TAP POS Tap changer position input mA signal TCO Tap changer operating input RAISE Raise command or parallel operation input LOWER Lower command or reduce set voltage input AUTO Automatic mode input MAN Manual mode input U1 Automatic voltage regulating mo...

Page 6: ...ess this input can be connected to the corresponding tap changer output 11 12 Blocking control signal Can also be configured as remote local control input 13 14 RSV control signal reduces the voltage set value Us Can also be configured as parallel control input 15 16 Tap changer position input mA signal The positive pole of the signal is connected to terminal 15 X2 1 2 Raise output relay 3 4 Lower...

Page 7: ...e secondary voltages differs by more than 25 from the rated value An alarm signal is also obtained if the power sup ply module is missing or if the auxiliary volt age to the regulator has been interrupted I O module The I O module SPTR 6B32 is located on the rear panel of the regulator in the same direc tion as the mother board It can be removed by undoing the fixing screws the protection earth ca...

Page 8: ...t voltage 5 A 3 A 1 A Contact material AgCdO2 Signalling contacts Terminal numbers X2 5 6 7 8 9 10 11 14 15 16 Rated voltage 250 V ac dc Continuous current carrying capacity 5 A Make and carry for 0 5 s 10 Make and carry for 3 s 8 A Breaking capacity for dc when the control circuit time constant L R 40 ms at 48 110 220 V dc control circuit voltage 1A 0 25A 0 15A Contact material AgCdO2 External co...

Page 9: ...t voltage according to IEC 255 5 5 kV 1 2 50 µs 0 5 J Insulation resistance according to IEC 255 5 100 MΩ 500 V dc Disturbance tests High frequency 1MHz disturbance test according to IEC 255 22 1 2 5 kV common mode 1 0 kV differential mode Electric discharge test according to IEC 255 22 4 and IEC 801 2 Class III air discharge 8 kV contact discharge 6 kV Fast 5 50 ns transients according to IEC 255...

Page 10: ...in cluded in the regulator the blocking situations and overvoltage detection are indicated by red alarm LEDs Manual voltage regulation is ena bled in undervoltage and overvoltage situations In overcurrent and external blocking situations however manual voltage regulation is disabled Exceptions to the operation explained above if SGF2 2 is in position 1 an overvoltage situation U will activate the ...

Page 11: ...el operation the master regulator is set to automatic mode and the slaves remain in manual mode Negative reactance principle The negative reactance principle implemented in SPAU 341 C is modified from previous regu lator designs The expected phase shift of the load supplied by the transformers operating in parallel is entered as a setting value The regula tors correct their control voltage accordi...

Page 12: ...slave address codes of the factory configuration interferes with the previously selected codes the bus connection modules have to be reconfigured During con figuration phase the monitor registers in sub menus 1 7 under register 3 of the SPCU 1D50 module might be useful The settings for par allel operation are described in detail in the manual of the automatic voltage regulating module SPCU 1D50 Fi...

Page 13: ...g 6 Application example for the voltage regulator SPAU 341 C1 The overcurrent blocking and the undervoltage blocking features complement each other as the voltage is measured from phases L1 and L2 and the current from phase L3 Load shedding in two stages Stage 1 reduces the set voltage by half the setting value RSV and stage 2 reduces the set voltage to the full extent of setting value RSV Tap cha...

Page 14: ...asured on the primary side of the transformer for overcurrent blocking purpose No line drop compensation used Automatic selection of master regulator using digital inputs The TCO signal from the tap changer with the longest operate time is connected to the regulators to prevent regulating pulses during tap changer operation Table 1 Regulator mode compared to circuit breaker configuration CB 1 CB 3...

Page 15: ...compared to circuit breaker configuration CB 1 CB 2 CB 3 Regulator 1 Regulator 2 open open open as before as before open closed open as before as before closed closed open automatic master manual slave open closed closed manual slave automatic master closed closed closed automatic master manual slave open open closed as before automatic closed open open automatic as before closed open closed autom...

Page 16: ... regulators SPAU 341 C1 in parallel operation using the negative reactance princi ple Depending on the position of the Remote local selector switches the operation mode of the regulators can be selected via remote control serial link or local control push buttons The phase currents IL2 IL3 are measured on the primary side of the transformer mainly for overcurrent blocking purposes while the phase ...

Page 17: ...on CB 1 CB 2 CB 3 Regulator 1 Regulator 2 open closed open manual manual closed closed open automatic manual open closed closed manual automatic closed closed closed parallel parallel open open closed manual automatic closed open open automatic manual closed open closed automatic automatic M Raise Lower Man Auto CB1 CB2 T1 SPAU 341 C R1 Adr 10 11 L N Parallel RSV SPA ZC 100 AB Serial port Single P...

Page 18: ...olt age approximately as high as the step voltage relative to the nominal voltage During start up the time delays T1 and T2 should be rather long for instance 60 s and 30 s If required the settings can be changed after start up If parallel operation is used the stability setting value should be very small for example 10 when the operation is started Check that the transformers are equally loaded b...

Page 19: ...t can be taken by the cus tomers but any major measures involving the electronics should be taken by the manufacturer For further information please contact the manufacturer or his nearest representative Spare parts Automatic voltage regulating module SPCU 1D50 Manual voltage regulating module SPCN 1D56 Power supply module Uaux 80 265 V ac dc operative range SPGU 240 A1 Uaux 18 80 V dc operative r...

Page 20: ...ired input and output circuits are con nected to the screw terminals on the rear panel Terminal block X0 consists of screw terminals fitted to the rear panel of the relay The termi nal blocks X1 and X2 are provided with discon nectable multi pole screw terminals The male parts of the disconnectable terminal blocks are attached to the I O module The female parts are included in the delivery The fem...

Page 21: ...the type of LON interface Glass fibre or plastic fibre A plastic fibre D glass fibre The second letter of the letter combinations indicates the type of configuration of the module A No configuration B Configured to operate with the regulator 1 in parallel operation C Configured to operate with the regulator 2 in parallel operation D Configured to operate with the regulator 3 in parallel operation ...

Page 22: ......

Page 23: ...LEL RESET STEP m m d IRF U I U 0111A PROGRAM AUT MAN OUT s U s U n U n U T2 s U n U LDC LDC PARALLEL MAN U T1 s n I I U n U r U x U SPCU 1D50 Automatic voltage regulating module User s manual and Technical description ...

Page 24: ...es 25 Features Measured quantities one phase to phase volt age and three phase currents Stable transformer secondary voltage regardless of the loading situation Line drop compensation Detects undervoltage overvoltage and overcur rent Parallel operation of transformers feeding the same busbar by the master slave negative reac tance or minimizing circulating current princi ple Digital display of set...

Page 25: ...ding on the set value of Us Control voltage Up The voltage regulating module constantly regu lates the secondary voltage towards Up The control expression has the following form Up Us Uz Uci Ursv Us reference voltage Uz line drop compensation value Uci circulating current compensation value Ursv reduce set voltage value Reduce set voltage The reduce set voltage feature can be used for load sheddin...

Page 26: ...power transformers can be operated in parallel The voltage regulating module operating as master calculates the voltage drop on the basis of its own measurements assuming that the power transformers are equally loaded The general rule for calculating the parameters Ur and Ux is that the line and transformer ratings for sin gle operation are entered When the negative reactance principle is used the...

Page 27: ...PCU 1D50 Fig 1 Manual automatic mode or parallel operation control command logic SGF1 1 SGF2 1 SGF1 1 SGF2 8 SGF1 3 R S S R R S S R I 1 1 1 1 1 1 Commands Auto Man Commands Parallel on Parallel off Commands Parallel on V152 1 Parallel off V152 0 Auto I6 1 Man I7 1 Raise I9 1 Lower I10 1 Commands Raise Lower Command Parallel on Parallel off Command Man Command Lower Command Raise States Remote Loca...

Page 28: ...f the software switch SGF1 2 0 and parallel operation has been selected the regulator starts operating according to the minimizing circu lating current principle Each voltage regulat ing module transmits its own current and phase shift values to the other modules operating in parallel Then the modules calculate the total value of the busbar current and the phase shift and compare it with its own v...

Page 29: ...ation push button Operation indicator Type designation of the regulator module Fig 2 Front panel of the automatic voltage regulating module SPCU 1D50 Operation indicators When the voltage regulating module delivers a raise or lower pulse the yellow LED indicator OUT in the bottom right corner of the front panel is lit and remains so as long as the pulse is active When the voltage Um is outside the...

Page 30: ...ection If the measured voltage 1 05 1 25 x Un 1 25 exceeds the setting value lower pulses are given faster than normally Ur Resistive line drop compensating factor 0 0 25 0 x Un 0 0 Ux Reactive line drop compensating factor 0 0 25 0 x Un 0 0 1 Checksum of switchgroup SGF1 0 255 16 2 Checksum of switchgroup SGF2 0 255 28 3 Operation counter Shows the number of raise 0 and lower operations Note The ...

Page 31: ...ws Ur Ux Setting as for single operation except for the calculation of the values which is made on the basis of the common network Stability The gain of the parallel operation The setting should be proportional to the rated currents of the parallel operating transformers Start with small values and increase them to obtain the optimal voltage regulation Load phase shift The expected phase shift of ...

Page 32: ...lled remotely when the external control input is energized and controlled locally when it is not energized When SGF1 3 0 the blocking input is connected as blocking input The automatic and manual voltage regulation is blocked when the external control input is energized SGF1 4 Display mode 0 When SGF1 4 1 the measured voltage Um will be displayed continu ously when 5 minutes have passed from the l...

Page 33: ... lit SGF2 3 I overcurrent blocking 1 When SGF2 3 1 I overcurrent blocking is in use When SGF2 3 0 I overcurrent blocking is not in use SGF2 4 When SGF2 4 1 U undervoltage blocking is in use 1 When SGF2 4 0 U undervoltage blocking is not in use SGF2 5 When SGF2 5 1 U overvoltage detection is in use 1 When SGF2 5 0 U overvoltage detection is not in use SGF2 6 Selection of measured current 0 SGF2 7 0...

Page 34: ...ated voltage Measuring range 51 1 28 x Un Im Phase current on phase one Measuring range 0 2 50 x Int Im submenu Phase current on phase two Measuring range 0 2 50 x Int Im submenu Phase current on phase three Measuring range 0 2 50 x Int Ud Difference Um Up between the measured voltage and the control voltage Up Measuring range 51 1 60 x Un Ud submenu Phase shift of the network measured by the volt...

Page 35: ... regulator Middle green digit digit 2 shows SI 0 5 from one of the other two regulators Left green digit digit 3 shows SI 0 5 from the other one of the other two regulators The meaning of the digit 1 2 3 depends on which regulator is inspected When using the factory settings of SPA ZC 100s the digit numbers 1 2 3 are mapped according to the tables below Inspection of SI on SPCU 1D50 with address A...

Page 36: ... Regulator A20 selected in parallel operation Red digit SI from A30 SI from A20 Own SI A10 1 2 5 5 Regulator A30 selected in parallel operation Red digit SI from A30 SI from A20 Own SI A10 1 5 5 5 2 Present value of In nominal current from regulator A20 0 00 5 00 kA 3 Measured current in phase L1 from regulator A20 0 00 2 55 x In 4 Measured phase angle from regulator A20 0 00 180 5 Present value o...

Page 37: ...e the numbers 0 255 are rolling on the display 3 Password needed for remote control of settings 1 The password must always be entered parameter V160 before a setting can be altered via the serial communication 4 Selection of main or second settings V150 Main setting as default 0 setting Registers address code of the relay module communication rate and password will not be erased by a voltage suppl...

Page 38: ...ion 1 SGF1 switchgroup SGF2 switchgroup Int Ict CT compensation 2 Raise Lower op counter 3 Int nominal current Stability 7 8 Output pulse duration 5 6 4 Input status 0 Module address code A Reduce set voltage RSV 0 000 U block U det I block Lower Raise Aut man 2 Supervision counter Data transfer rate 1 4 Main secondary sett Password 3 2 Im3 current on L3 MAIN MENU SUBMENUS step 0 5s Program 1s SUB...

Page 39: ...sh button Action Forward step in main or submenu STEP Press 0 5 s Rapid scan forward in main menu STEP Keep depressed Reverse step in main or submenu STEP Press 0 5 s Entering a submenu from a main menu PROGRAM Press 1 s Entering or leaving the setting mode PROGRAM Press for 5 s Increasing a value in the setting mode STEP Press about 0 5s Moving the cursor in the setting mode PROGRAM Press about 1...

Page 40: ...owing expression B t where Ud Um Up differential voltage Us bandwidth T T1 or T2 Ud Us T 2 B 1 Fig 5 Time characteristics of the automatic voltage regulating module SPCU 1D50 Technical data Delay time setting range 0 0 300 s Operate time accuracy at definite time 1 of set value or 250 ms characteristic Operate time accuracy at inverse time 250 ms and the inaccuracy appearing characteristic when th...

Page 41: ... from the event reporting At a maximum eight events can be stored in the event buffer If a ninth event message is received the code E51 is recorded in the buffer The buffer and the code E51 are reset by giving the parameter WC the value 0 The event codes E52 E54 are generated by the control data communicator e g SACO 100M SRIO 1000M etc More information about the SPA bus commu nication is given in...

Page 42: ...tivated 8 0 E29 Aut Man output signal activated automatic mode 16 0 E30 Aut Man output signal deactivated manual mode 32 0 E31 Parallel operation activated 64 0 E32 Parallel operation deactivated 128 0 Default value of event mask V158 0 E33 The measured voltage outside the bandwidth range 1 0 for 7 minutes Default value of event mask V159 0 E50 Restarting of microprocessor E51 Overflow of event re...

Page 43: ...written to the module P password to be opened before writing is possible Inputs The measured voltage currents and the status of external control signals can be read from the parameters I1 I18 Some of the external con trol signal parameters also allow writing If the value 1 is written to a parameter that is 0 the module treats it as a short energizing pulse on the corresponding control signal and w...

Page 44: ...e Raise O11 R W P 0 not active 1 active Lower O12 R W P 0 not active 1 active Overcurrent blocking O13 R W P 0 no blocking 1 blocking Undervoltage blocking O14 R W P 0 no blocking 1 blocking Overvoltage O15 R 0 no detection 1 detection Auto O16 R W P 0 not active 1 active Forced activation of O21 R W P 0 operation blocked output relays O11 O16 1 operation enabled Settings used Reference voltage Us...

Page 45: ...ngs Reference voltage Us S41 R W 0 85 1 15 x Un Bandwidth Us S42 R W P 0 60 9 00 of Un Time delay T1 S43 R W P 0 0 300 s Time delay T2 S44 R W P 0 0 300 s Overcurrent blocking I S45 R W P 1 00 2 00 x In Undervoltage blocking U S46 R W P 0 70 0 95 x Un Overvoltage detection U S47 R W P 1 05 1 25 x Un Ur line drop compensation S48 R W P 0 0 25 0 of Un Ux line drop compensation S49 R W P 0 0 25 0 of ...

Page 46: ...R W 0 255 see paragraph Event codes Event mask V159 R W 0 255 see paragraph Event codes Opening of password V160 W 1 999 Closing or changing of password V161 W P 0 999 Activation of self supervision V165 W 1 self supervision output activated and IRF LED lit LED test V166 W P 0 3 5 15 21 Factory final test V167 W P 1 display segment test 2 format EEPROM Internal error code V169 R 0 255 Um voltage m...

Page 47: ...d writing A con dition for writing is that the password V160 for remote setting has been opened When setting values are changed the module checks that the parameter values are within the limits specified for the module An attempt to write an incorrect value manually or via the serial bus will be rejected by the module which retains the previous setting Fault codes When the self supervision system ...

Page 48: ......

Page 49: ...SPCN 1D56 RESET STEP IRF POS 0112A PROGRAM MAN BLOCK TCO I U U SPCN 1D56 Manual voltage regulating module User s manual and Technical description ...

Page 50: ...ng the regulator for manual mode the manual voltage regulating module is acti vated and the tap changer can be controlled from the push buttons Pressing the raise or lower button once makes the corresponding LED flash This indicates that the module is ready for a raise or lower command If a com mand cannot be executed because of an over current or external blocking situation the I or BLOCK indicat...

Page 51: ... LED is lit and any tap changer control is prevented U overvoltage detection input This input is activated by the module SPCU 1D50 in an overvoltage situation During such a condition an indicating LED is lit but manual tap changer control is still possible SPCN 1D56 RESET STEP IRF POS 0112A PROGRAM MAN BLOCK TCO I U U Front panel Simplified device symbol Self supervision alarm indicator Position i...

Page 52: ... high Then lower the tap changer manually to a low position Then store the mA signal measured as the mA input low value and the correspond ing tap changer position as the setting value tap changer position low The tap changer positions high and low from which the mA input signal is stored does not necessarily have to be the highest and lowest position of the transformer but the measure ment accura...

Page 53: ...he high tap 0 20 0 mA 20 signal changer position 4 OPD Output pulse duration 0 5 10 0s 1 5 Settings for the serial communication is dealt with in the section Recorded data Selector switches The checksum of the programming switchgroup SGF1 is indicated on the display when the cor responding setting value is selected An exam ple of calculating the checksum and detailed in formation of the push butto...

Page 54: ...control signal 2 TCO external control signal Second number 1 U internal control signal 2 Blocking external control signal Third number 1 U internal control signal 2 I internal control signal A Address code of the manual voltage regulating module required for serial commu nication Register A has four subregisters with the following contents 1 Selection of data transfer rate for the serial communica...

Page 55: ...ation of the module and the operation of the TEST mode are described in detail in General characteristics of the D type relay modules Below a short guide to the operations Desired step or operation Push button Action Forward step in main or submenu STEP Press 0 5 s Rapid scan forward in main menu STEP Keep depressed Reverse step in main or submenu STEP Press 0 5 s Entering a submenu from a main me...

Page 56: ...obtained The event buffer and the E51 code is cleared by WC 0 The event codes E52 E54 are generated by the control data communicator SACO 100M SRIO 1000M etc More information about the serial communi cation over the SPA bus can be found in the manual SPA BUS COMMUNICATION PROTOCOL 34 SPACOM 2 EN 1 Output events Code Event Number Default value representing of the event the event factor E4 Tap chang...

Page 57: ... relays enabled Settings used Present checksum of switchgroup SGF1 S1 R 0 255 Present value of tap changer position corresponding to low mA signal S2 R 0 34 Present value of tap changer position corresponding to high mA signal S3 R 1 35 Present value of output pulse duration S4 R 0 5 10 0 s Main settings Main checksum of switchgroup SGF1 S21 R W P 0 255 Main value of tap changer position correspon...

Page 58: ...signation of the module F R SPCN 1D56 Reading of module state data C R 0 normal state 1 module been subject to an automatic reset 2 overflow of event register 3 events 1 and 2 together Resetting of module state data C W 0 resetting Time reading and setting T R W 00 000 59 999 R data to be read from the module W data to be written to the module P writing enabled by a password The event register can...

Page 59: ... is composed of a red figure 1 and a green code number Below is a list of some of the most general fault codes appearing in the module SPCN 1D56 Fault code Type of error 4 Output relay path broken or relay board missing 30 Faulty program memory 50 Faulty working memory RAM 51 54 Parameter memory EEPROM faulty 56 Parameter memory EEPROM key faulty Format by writing 2 to variable V167 195 Reference ...

Page 60: ......

Page 61: ... indicator Internal Relay Fault Display 1 3 digits Reset Step push button Programming push button Trip indicator Module type designation Fastening screw Indicators for measured quantities Indicators for setting parameters Indicators for switchgroups SGF SGB and SGR Fastening screw General characteristics of D type relay modules User s manual and Technical description ...

Page 62: ... SGB SGR 4 Settings 4 Setting mode 4 Example 1 Setting of relay operation values 7 Example 2 Setting of relay switchgroups 9 Recorded information 11 Trip test function 12 Example 3 Forced activation of outputs 13 Operation indicators 15 Fault codes 15 1MRS 750066 MUM EN Issued 95 04 12 Version A replaces 34 SPC 3 EN1 Checked JH Approved TK Data subject to change without notice ...

Page 63: ...ation are accessible in the main menu i e present meas ured values present setting values and recorded parameter values The data to be shown in the main menu are sequentially called up for display by means of the STEP push button When the STEP push button is pressed for about one second the display moves forward in the display sequence When the push button is pressed for about 0 5 seconds the disp...

Page 64: ... cation bus 2 By an external control signal BS1 BS2 or RRES BS3 3 Via the push buttons of the relay module see submenu 4 of register A Setting mode Generally when a large number of settings is to be altered e g during commissioning of relay systems it is recommended that the relay set tings are entered with the keyboard of a personal computer provided with the necessary software When no computer n...

Page 65: ...illshowthreedashes toindicatethenon tripping mode The serial communication is operativeandallmainandsubmenuesareacces sible In the non tripping mode unnecessary trippings are avoided and the settings can be checked The normal protection relay mode is entered automatically after a timeout of five minutes or ten seconds after the dark display position of the main menu has been entered Normal status ...

Page 66: ...ase L2 Event n 2 value of phase L2 Latest memorized event n value of phase L2 2 1 2 Event n 1 value of phase L3 Event n 2 value of phase L3 Latest memorized event n value of phase L3 3 1 2 Main setting value for t or k Main setting value for I Main setting value for t Main setting value for Io Main setting value for to or ko Main setting value for Io Main setting value for to Second setting of SGB...

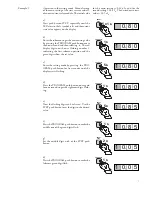
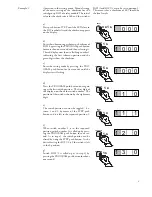
Page 67: ...y pressing the PRO GRAM push button for five seconds until the display starts flashing d Press the PROGRAM push button once again for one second to get the rightmost digit flash ing e Now the flashing digit can be altered Use the STEP push button to set the digit to the desired value f Press the PROGRAM push button to make the middle one of the green digits flash g Set the middle digit with of the...

Page 68: ... value automatically initi ates a return from the setting mode to the normal submenu Without recording one can leave the setting mode any time by pressing the PROGRAM push button for about five sec onds untilthegreendisplaydigitsstopflashing o If the second setting is to be altered enter submenu position 2 of the setting I by pressing the STEP push button for approx one second The flashing positio...

Page 69: ... mode by pressing the PRO GRAM push button for five seconds until the display starts flashing d Press the PROGRAM push button once again to get the first switch position The first digit of the display now shows the switch number The position of the switch is shown by the rightmost digit e The switch position can now be toggled be tween 1 and 0 by means of the STEP push button and it is left in the...

Page 70: ...lash in the display i e 1 If the checksum is incorrect the setting of the separate switches is repeated using the PROGRAM and STEP push buttons start ing from step d l Recording the new value automatically initiates a return from the setting mode to the normal menu Without recording one can leave the setting mode any time by pressing the PRO GRAM push button for about five seconds until the green ...

Page 71: ...s the data trans fer rate value expressed in kilobaud of the serial communication Submenu 2 of register A contains a bus commu nication monitor for the SPAbus If the protec tion relay which contains the relay module is linked to a system including a contol data communicatoe for instance SRIO 1000M and the data communication system is operating the counter reading of the monitor will be zero Otherw...

Page 72: ...s the two push butttons are pressed The effect on the output relays depends on the configuration of the output relay matrix switches Theself supervisionoutputisactivatedbypress ing the STEP push button 1 second when no setting indicator is flashing The IRF output is activated in about 1 second after pressing of the STEP push button Thesignalsareselectedintheorderillustratedin Fig 4 REGISTER 0 I ST...

Page 73: ...and the IRF output is activated When the step push button is released the IRF indicator is switched off and the IRF output resets d Press the PROGRAM push button for one second and the indicator of the topmost setting start flashing e If a start of the first stage is required now press thepush buttonsPROGRAMandSTEPsimul taneously Thestageoutputwillbeactivatedand the output relays will operate acco...

Page 74: ...ay is operated the trip indicator of the measuring module is lit h The starting and tripping of the remaining stages are activated in the same way as the first stage above The indicator of the corresponding setting starts flashing to indicate that the con cerned stage can be activated by pressing the STEPandPROGRAMbuttonssimultaneously For any forced stage operation the output relays will respond ...

Page 75: ...In most fault situations a fault code indicating the nature of the fault appears on the display of the module The fault code which consists of a red figure 1 and a three digit green code number cannotberemovedfromthedisplayby resetting When a fault occurs the fault code should be recorded and stated when service is ordered When in a fault mode the normal relay menus are operative i e all setting v...

Page 76: ...1MRS 750110 MUM EN ABB Oy Substation Automation P O Box 699 FIN 65101 VAASA Finland Tel 358 0 10 22 11 Fax 358 0 10 22 41094 www abb com substationautomation ...

Reviews: