1
WARNING: Because of the possible danger to person(s)
or property from accidents which may result from the
improper use of products, it is important that correct
procedures be followed. Products must be used in
accordance with the engineering information specified
in the catalog. Proper installation, maintenance and
operation procedures must be observed. The instructions
in the instruction manuals must be followed. Inspections
should be made as necessary to assure safe operation
under prevailing conditions. Proper guards and other
suitable safety devices or procedures as may be desirable
or as may be specified in safety codes should be provided,
and are neither provided by ABB nor are the responsibility
of ABB. This unit and its associated equipment must be
installed, adjusted and maintained by qualified personnel
who are familiar with the construction and operation of
all equipment in the system and the potential hazards
involved. When risk to persons or property may be
involved, a holding device must be an integral part of the
driven equipment beyond the speed reducer output shaft.
Instruction Manual
Dodge
®
Torque-Arm
™
II Speed Reducers
Ratios 5, 9, 15, 25, and 40:1
TA0107L
TA3203H
TA6307H
TA9415H
TA1107H
TA4207H
TA7315H
TA10507H
TA2115H
TA5215H
TA8407H
TA12608H
These instructions must be read thoroughly before installation or operation. This instruction manual was accurate at the time of
printing. Please see
baldor.com
for updated instruction manuals.
Note! The manufacturer of these products, Baldor Electric Company, became ABB Motors and Mechanical Inc. on
March 1, 2018. Nameplates, Declaration of Conformity and other collateral material may contain the company name of
Baldor Electric Company and the brand names of Baldor-Dodge and Baldor-Reliance until such time as all materials have
been updated to reflect our new corporate identity.
WARNING: To ensure the drive is not unexpectedly
started, turn off and lock-out or tag power source before
proceeding. Failure to observe these precautions could
result in bodily injury.
WARNING: All products over 25 kg (55 lbs) are noted on the
shipping package. Proper lifting practices are required for
these products.
WARNING: Torque-Arm II product exceeding 13.5 kg (30
lbs) should be lifted using lift-assist equipment rated for
the weight of the product. Weight values for all Torque-Arm
II products are listing in the Gearing Engineering Catalog.
Lifting brackets provided on the Torque-Arm II should be
used when connecting to the lift-assist equipment.
WARNING: Depending on operating conditions, sound
levels for Torque-Arm II products may exceed 70 dB.
Protective measures such as hearing protection may be
needed when in close proximity to a Torque-Arm II.
INSTALLATION
1.
Use lifting bracket to lift reducer.
2.
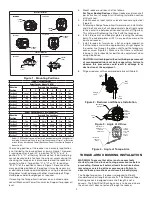
Determine the running positions of the reducer. (See
Figure 1). Note that the reducer is supplied with 6
plugs; 4 around the sides for horizontal installations
and 1 on each face for vertical installations. These
plugs must be arranged relative to the running
positions as follows:
Horizontal Installations
–Install the magnetic drain
plug in the hole closest to the bottom of the reducer.
Throw away the tape that covers the filter/ventilation plug
in shipment and install plug in topmost hole. Of the 2
remaining plugs on the sides of the reducer, the lowest
one is the minimum oil level plug.
Vertical Installations
–Install the filter/ventilation plug in
the hole provided in the upper face of the reducer housing
as installed. If space is restricted on the upper face, install
the vent in the highest hole on the side of the reducer per
Figure 1. Install a plug in the hole in the bottom face of
the reducer. Do not use this hole for the magnetic drain
plug. Of the remaining holes on the sides of the reducer,
use the plug in the upper housing half for the minimum oil
level plug.
Summary of Contents for TA0107L
Page 31: ...31 ...


