
Conductor
Average compressions per charge
BAT-MK
4/0 Cu
120
500 kcmil
155
750 kcmil
145
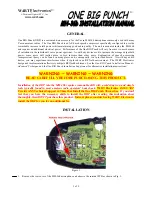
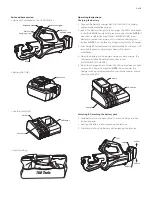
Advance trigger
Manual release lever
Release button
Die Release
Knob
C-Head
Die half
Pull
Slide in
Ram
Die Half
Slide in
Die Release Pin
Push
Compression cycles
This guide indicates the number of compression cycles that the
TBM14CR-LI can be expected to perform when the battery is fully
charged. These figures are approximate and will vary according
to the charging and other operating conditions, such as
temperature, humidity, and battery condition.
Switch operation
1. The ram advances when the Trigger is depressed and stops
when the Trigger is released.
2. To retract the ram, depress the Release button. The ram
continues to retract while the Release button is depressed. If
the auto-retract feature is activated, the ram will automatically
retract after the crimp is completed. See “Compression
operation” section, page 4 for instructions on enabling and
disabling the auto-retract function.
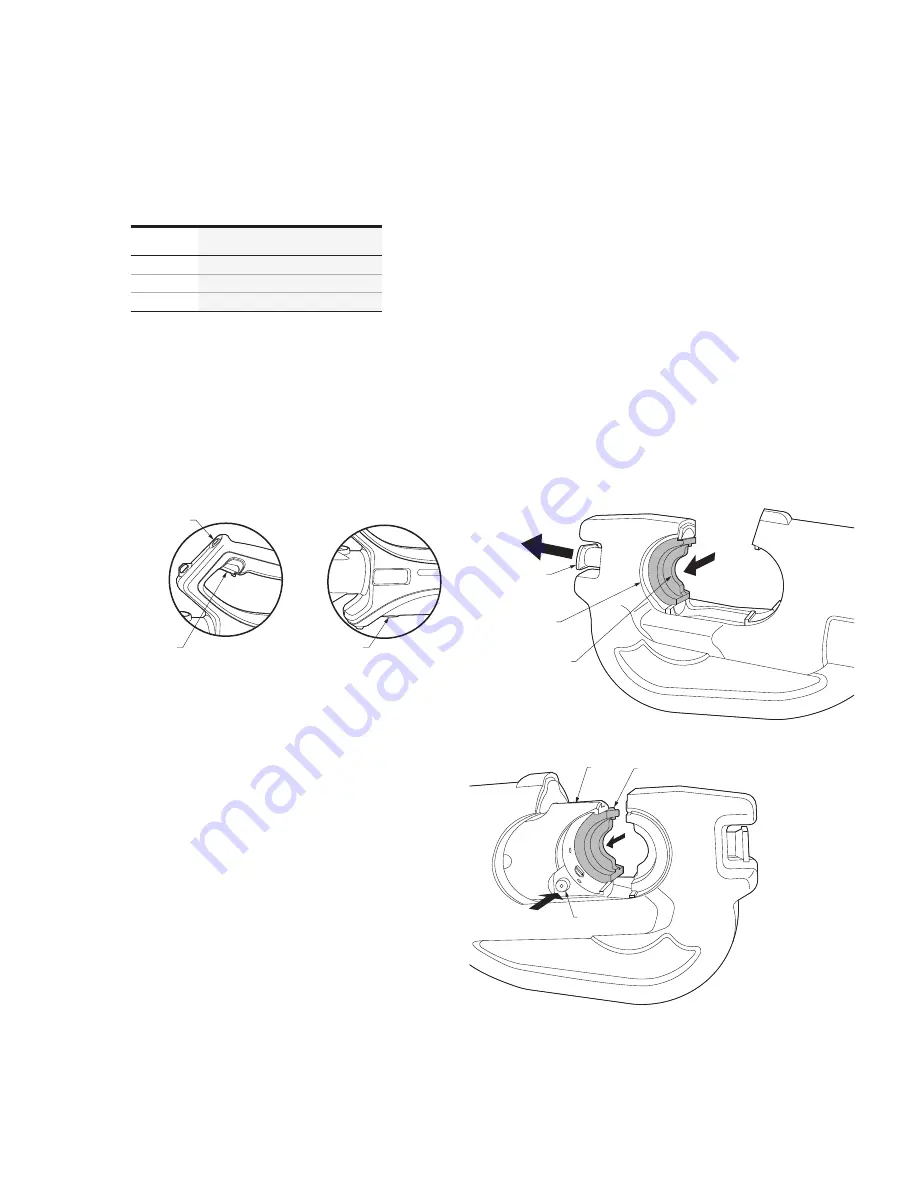
Compression operation
1. Select the appropriate size dies for the connector.
2. Insert one die half into the C-head by sliding it in while pulling
the Die Release Knob.
3. Press the trigger (Switch Operation, page 4) to advance the
Ram until the Die Release Pin is accessible. Insert the other
half of the die into the Ram while pressing the Die Release Pin.
4. Press the trigger and advance the Ram so the connector is
held lightly between the dies. Do not deform the connector.
5. Insert the conductor into the connector.
6. Press the trigger until the compression is complete. A series
of clicks will be heard followed by a release in the pressure
when compression is complete. Once the compression cycle is
complete, the tool will shut off and retract the ram.
7. If the tool is stopped prior to the auto-retract feature being
activated, press the release button (Switch Operation, page 4)
to retract to ram. The ram continues to retract while the
release button is pressed. The ram stops when it reaches the
lower end.
8. Remove the compressed connector from the tool.
4 of 5