The cursor will be positioned under the far right hand zero which
corresponds to LOCAL VOLTAGE. The remaining Data Log
parameter selections are displayed by moving the cursor to the left.
6.
Utilizing the arrow pushbuttons enter a "1" for those Data Log parameters to be
activated and a "0" for those that are to be disabled, then press the ENT pushbutton.
7.
Press the Down arrow pushbutton, as necessary, until the "Data Log Interval" screen
is displayed.
8.
Utilizing the arrow pushbuttons, enter the desired "Data Log Interval" (0 to 120
minutes in 1 minute increments), then press the ENT pushbutton.
6.5.1.2
Setting up Data Logging from TCC600
1.
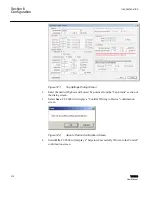
Select
Setup/Data Logging/Setup
from the TCC600 toolbar. TCC600 will display
the Data Logging screen.
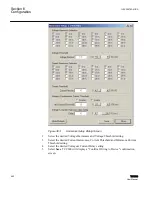
GUID-CF69965E-8DF7-4CE6-B1F3-146B6168A4D5 V1 EN
Figure 380:
Data Logging Setup Dialog Screen
The Data Logging Setup dialog screen contains a self calculating
Duration parameter that represents the number of Days and the
specific time when the data logging buffer will be full. The number
of parameters selected to log and the Data Log Interval are
considered in this calculation.
2.
Enter a Data Log Interval (0 to 120 minutes).
3.
Select
Save
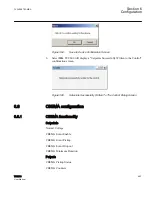
. TCC600 will display a "Confirm Writing to Device" confirmation
screen.
Section 6
1VAC388793-MB A
Configuration
478
TCC300
User Manual
Summary of Contents for TCC300
Page 1: ...Digital Tapchanger Control TCC300 User Manual ...
Page 2: ......
Page 3: ...Document ID 1VAC388793 MB Issued 2016 08 10 Revision A Copyright 2016 ABB All rights reserved ...
Page 26: ...20 ...
Page 34: ...28 ...
Page 91: ...1VAC388793 MB A Section 3 Operation TCC300 85 User Manual ...
Page 126: ...120 ...
Page 176: ...Section 4 1VAC388793 MB A TCC600 170 TCC300 User Manual ...
Page 260: ...254 ...
Page 328: ...322 ...
Page 494: ...488 ...
Page 556: ...550 ...
Page 580: ...574 ...
Page 600: ...594 ...
Page 700: ...694 ...
Page 710: ...704 ...
Page 712: ...706 ...
Page 713: ...707 ...
Page 714: ......
Page 715: ......


