background image

Structure and function

1-12

3HDA000057A8519-001

Torch Service Center - TSC 2013

Assembly instructions

1.5.1  

Torch cleaner TC 2013

The TC 2013 torch cleaner is used to clean the gas nozzle which is contaminated with weld spatter 
during the welding process. Subsequent spraying of the gas nozzle with a release agent prevents 
early contamination of the gas nozzle. 

1.5.2  

Wire cutter

The write cutter can be used to shorten the welding wire to a particular wire length. It is an add-
on module for the TC 2013 torch cleaner and is also actuated from the latter.

1.5.3  

TCP gauging (BullsEye

®

)

TCP measurement is used to measure and adjust the robot tool center point (TCP) It is available 
as an add-on module for the TC 2013 or a standalone version (with stand).

NOTICE

A detailed description can be found in  Chapter 2  Torch 
cleaner TC 2013.

NOTICE

A detailed description can be found in  Chapter 3  Wire 
cutter.

NOTICE

A detailed description can be found in  Chapter 4  TCP 
gauging (BullsEye

®

)

.

Summary of Contents for TSC 2013

Page 1: ... ROBOTICS Assembly instructions Torch Service Center TSC 2013 ...

Page 2: ...l ABB be liable for incidental or consequential damages arising from use of this manual and products described herein This manual and parts thereof must not be reproduced or copied without ABB s written permission Keep for future reference Additional copies of this manual may be obtained from ABB This document is the English translation of the German Original Assembly instructions Document No Lang...

Page 3: ...e 1 9 1 4 1 General 1 9 1 4 2 Transport and packaging 1 9 1 4 3 Damage in transport 1 10 1 4 4 Storage 1 10 1 4 5 Packaging disposal 1 10 1 5 Structure and function 1 11 1 5 1 Torch cleaner TC 2013 1 12 1 5 2 Wire cutter 1 12 1 5 3 TCP gauging BullsEye 1 12 1 6 Technical data of TSC 2013 1 13 2 Torch cleaner TC 2013 2 1 2 1 Use 2 1 2 1 1 Designated use 2 1 2 1 2 Non designated use 2 1 2 2 Technica...

Page 4: ... for TC 2013 2 28 2 8 1 TC 2013 without wire cutter 2 28 2 8 2 TC 2013 with wire cutter 2 31 2 9 Pneumatic plan 2 34 2 10 Electrical circuit diagram 2 35 3 Wire cutter 3 1 3 1 Designated use 3 1 3 2 Technical data 3 1 3 3 Safety instructions 3 2 3 4 Ignition behaviour availability of the system 3 2 3 5 Function and structure 3 2 3 6 Assembly of the wire cutter on the TC 2013 3 3 3 6 1 Preparations...

Page 5: ...Assembly 4 8 4 7 1 Subsequent assembly on the TC 2013 4 8 4 7 2 Assembly of TCP gauging with stand 4 9 4 7 3 Assembly site and alignment 4 9 4 8 Using for the first time 4 11 4 8 1 General 4 11 4 8 2 Installation of Software BullsEye 10 4 11 4 8 3 EIO Configuration 4 11 4 9 Operation 4 12 4 9 1 Switching on 4 12 4 9 2 Function test 4 12 4 10 Maintenance 4 12 4 11 Spare parts 4 13 5 Appendix 5 1 5 ...

Page 6: ...Contents 3HDA000057A8519 001 I 6 ...

Page 7: ...ese operating instructions are relevant for the clarification of technical issues and ordering of spare parts ABB does not accept liability if faults damage operating breakdowns and resultant production failures occur through non compliance with these assembly instructions Area of use The TC TSC 2013 is a tool of the robot and is controlled by the robot It is used in robotic MIG MAG welding units ...

Page 8: ... Replaced parts become the prop erty of the supplier Excluded from the warranty are wearing parts lubricants external cable connections cables subjected to torsion and bending etc Also excluded is damage due to causes for which the manufacturer is not responsible such as force majeure natural wear and tear improper handing interventions by third parties excessive loading unsuitable equipment and a...

Page 9: ...hese instructions Copyright For copyright reasons we must point out that these assembly instructions may only be used for internal company purposes The document or parts thereof may not be reproduced or copied without prior permission from ABB For competition reasons the documents or parts thereof must not be divulged to third parties Reference manuals Document number General safety information IR...

Page 10: ...1 4 3HDA000057A8519 001 Torch Service Center TSC 2013 Assembly instructions ...

Page 11: ...ge of the TC 3013 deviating from designated use is regarded as non designated use The TSC 2013 must only be used in accordance with the operating conditions and performance data stipulated in the installation instructions Other or more extensive use or unauthorised reconstruction or modification of the TC 2013 is deemed as not being in accordance with designated use TSC means T Torch S Service C C...

Page 12: ...Installation declaration for TC TSC 2013 1 6 3HDA000057A8519 001 Torch Service Center TSC 2013 Assembly instructions 1 2 Installation declaration for TC TSC 2013 ...

Page 13: ...ive Persons must only remain in the working range of the robot for as long as is necessary 1 3 2 Sources of danger The TSC 2013 is installed in the working range of the industrial robot Robots have a very high diversity of movement and operate with high accelerations In automatic operation the robot is pro gram controlled and may also start up unexpectedly after being at rest for a prolonged perio...

Page 14: ...specified by the manufacturer Remove combustible material packaging material from the system 1 3 5 Possible dangers due to release agent There is a safety data sheet for the release agent for spraying the gas nozzle in accordance with Regulation EC No 1907 2006 REACH Section 5 Appendix WARNING There is a danger of fire in welding due to flying sparks NOTICE The release agent AS 72 K does not conta...

Page 15: ...d depending on the assembly to be supplied and number of units Table 1 1 The TSC 2013 is packed singly lying in a carton Several units are screwed standing on a wooden pallet and protected by a wooden crate against damage in transport The transport pallets are suitable for transporting with fork lift truck CAUTION Danger of injury due to unsuitable means of transport and lifting implements The loa...

Page 16: ...ed air connections plug connectors with protective caps Protect stored parts against moisture 1 4 5 Packaging disposal The transport packaging made available by ABB is used as packaging for the storage of system components Disposal takes place only in accordance with contractual agreements entered into Table 1 1 Transport weight and packaging Pos Qty units Components Transport weight kg Packaging ...

Page 17: ...ng is performed fully automatically by a rotating tool milling cutter in the TC 2013 torch cleaner 1 The welding torch is clamped in a holding mechanism V block for this purpose The external surface of the contact tip nozzle and the internal surface of the gas nozzle are then cleared of weld spatter in one operation The cleaned gas nozzle is then wetted with silicone free liquid weld spatter relea...

Page 18: ...rite cutter can be used to shorten the welding wire to a particular wire length It is an add on module for the TC 2013 torch cleaner and is also actuated from the latter 1 5 3 TCP gauging BullsEye TCP measurement is used to measure and adjust the robot tool center point TCP It is available as an add on module for the TC 2013 or a standalone version with stand NOTICE A detailed description can be f...

Page 19: ...r Gas nozzle external diameter min Ø 20 mm max Ø 34 mm adjustable using different spacer plate thicknesses Milling cutter V block and spacer plate for standard torches PKH and PKI 500 404 15 70 with torch exter nal diameter Ø 28 mm Please enquire about milling cutter V block and spacer plate for special torches Air motor n 950 min Md 3 Nm Stroke 45 mm Shaft end Ø 9x16 length Air consumption 25 lit...

Page 20: ...imensions of TSC 2013 Pos Assembly Article No 1 Torch cleaner TC 2013 3HDA000057A5527 2 Wire cutter 3HDA000000A9289 3 TCP measurement 3HDA000000A9324 Weight 32 kg without release agent A A A A 1 5 3 2 1 Spacer plate Wire cutter Spray head Clambing cylinder Milling cutter Protective sleeve Adjusting tip 3 1 ...

Page 21: ...designated use The TC 2013 must only be used in accordance with the operating conditions and performance data stipulated in the installation instructions Other or more extensive use or unauthorised conversions or modification of the TC 2013 are deemed not to be in accordance with designated use Non designated use invalidates the ABB warranty The warranty covers elimination of faults and the use of...

Page 22: ... adjustable using different spacer plate thicknesses Milling cutters V blocks and spacer plates for standard torches PKH and PKI 500 404 15 70 with torch external diameter Ø 28 mm Please enquire about milling cutters V plates and and spacer plates for special torches Air motor n 950 min Md 3 Nm Stroke 45 mm Shaft end Ø 9x16 length Air consumption 25 litres cycle Max welding wire diameter for cutti...

Page 23: ...13 Torch cleaner TC 2013 3HDA000057A8519 001 2 3 Assembly instructions 2 2 1 Torch cleaning device TC 2013 Figure 2 1 Dimensions TC 2013 Spacer plate Protective sleeve Adjusting tip Spray head Clambing cylinder Milling cutter ...

Page 24: ... NOTICE For the choice of a suitable milling cutter the measures as well as the construction of the gas nozzle are needed see Figure 2 2 Outside diameter gas nozzle Ø X mm Outside diameter contact tube Ø Y mm Inside diameter gas nozzle Ø Z mm Distance of leading edge to nozzle stick A mm Contact tube prodruding Contact tube flush Contact tube inwards Distance of leading edge to contact tube B mm N...

Page 25: ...nozzle diameter has to be transmitted to ABB Automation GmbH as in Section 2 2 2 Milling cutter described Table 2 1 Replacement spacer plates Gas nozzle external diameter mm Strength mm Ø 16 12 50 Ø 17 11 85 Ø 18 11 20 Ø 19 10 55 Ø 20 9 90 Ø 21 9 25 Ø 22 8 60 Ø 23 7 95 Ø 24 7 30 Ø 25 6 65 Ø 26 6 00 Ø 27 5 35 Ø 28 4 70 Ø 29 4 05 Ø 30 3 40 Ø 31 2 75 Ø 32 2 10 Ø 33 1 45 Ø 34 0 80 NOTICE Instructions ...

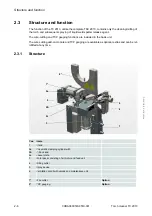
Page 26: ... wire cutting and TCP gauging functions are included in the basic unit The wire cutting add on module and TCP gauging are available as optional extras and can be ret rofitted at any time 2 3 1 Structure Pos Name 1 Stand 2a 2b 2c Pneumatic clamping cylinder with V block and spacer plate 3 Motor pack consisting of air motor and feed unit 4 Milling cutter 5 Spray device 6 Ventilation circuit with val...

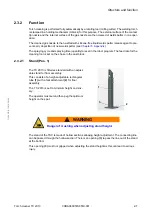
Page 27: ...ng time quantity are set in the robot program The feed rate for the cleaning tool is set on the choke in the cast block 2 3 2 1 Stand Pos 1 The stand of the TSC is made of hollow sections allowing height adjustment The connecting line can be passed through the hollow section There is an opening 3 to pass the line out of the stand at the bottom This opening 3 must not gripped when adjusting the sta...

Page 28: ...ion of spacer plates see Table 2 1 2 3 2 3 Motor pack Pos 3 The air motor is integrated into the pneumatic feed cylinder and thus forms a common motor pack The shaft end of the air motor carries the milling cutter 2 3 2 4 Milling cutter Pos 4 There are suitable milling cutters for the welding cutter nozzles concerned for internal and external cleaning It is recommended that the optimum height is d...

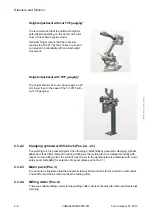
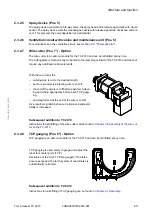
Page 29: ...ontrol elements Subsequent addition to TC 2013 Instructions for retrofitting of the wire cutter can be found in Chapter 3 6 Assembly of the wire cut ter on the TC 2013 2 3 2 8 TCP gauging Pos 8 Option TCP gauging is an add on module for the TC 2013 and can be retrofitted at any time Subsequent addition to TC 2013 Instructions for retrofitting of TCP gauging can be found in Chapter 4 7 Assembly Wit...

Page 30: ... off milling cutter 3 Put on new milling cutter and tighten with threaded pin M 5x6 4 Re attach the protective cover 1 after replacing the milling cutter NOTICE At the factory the motor shaft is drilled approx 1 mm deep through the core hole in assembly of the first mill ing cutter in order to safely rule out axial migration of the milling cutter 1 1 The clamping V block is screwed on with 2 chees...

Page 31: ...he basic position of the robot is preferably defined with the arrangement of the TC 2013 A steel plate or a concrete floor with a quality of at least B 25 is necessary as a base The base must be a continuous unit Setting up over an expansion joint is not permitted 2 Screwing and pinning of the baseplate of the TC 2013 with the base 4 x M 12 screws 3 Determination and setting of optimum height and ...

Page 32: ...e system pressureless 2 4 3 2 Pneumatic installation The connection of compressed air takes place at the push in fitting or the screw in thread G 1 8 at the filter regulator WARNING Electrical installation must only be performed by qual ified personnel NOTICE The attached electrical circuit diagram must be observed in installation see Chapter 2 10 Electrical circuit diagram The grounding actions p...

Page 33: ... its maxi mum the cleaning time should be programmed one second longer Complete cleaning is achieved in a shorter time The operating pressure is set on the mainte nance unit 1 for the complete unit and should no longer be changed The quantity of oil through flow at the oiler should be one drop per 6 10 cleaning cycles and the air motor and the pneumatic cylinders should be adequately lubricated 1 ...

Page 34: ...et system pressure of 6 bar in the pressure control valve 2 3 The degree of nebulisation is set on the set ting screw 3 4 Slowly open setting screw until optimum nebulisation is reached 5 The amount of spray is regulated by the soft ware using the spraying time Note Quantity sprayed and spraying time should be kept as small as possible to avoid an excess of release agent drips onto weld seam impai...

Page 35: ...n the meaning of the Recycling and Waste Disposal Act KrWG is all materials or objects which their owner disposes of wishes to dispose of or has to dispose of Waste for recy cling is waste which is recycled waste which is not recycled is waste for disposal The disposal of waste should preferably take place within the country Waste avoidance takes pre cedence over waste recycling CAUTION Before the...

Page 36: ...nk 2 5 2 Function test A function test in manual mode is to be performed during commissioning of the TC 2013 Ensure in testing or programming work that the welding torch is correctly introduced into the TC 2013 by the robot Ensure in testing the TC 2013 in connection with a welding torch that no weld spatter metal chips or debris from a broken milling cutter of spray fluid enter the eyes WARNING D...

Page 37: ...otor starts to turn the tool unit with the milling cutter runs vertically from above into the torch and cleans the gas nozzle and contact tip nozzle If there is a blow out valve the chips remaining in the torch can be blown out Machining time and tool feed are directly related If the milling cutter feed is at its maximum the machining time should be programmed one second longer Complete cleaning i...

Page 38: ...y as the two motions are linked The knife closes and cuts the welding wire to the desired wire length distance The knife and clamping cylinder are then back in their basic position The robot runs into the basic setting and reports end of program and readiness to start for con tinued running through the welding program A detailed description of the wire cutter can be found in Chapter 3 Wire cutter ...

Page 39: ...lower end position digital input release agent present digital output start of torch cleaning milling cutter in or wire cutting dual function digital output torch blow off depending on welding equipment used digital output spraying The software option 653 1 ABB TC96 makes separate rapid instructions available for torch cleaning torch blow out spraying and shortening of the welding wire The operato...

Page 40: ...m sequence for torch cleaning 2 20 3HDA000057A8519 001 Torch cleaner TC 2013 Assembly instructions 2 6 2 Program examples Program example Torch cleaning Torch spraying Program example Welding wire shortening ...

Page 41: ...figuration for torch cleaning The configuration for torch cleaning can take place via RobotStudio or directly via the FlexPendant of robot control The configuration is produced in the process configuration database Proc cfg Parameter view in a text editor RobotStudio view of the configuration for torch cleaning Torch services mech clean properties ...

Page 42: ...ning 2 22 3HDA000057A8519 001 Torch cleaner TC 2013 Assembly instructions 2 6 3 2 Configuration for wire cutting Parameter view in a text editor RobotStudio view of the configuration for wire cutting Torch services wirecut properties ...

Page 43: ...aning Torch cleaner TC 2013 3HDA000057A8519 001 2 23 Assembly instructions 2 6 3 3 Configuration torch spraying Parameter view in a text editor RobotStudio view of the configuration for torch spraying Torch services spray properties ...

Page 44: ... necessary In the case of correct signal states the cleaning sequence is started The set time for torch cleaning does not start until the mill ing cutter has reached the upper end position After the end of the cleaning time the clamping ele ment is opened and the robot returns to the preliminary position Note The milling cutter must be set so that it has reached the upper end position in 30 second...

Page 45: ...al status clamping elements open and milling cutter in lower end posi tion 9 Robot runs out of the cleaning station into a safe position 2 6 4 2 Sequence of wire cutting without software option 653 1 ABB TC96 Example of a possible sequence for shortening of welding wire without software option 653 1 ABB TC96 The output for cleaning of the welding torch milling cutter is used at the same time for s...

Page 46: ... 4 Trial run The following should be fulfilled in the trial run 1 Ensure that there is no compressed air on the TC 2013 Uncontrolled movements are conse quently avoided 2 Then run through the sub program for torch cleaning step by step 3 After the trial run switch the compressed air back on run through the program in automatic mode 4 Check the welding torch position inside the torch cleaner millin...

Page 47: ...tivity Remark daily TSC 2013 Visual inspection weekly Spray nozzle Test Clean when required Milling cutter unit Test Clean when required Do not use compressed air Maintenance unit pressure regulator Check pressure Values see Chapter 2 2 Technical data of TC 2013 Maintenance unit oiler Check fill up quantity Mineral oil to DIN 51524 HLP 32 Release agent container Check fill up quantity Visual inspe...

Page 48: ... 2013 2 28 3HDA000057A8519 001 Torch cleaner TC 2013 Assembly instructions 2 8 Spare and wearing parts for TC 2013 2 8 1 TC 2013 without wire cutter 23 21 17 15 16 8 20 13 11 14 12 3 15 16 19 9 10 5 4 22 3 19 18 15 16 2 1 6 15 16 7 ...

Page 49: ...le hollow screw G1 8 Type C Article No 304005 3 ITV GmbH 3HDA000057A5344 x 9 1 Filter regulating valve LFR 1 8 D 7 MINI Festo AG Co KG 3HDA000057A5023 x 10 1 Oiler LOE 1 8 D MINI Festo AG Co KG 3HDA000057A5022 x 11 1 Solenoid valve VSVA B M52 MD D1 1R5L Festo AG Co KG 3HDA000057A5014 x 12 1 Solenoid valve MDH 3 2 24DC Festo AG Co KG 3HDA000057A5015 x 13 1 Connecting line NEBU M12W5 K 0 5 N LE3 Fes...

Page 50: ...677 00 10 Parker Hannifin GmbH 3HDA000057A5155 x 20 1 Cable 14G 0 5mm HELUKABEL GmbH 3HDA000057A5224 x 21 1 litre Release agent 3850 in original container 0 743 505 003 x 22 1 Adjusting injector for reference points0 746 335 025 x 23 1 Protective sleeve for adjusting syringe 0 746 335 026 x Pos Qty Name ABB Article No Spare part Wearing part ...

Page 51: ...Spare and wearing parts for TC 2013 Torch cleaner TC 2013 3HDA000057A8519 001 2 31 Assembly instructions 2 8 2 TC 2013 with wire cutter ...

Page 52: ... 3 ITV GmbH 3HDA000057A5344 x 9 1 Filter regulating valve LFR 1 8 D 7 MINI Festo AG Co KG 3HDA000057A5023 x 10 1 Oiler LOE 1 8 D MINI Festo AG Co KG 3HDA000057A5022 x 11 1 Solenoid valve VSVA B M52 MD D1 1R5L Festo AG Co KG 3HDA000057A5014 x 12 1 Solenoid valve MDH 3 2 24DC Festo AG Co KG 3HDA000057A5015 x 13 1 Connecting line NEBU M12W5 K 0 5 N LE3 Festo AG Co KG 3HDA000057A5229 x 14 1 Socket KMC...

Page 53: ...cleaner TC 2013 3HDA000057A8519 001 2 33 Assembly instructions 20 1 Cable 14G0 5mm HELUKABEL GmbH 3HDA000057A5224 x 21 1 litre Weld spatter release agent in original container 0 743 505 003 x Pos Qty Name ABB Article No Spare part Wearing part ...

Page 54: ...Pneumatic plan 2 34 3HDA000057A8519 001 Torch cleaner TC 2013 Assembly instructions 2 9 Pneumatic plan Spray device Air motor Feed cylinder Clambing cylinder and Wire cutter optionally ...

Page 55: ...ODPSLQJ HOHPHQW FODPSHG ZLUH FXWWHU RSHQ PLOOLQJ FXWWHU GRZQ PLOOLQJ FXWWHU XS ORZ OHYHO ZDUQLQJ WRUFK FOHDQLQJ IOXLG 9 YROWDJH VXSSRUW QSXWV 9 YROWDJH VXSSRUW QSXWV 9 YROWDJH VXSSRUW RXWSXWV 6SDUH 1387 OLJKW FXUWDLQ 7 3 PHDVXUHPHQW 1387 WRUFK FOHDQLQJ ILQLVKHG ZLUH FXWWHU FORVHG 1387 WRUFK FODPSHG ZLUH FXWWHU RSHQ 287387 FOHDQ WRUFK RSHQ ZLUH FXWWHU 287387 VSUD WRUFK 1387 PLOOLQJ FXWWHU GRZQ 1387...

Page 56: ...Electrical circuit diagram 2 36 3HDA000057A8519 001 Torch cleaner TC 2013 Assembly instructions ...

Page 57: ...utting of the welding wire It only works on combination with a TC 2013 as it is actuated by the latter The wire cutter can be retrofitted on the TC 2013 at any time 3 2 Technical data Supply data Figure 3 1 TC 2013 with wire cutter Wire cutter Air pressure 5 10bar Clamping cylinder diameter 45mm Stroke 36mm Clamping force at 5 bar 790N Max welding wire diameter for cutting d 1 0mm d 1 2mm Steel Al...

Page 58: ...re each torch clean and before each TCP measurement cutting off slag formed at the end of the wire 3 5 Function and structure The wire cutter consists of the following components Sequence of operation The robot is in the cleaning position in this process The welding torch is generally inside the torch cleaner above the spray head The blade opens after a wire cutting program stored in the robot is ...

Page 59: ... on the TC 2013 1 set of Allen keys 1 open end wrench wrench width 10 mm It is recommended that the TC 2013 should be cleaned prior to the conversion The welding torch runs to the desired wire length distance e g 10 mm above the knife into the wire cutting position of the torch cleaner The wire feed advances a welding wire surplus length of at least 20 mm A surplus wire length of at least 20 mm is...

Page 60: ...m push in fitting 1 and unscrew push in fitting This is needed again for the wire cutter 3 Unscrew sensors 2 together with the clamping holders and protect against unintentional tearing off 4 Detach and remove 4 cheese head screws M6x130 3 These are needed again for the wire cutter 5 Pull off lid 4 including O ring These parts are no longer needed 6 Push pull out cushion disc 5 and combined piston...

Page 61: ...12x3 and 60x3 are assembled 10 Screw blade carrier 12 together with the cutting plate at the bottom onto the shaft 11 Screw housing 13 cover and cutting plate at the top Then push the blade carrier 12 and rotate the piston so that the blade carrier is upright 12 Screw casing and cover with screws 3 and dowel pins 14 on the lid 11 of the wire cutter 13 Attach sensors 2 together with the clamping ho...

Page 62: ...welding wire be cut 3 7 Corrective and preventive maintenance Regular corrective and preventive maintenance should be performed to guarantee operation of the wire cutter The following activities are recommended Maintenance table Figure 3 4 Setting aid for sensors view from below Setting aid Sensors fastened in this orientation Interval Activity daily Visual inspection Empty wire collecting tank we...

Page 63: ...asure and adjust the robot tool center point TCP 4 1 2 TCP tool center point The tool position of an industrial robot is described through what is known as its TCP tool center point This is the imagined reference point located at a suitable place on the tool precisely where the tip of the welding wire would touch the workpiece if a predefined distance stick out length of the welding wire from the ...

Page 64: ...7A8519 001 TCP gauging BullsEye Assembly instructions 4 2 Technical data 4 2 1 Dimensions 4 2 2 Connection data electrics Adjusting tip Protective sleeve Electrical connection 40mA at 24VDC Connection of robot digital sensor input ...

Page 65: ...producibility minimisation of time consuming and expensive re programming of components monitoring of the robot error message appears if the calibration of the robot is no longer cor rect or the TCP gauging has lost its original position TCP software from BullsEye 10 RobotWare from version 5 06 Digital input at least 1 free input RobotWare options Arc BullsEye WARNING Observe the safety instructio...

Page 66: ...llowing components 4 5 2 TCP gauging with stand TCP gauging 1 is mounted on a stand 3 available as a standalone version A holding angle 2 is provided to attach the TCP gauging unit on the stand The TCP gauging unit is screwed and pinned with the baseplate 4 on the workshop floor or on the floor of the robot cell 1 adjusting tip 2 protective sleeve for adjusting syringe 3 fibre optic sensor 4 fibre...

Page 67: ...ection of the incorrect alignment the TCP being redefined according to the new torch position with BullsEye After BullsEye has updated the TCP position the torch rotates about the TCP as previously because the trajectory of the robot arm was adapted in order to offset the incorrect alignment of the torch After a point has been programmed the angles of the robot joints are not stored in the robot b...

Page 68: ...gnment in a mechanical torch gauge Manual alignment via two adjusting tips Manual gauging using programming device Further information on manual gauging can be found in the user manual on robot control 4 6 2 2 Program correct by TCP calibration Automatic re adjustment of the welding wire in a measuring beam Motion program for the robot as software module If a position is saved this is always done ...

Page 69: ...ectory on the component The welding gun runs the correct path again the axial configuration of the robot has changed Figure 4 5 Deviation from the programmed trajectory Figure 4 6 The TCP was corrected New path of the welding torch Same path of th robot Workpiece Robot arm Workpiece Robot arm Path of the welding torch once again correctly on he trajectory Path of the robot has shifted ...

Page 70: ...pro tected against being switched back on 1 It should be verified before starting assembly that the protective sleeve 3 is in position on the adjusting tip 5 If not put the protective sleeve on danger of piercing 2 Place the TCP gauging unit on the TC 2013 so that the two pins 4 rest in the holes pro vided 2 3 Then secure with 1 screw M6x12 1 4 Then attach the two pins 4 CAUTION The electrical con...

Page 71: ...ll the TCP gauging unit suspended e g from the cell ceiling The direction of the sensor should be aligned parallel to the robot base coordinates system in the x or y direction The y axis of the write coordinates system on the robot should always be parallel to the direction of the light barrier This specification also results in alignment of the TCP gauging unit to the robot base coordinates syste...

Page 72: ...f the device alongside or in front of the robot depends among other things on the assembly of the welding gun on the wrist and is only fixed after a test run Carry out the connection according to the following connection diagram WARNING Electrical installation must only be performed by qual ified personnel Figure 4 7 Connection diagram TCP gauging unit LFKWVFKUDQNH 7 3 9HUPHVVXQJ 9 LQJlQJH 9 LQJlQ...

Page 73: ...r manual 4 8 3 EIO Configuration For DeviceNet or EtherNet IP Local IO the configuration of system parameters for the I O is set up automatically when loading the software If a manual configuration is done make sure the parameter Connection Type is set to Change Of State COS connection to get the most accurate measurement How do I set up a non ABB supplied I O device Only ABB I O devices are guara...

Page 74: ...t the signal is defined on an I O card as input 2 Place your hand through the beam of the TCP control unit to interrupt the beam The LED for the input on the I A card must light up if the beam is interrupted If this is not the case check that the E A card and the connections are properly configured 4 10 Maintenance TCP gauging is supplied ready for use and apart from cleaning of the device require...

Page 75: ... instructions Replacement of the sensor If the fibre optic sensor of TCP gauging is to be replaced due to a defect it should be ensured that the 3 switches on the senor are in the illustrated position 4 11 Spare parts Pos Switch position 1 Standard 2 T Off 3 LO 1 2 3 ...

Page 76: ...ng BullsEye 3HDA000000A9324 1 1 Adjusting tip for reference points 0 746 335 025 2 1 Protective sleeve 0 746 335 026 3 1 Fibre optic sensor SU18 40A 110 115 126A Pepperl Fuchs GmbH 3HDA000057A5166 4 1 Fibre optic KLE C01 2 2 2 0 K103 Pepperl Fuchs GmbH 3HDA000057A5175 Optional 1 TCP gauging complete with stand 3HDA000057A5435 ...

Page 77: ...Dimension sheet Gas nozzle Appendix 3HDA000057A8519 001 5 1 Assembly instructions 5 Appendix 5 1 Dimension sheet Gas nozzle ...

Page 78: ...Dimension sheet Gas nozzle 5 2 3HDA000057A8519 001 Appendix Assembly instructions ...

Page 79: ...gas nozzle should be sprayed with the release agent AS 72K The safety data sheet is provided to the information arrangement for the simplification NOTICE No safety data sheet is required for this product in accordance with article 31 of the REACH ordinance EC No 1907 2006 The release agent AS 72 K is not dangerous goods according to the transport regulations ...

Page 80: ...DA000057A8519 001 Appendix Assembly instructions G 1 1 2 3 1 H2 5 A Q 5 F G 9 8 A A A 7 3 8 7 3 8 C C I 5 D AH D 4 A A 5 A G A J K A A 1K 20 5 A J K 8 A G A K 6AA 9A 8 L A A L A D M K E 1 2 0 8 8 C 3 8 6 6 3 8 6 9 A 6 4 3 A 8 6 3 3 8 6 79 6 A 1 4 A ...

Page 81: ...ta Sheet Release Agent AS 72 K Appendix 3HDA000057A8519 001 5 5 Assembly instructions G 1 1 2 3 1 H2 5 A Q 5 F 0 1 2 3 0 1 2 3 0 14 5 6 2 1 2 17 8 2 1 4 5 667 8 9 9 1 2 3 9 9 5 667 8 9 8 A A 8 1 4 1 4 A 4 3 8 5 ...

Page 82: ... 6 3HDA000057A8519 001 Appendix Assembly instructions G 1 1 2 3 1 H2 5 A Q 5 F 1 4 1 4 5 667 8 9 1 C D E F 3 3 0 G 8 1 A 2 8 8 8 G A 8 A 8 8 A 3 A A A G A A A A 1 2 8 3 3 A 3 A E A 5 H A 4 9 1 7 2 9 E AA A 8 3 9 A A A B A 8 A B E A 8 8 A 8 A A ...

Page 83: ...3HDA000057A8519 001 5 7 Assembly instructions G 1 1 2 3 1 H2 5 A QC 5 F A B A I A 0 A A I 1 8 2 A 3 0 A I A 0 A 0 C A 6 AA A 8 8 5 1 5 E A A I A 1 2 3 A A 3 A E 8 5 A 8 A B A 1 0 5 D I 8 5 7 8 7 7 3 8 7 7 3 8 7 B A A 8 8 G3 3 C 0 3 13 2 1 9 2 G 8 A A ...

Page 84: ...lease Agent AS 72 K 5 8 3HDA000057A8519 001 Appendix Assembly instructions G 1 1 2 3 1 H2 5 A Q 5 F 3 A 3 A 3 A B 8 9 8 9 3 8 E 3 8 3 3 8 E E E E 5 A 4 N 9 8 8 H 9 OGGG A 3 8 2 A 2 A AA AA A A 9A A A A A 3 8 3 3 A 3 8 3 8 ...

Page 85: ...Agent AS 72 K Appendix 3HDA000057A8519 001 5 9 Assembly instructions G 1 1 2 3 1 H2 5 A Q 5 F 3 4 8 3 3 8 3 4 8 3 A 8 3 5 9 5 57 E 8 3 8 8 2 4 20F 20F P 3 8 3 8 A A 3 8 A 3 8 A F A 3 5 667 8 9 5 667 8 9 9 1 2 3 A 1 1 3 8 A A 3 8 ...

Page 86: ...Safety Data Sheet Release Agent AS 72 K 5 10 3HDA000057A8519 001 Appendix Assembly instructions G 1 1 2 3 1 H2 5 A Q 5 F A 5 8 9 8 I A A 8 8 A A A A A G 9 A A A 8 A ...

Page 87: ......

Page 88: ...65 N 4349 BRYNE Norway Telephone 47 22 87 2000 ABB Engineering Shanghai Ltd Robotics and Motion No 4528 Kangxin Highway PuDong District SHANGHAI 201319 China Telephone 86 21 6105 6666 ABB Inc Robotics and Motion 1250 Brown Road Auburn Hills MI 48326 USA Telephone 1 248 391 9000 abb com robotics 3HDA000057A8519 001 Rev 03 en Copyright 2018 ABB All rights reserved ...

Reviews: