18
1ZSE 5492-115 en, Rev. 5
4.1.3 Assembly of accessories
All details which have been removed for the transport are specified on the packing list. The
openings on the on-load tap-changer are then sealed by transport covers.
1.
Remove the transport covers.
2. Check the O-rings. Make sure they are pressed into the bottom of the groove on the
flanges.
3.
Assemble the accessories. Tightening torque for the nuts as per section 1.7.
4.1.4 Retightening
When a gasket is subjected to the pressure from the flange bolts it will change its shape or
settle. This reduces the pressure on the bolts, making them loose.
The settling effect will increase at higher temperatures. For this reason retightening is re-
quired.
Retighten one day after assembly. Retighten again after the transformer has been in service
for about two weeks to let the gaskets settle at service temperature. The retightening torque
should again be approximately 90 Nm.
Retighten the dome nuts with 42 Nm before oil filling. See section 6.1.1.
4.2 Connection of the regulating winding of the transformer
On UZE the winding has to be connected from the rear.
On both UZE and UZF the cable lugs can be either crimped or brazed. The free distance
between the cable lugs for adjacent contacts must be at least 7 mm. Tightening torque is
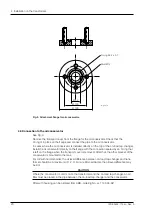
38 Nm. For star point design, attach the neutral connection as shown in Fig. 8 and the con
-
nection diagram.
On UZF the top cover is intended to be used when connecting the transformer’s regulating
winding leads to the on-load tap-changer terminals.
Remove the cover and connect the leads. Tightening torque is 38 Nm for the cable lugs.
For star-point design, attach the neutral connection as shown in Fig. 8 and the connection
diagram. Bolt on the cover. Tightening torque is 42 Nm for the dome nuts.
If the oil conservator is to be installed on the top of the on-load tap-changer, connect the
regulating winding leads before installing the oil conservator.
4 Installation on the transformer

