background image

4

1.1

1.1

1.1

1.1

1.1

1.1

1.1

1.1

36.1

8

28

29

38

8

35.2

28

28

1.2

7

6

5

35.4

8

2

3

35.2

35.3

35

M ED I U M  VO LTAG E  P R O D U C T S

27

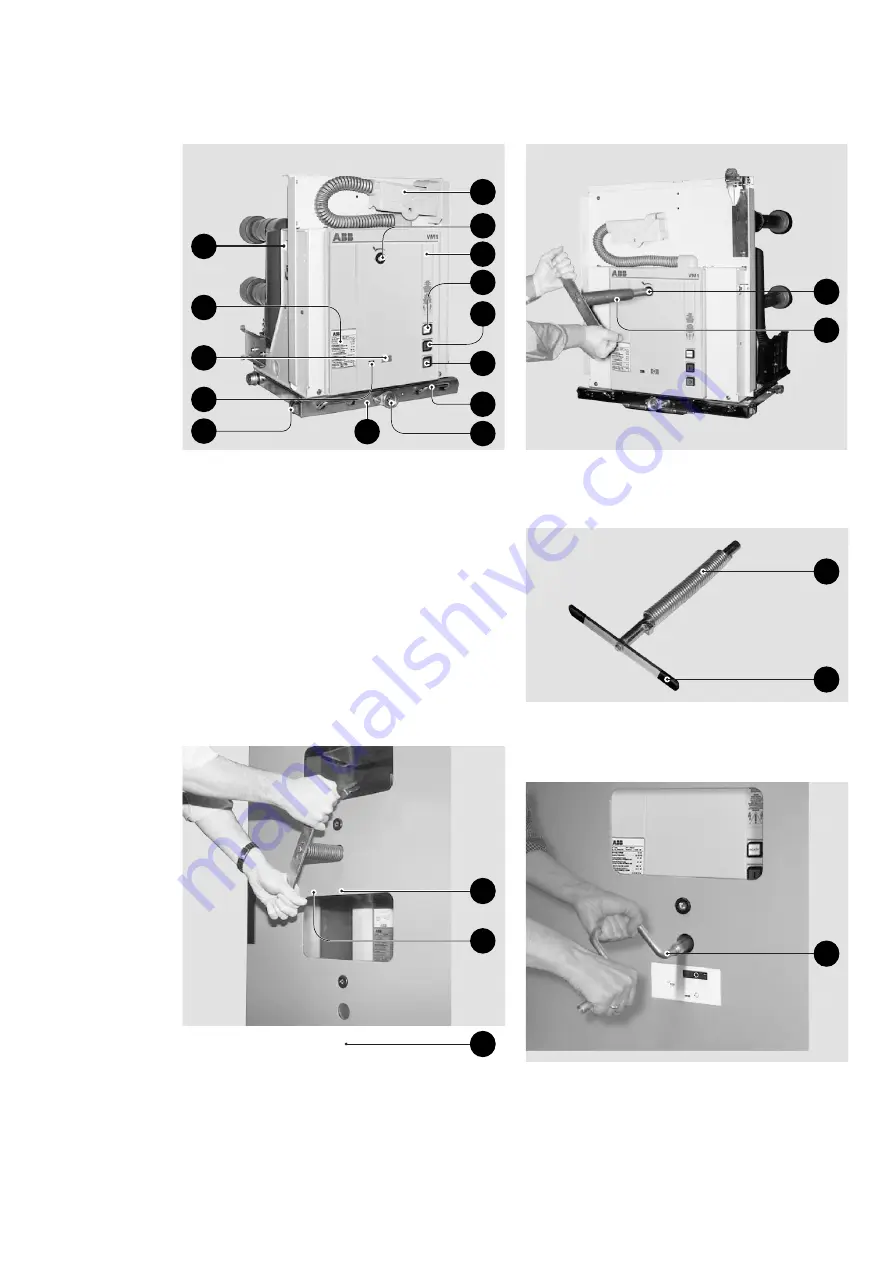
Figure 9/16:   Front of circuit breaker
 

with indicators and controls


1.1   Front plate


1.2   Bore for handling, both sides


2  

“READY” lamp


3  

ON push-button


4  

OFF push-button


5  

Mechanical operating cycle counter


6  

Mechanical position indicator


7  

Rating plate


8  

Recess for emergency manual opening lever


35   Withdrawable assembly


35.2   Square spigot for hand crank 38


35.3   Sliding handle


35.4   Catch


36.1   Control wiring plug

Figure 9/17:   Emergency manual switch-off
 

8  

Recess for emergency manual opening lever


28   Emergency manual opening lever

Figure 9/19:   Emergency manual opening lever
 

28   Emergency manual opening lever


29   Spring to secure the opening capacity

Figure 9/18:   Emergency manual switch-off of a VM1-T circuit breaker
 

with panel door closed, example.


8  

Recess for emergency manual opening lever


28   Emergency manual opening lever


35.2   Square spigot for hand crank 38

Figure 9/20:   Moving the circuit breaker on a withdrawable part between
 

the test/disconnected position and the service position; 
clockwise up to the stop for the service position and 
anticlockwise for the test/disconnected position.  
Example of a panel.


38   Hand crank

Summary of Contents for VM1-T

Page 1: ...k regulations Observe the relevant information in the instruction manual for all actions involving switchgear and switchboards Danger Pay special attention to the hazard notes in the instruction manual marked with this warning symbol Make sure that under operation condition of the switchgear or switchboard the specified data are not exceeded Keep the instruction manual accessible to all persons co...

Page 2: ...disconnected position 12 6 4 3 Motor driven movement of the withdrawable part 12 6 4 4 Withdrawal from the test disconnected position onto the service truck 12 6 4 5 Insertion from the service truck into the test disconnected position 13 6 5 Operation of the circuit breaker 13 Page 7 Maintenance 14 7 1 General 14 7 2 Inspection and functional testing 14 7 2 1 Circuit breaker in general 14 7 2 2 Ma...

Page 3: ...nstallations with rated voltages above 1 kV Accident prevention regulations issued by the appropriate professional bodies or comparable organisations In Germany these comprise the following safety regulations Health and Safety at Work Standards BGV A1 and BGV A3 Safety guidelines for auxiliary and operating materials Order related details provided by ABB 1 Summary 1 3 Operating conditions 1 3 1 No...

Page 4: ...age of 80 V from any supply voltage within the input voltage range with which the storage capacitors are charged This is also used to generate a voltage of 18 V to supply the breaker controller 2 Power output upper board Power electronics for activation of the actuator coils 2 1 2 Storage capacitor Figures 9 13 9 15b and 9 25 The electrical energy for operation of the circuit breaker is stored in ...

Page 5: ...ted Insulated contact arms 34 with the spring loaded contact systems 34 1 are fitted to the circuit breaker poles These create the electrical connection to the panel when the withdrawable part is inserted into the service position A multi pole control wiring plug connector 36 1 connects the signalling protection and control wiring between the panel and the withdrawable part The withdrawable assemb...

Page 6: ...it breaker controller All the conditions for control of the opening and closing commands to the magnetic actuator are defined in a fixedprogrammed logic module Supply voltage must be applied to the AC DC converter The storage capacitors must be sufficiently charged for the next switching operation Switch position Storage capacitor energy for OFF ON and OFF ON OFF The moving contacts in the circuit...

Page 7: ...uch a way that an opening command is executed directly without being passed through the microprocessor 3 1 5 The READY lamp monitors the following conditions supply of auxiliary power to the VM1 T circuit breaker see also section 6 2 detection of a defined ON or OFF position by the position sensors monitoring of the controlled function of the microprocessor Watchdog sufficient voltage at the capac...

Page 8: ...withdrawable assemblies are used Figures 9 9 and 9 26 1 The VM1 T can only be closed via input MC when a voltage of 24 V to 240 V AC DC is applied to input RL1 electrical closing lock out 2 The VM1 T can only be closed when the withdrawable assembly is in service or test position In the intermediate positions the voltage for the closing lock out is interrupted by auxiliary switches BT2 BT1 3 A mec...

Page 9: ...ng devices at site include the following Checking the delivery for completeness and freedom from damage e g moisture and its adverse effects Any short quantities defects or damage in transit Must be precisely documented on the consignment note The shipper carrier is to be notified immediately in accordance with the liability provisions of the German general conditions for forwarders ADSp KVO Note ...

Page 10: ...ve any contamination see also section 7 3 1 Recommended tightening torque 1 Nm Lubricant 2 Thread without dry Oil or grease M 06 10 5 4 5 M 08 26 10 M 10 50 20 M 12 86 40 M 16 200 80 1 The rated tightening torques for fasteners without lubrication are based on a coefficient of friction for the thread of 0 14 the actual values are subject to an unavoidable partly not inconsiderable spread Rated tig...

Page 11: ...rom the switchgear Properly refit all covers etc removed during assembly and testing processes Connect the supply voltage Figures 9 15b 10 7 and 10 8 READY will shine Inputs RL1 Closing lock out and MU Undervoltage release if applicable must be supplied with power before the circuit breaker can be closed For this reason an internal circuit applies a voltage of 80 V to the input RL1 Figure 9 15b as...

Page 12: ...any position in the travel range between the service position and test disconnected position 6 Commissioning Operation 6 4 2 Manual withdrawal from the service position into the test disconnected position Ensure that the circuit breaker is in the OFF position Reverse the procedure described above for insertion into the service position Note Withdrawable parts with blocking magnet RL2 may not be fo...

Page 13: ...ut MO1 see also sections 10 1 1a and 6 2 or locally by pressing OFF pushbutton 4 3 Opening on failure of the supply voltage a Initially for a period of 180 seconds opening by remote control or by pressing pushbutton 4 is still possible b During the subsequent period emergency manual opening of the breaker is possible Insert emergency OFF lever 28 into the receptacle 8 on the front plate and turn i...

Page 14: ...ork in section 6 1 Standards and specifications in the country of installation Maintenance work may only be performed by fully trained personnel observing all the relevant safety regulations It is recommended that ABB after sales service personnel should be called in at least during the performance of servicing and repair work While the work is in progress and if the work permits all supply voltag...

Page 15: ...withdrawable part assembly Special attention is to be paid to those parts which may possibly be damaged by improper handling Perform a visual check on the condition of the isolating contact system It is recommended that the contact system be turned alternately so that its inner contact points can be cleaned If there are signs of impermissible overheating discoloured surface the contact points are ...

Page 16: ...a result of their cable capacitance In such cases the cables are to be removed 7 4 Repair 7 4 1 Repair of surface damage Circuit breaker part in general Sheet steel parts painted Remove rust e g with a wire brush Grind off paint coat and degrease Apply anti rust primer and top coat Use a top coat in the standard colour RAL 7035 or the relevant special colour Sheet steel parts with aluminium zinc s...

Page 17: ...or i e it can lead to reverse voltages in the terminals 7 5 2 Checking the auxiliary switch settings on withdrawable parts Figures 9 14 and 9 25 Compliance with the interlock conditions in the test disconnected and service position areas is ensured by position signalling switches BT2 and located in the withdrawable assembly and factory set In test operations the withdrawable part must be moved by ...

Page 18: ... previously have been inserted Check this condition as follows It must not be possible to close the circuit breaker with the withdrawable part in any position between the test disconnected position and the service position Readiness for switching is established electrically when the service position is reached by auxiliary switch BT1 in the withdrawable assembly switching over For motion into the ...

Page 19: ...nually operated mechanism BT2 BT1 Silver plated contacts GCE7004024R0101 Gold plated contacts GCE7004024R0103 Auxiliary switches for motor operated driving mechanism BT2 BT1 Silver plated contacts GCE7004024R0102 Gold plated contacts GCE7004024R0104 Blocking magnet RL2 24 V GCE7003820R0101 30 V R0102 48 V R0103 60 V R0104 110 V R0105 125 V R0107 220 V R0106 Motor with gearbox MT 24 V GCE0940150P01...

Page 20: ... voltage may only be performed by trained personnel observing the stipulations of the EU basic standard Stipulation 96 29 Euratom of the senate from 13 May 1996 ABI L 159 from 29 June 1996 Application of the rated voltage specified for the switching device by VDE 0671 part 100 or IEC 62271 100 is completely safe Higher voltages than the rated voltage or DC test voltage specified in VDE or IEC stan...

Page 21: ...pe VM1 T on withdrawable part 24 kV 1250 A 25 kA mechanism side Figure 9 2 Vacuum circuit breaker type VM1 T for fixed installation 12 kV 1250 A 25 kA pole side Figure 9 4 Vacuum circuit breaker Typ VM1 T for fixed installation 12 kV 1600 2000 A 25 kA pol side Figure 9 6 Vacuum circuit breaker type VM1 T on withdrawable part 12 kV 630 A 25 kA pole side 33 Breaker pole 34 Contact arm with insulatin...

Page 22: ...rvice position indicator 35 1 Spindle mechanism 35 2 Square spigot 35 5 Pawl 35 6 Scene head on spindle 37 Control wiring plug connector for withdrawable assembly Figure 9 8 Vacuum circuit breaker type VM1 T on withdrawable part 24 kV 1250 A 25 kA mechanism side 35 Withdrawable assembly 36 1 Control wiring plug Figure 9 10 Circuit breaker front with controls and annunciations 1 Mechanism enclosure...

Page 23: ...manual opening mechanism 10 Magnetic actuator 11 OFF coil 12 Magnet armature 13 Permanent magnets 14 ON coil 15 Sensor B0A for circuit breaker OFF signal 16 Sensor B0E for circuit breaker ON signal 17 Travel adjuster 18 Lever shaft 19 Insulated link rod 20 Contact force spring 21 Flexible connector 22 Lower breaker terminal 23 Cast insulation 24 Vacuum interrupter 24 1 Moving contact 24 2 Fixed co...

Page 24: ...wiring plug 10 2 Basic design Number of sockets optional but always with the basic assignment 1 8 10 20 21 31 33 40 Sockets and pins can be mixed In the control wiring socket 1 0 1 and control wiring plug 1 0 2 as required Figure 9 13 Block diagram of the magnetic actuator mechanism 2 READY lamp LED 3 ON push button 4 OFF push button 10 Actuator 15 Sensor for circuit breaker OFF signal 16 Sensor f...

Page 25: ...2 DO2 DC1 DO1 AUTO OFF at declining capacitor voltage Delay time undervoltage release MU For VM1 T ON Inputs MU RL1 MO2 MO1 MC Undervoltage release deactivated Treshold for undervoltage release MU Rated voltage Treshold range 35 70 220 240 V AC DC 84 V 154 V AC DC 100 127 V AC DC 45 V 70 V AC DC 48 60 V DC 21 V 33 V DC 24 30 V DC 11 V 16 V DC No delay delay 0 5 s delay 1 s delay 2 s delay 3 s dela...

Page 26: ...ching command OFF 2 open circuit MO1 Switching command OFF 1 open circuit MC Switching command ON open circuit Outputs BB4 Fleeting contact 100 ms DN NOT READY NCC DR READY NOC DC2 ON signal 2 NOC DO2 OFF signal 2 NOC DC1 ON signal 1 NOC DO1 OFF signal 1 NOC See page 42 for comparison of IEC VDE designations Figure 9 15b Terminal diagram for circuit breaker for fixed installation without plug wiri...

Page 27: ...wiring plug Figure 9 17 Emergency manual switch off 8 Recess for emergency manual opening lever 28 Emergency manual opening lever Figure 9 19 Emergency manual opening lever 28 Emergency manual opening lever 29 Spring to secure the opening capacity Figure 9 18 Emergency manual switch off of a VM1 T circuit breaker with panel door closed example 8 Recess for emergency manual opening lever 28 Emergen...

Page 28: ... 23 Fit the contact system back to front on the thin end of the arbor and slide it onto the thicker shank area 34 1 Contact system 39 Arbor 39 1 Journal Figure 9 22 Sevice truck approaching the panel Align the guide pins on the load surface with the height adjusters position the truck atch to engage 40 1 Height adjuster for the load surface 40 2 Guide pin 40 3 Catch Figure 9 24 Slide the contact s...

Page 29: ...tors 27 Circuit breaker control unit 27 1 Plug connector for outputs BB4 DR DN DO1 DC1 27 2 Plug connector for supply voltage 27 3 Plug connector for inputs filter card not shown 45 Power output 60 Filter card Figure 9 26 Mechanical interlock between the withdrawable assembly and the circuit breaker setting of the slide blocker View from front 35 5 Pawl in the withdrawable assembly 41 1 Fixing she...

Page 30: ...dual inputs on request 2 Full version on the control module 3 In general with AC signals which are connected via long lines it should be checked whether the installed base load of 300 kΩ is sufficient mutual capacitive coupling to ensure a reliably low interference level Otherwise an appropriately dimensioned resistor or capacitor is to be connected in parallel at the input terminals 10 1 2 Techni...

Page 31: ... kA Number of operating cycles n Diagram B 8 10 2 2 3 4 5 6 7 8 103 2 3 4 5 6 7 8 4 2 3 4 5 6 7 8 105 10 6 7 8 10 2 3 4 5 6 7 5 0 05 0 1 0 2 0 3 0 4 0 5 0 6 0 8 2 3 4 5 6 7 8 10 9 20 30 1 0 01 0 02 0 03 0 08 Breaking curr ent la kA Number of operating cycles n Diagram C 8 10 2 2 3 4 5 6 7 8 103 2 3 4 5 6 7 8 4 2 3 4 5 6 7 8 105 10 6 7 8 10 2 3 4 5 6 7 5 0 05 0 1 0 2 0 3 0 4 0 5 0 6 0 8 2 3 4 5 6 7...

Page 32: ...5 6 7 8 105 10 6 7 8 10 2 3 4 5 6 7 5 0 05 0 1 0 2 0 3 0 4 0 5 0 6 0 8 2 3 4 5 6 7 8 10 9 20 30 1 0 01 0 02 0 03 0 08 Breaking curr ent la kA Number of operating cycles n Breaking curr ent la kA Number of operating cycles n Diagram E 8 10 2 2 3 4 5 6 7 8 103 2 3 4 5 6 7 8 4 2 3 4 5 6 7 8 105 10 6 7 8 10 2 3 4 5 6 7 5 0 05 0 1 0 2 0 3 0 4 0 5 0 6 0 8 2 3 4 5 6 7 8 10 9 20 30 1 0 01 0 02 0 03 0 08 B...

Page 33: ...nce O 3 min CO 3 min CO Rated operating sequence for autoreclosing O 0 3 s CO 3 min CO Guideline values for function times kV Closing time approx 16 ms Opening time approx 10 ms Arcing duration at 50 Hz 15 ms Total opening time 25 ms Minimum command time on closing 2 ms Minimum command time on opening 2 ms Breaker type Rated voltage Rated current Rated short circuit breaking current symm 1 Pole ce...

Page 34: ...N VDE 0101 A1 Terminal for 630 A A2 Terminal for 1250 A A4 Connecting bar to DIN 46 433 for 17 5 kV with shrink on sleeve PE conductor terminal use contact washer Rated voltage Rated current Rated short circuit breaking current kV A kA p a a1 c d f 12 17 5 630 1250 25 150 450 395 400 450 160 210 570 515 520 570 220 Figure 10 1 Dimensional drawing of circuit breaker type VM1 T 12 17 5 kV 630 A und ...

Page 35: ...nnecting bar A4 Terminal bar to DIN 46 433 for 17 5 kV shrink sleeve fitted Earthing conductor terminal use contact washer Rated voltage Rated current Rated short circuit breaking current kV A kA p a a1 c d f g h 12 1600 2000 25 210 610 555 560 600 405 320 20 275 750 695 700 750 545 345 25 17 5 1600 2000 25 210 610 555 560 600 405 320 20 275 750 695 700 750 545 345 25 Figure 10 2 Dimensional drawi...

Page 36: ...r 1250 A A4 Connection bar to DIN 46 433 for 17 5 kV with shrink on sleeve PE conductor terminal use contact washer Rated voltage Rated current Rated short circuit breaking current kV A kA p a a1 c d f p e i k l 24 630 1250 25 210 570 515 520 570 220 210 409 60 368 480 275 750 695 700 750 545 275 428 50 530 670 Figure 10 3 Dimensional drawing of circuit breaker type VM1 T 24 kV 630 A and 1250 A 25...

Page 37: ...ted operating sequence O 3 min CO 3 min CO Rated operating sequence for autoreclosing O 0 3 s CO 3 min CO Guideline values for function times Closing time approx 16 ms Opening time approx 10 ms Arcing duration at 50 Hz 15 ms Total opening time 25 ms Minimum command time on closing 2 ms Minimum command time on opening 2 ms Breaker type Rated voltage Rated current Rated short circuit breaking curren...

Page 38: ...ted withdrawable parts the weight is increased by approx 2 kg Panel type Parameters 12 kV Parameters breaking 17 5 kV p A C D E J Y 2 X 3 Weight 4 approx kg UniGear type ZS1 630 A 25 kA 630 A 25 kA 150 502 466 490 503 492 X 127 1250 A 25 kA 1250 A 25 kA 150 502 466 490 503 492 X 131 UniGear type ZS1 p N 0 Q R S T F1 G1 150 624 2 618 628 620 2 128 1 120 1 30 1 203 1 Figure 10 4 Vacuum circuit break...

Page 39: ... 3 approx kg UniGear type ZS1 1600 A 25 kA 1600 A 25 kA 210 650 618 640 653 636 120 79 215 1600 A 25 kA 1600 A 25 kA 275 850 812 836 853 844 120 79 220 2000 A 25 kA 2000 A 25 kA 210 650 618 640 653 636 120 79 215 2000 A 25 kA 2000 A 25 kA 275 850 812 836 853 844 120 79 220 p N 0 Q R S T G1 UniGear type ZS1 210 691 2 688 698 688 2 119 111 1 273 2 275 691 2 688 698 688 2 119 111 1 273 2 Figure 10 5 ...

Page 40: ...ating shaft BB3 Auxiliary switch on the actuating shaft BB4 Fleeting contact 100 ms BT2 Limit switch for withdrawable part in test position BT1 Limit switch for withdrawable part in service position DR READY for operation NOC DN NOT READY for operation NCC DO1 OFF signal NOC DC1 ON signal NOC DO2 OFF signal NOC Full version DC2 ON signal NOC Full version Mode of presentation 1 Connection exists wh...

Page 41: ... withdrawable part in test position BT1 Limit switch for withdrawable part in service position DR READY for operation NOC DN NOT READY for operation NCC DO1 OFF signal NOC DC1 ON signal NOC DO2 OFF signal NOC Full version DC2 ON signal NOC Full version Mode of presentation 1 Connection exists when auxiliary switches BB1 and BB3 are not used See page 42 for comparison of IEC VDE designations Figure...

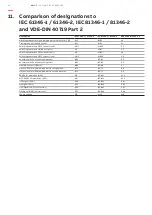
Page 42: ... Switching command OFF closed circuit MU MBU Y4 Switching command OFF 2 open circuit MO2 MBO2 Y9 Auxiliary switch on the actuating shaft BB1 BGB1 S3 Auxiliary switch on the actuating shaft BB3 BGB3 S5 Fleeting contact 100 ms BB4 BGB4 S7 Limit switch for withdrawable part in test position BT2 BGT2 S8 Limit switch for withdrawable part in service position BT1 BGT1 S9 READY for operation NOC DR BGB31...

Page 43: ...MEDIUM VOLTAGE PRODUCTS 43 ...

Page 44: ...ener Strasse 33 Petzower Strasse 8 40472 Ratingen 14542 Werder Havel OT Glindow GERMANY GERMANY Tel 02102 12 0 Fax 02102 12 17 77 E Mail powertech de abb com www abb com mediumvoltage 1VCD601412 Rev B en Instruction Manual 2022 01 VM1 T gs The data and illustrations are not binding We reserve the right to modify the contents of this document following technical developments Copyright 2022 ABB All ...

Reviews: