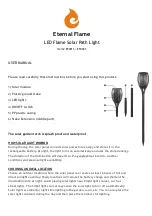

Do not instal within 10 feet of a pool, spa or fountain
CAUTION:
fixture(s) must be installed in accordance with all local codes and ordinances.
www.ABBALightingUSA.com
INSTALLATION INSTRUCTION
To ensure optimal performance and safety, it
is important to use our fixtures ONLY with a
low voltage landscape transformer. This
transformer reduces the voltage from 120V to
12V, making it safe and suitable for outdoor
use.
When installing the fixture(s), please follow
these instructions carefully:
1. Please ensure the light cable wires input are
12v ac/dc.
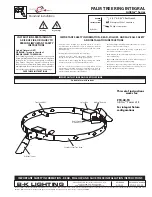
2. To establish a dependable and enduring
electrical connection between fixture wires
and the main line in outdoor or underground
installations, it is essential to select a suitable
main cable connector designed for direct
burial. This connector should be chosen based
on its ability to withstand environmental
conditions, resist moisture and corrosion, and
provide robust insulation. By adhering to
industry standards and best practices,
including proper wire stripping and secure
fastening techniques, a reliable connection
can be established, ensuring optimal
performance, safety, and longevity of the
system.
We recommend using WN12 waterproof wire
nuts
(sold
separately)
for
optimal
connectivity.
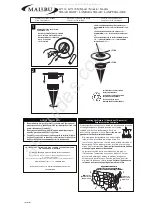
3. Strip the insulation: Carefully strip
approximately 3/4 inch (1.9 cm) of insulation
from the ends of the two wires you wish to
connect. Ensure that the bare metal ends are
clean and free from any frayed strands.
4. Align the wires: Hold the stripped ends of
the two wires together, aligning them neatly
and ensuring that no stray strands are
crossing over.
5.Insert the aligned ends of the wires into the wire
nut, ensuring that they go all the way in. The bare
ends should be completely covered by the wire
nut. Twist the wire nut: Firmly twist the wire nut
clockwise onto the wires, ensuring a secure
connection. Continue twisting until the wire nut is
tight and snug. Test the connection: Gently tug on
each wire to ensure they are securely held by the
wire nut.
The connection should be firm and not come loose.
Inspect the connection: Examine the wire nut
connection to ensure there are no exposed wires or
loose strands. If any issues are detected, remove
the wire nut and repeat the process from step 3.
Note: It's always recommended to follow local
electrical codes and regulations when performing
any electrical work. If you're uncertain or
uncomfortable with electrical tasks, it's advisable
to consult a qualified electrician. Safety should
always be a top priority when working with
electrical connections.
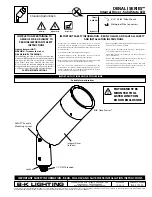
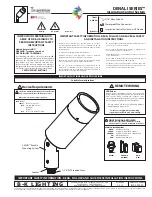
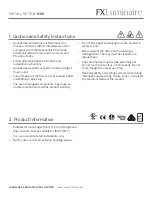
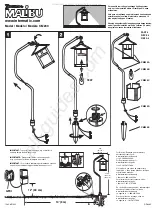
6. Remove the lens from the fixture.
7. Insert the bulb with the correct wattage.
8. Place the lens back onto the fixture.
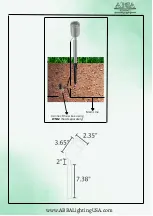
9. For a secure and stable mounting, dig a small
hole and insert the spike into the ground, ensuring
it is vertical and firm.
10. Adjust the light angle.
11. Turn on the power.
We strongly recommend that the main cable from
the transformer be buried underground for safety
reasons. Additionally, please be sure to avoid
exceeding the maximum wattage on the fixture(s) to
prevent any damage or hazards.