•
2006/42/CE (+2009/127/CE)
•
2014/35/CE
•
2014/30/CE
•
2011/65/UE
•
2009/125/CE
Harmonized rules applied:
•
EN 55014-1: 2006+A1: 2009+A2: 2011
•
EN 55014-2: 1997+A1: 2001+A2: 2008
•
EN 60335-1
•
EN 60335-2-69
•
EN 61000-3-2: 2006+A1: 2009+A2: 2009
•
EN 61000-3-3: 2013
•
EN 62233: 2008
•
EN 50581
•
EN 60312: 2013
Regulations applied:
•
666/2013
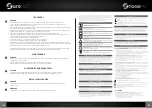
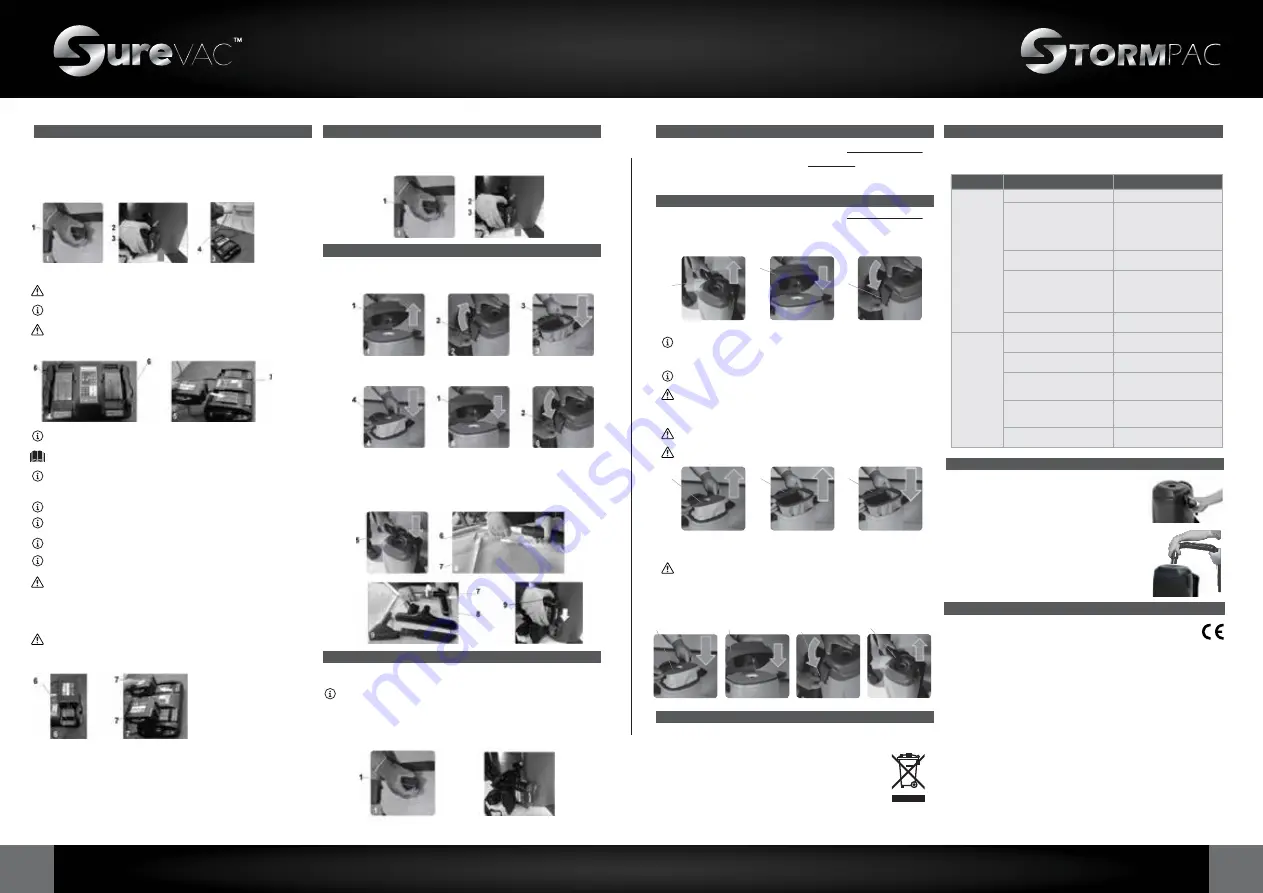
The battery must be charged prior to the first use, and when it doesn’t provide enough power for tasks
that could formerly be performed without difficulty. To recharge the battery, proceed as follows:
1. Take the appliance to the dedicated battery recharging area.
2. If the appliance is working, turn it off using the main switch (1) (Fig.1).
3. To remove the power battery (2) from the appliance, you must first free it by shifting the stop levers
(3) in the direction of the two arrows (Fig.2). Remove the battery by lifting it out of the appliance.
1. Switch off the appliance by positioning the main switch (1) to “0” (Fig.1)
2. To remove the power battery (2) from the appliance, you must first free it by shifting the stop
levers (3) in the direction of the two arrows (Fig.2) Remove the battery by lifting it out of the
appliance.
1. Make sure the machine has been secured (see the section titled “SECURING THE MACHINE”).
2. Take the appliance to the designated place for emptying the tank.
3. Carry out the procedures described in the chapter “MAINTENANCE”.
4. Position the appliance on a flat surface in an enclosed place; there must be no objects near the
appliance that could either damage it, or be damaged through contact with it. If you decide to
hang the appliance on supports, make sure they are able to sustain its volume and weight.
This chapter lists the common problems linked with the use of the appliance. If you are unable to
resolve the problems with the information given here, please contact your nearest assistance centre.
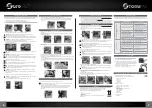
1. Remove the cover (1) from the vacuum tank (Fig.1) using the hooks (2) on the side of the tank
itself (Fig.2).
2. Check the fabric fibre (3) is correctly positioned (Fig.3) and that the collection bag (4) is correctly
inserted inside it (Fig.4).
3. Fasten the cover (1) above the vacuum tank (Fig.5) locking it with the hooks (2) on the side of the
tank itself (Fig.6)
4. Insert the nozzle (5) on the vacuum hose into the hole on the cover of the vacuum tank (Fig.7).
5. Connect the vacuum hose (6) with the aluminum pipe (7) (8)
6. Select the most suitable attachment for the work to be carried out. Attach the attachment (8) to the
aluminum tube (7) Fig.9)
7. Insert the battery (9) in the battery compartment on the top of the appliance, making sure that the
poles of the battery are facing the top of the appliance. Press the battery until the clamp (10) is in
place (Fig.10)
1, Switch on the machine by setting the main switch (1) to “I” (Fig.1).
4. Connect the battery charger power cable plug to the main socket.
5. Insert the battery (2) in the seat (8) in the battery charger, taking care to position the poles (9)
in the battery correctly (Fig.6).
6. Perform a complete battery charging cycle.
7. With charging complete, position the main switch (6) on the base of the battery charger to
position “0” (Fig.8).
8. Disconnect the battery charger power suply cable plug from the mains socket.
7. Remove the battery (2) from the base of the charger (8) pulling it out (Fig.9).
RECHARGING THE BATTERY
APPLIANCE SAFETY
THE END OF THE WORK
1. Make sure the machine has been secured (see the section titled “SECURING THE MACHINE”).
2. Remove the vacuum nozzle (1) from the hole in the cover (2) of the appliance turning it
anti-clockwise (Fig.1) .
3. Remove the cover (2) of the vacuum tank (Fig.2), releasing the hooks (3) on the side of the tank
itself (Fig.3)
4. Remove the collection bag (4) from the tank (Fig.4).
5. Remove the fabric filler (5) from the appliance (Fig.5).
6. Clean the inside of the collection tank with a damp cloth.
7. Insert the fabric filter (5) in the tank (Fig.6).
8. Insert the collection bag (4) in the tank (Fig.7)
9. Place the cover (2) on the vacuum tank (Fig.8), using the hooks (3) on the side of the tank
itself (Fig.9)
10. Disconnect the vacuum hose (6) from the cover (2) (Fig.10).
11. Clean the inside of the vacuum with a jet of compressed air, if necessary removing any
obstructions.
12. Disconnect the cleaning accessory.
13. Clean the inside of the vacuum chamber of the accessory with compressed air, and if
necessary remove any obstructions.
MAINTENANCE
To dispose of the appliance, take it to a demolition centre or an authorised collection centre.
Before scrapping the machine, it is necessary to remove and separate out the
following materials, then send them to the appropriated collection centres in
accordance with the environmental hygiene regulations in force:
• Felt
• Electric and electronic parts*
• Plastic parts
• Metallic parts
(*) In particular, contact your local distributor when scrapping electric and
electronic parts.
DISPOSAL
TROUBLE SHOOTING
VACUUM CLEANERS model SUREVAC STORMPAC
complies with the requirements of the following directives:
STORMPAC COMPLIES WITH THE FOLLOWING REQUIREMENTS
PREPARING TO WORK
WORK
7
6
WARNING:
Before connecting plug to the socket, check that the characteristics of the
mains power supply corresponds to that of the battery charger.
N.B. :
Make sure the green LED (7) on the battery charger lights up when you enable the battery
charger base circuit (Fig.5) This LED indicates that the battery charger circuit is correctly powered.
WARNING:
Before inserting the battery into the charging holder, check that there is no
condensation or other liquid in the dock that will hold the battery.
WARNING:
Carefully read the battery charger use and maintenance manual delivered with
the appliance, before charging the battery.
ATTENTION:
Check the condition of the cloth filter if the filter surface area is particularly clogged
or if it is damaged replace it.
ATTENTION:
When inserting the fabric filter (5) in the tank, make sure that the gasket adheres
fully to the edge of the tank so that the vacuuming is not compromised.
ATTENTION:
When putting on the cover (2) make sure that the nozzle (6) is inserted correctly
into the hole on the collection bag (4) (Fig.8).
WARNING:
Before inserting the fabric filter (5) in the tank, wait until it is completely dry if it was
washed.
WARNING:
To prevent damaging the power cable, disconnect the plug from the mains socket by
directly pulling the plug and not the cable.
N.B. :
When using bags for collecting dust, made of fabric instead of paper, empty them and
clean them with a jet of air, check their condition and if necessary change them.
N.B. :
If the surface of the filler is extremely dirty, brush the filler with a normal soft brush to clean
it thoroughly, and if necessary wash it in water.
N.B. :
The battery can only be inserted into the charger one way. Do not use force when inserting
the battery.
N.B. :
Check that, when inserting the battery into the base of the battery charger, the red LED (10)
present on the battery charger (Fig.7) turns on. This LED indicates that the battery is charging.
N.B. :
The red LED (10) remains until the battery is fully charged.
N.B. :
The charger and the battery can be left connected to the power outlet. The red LED (10)
lights up when the charger occassionally tops up the battery.
N.B. :
The red charge status LED (10) does not provide any indication of the battery charge level.
N.B. :
The battery may overheat during the charging phase, nevertheless, this is normal and does
not imply that there is a problem with the battery.
ATTENTION :
If the battery used in this device is over-charged, this may present a risk of fire,
explosion or chemical burns.
N.B. :
If the vacuuming capacity is excessive, shift the lever (3) on the vacuum hose handle (Fig.3)
while the accessory is in contact with the floor.
N.B. :
On the front of the appliance there are 4 different colour LED, one red and three green,
which signal the battery charge level (Fig.4). When only the red is lit the battery is at a critical
level, switch off the appliance and charge the battery (read the chapter “CHARGE THE
BATTERY”).
2
1
3
3
2
1
6
5
4
5
5
4
7
4
8
9
3
2
10
6
PROBLEM
POSSIBLE CAUSE
SOLUTION
THE
APPLIANCE DOES
NOT
SWITCH
ON
The main switch is not activated.
Place the main switch on “I”.
There is no battery on the lower part
of the tank of the vacuum cleaner.
Insert the battery in the battery
compartment on the top of the
appliance, making sure that the poles
of the battery are facing the top of the
appliance.
Press the battery until the
catch clicks into position.
The battery is not charged.
Charge the battery, read the chapter
“CHARGE THE BATTERY””.
The battery charger does not
charge the battery, the electronic
specifications of the battery
charger do not match the electronic
specifications of the mains supply.
Check that the technical data on the
battery charger's serial number plate
match the data of the mains supply.
The battery charger power cable is
damaged.
Contact a specialised technician
immediately and replace it.
Lack
of
suction
The vacuum hose is not connected
correctly to the collection tank.
Connect the vacuum hose correctly to
the collection tank.
The vacuum hose is not connected
correctly to the telescopic hose.
Connect the vacuum hose correctly to
the telescopic hose.
The accessory being used is not
connected correctly to the telescopic
hose.
Connect the accessory correctly to the
telescopic hose.
The vacuum circuit is blocked
(vacuum hose; telescopic hose;
vacuum accessory).
Remove the obstruction in the
vacuum circuit.
There is a blockage in the vacuum
filters.
Clear the obstruction in the vacuum
filters.
OPERATIONS
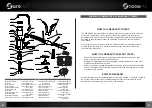
1. Release the two latches and lift off the lid to ensure that the
micro filter cloth bag and the disposable bag are inside. Once
checked replace the lid back and lock the latches.
2. Both the micro filter cloth bag and disposable bag, filter the air
while holding all debris. The micro filter cloth bag with its rubber
top provides the seal for the vacuum while also filtering the air.
Replace or empty each as necessary.
3. Make sure lid is locked on the vacuum. Take the vacuum hose
and push it into round opening on top of lid.
1.
3.


